Taught by Judi Ward of Judi's Dolls
http://JudisDolls.com
Certain skills are vital to excellent quality dolls. In the Cloth Dollmaking for Everyone class, I teach many, many skills with exercises to practice those skills. Some are used for Whatever! some not.
Here I would like to go over a few briefly to help you with creating a wonderful doll.
Some of you will already know these things, some
not. If you can honestly say " I can do a perfect ladder stitch". Sew the perfect
small curve. Stuff as hard as an green tomato, with no lumps. Know where to
stuff extra hard and know where to let up and stuff lightly, skip this.
***SEWING SMALL TIGHT CURVES***
NOTE You dont have to use thread in the machine for these exercises if you dont want to. The holes in the paper will show up very well. Use an old needle too, and throw it away after you are done.
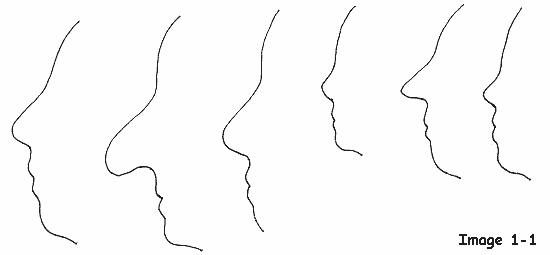
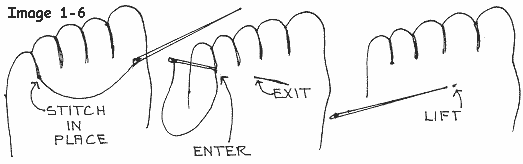
Here are some hand and nose drawings to practice sewing on. Start on the bigger hands and noses, and work your way down in size.
Those of you who have been in some of my other classes
should have this practiced to perfection.
Use a clear sewing machine foot if you have one,
so you can see the lines all of the time. It is best to use a clear foot for
your actual doll sewing too. REMEMBER Very Small stitches! The smaller the hand,
the smaller the stitches too. Never more than 15 per inch. Many times 20 per
inch.
***EXACTLY HOW TO SEW THOSE TINY CURVES***
When you sew those little fingers, you need to sew straight up the side of a finger, right along the edge of the Freezer paper or just inside the line, and then when you get to the curved top, sew 2-3 stitches, stop with the needle down, turn the paper slightly in the direction you need to go, sew a stitch or two more, turn again, and repeat, till you get around the curve.
Sew straight down to the spot between the fingers. Be sure to stop just as you get to the edge of the Freezer paper or JUST PAST the thickness of the line, but dont go way into the palm of the hand. This takes accurate stopping!
You may have to hand wheel the last few stitches.
 REMEMBER>>>When
you are using Freezer paper and actually sewing the dolls hands, you will
have already cut off those lines. If you are using the "draw around the
parts" method for your doll, you will sew JUST PAST the line
between the fingers.
REMEMBER>>>When
you are using Freezer paper and actually sewing the dolls hands, you will
have already cut off those lines. If you are using the "draw around the
parts" method for your doll, you will sew JUST PAST the line
between the fingers.
Now with the needle down, turn the paper and sew a couple of stitches across to the next finger. This also takes accurate stopping, or you will sew right across a finger! You may have to "hand wheel" the needle into the DOWN position if your sewing machine doesnt have a down setting. With a little practice you can also learn to stop the needle in the down position by tapping on your presser foot.
You may need to enlarge the exercise papers, because your computer may print them out even smaller than needed for good practice.
If you start on a small hand, and find yourself going off the lines, practice on the big ones until the lines are perfect and the tips done in a smooth curve. No little jerky points allowed!
When you feel good about sewing on a big hand, move down a size. Continue moving down a size each time you feel comfortable with the size you are working on.
You may need to make several copies of the exercises to really get "practiced" enough to feel really confidant when you start sewing on your dolls.
There are lots of places on a doll where the "sew-sew-lift-turn" method is needed. Noses, chins, knees, toes, heels, belly buttons, ears, boobs, elbows, Wow! Almost all over the doll!
PRACTICE! PRACTICE! PRACTICE!
I use a Quadruple thread for closing openings. You can pull very hard without fear of the thread breaking.
I tend to be a very strong "thread puller" so the quadruple thread is insurance.
NOTE Whenever you need to pull firmly on thread for either closing openings or for needle sculpture; pull on the thread itself, right near the stitch. Dont pull on the needle and let it pull the thread. The thread will often break if you pull on the needle.
A quadruple thread is 2 strands of thread about
36" long, threaded through the needles eye and then pulled 1/2 way, so you
have 4 strands of thread to knot. Knot all 4 strands together.
First, put your needle in from the wrong side, right where the machine sewing stops, on one side of the seam or the other. It makes no difference on which side you start.
After the first stitch, which hides the knot under the surface of the doll skin, the ladder stitch ALWAYS ENTERS AND EXITS ON THE RIGHT SIDE OF THE FABRIC, right along the seam line.
Lightly mark the seam line along both sides. It is easier to keep track of where to sew if you do this at first. When the ladder stitch becomes second nature, you wont need the marks.
Take one stitch, about 1/8" or less long, right along the seam line on one side. REMEMBER! The needle ENTERS AND EXITS on the RIGHT SIDE of the fabric. Take another stitch on the opposite side of the opening, right along the seam line. REMEMBER!!! The needle ENTERS AND EXITS on the RIGHT SIDE! Repeat again on the other side.
You will take 3 or 4 stitches and can see how the thread makes a little "ladder" going across from side to side. After 3 or 4 stitches, poke your finger where you stitched, pull the thread tight, and watch the seam close and the stitches disappear! The raw edges will just magically go inside! If you pull too hard the area will gather too. You dont want that!
Continue to the end of the seam, adding stuffing as needed to finish filling the opening so it will be smooth. DESIGNERS HINT Add fluffed up cotton balls as you finish closing the openings. They stay put better than soft fluffy polyester stuffing.
When you get to the end, stitch in place with very tiny stitches a couple of times and then "LOSE THE ENDS" of your thread.
You LOSE THE ENDS by bringing your needle out as far away from the last stitch as possible. Cut the thread at the fabric surface, and then lift the fabric with the tip of your needle, so the thread gets LOST under the fabric skin. A "LOSE THE ENDS" illustration follows the ladder stitch illustration.
You can close straight openings, curved openings and pointed openings with this stitch. Once you get the "hang" of it you will find it very fast and easy to do. The ladder stitch is also wonderful for mending your own clothes. Linings, pockets, etc.
No more ugly whip stitching marring your dolls bodies!
The ladder stitch drawn HUGE! so it is easy to analyze. The dash lines are just ONE stitch under the fabric. The dark lines are the threads going across to the other side.
Note the needle ENTERING and EXITING on the
RIGHTSIDE right along the seam line.
| Ladder stitch in progress scanned. I used
green thread so you can see it better.
Note, where the seam is closed (for about 1" ) the green thread doesnt even show! |
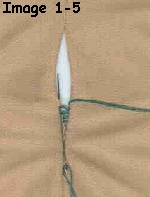
Image 1-5 |
Losing the ends illustration (above). Use this whenever
you need to knot a stitched section where the little clipped thread ends could
be visible on your doll.
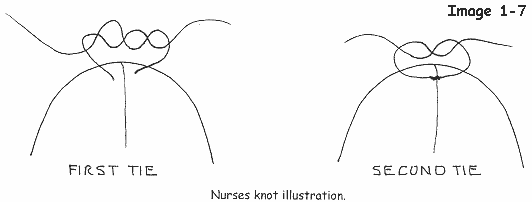
***THE "NURSES KNOT"***
The "nurses knot" is a knot you use when tying off sculpting stitches, or jointing cords, or anywhere you need to tie a knot and there is pressure on it trying to loosen the tie.
It is very simple and makes tying things with pressure against them much easier.
Simply take the thread or cord around a second time when you make the first tie.
Pull it tight, and then tie the second time. This
also makes an "automatic" square knot, so you dont have the keep thinking "right
over left", "left over right".
***STUFFING TIPS***
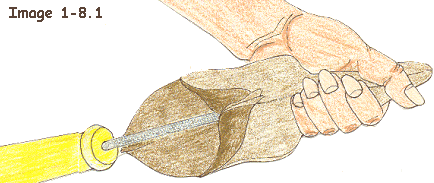
When you are stuffing a long thin area like a neck, leg arm etc. hold around the whole piece, like holding a banana.
This is how to hold the body while stuffing
the neck.

Image 1-8.1: Stuffing the neck
"hold"
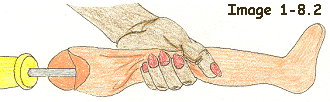
It is also how you should hold the legs and
arms for stuffing.

Image 1-8.2: Leg or arm "hold"
You will have far fewer popped seams if you stuff this way whenever possible.
When stuffing down into a foot, hold the whole foot and stuff the front and middle part.
Then when you stuff the heel, hold your hand under the foot and press the stuffing down hard, forcing some into the middle part of the foot too.
Keep holding the bottom of the foot at the heel area as you stuff up towards the ankle.
By bracing the foot against your hand, you will have a surface to press against as you keep pressing the stuffing down more firmly.
A little twisting motion with your screwdriver will press the stuffing even more firmly.
I use the "twisting back and forth" motion a lot
when stuffing. You will be amazed at how much more firmly the stuffing will
go in, NOTE***Some dolls and areas of dolls wont need to be stuffed so firmly,
but, except for the hands, Whatever! Whatever! does.
***MORE STUFFING TIPS***
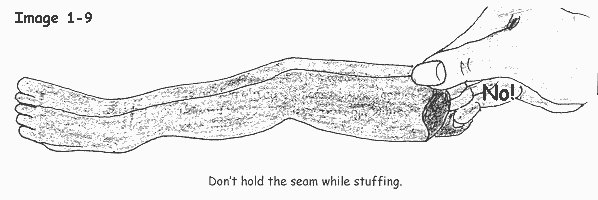
Dont hold the edge of the opening until you get right to the opening, and especially dont hold the seamed part. Pushing stuffing down hard, while holding the seamed edge causes most popped seams.
Also, dont put a piece of stuffing in and then "tap, tap, tap it down. Always hold the area and push down firmly with your screwdriver.
The only time you will hold the edge of the opening
is when the whole part that you are stuffing is nearly full and you have to
add the final stuffing as you are closing the opening with a ladder stitch.
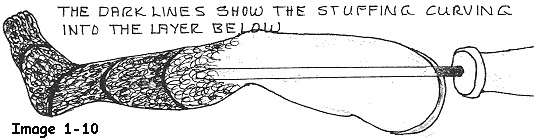
The last stuffing tip is to always put as much stuffing as possible into an area by feeding and pressing a large piece in. The stuffing needs to go down in layers for most parts. The main exception being boobs, they tend to need special attention. Chins too, and around the chenille stems in the arms, you will have to feed the stuffing down along the chenille stems, rather than down in a solid piece that takes up the whole circumference of the arm.
When stuffing is pressed down in layers, it will actually be stacked one layer on the other. Not put in, in little pieces here and there.
Stuff with the most pressure in the center. Pressing down hard in the center, will force stuffing to the sides evenly, not in bits. As soon as you start pressing pieces out to the sides with your stuffing tool, you will get lumps.
REMEMBER*** With your flat bladed screwdriver you can reach in and flatten a lump if you do get one!
Stuffing pressed down in layers, each layer cupped into the lower layer.
Well, that does it for preparation. Do practice the sewing skills, and "see" you in 2 days to start on Whatever! Whatevers! head.
NOTE*** If you bought 1/2 yard of 54" to 60" wide fabric for your doll, you have enough to make 2 heads.
Head insurance!
Dolly Hugs, Judi
Judi Ward
Judi's Dolls
http://JudisDolls.com


