Whatever!
Whatever!
Ó
1999
Taught by Judi Ward of Judi's Dolls
http://JudisDolls.com
Domed Eyelids
Lets do those great domed eyelids now. The method I am going to show you can be used for any doll where the directions read, "make eyelids and glue them on"! I just read some directions like that and wondered how many dollmakers could do it without a little more info.
1) First get a piece of paper. I use a scrap of Freezer Paper, but for this class I am going to show this using tissue paper so you can see the eye showing through better.
After making the patterns on tissue paper, they need to be cut out of Freezer paper or regular paper so they have some body.
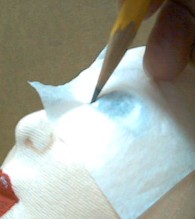
2) Lay the piece of paper over one of your dolls eyes, and draw right along the top line of the eye from corner to corner with a pencil.
3) Now, take the paper off and lay it down on the table. Draw about 1/16" away from that top line and then draw straight across the bottom, connecting the 2 corners.
The following photos tell the story.
Draw along the upper eye line. |
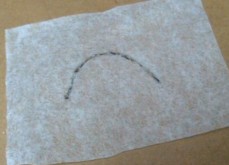
The upper eye line drawn on paper. |
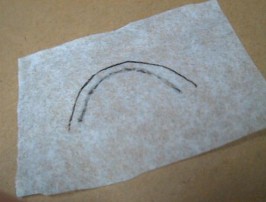
The line 1/16" away from the first line. |
The line straight across the bottom. |
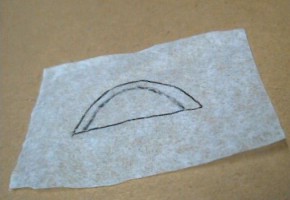
4) Now, make a right and a left eyelid pattern from firmer paper. I use Freezer Paper, folding it shiny sides together, and cut both eyelids at the same time.
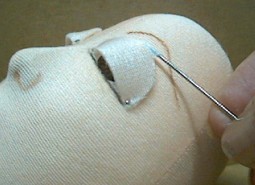
5) Place the inner corner of one eyelid at the inner corner of the corner of the correct eye and push a small straight pin straight into it, securing it to the face. Curve the eyelid and pin the other corner to the other corner of the eye. Push the top of the eyelid back against the face to see how they are going to "dome" over the eye.
NOTE>>>The upper edge of the eyelid will be about 1/8" above the top of the painted eye.
NOTE 2>>> The eyelids will be covering too much of the eye. We will trim them pretty soon. In fact we can trim them right up the when the eyelashes are applied!
6. Repeat for the other eye.
One corner pinned. |
The other corner pinned. |
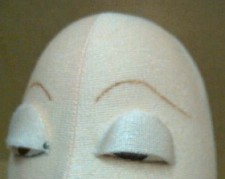
Both paper lids on.
SoooooSleepy!
7. Iron your Freezer Paper patterns to a scrap of your skin fabric and cut them out.
8. Now, you need to take the paper off and put the fabric eyelids on, just like you did with the paper. (We are going to trim them, honest! But not until they are Gessoed) Be patient.

The Freezer Paper eyelids ironed to the fabric. |
The fabric eyelids pinned on. |
9. Using a Super Tacky glue and a long needle that you can hold onto,
apply glue carefully to the underside of the eyelids and press them
into the fabric all along the upper edge.
I put a little under the edge in the center, and press it down with the side of the needle, then remove one corner pin and put glue along that area and press it down, then remove the other pin and apply glue there and press it down.
Try to keep the glue sparse, and mostly under the edge of the lid. Some will come out on the skin above the eyelid, but try to keep it to a minimum.
I find most dollmakers have trouble applying the glue all along the edge and then putting the eyelid in place. It seems to stick to their fingers and drop on the face etc. Hence the above method.
Applying the glue under the edge Press on the top of the edge with the needle, after applying the glue underneath. |
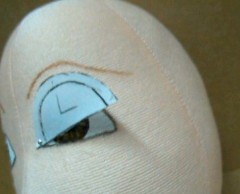
One eyelid glued down. Note how it "cups" in and forms a nice rounded curve over the eye. |
NOTE>>>>The doesuede will not cup in as much as the velour. Dont worry about it, they are both fine. It is a mystery to me too. When all is done, no one will know!
10. Repeat for the other eye, and then let it set for a few minutes and check to see if the eyelids stayed glued. If a part came up press it down again, perhaps adding a little glue with the side of your needle.
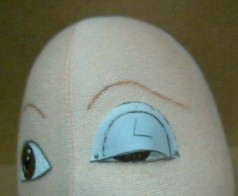
Both eyelids glued in place and
drying
Sorry, she is still VERY sleepy or drunk!
When I have had the students trim the eyelids first, and then apply them we ran into a lot of trouble with not knowing how much, or trimming the corners off etc. so with trial and error I found it is best to wait til they are glued on, gessoed and dry. We will trim them with tiny scissors real soon and wake your Millis right up!
11. After the eyelids are glued securely in place, paint a coat of Gesso over them. Put it on thick. This will harden the lids up, and then after the Gesso is dry we will trim the lids.
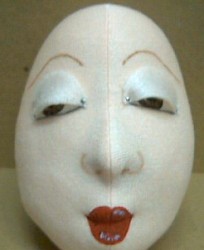
12. Get a tiny pair of scissors, like manicure scissors and trim the eyelids off. Start at one corner and curve up, taking about 1/4" off of the center and taper to nothing at the other corner. This may not be enough. BUT .It is best to start small and work up.
Pictures will follow.

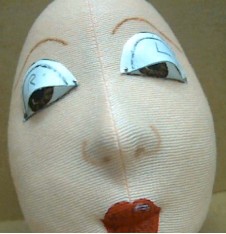
The eyelids gessoed and dry. My oh my does she look dazed! |
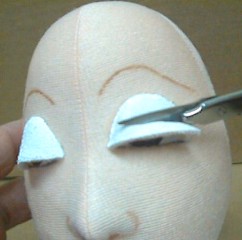
Trimming one eyelid. |
Copyright
Notice: All pages and graphics are copyrighted
by the Internet Visions Company and/or instructor.
You may print these out for the use of the class only. All
other uses or distributions are forbidden.
Crafty College and Doll Net are divisions of the Internet Visions Company.
© 1997-2003, Internet Visions Co. All rights reserved.