***Introduction***
Taught by Judi Ward of Judi's Dolls
http://JudisDolls.com
***Table of Contents***
***Introduction***
Whatever! Whatever! An oft heard saying by young people today. My grand daughters say it, and they are who inspired the doll.
This doll was designed to depict the nonchalant, yet slightly apprehensive, look and stance of a young teen saying those words in resignation or exasperation!
Whatever! Whatever! says it so well!
She has articulated fingers, with poseable wrists. Invisibly jointed hips, shoulders and head too! (So easy to do, you will do it for all of your tab head patterns.)
She has "coltish" proportions in a slightly exaggerated way that is so endearing.
I will show you how to apply real wefted mohair for hair in one ponytail or two. I will also show you how to make the hair from yarn, if you dont want the expense of mohair.
This class will guide you along, a step at a time, towards making this detailed and expressive doll, who stands alone with no armature required but you can put an easy one in the legs if desired! I will show you a way that is Dollmaker friendly, and you dont have to buy out the hardware store to do it.
You will need to have good control of your
sewing machine, and if you have taken the Cloth Dollmaking For Everyone
class, on-line, you will recognize and be able to use many techniques taught
there.
***Doll Size***
 My
original Whatever! Whatever! is about 24" tall. I have made several and
they are all in the 23" to 25" range.
My
original Whatever! Whatever! is about 24" tall. I have made several and
they are all in the 23" to 25" range.
A cloth doll cannot be said to be "exactly" a certain height. An extra strong "stuffing day" will produce a taller doll, perhaps fatter too.
Stuffing softly will produce a smaller doll. Slightly different seam allowances will make size differences. Different fabrics will do the same. Turning the "Stretch Direction" of the fabric across rather than up and down will produce yet another size.
The pattern pieces for this class should come from your computer full sized. Paul has the "sizing problem" fixed for almost every kind of computer, program, and printer known.
***but***
If you are downloading the pattern over the web, and it isnt full sized, the sizing directions are found linked to the Pattern Download Page. You can also make a smaller size if desired, or any size for that matter.
If you got the pattern by mail, or if it printed
out full sized, and wish to make a smaller doll, simply take it to a copy shop
and reduce all of the pages the same amount.
***Two important things to remember***
#1 Always remove all seam allowances BEFORE you reduce or enlarge any pattern. The seam allowances also reduce and enlarge. You could end up with seam allowances of only 1/16th of an inch! Or 3/4 of an inch! You would from habit, probably still use a 1/4" seam allowance and end up with a very different doll indeed. (Perhaps a nice doll, perhaps not so nice!)
Always add the appropriate seam allowances after the resizing. (Template pieces dont need seam allowances)#2 Resizing a pattern does not make it a "different" pattern. All copyrights still apply, just as if it was the original size.
Of course, there are no seam allowances on the pattern pieces for Whatever! Whatever! since she is intended to be reduced and/or enlarged if desired. They need to be added where needed after you do the sizing. Some pieces are TEMPLATES. You DO NOT add seam allowances to the template pieces. The head is a combination Template and non-template piece. More on that in the lessons.
Following is the supplies list to keep with your pattern and class. You have received it already from Paul, and should have most of your supplies ready to go, but I thought it would be nice to have here too, in the same format as the class.
CRs Crafts. Call for their catalog. (Website: http://www.crscraft.com) It has all kinds of doll "stuff" that is hard to find. If you have been in any of my other classes, you already have their catalog. If not call and order it. Also order their fabric and fur sample cards if you can. They are about $14.00 and have hundreds of samples of everything from velour and Doesuede, to mohair fur, to wovens, to fake fur and lots more.
CRs Crafts phone numbers:
1-641-567-3652 for general info.
1-877-2772782 for ordering only.
For calling purposes, they are only open from 8 AM til 4 Pm central time,
Mon thru. Fri.
I am not affiliated with them, and dont get paid for recommending them, or any of the other sources I give addresses for here.
There are also lots of suppliers at http://thedollnet.com
The proportional wheel, if you wish to use it for sizing, can be found there at Dollmaker's Journey (found on The Doll Net).
***For the Doll***
Right off the bat you will need Freezer Paper, or something that will work like Freezer Paper for re-tracing all of the pattern parts onto. This is the preferred method, for the most accurate dollmaking.
You can also use the Draw Around method, but it isnt quite as accurate or easy.
If you are in a place like Australia, New
Zealand, Japan, Britain etc. you may have a problem finding Freezer Paper.
You can use the wrapping paper from many brands Copy Machine paper! It
is a paper that is waxed on one side, and that is what you need. Perhaps
a butcher shop would have it too. Also, some quilt shops carry it.
***For the clothes***1. 1/2 yard of a firm knit fabric like CRAFT VELOUR or DOESUEDE (Suedecloth at Jo Anns) for the doll itself. NOTE*** Another option. You can make the legs from a print or colored velour or Doesuede! No stockings to make that way! Online source of fabric - http://sistersanddaughters.com
Note on Fabric: You can use 100% cotton woven fabric instead of the called for Velour or Doesuede....For detailed dolls like Whatever! Whatever! Use the woven fabric on the bias. On the bias, the fabric will stretch a little both ways. This is desirable for the detailed dolls, as they need the stretch for the shaping. Be sure to cut the lines off of your pattern pieces when preparing the patterns for use. This is especially crucial at the fingers. If you don't you may end up with no space between the fingers, and with woven fabrics, you must have enough space to clip between and leave at least 1/16" seam allowance. If fraying is a problem, apply watered down white glue to the raw edges of the seam allowances. Let dry until it is almost completely dry, then turn the parts right side out. I only find this necessary for very small fingers. Don't let it dry all the way. If you do it will be too stiff to turn.If you have any questions on fabric please ask them on the Black Board.
2. 2 pounds of excellent quality polyester stuffing. Buffalo Batt, Polyfil, Airtex, etc. (not Airtex soft and silky, it is too soft) The best stuffing for detailed, hard stuffed cloth dolls, has a slightly wiry feel to it. Not a slippery feel. And no Lumps!
If you have a business name, and the proper state numbers for your state, you can order the kind I use in 10 pound rolls from I.R. Specialty Foam and Packaging-Tacoma Industrial Rubber and Supply 1-800-426-7944
It is called Plain Fortrel. Tell them Judi, from Judis Dolls sent you. The stuffing is about $24.87 per 10# roll plus shipping. 10# minimum order. Dont forget the business name and the proper state ID#
I dont get anything from them for this. It is just great stuffing, I have used it for years and love it!
3. Metrosene/Mettler thread to match your dolls "skin". Metrosene/Mettler is the only thread that stands up to very firm stuffing nowadays. Metrosene/Mettler is usually only available from stores that sell top of the line sewing machines, and sometimes from quilt shops.
Get the poly/cotton type, not the all cotton. You can also get Metrosene/Mettler thread on line from http://www.zippersplus.com/thread.htm#Metrosenethread
Gutterman thread is the next best.
4. One pair of size 45mm, metal, buttons to cover for arm joints. The kind with the "teeth" in the cap are the only ones to get.
5. One pair of size 60mm buttons to cover, for leg joints. The kind with the "teeth" in the cap are the only ones to get. You can get them from a fabric store. Prymm/Dritz makes them.
6. 5 yards of strong nylon cord. I use and sell a shoemakers cord. You can use waxed nylon Dental Floss, but will need to at least double the amount, when we joint the doll.
7. A strong jointing needle, about 8" long. It is an upholstery needle.
8. A finger-stuffing fork, for guiding the chenille stems into the fingers. I have long, 12" upholstery needles with the eye cut 3/4 off that I use for a finger-stuffing fork. I wrapped mine with tape and blunted the sharp point. Have been using it for over 20 years.
You can buy them in the upholstery dept. of fabric stores.
You can cut part of the eye off of the longest one yourself, with a very sharp pair of wire cutters. Hold a towel over it while you do this. The cut end flies off, and could hurt someone. You want the fork about 1/8".
9. One package of Schmetz Stretch or Schmetz Universal sewing machine needles in a size 10 or 11
10. A hemostat, sometimes called Forceps. You can find them in the fly tying area of a sporting goods store, in medical and dental supply shops, at CRS Crafts and sometimes even in fabric stores. I like the 5" long ones best. The curved point ones are my special favorite. There are also places online where they are available. The hemostats are used for turning, not stuffing.
11. A hand sewing needle with a fairly large eye, and a 4" to 5" long needle sculpture needle. I like my hand sewing needles to be easy to thread. For the type of hand sewing you need to do on a doll, you usually dont need the tiny, little, hard to see, thread and hold type. My eyes cant cope with those anyway!
12. A flat bladed screwdriver about 10 inches long, with the blade about 1/4" to 3/8" wide. This will be your stuffing tool. Once you use a screwdriver for stuffing you will never use anything else! I promise, IF you really give it a try!
You can stuff so much harder with a screwdriver, and the flat blade will let you go down next to the "skin" to flatten a lump.
The handle lets you really get a grip and push, twist, and really work the stuffing down smoothly.
Hemostats really dont let you stuff as hard and/or smoothly, and sadly, when you let the stuffing go, down where you put it, the little teeth on the hemostat, pull some of the stuffing back!
Hemostats are good for turning fingers and other parts. They are good for guiding a Pom Pom into place for a wrist bone, anklebone or into a nose, but for your major stuffing they really dont do the job.
13. Ten, 15mm chenille stems for the fingers. Michaels Crafts usually has them. CRS Crafts always does. NOTE***10 more if you want to put an armature in the legs.
14. Your sewing machine in good working order, and the ordinary sewing supplies you use, like pins, scissors etc.
1. 1/3rd yd. of lightweight woven for skirt, and another 1/3rd yd. for the skirt lining. I like to make the lining really bright or different. Like polka dots, or bright flowers, or African prints, color co-ordinated with the tights, skirt and shirt.2. 1/2 yd of swimsuit fabric for stockings/tights Or You can use a knit shirt with a high spandex content. (I find them in thrift stores) The stockings/tights, MUST be made from very stretchy, two way stretch fabric.
You wont use all or even nearly all of it, but the way the most stretch goes, you need the 1/2 yd. to get the length of the stockings on it. You can also use it for the shirt, and panties too of course.
Please note*** and dont be confused. There are 3 options for the legs/tights/stockings.
***Stockings, made from stretchy spandex fabric and panties made from the same or another fabric and not sewn to the stockings.
***The legs made from a print or colored Doesuede or Velour, to simulate stockings, and the panties made from another fabric.
3. A very small piece of stretchy fabric for the panties. (Or make them from the very stretchy stocking fabric)
NOTE***If you are going to make the stockings, and sew them to the panties to make tights, the panties must be cut from the stocking fabric.
4. A small piece (1/4 yd. of either woven or knit for the shirt. A cotton knit, like t-shirt knit is easiest to work with for turning the edge of the neckline in and for hemming. You only have to turn the hems up one turn. Remember .You can also use the swimsuit fabric for the shirt.
5. Thread to match your chosen clothing fabrics.
6. Schmetz universal sewing machine needles in a size 10 or 11 for lighter fabrics and a size 12 for heavier fabrics, like poplin, lightweight denim, etc.
7. Four, sew on snaps or Velcro for the skirt and shirt closing.
8. A fancy button for the skirt closing.
9. A small, (about 10" long) piece of 1/4" wide elastic for the pantys waist.
10. 1 pair of "grown up" looking, HARD SOLED baby shoes or boots in a size 2. Volume, Target, Wal Mart and K-Mart are good places to find the shoes. I have purchased a pair of "chunky" black strap shoes like the teens wear, a pair of tan hiking boots, a pair of black velvet ankle boots, and a pair of thick brown sandals recently. None were more than $10.00. Two pairs were on sale for $3.00.
If you are making a smaller version of Whatever! You will need doll shoes. CRs Crafts has lots of suitable styles. Make your doll first, and then order shoes so you get the size that fits. NOTE there are other doll supply places too, Tallinas and Dollspart are 2 that come to mind. You can find ads for places in doll magazines.
Your doll may turn out to be a size that fits all of the great American Girls type shoes. They are available at a lot of craft stores and from magazine ads.
11. A label, for the shirt front decoration, removed from "people" clothing. Look for the kind you can "unsew" rather than the kind you have to cut out. I have found some really neat ones in shirts. One says, Energie. One says ZINARI COLLECTION. One says Erica and Company. All have graphics included, and are in colors that I co-ordinated with my dolls clothing fabrics. Most of these are about 2 1/2" by 1". I did find and use one, that was about 2 1/2" square.
2. Acrylic paints in bottles, not tubes. An assortment of colors. Have at least red, yellow, blue, and brown plus black and white.
3. A small amount of white Gesso. It is available from craft stores. Get a 4 oz. Bottle. It dries out easily, and it takes quite a while to use even the small bottle.
4. A size 000 or less, pointed paintbrush or even a 00000 pointed paintbrush. (Very tiny brushes make very tiny mistakes!) If you are not adept at painting get really TINY brushes! Forget even the size 000. Go for a lot of 000000s. I just found ten 0 brushes at Wal-Mart. They are called "spotters" and are only $1.50 each. Great size and great price!
If painting is too scary, you can embroider the features using ordinary sewing thread. It lays flat, and when you coat it with clear Mod Podge, it looks so close to painted you wont believe it. Regular embroidery floss sticks up too far, and always looks embroidered and bulky.
5. Clear coating for the eyes and mouth. Mod Podge is one type of clear coating.
Keelings Krafts has a coating that is great for eyes, mouths and fingernails too. You can even pull it out to make long fingernails! It is called 3-D Crystal Lacquer. http://www.keelingskrafts.com
6. Colored pencils, Berol/Prismacolor are good. In a color close to your dolls skin, plus pink or red, brown, and tan. (You may want more colors if you choose to pencil the eye shadow.)
7. A small piece of WHITE Super SculpyÒ or FimoÒ or PromatÒ oven baked clay. You can buy small packages with enough for several noses for a couple of dollars.
You can also use paper clay, but it will take a day or so to dry, and holds up your dollmaking.
8. A pair of big, loopy ear rings. For the best price try a thrift store or a Dollar Store or A pair of your own earrings.
9. A small amount of Tacky glue and a toothpick to apply it with, for holding the eyelashes.
10. Powdered blush just like you use for yourself. Get a pink or peach shade. The muddy mauves and plums look dirty on a doll.
The mohair is perfect and long and wonderful. It ranges in price from about $11.00 for the 7" to 8" long hair, to about $16.00 per length for the 9" to 11" long hair.
The place is Sandcastle Creations. 1-800-605-1901. I have never received any "bad" mohair from them, and have only ordered and used the "seconds". Be sure to ask for "seconds" when you order if you want a lower price. The regular price for the "firsts" is $20.00 to $30.00 per length. It is usually more than that from other sources.
There are lots of Mohair sources. CRs Crafts has wefted Mohair too. You may already have some. You do need about a 1 yard strip of fibers at least 7" long.
2. Multi temp glue sticks and a low temp, mini, hot glue gun. This is used for applying the hair. You can also use very thick tacky glue, but it will take longer to do the hair, because you have to wait for it to dry between rows.
If you are "anti glue" you can sew the hair strips on. Takes more time but works fine.
I tend to opt for the hot glue. Neatly done, you will have none showing, and the hair is there to stay! It also looks like it is "rooted" to the scalp.
3. Waxed dental floss or small rubber bands to tie the pony tail/tails in with.
4. Very "IN" hair decorations, like the little butterfly/flower clips, or barrettes, or flowers etc. Your choice. Ribbons if desired to tie around the pony tail/tails too.
5. Hairspray.
NOTE***If you can get some Machine Knitting Yarn, it is really thin, and comes in very fluffy versions too. I love machine-knitting yarn for doll hair. It looks more like hair than regular yarn does.
2. Thread to match the yarn color.
You will need the glue, hair accessories etc. just like for the Mohair

Remember***for the places where it is hard to get Freezer Paper, (or anyone else, for that matter,) you can use the paper that is used to wrap copy machine paper. Most of it is waxed on one side, and works just like Freezer Paper.
If you just dont want to use the Freezer paper method, you can re-trace your pattern pieces to any other paper or Pellon, and draw around the parts on your fabrics. REMEMBER When you draw around something it gets bigger! Always sew INSIDE the drawn line, NOT OUTSIDE.
You should have your pattern all ready to add seam allowances to those parts that need them while transferring to Freezer Paper (Or copy machine paper wrapper) (or other paper) Note You can see through Freezer Paper really easily to do the tracing.
Add 1/4" or 3/8" seam allowances to all of the parts that need them, right on your Freezer paper. You choose the seam allowance you like to work with.
An easy way to add 1/4" seam allowances was shared in another class. The dollmaker taped 2 lead pencils together side by side. She drew one along the edge of the pattern piece that has no seam allowance and the other pencil drew the seam allowance 1/4" away.
I know there are other ways too, and there are some gadgets to do it. Add the seam allowance however you desire. You can even measure and make dots about an inch apart and then connect them like "dot to dot". The places where you add seam allowances are marked on your original pattern.
Transfer all markings needed, like STRETCH DIRECTION, TEMPLATE, BODYBACK, ETC. to the Freezer paper patterns.
Always keep your original patterns intact to refer to for extra directions and for re-tracing a lost or damaged piece.
Make 2 arm, 2 leg and 2 ear patterns. (They dont need to be made with one reversed, since they can be sewn and cut out on doubled fabric.)
NOTE I like to have all of the pattern parts on Freezer Paper. Not just the actual doll parts and templates. Why you ask? You can iron the pattern pieces for clothing onto doubled fabric; stick in a few pins and the nice sharp edge of the Freezer Paper pattern makes it so much easier to cut accurately. When you just pin the pattern parts on, you get little gaps between the pins and sometimes the parts arent accurately cut.
Cut out the pattern parts from your Freezer Paper. For the TEMPLATE pieces . Cut off the drawn lines too. Why you ask? If you cut outside of the drawn lines the pattern is automatically bigger by a fraction, and then you tend to sew a bit outside of the Freezer Paper pattern, which makes it bigger still. When this happens you will lose the space between the fingers and fat fingers will be the result. The whole unit, leg, arm etc. will be fatter too. On very small dolls this can be a real problem.
Dolls are small and it doesnt take much to make a difference in their finished size.
I think this is one of the biggest problems when dollmakers start making detailed fingers. They lose that "between the fingers" space, and then they cant clip close and it makes turning hard. With woven fabrics it also often results in fingers tearing in between.
***BEFORE IRONING THE PATTERN ONTO YOUR DOLL BODY FABRIC, FOLD THE FABRIC WITH THE SMOOTH SIDE TO THE INSIDE*** YOU WILL BE SEWING ON THE FUZZY SIDE***
After the pattern parts are all cut out of the Freezer paper, iron the Template parts onto your fabric. I like to iron the head parts on a section of the fabric, and then cut that section away from the rest. Ditto for the legs and arms. I dont mean to cut the pieces out, that will be done AFTER sewing.
Just cut them away from each other so they are easier to handle. Be sure you arrange the pieces so you can get them all on. (2 layouts follow after the stretch direction illustrations.)
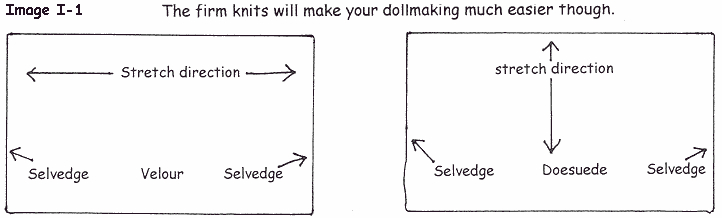
Be sure to check the Stretch Direction. You want the stretch up and down the height of the doll for this first doll.
Velour stretches most from selvedge to selvedge. Doesuede/Suedecloth stretches most, perpendicular to the selvedge.
Even wovens have a little stretch, more one way than the other. The cross grain gives a little more. Woven fabric dolls generally look better with the "give" up and down too.
NOTE>>>You can make Whatever! Whatever! from 100%
cotton woven fabric if you are really good with woven fabric. She will be a
little smaller and will have a few places where it is very hard to get the "Krinkles"
out. If you are going to make her from woven fabric, be sure it 100% cotton
and place the head pieces on the BIAS. The firm knits will make your dollmaking
much easier though.
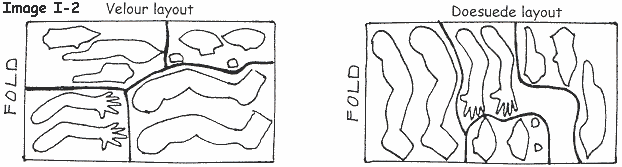
Image I-2: Darklines show
where to cut the template parts away from the rest of the parts for ease
of sewing.
You will cut the rest of the parts out after that. Actually the only DOLL parts left are the 3 body pieces!
Be sure to leave at least 1/2" between all parts, especially the Template parts.
Set your iron to the wool setting and iron the parts to the FUZZY side of the fabric. Put a pin or two in the template parts just to keep the 2 layers of fabric together while you are sewing.
Put a few more pins in the body parts and cut them out. DOUBLE CHECK!!!! DID YOU ADD THE SEAM ALLOWANCES TO THE BODY PARTS? They need them!
Now your patterns are all sized, they are on the fabric, and ready to sew.
If you havent decided on clothing fabrics yet, all of the patterns are still ready to iron to the clothing fabrics when you are ready. When you do iron the patterns to the clothing fabrics, be sure to check the stretch direction for the tights and panties.
Now take a rest and have a cuppa, or a snack!
The next chapter will be short and will contain some extra skills to do before you actually begin to make the doll.
This will give you time to gather the supplies if you havent already.
Have fun with the color co-ordination for the clothes. I love that part, and had teenage girls "helping" to be sure the first Whatever! Whatever! was totally "in".
She is wearing an orange skirt with a black lining, multi colored striped stockings/tights and shirt, and black "chunky" strap shoes.
Since then I have made one with a bright yellow and white striped shirt and stockings/tights, a black skirt with black and white polka dot lining and black boots.
Another with a gold flecked, leopard print shirt, a black velvet skirt with a gold glitter design in it, lined with black and gold dotted taffeta, black stockings/tights, and black velvet shoes with a jeweled buckle.
Another with leopard tights and shirt, a black skirt with dotted lining, and tan boots.
There are so many combinations that are fun,
and the spandex swimsuit fabrics are incredible!
Dolly Hugs, Judi
Judi Ward
Judi's Dolls
http:/judisdolls.com