Go to.. Classroom...
Cloth Dollmaking for Everyone
© 1998, © 2012 Judi Dolls/Judi Ward
Taught by Judi Ward of Judi's Dolls
http://JudisDolls.com
…CHAPTER 1 …
What do I need and where do I get it.
Having the right “tools” for making cloth dolls is a very important aspect of making dolls successfully. But it doesn’t have to be terribly expensive, nor do the “tools” have to be hard to acquire.
This chapter will show and tell all of the things I use in my doll making. Some are “real tools”. Some are adapted for use in my doll making, but are really meant for something else. The things I will introduce to you are the things I find the most useful and that work best for me. I have favorites that I feel that I couldn’t do without. I have special, purchased tools, that I have tried, but prefer a “home made” one that does the same job. I am basically "cheap" and don't jump on every "product" bandwagon.
Cloth dollmakers have always been innovators and we still are.
Those of you who have made some dolls, will already have favorite tools, and those of you who are just starting out will want to try different things to find your favorites.
The biggest “tool” for your doll making will be your sewing machine. Yes, you can of course make dolls by hand, but I don’t have enough time or patience, in this lifetime or another to make dolls by hand. If you do, and you love it, the sewing machine is the least of your worries.
I have often been asked at shows, “what kind of sewing machine do you use?” As if the sewing machine made the dolls.
It doesn’t of course, but it is nice to have a machine that is pleasant to use and not persnickety! I have several machines, including a wonderful, antique treadle. I figure with that and my stash of fabrics I can still be happily making dolls even during a disaster!
My primary machine is an older, electronic, computerized Pfaff. I also have a small Janome as of 2009, 2 cheapie Singers, a Mexican made “fake” Featherlite, and the antique treadle dated 1889.
What I am trying to illustrate here is that the sewing machine doesn’t need to be a top of the line machine to make dolls. What it does need to be, is in perfect working order, cleaned frequently and oiled regularly if it is one that requires oil…. and you need to be able to operate it easily and skillfully.
…Other supplies…
I am going to list and/or picture a number of things you will/may need for your doll making.
Supply sources…
When this class was first written about 1997 some supplies were not easy to find, and I listed some suppliers, but now some of those are out of business. Now a Google search can find anything. Seriously, ANYTHING! I am not going to list specific suppliers because it would be pages and pages long! Be assured that the supplies used for this class are just normal things, easily obtained, either online or at stores.
I almost always use CRAFT VELOUR for Dollmaking because it is lightweight, sews, turns, and stuffs beautifully ( No Krinkles) and has GIVE not stretch….If you sew on the fuzzy side you have a smooth skinned doll when the parts are turned.
Any doll designed for CRAFT VELOUR can also be made from excellent quality 100% cotton cloth….And Vice Versa….
One type of doll that you may want to use only woven cotton for is the Vintage Reproduction style, like Izannah Walkers, Columbians, Presbyterians etc.
Other doll types look best in wool or wool/rayon felt, like Lenci types.
Yet others, like Waldorf style, are best made from cotton knit.
NOTE ABOUT WOVEN COTTON….You can place the pattern pieces on the diagonal on woven fabric if desired, but it is not needed if you use HIGH QUALITY woven cotton that has give in one direction.
Now to go on with the supplies you may need as your doll making progresses.
Needles….
A most important part of your sewing machine is the needle/needles. I can’t stress too much the importance of using excellent quality sewing machine needles in the right size and type for the fabrics you are working on. It is very important to change the needle when you go from a firm knit fabric to a woven fabric…Or…Use Schmetz Universal needles. I like size 11 for most of my Dollmaking. If you are using very thin fabric for clothes you may want a size 10 or even a 9.
Below are 2 packages of Schmetz needles so you can see what they look like.
|
|
|


It is also very important to change to a new needle after about 8 hours of sewing. This alone will help prevent the little tangles, skips, pulls, etc. that many mistake for a sewing machine problem.
If your sewing machine is acting up, the first thing to try to correct the problem is to change the needle. I can’t tell you how many times in classes that the needle has been the problem for a student. Often they will say that they have had the same needle in for months, even years, and they have been having trouble with their machine for that long too!! It takes only one tiny nick or burr on a needle to throw your machine off completely!
I use leather needles when making leather shoes. They also have needles for metallic thread, which I haven’t used, and they have one for very stretchy knits like swimsuit material. I often make doll stockings from swimsuit fabric, so I use the Stretch needles for those.
Other needles you will need are good hand sewing needles and doll Sculpting needles. I have bunches of hand sewing needles, and find I prefer those with bigger eyes. A lot of hand sewing on dolls, needs to be done with a Quadruple thread, so the big eye is needed, and my old eyes need that big eye too.
Doll sculpting needles will be needed for most face and body sculpting you will do. Sculpting needles come in different lengths, ranging from 3”-7”.
I use the 3” and 5” ones the most. Mine are usually bent after a
very few uses, but still work fine.

3” sculpting needle. 5” sculpting needle.
Big Jointing Needles are invaluable, and needed for making button jointed dolls. They range from 8” to 12” long. They are nothing more than Upholstery Needles, used for attaching buttons to sofas and chairs. The upholstery section of any big fabric store has them, usually in packages of four, ranging in length from 6" to 12".
I also use a broken 12” one for a finger-stuffing tool. It also works well for adding more stuffing to noses after the rest of the head is stuffed. It is also used to guide chenille stems or stuffing into place in fingers.
To be able to easily make all 4 of the dolls we will make in this class, you will need both needles.

Actual size jointing
needle.
Below is a 12” needle, broken and wrapped for use as a stuffing needle. This is my ancient one, close to 20 years old!
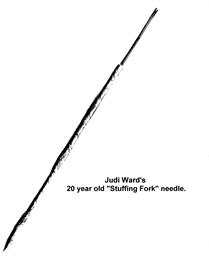
We will be using these needles for the level 3 and 4 dolls. (We will use the “forked one” if you wish to guide chenille stems into the fingers of the level 2, 3 and 4 dolls.)
We will also be using chenille stems for leg and arm wiring if desired. You will need 1 package of 9mm or 15mm for the fingers for 1 doll.
15 mm chenille stems will fit into the fingers of all of these dolls! It won't look possible, but they will fit, and you don't have to add any stuffing then.
You can use the 9mm too though. If you use 9s you may need to guide some stuffing into the fingers.
The "wire" in the stems is the same size for all stems. It is only the "fuzz" that is different. You will be surprised at how a big fluffy stem will fit into a tiny slim finger! You will need 2 packages of 15mm for the leg and arm wiring if you want to try that.
Joint Buttons….
Metal Shank Jointing Buttons are actually Dritz Half Ball Cover Buttons. They are used closed, but not covered for invisible inside jointing. The only ones to use in your dollmaking are the ones with the TEETH in the cap. DO NOT use the ones that come with a little rubber thing to help you cover them. Those don’t have the teeth, and pull apart in your doll the minute you pull on the jointing cord. They are cheaper, so it will be “oh so” tempting! But you will be sorry!
For outside jointing, they are used by covering them with fabric, to match the doll’s body fabric. For some patterns you may have, or will have, you can use them covered in bright fabrics as a decorative joint button, instead of using clothing buttons.
You can get the smaller sizes from most fabric stores too. When you are choosing the joint buttons, for invisibly jointing a doll, you want the largest size that will fit into the top of the limb. For outside jointing, where the buttons will be covered, you will want the size that will be nearly as big as the top of the part you desire to joint. For very small outside joints you may want the very small sized buttons to cover.
AGAIN…Be sure they are the kind with the TEETH inside the cap.
You can also substitute large, sturdy coat type buttons as long as they have a METAL shank. Plastic shanks will break off due to the plastic deteriorating over time…Been there, done that….Many years ago.
AN IMPORTANT BUTTON WARNING! I don’t recommend outside jointing buttons of any kind for play dolls for small children!

Assortment of shut, half
Ball Cover Buttons.
Note the teeth around the edges

A package of Dritz Half Ball Cover Buttons
These are size 36mm
or 7/8”.
As mentioned above, you can use these buttons for jointing on the outside too. They are very strong. I have never had a shank break.
There are many types of jointing though, and as you do more dolls from different patterns, different types of buttons will be used.
When using ordinary clothing buttons for joints, you have to be careful about the kind you use. Ones with small thin shanks will break and your poor doll will pop apart! Buttons with holes will often break too. Most clothing buttons are best left for softly stuffed, primitive and country dolls, that don’t put much stress on them. Some clothing buttons work O.K. for knee, ankle, wrist and elbow joints displayed in some doll patterns. I have 2 patterns with such joints, and find that plastic shank buttons, and the thicker 2 hole buttons work fine. There isn’t much stress on these smaller, thinner joints.
Threads….
The thread I like best is Metrosene. It seems to only be available from stores that sell sewing machines. If you buy a new sewing machine from a dealer, they will almost always recommend Metrosene thread.
Gutermann is also good thread, but not as good as Metrosene. Bite the bullet, and get some Metrosene, in at least the doll body colors.
Gutermann thread is available at most fabric stores.
In 1997/98 Coats and Clarks thread was awful! But it has improved and is again a good thread, especially for clothes.
When making dolls, there is a lot of stress on long seams as you stuff. Some people suggest that you sew the seams twice. I don’t recommend that because the chance of staying on the same line is almost zero! In crucial places like fingers, noses, chins etc. sewing in 2 different places will make turning and stuffing much more difficult, if not impossible!
Use really good thread, and a really tiny stitch length, and your sewing machine and dolls will thank you.
Stuffing….
This is a hornet’s nest!! There is so much stuff on the market that is just AWFUL! Generally speaking, if it is really cheap, it is probably really bad! You get what you pay for here…BUT…some very expensive stuffing is slippery and slimy and won't stay where you put it for a second.
I stuff hard and use stuffing that is a little wiry…In 1997 when this class was first written Polyfil and Airtex had a stuffing that was a bit wiry, but not any more…2010…
I use Putnam, Buffalo Batt, Mountain Mist, and wool stuffing. I also use Glorex from Germany but it is not available here.
Don’t try to use stuffing that is full of bits of unexploded fibers or stuffing that is what I call “slimy”. It is impossible to get it to stay in place.
When you buy stuffing, squeeze some in your hand to see if returns very rapidly to nearly it’s pre-squeezed size. Then pull on a piece lightly to see if it "streams". Stuffing should be able to be fed into a space without falling apart.
You want to be able to really pack the stuffing in for a detailed, well formed doll, then have it expand a little inside the doll to fill the space even better. We will talk about that in chapter 9
If all else fails, buy Wool Stuffing….It is a fantastic stuffing but is NOT WASHABLE.
Hair…
Hair materials are so numerous and varied that you simply need to pick up a variety as your dollmaking progresses. For the dolls we are making in this class, yarn is the material we are using. The dolls that are made up as the samples have Machine Knitting Yarn hair, except the Angel. She has a fluffy mohair type yarn, purchased at a yarn shop.
The Machine Knitting Yarn is just wonderful for dolls! Do treat yourself and your dolls to the wonders of this fine yarn. Call some yarn shops in your area and ask if they carry yarn for knitting machines. You will also find cones of this yarn in thrift shops, because during the Knitting Machine craze, folks bought lots of it, then the craze died and they have all sorts of yarn that they aren't using and give it to thrift shops. It is also available online. Just "Google" Machine Knitting Yarn, look and be amazed!
I have several basic colors in the least expensive type, which is acrylic. It comes on big cones that will take “forever” to use up. I paid about $10.00 for each cone. I estimate that each cone will make about 6 long hairdos for dolls about 20” tall! That brings the cost down per doll to less than $2.00 each.
The best thing about the knitting machine yarn is that it is so fine ( 2 ply) Much more in scale for cloth dolls than regular yarn.
There are also the most wonderful “variety” yarns available for knitting machines. Some with sparkles and fuzz. Some made of pure mohair (expensive) and all sorts of other fiber combinations.
The hair for the class dolls can also be made with regular sport yarn though, and the directions will deal with both.
Many cloth dolls will "ask" for wild and colorful hair and there is no lack of that in stores.
You can also put real doll wigs on your cloth dolls. Doll wigs are not playable, and they are quite expensive, so don’t put them on a play doll.
Don’t order a doll wig until your doll’s head is done, so
you can measure it. Here is how you measure for a doll wig. If the measurement
comes out to be, for instance 9 1/2" order the size up, or a 10” wig.
Sometimes a real doll wig is just what a doll needs to make her perfect!

Measure around your doll's head from
forehead,
to above one ear, to the
nape of the neck, back above the
other ear, and then back
to the forehead.
Many other fibers can be used for cloth doll hair, and you can get most anything available from craft supply stores.
Most patterns give fairly detailed directions for making hair for your dolls, but some simply say things like “glue hair on all over the head”.
For some dollmakers this is perfect, for others it causes panic and self doubt. A doll will often go into the “discard bin” for lack of a hair-do. If you are in the latter group, and like hair directions to be very explicit, my hair class may be a good choice when you start making other dolls…OR….Again, "Google", Making Doll Hair from Yarn and all sorts of things come up.
The directions for the hairdos for these class dolls will be quite explicit. They will be for the very versatile center (or side) part hairdos that are used so often on cloth dolls. The variety you can make from this basic style is quite vast. A simple change of fiber will make a whole new look.
Turning and stuffing…
Turning and stuffing tools are a very big part of cloth doll making. Those of you who have made some dolls may already have favorite tools.
I have favorites, and feel that I couldn’t “live” without them. My favorite stuffing tool is an ordinary Sears Craftsman screwdriver. It is about 10” long.
It has a comfortable handle and I have used it for at least 20 years! I have tried many tools for STUFFING like…chopsticks, knitting needles, alligator clamps, dowels, hemostats, commercial stuffing forks (O.K. for some fingers, too large for others) pencils, pens, and just about anything you can think of that will push and poke! I always go back to my screwdriver. The handle is smooth and comfortable, both to hold and push against. The metal part is long, thin and strong. The blade is flat and I can guide a piece of stuffing smoothly into a hard to reach spot without it “balling” up. I have never pushed it through the fabric, because to stuff properly you aren’t pushing anything but stuffing against the fabric.
If you haven’t found the perfect, all purpose stuffing tool. One that you reach for automatically, one that you guard with your life and would rescue in case of fire, I suggest that you raid the tool box for a big comfortable screwdriver. If you don’t have one, go buy one. Feel the handle in your hand for smoothness. You don’t want something with sharp corners. You also want to be sure the blade is very smooth. Some bargain screwdrivers have rough metal blades. They just don’t know that we doll makers need them to be smooth!
The metal part should be fairly thin too. Smaller than a pencil. The blade on mine is 1/4" wide. I have another with a wider blade, but don’t like it.
The next absolute necessity for dollmaking is at least one pair of Hemostats. Many fabric stores, and even the fishing supply depts. of some stores carry them. You can sometimes get them in medical supply shops, and of course online….Google again….
I have several sizes of hemostats, from tiny 3” ones to long 10” ones. The ones I use the most, and quite frankly, interchangeably, are my 5” bent and 5” straight ones. If I had to pick just one to have, it would be my 5” bent ones. I almost never use the tiny 3” ones and only occasionally use the 10” ones.
You may find that you like the bigger ones for turning bigger parts, but I find that my 5” ones go down inside the bigger parts just fine. For long arms with fairly slim fingers (fingers that are big enough to be turned with the hemostats) they also serve to push the tips of the fingers out nice and round. (toes too)
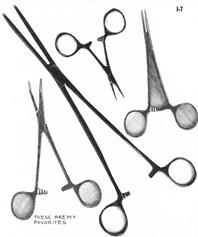
Assortment of Hemostats.
I don’t stuff with the hemostats. I like to be able to push down harder than the hemostat will allow, and a hemostat has teeth that actually pull stuffing back out as you remove it. The handles also cause blisters or sore places on ones finger and thumb…. I use then for turning only. For larger fingers, ¼” wide or more, hemostats make great turners. They also make a great tool for turning other parts quickly and easily.
I will be teaching you a really easy and nearly “tool-less” method for turning the very tiniest fingers later in this class. This method will solve your finger turning dilemmas forever! It does take a try or two to get the hang of it, and the “feel” of it, but once you “get it” you will never have to say “oh! Those fingers are much too tiny to turn!
Body Fabric….
Doll body fabric is a real problem for some. I will be very frank right up front. I don’t like making dolls with woven fabrics. I have used firm knits for too many years to “go back” to the difficulties posed by wovens. My favorite fabric for doll making is CRAFT VELOUR as mentioned earlier. I use it smooth side out for most dolls, but baby dolls are delightful with the “fuzzy side out.
I test my doll patterns in woven 100% cotton, and they make up fine in it, but I like the ease of sewing and turning velour, and the superior way it stuffs. It also doesn’t tear out between the fingers or in other tight spots….And you never need Fray stopper!
It doesn’t get wrinkles and little “points” where you don’t want them. You can needle sculpt the profile faces without getting un-wanted wrinkles, and you can close openings with the invisible ladder stitch much more easily.
As mentioned before, some dolls are meant to be made from wovens and the wrinkles and crinkles are part of the “look”. You can’t get the “homespun” look for primitives with the firm knits. I have made Raggedy Ann from cream velour though and you couldn’t tell it from muslin.
Some doll patterns are meant to be made from many bright colored wovens, and for those patterns, that is what you will want to use. But often those dolls will call for a firm knit for faces and hands.
Just as a general rule, if you are making a “skin” colored doll, you will probably have an easier time of it, and like the results better if you make the doll from a firm knit. The more shape and form a doll has, the more the firm knits will help you to make a beautiful doll.
For the purposes of this class, Firm Knit, means Craft Velour…but…Bucksuede, Doesuede, Deersuede, Visa Doeskin, Ponti, Crepe stitch and wool/rayon felt are also very usable. ALL but the felt are firm knits.
The one drawback to making dolls from knits is that the popular pens don’t always work on them, they often run and bleed…BUT…If you paint the whole surface of the doll’s head with Mod Podge or spray the surface with Clear Acrylic Coating, available from the paint dept. of hardware stores, you can then use pens on it.
I did a lot of testing with the Clear Acrylic Coating before I wrote this. I tested it on woven fabrics, both 100% cotton and a blend. I tested on velour, both the fuzzy and the smooth sides, on Windsor Ponti and on Doesuede.
If you like to use pens for your doll faces, simply spray 2 light coats of Acrylic Spray on the fabric first. Do the pen (and colored pencil) work and then spray 2 more light coats over the face. So now you can have the best of both worlds! Ease with making the doll in firm knits and ease with doing faces in pens if desired….BIG NOTE THOUGH!!!! ALWAYS mark on the back of the dolls head with any pen you plan to use and let it dry for a few hours and then spray it. Some pens run when you spray them, no matter what they are on!
I will go into this a bit deeper in later chapters.
I don’t often use pens, because I like the vibrancy and permanency of paint, and I love to paint doll faces. I will be teaching you basic painting techniques in this class. If you want to really work on your painting, I also teach an in depth class for painting doll faces at Crafty College.
The first doll in this class makes up very nicely in velour or woven cotton, but the 2nd, 3rd and 4th are much nicer and easier to make in velour. (You can also use Doesuede, Windsor Ponti, and felt with a high wool content for lots of dolls.) NOTE: Windsor Ponti and felt are too thick for the tiny fingers on the hands of the last 2 class dolls. (You could use them by making the 3rd. and/or 4th. doll with the 2nd doll hands.)
I often custom dye the velour. You can get a very nice light tan with cream velour and Rit dye in Tan. Just use it as the box directs and be sure to wet the velour first. Velour won’t take dark colors. Even if you start with dark brown Rit, you will end up with a light brown. You can even tea or coffee dye the cream velour, for the popular stained look. Simply wet the velour, and then drip strong coffee here and there…or…press a wet tea bag here and there over the surface. Squeeze the fabric, and then dry it in the dryer. I used a spice tea on some fabric, and it retained the spicy smell for quite a while.
Following are some fabric samples of suitable firm knit fabrics and felt.
Below, on the right side are 2 samples of OLD Doesuede, which sadly, is no longer available. There are other suede's available though, but some are too stiff for use with small dolls.
|
|
|||
|
Pale peach velour, smooth side out. |
Pale peach velour, fuzzy side out. |
Tan Doesuede, smooth side out. |
Tan Doesuede, fuzzy side out. |


Several other shades of
velour and doesuede.
Some of these were found here
and there at fabric stores.
|
|
|||||
|
|
|
|
|
|
|
Wool/Rayon Felt and other fabrics with CRS Crafts item numbers. I am not sure if the color numbers are still the same, but the felt is still available, as are the other fabrics with numbers.


Windsor Ponti from CRs Crafts. They have 3
perfect doll colors.

Some samples of some woven
fabrics suitable for dolls.
There are of course many
more wovens that work for dolls, including silk.
Not all fabrics are good for all dolls. As you make dolls you will discover favorites for certain doll types. Example, the 4th fabric above would only be good for a softly stuffed, country style doll because of it's loose weave.
Another fabric that is very nice for sculpted faces, and for some complete dolls is the 100% cotton knit carried by firms that have Waldorf Doll supplies…GOOGLE again…
Acrylic Paints….
As mentioned above I usually paint my doll’s features. I use Acrylic paints and do shading with colored pencils and even crayons. You can get the Acrylic paints from craft supply stores and online. No special brand is needed.
You will also need very tiny pointed paintbrushes. I use red sable in sizes 0 thru 00000 for most faces, sometimes 0000000000.
Craft stores, art supply stores all have paintbrushes.
Sizes and prices for paintbrushes vary widely. I have found some tole painting brushes that would be wonderful size wise, but I would have to take out a loan to buy them!! What you want to look for are reddish colored bristles that come to a fine point. Go for very small. The smaller the paintbrush, the smaller the mistake. You can put the paint on a little at a time, but sadly, you can’t take it off.
If you are going to be coating any heads with Mod Podge? You will want a 1/2" wide flat paintbrush too.
I use and will teach using colored pencils in this class for mild and muted shading. My favorite kind are Berol Prismacolor Pencils. Art supply stores carry them, as do crafts supply stores.
Acrylic Paints are available in Paint Pot sets, if you don’t want to buy a lot of paint. These are little tiny plastic pots that come in a bubble pack and are very inexpensive.
You will need at least red, yellow, blue, black, brown, and white to start with. Of course craft stores, art supply stores and many fabric stores also carry paints.
If you are going to embroider the faces, you will need a selection of embroidery floss, or my favorite for embroidery, Ordinary Sewing Thread! It is fine and you already have it on hand. It also can be coated with Mod Podge, after the embroidery is done, and it looks almost like paint!
Well that is about it for the tools. You probably have a lot of them already. Don’t panic at what looks like a daunting list. If I took out all the words in between it would boil down to.
1. Sewing Machine.
2. Fabrics.
3. Needles.
4. Yarn, and /or other “hair”
5. Stuffing, and chenille stems.
6. Screwdriver and hemostat.
7. Paints and paintbrushes.
8. Joint buttons and strong, nylon jointing cord. (Or Dental Floss, or 1/8th
inch wide ribbon!) A fabulous
"invention" from Victoria De Pietro…
9. Colored pencils
10. ENTHUSIASM and a can do attitude! This just might be the most important
supply you need!
· YOUR HOMEWORK ASSIGNMENT is to start your hunt for “stuff”.
Haunt craft supply and fabric stores. Use Google for finding anything anywhere!
The “hunt” is part of the fun of cloth doll making, but when the “hunt” always comes up empty handed it takes the fun right out of it.
www.thedollnet.com has several suppliers but you may also need to use Google…You will be amazed at what you can find.
Many of you will already have a bunch or “stuff” and can now get ready to use some of it.
A couple of other things to have ready… Freezer paper and other paper or lightweight Pellon for tracing patterns onto.
Plenty of ink or a new cartridge in your printer, so you don’t run out in “mid class”!
The location of a copy machine that reduces and enlarges for sizing the patterns. All computers and printers will download the patterns at a different size. I wish they didn’t, but they do! A size scale will be included with the patterns, so you can size them correctly on a copy machine. You may wish to make the dolls in the size they come in (usually smaller) but if they come in too small, the detailed fingers may prove impossible.
The first doll can easily be made down to pin doll size.
In fact, after this class, and practice, you should have such good control of your sewing, turning and stuffing that you can make most any doll down to pin doll size!!! Except for the separate fingers.
Happy “soon to be” Dollmaking, Judi
Copyright Notice: All pages and graphics are copyrighted by the Internet Visions Company and/or Judi Ward. You may print these out for the use of the class only. All other uses or distributions are forbidden.
Crafty College and Doll
Net are Divisions of
the Internet
Visions Company.
© 1998-2017, Internet
Visions Co. All rights reserved.
All trademarks are owned by Internet Visions Company.
http://JudisDolls.com http://DollNetMarket.com