Go to.. Classroom...
Cloth Dollmaking for Everyone
© 1998, © 2012 Judi Dolls/Judi Ward
Taught by Judi Ward of Judi's Dolls
http://JudisDolls.com
…CHAPTER 3 …
Sewing techniques
to be learned, practiced and used for all of
your dollmaking.
Both machine and hand sewing.
This chapter
will deal with several sewing techniques that you will use for dollmaking. To
get a “handle” on the various techniques will require practice. I am
going to first give you some machine sewing practice sheets.
I know you are now saying, HOW BORING! I want to make dolls! Not practice sewing! But your dolls will thank you.
Dolls are small, the seams are narrow, the lines are curvy, and there is a lot of stop and start sewing required. To make it even harder, you are sometimes putting 2 parts together that aren’t exactly alike. Like a side seam with darts, to a side seam without darts. Like a foot top to a foot sole, or shoe top to shoe sole. I think doll and doll clothes sewing is more difficult if only because it is small.
One of the most often heard laments is that sewing little fingers, or even just a thumb is just too hard. If you practice the exercises in this lesson, you should be able to sew little fingers and noses too, without any trouble.
I remember in my first home-ec class, the teacher had us sew all kinds of shapes on paper. I thought even then, How Dumb!! I had been sewing my own clothes for a couple of years and thought I certainly didn’t need such an exercise! But…. I did it and actually found it quite a challenge to stay right on those lines. I prided myself on getting better control, and even learned how to control the “needle down” position with the foot pedal. My machine now has an automatic “needle down” position but I’m sure many of you have machines that don’t.
I have taught my grand daughters to sew by doing the exercises first, until they had control. I had them sew lines I drew, and then had them sew on coloring book pages. They loved sewing the coloring book pages, and got practice changing the thread too, because they decided to sew the different parts in different colors.
Following will be exercise sheets to practice on. Use an old sewing machine needle, because paper will dull a needle pretty fast. When you are done with this practicing, throw the needle away. You don’t want to accidentally pick it up and try to sew fabric with it later!
I HEAR YOU ALL STILL GROANING!! Especially those who have made a bunch of dolls. If you can honestly say, I never have trouble staying on the line on curves. I never have trouble sewing fingers. I never have trouble sewing a nose. I never have trouble stopping with the needle down. I never have trouble back-tacking directly on the sewn line. I never have trouble stopping my seam right where I want to, then pass this exercise up, but if you ever have trouble with any of this, please do the exercises. Hey, it’s a good excuse to just play for awhile! Tell yourself, this is homework, I must do it! It is actually fun, and I think you will find some of it a challenge!
Before you start, go find a coloring book too, so you can follow the lines on a picture or two.
NOTE…You don’t have to use thread in the machine for these exercises if you don’t want to. The holes in the paper will show up very well.
When you get to the little finger exercises, you need to sew straight up the side of a finger, and then when you get to the curved top, sew 2-3 stitches, stop with the needle down, turn the paper slightly in the direction you need to go, sew a stitch or two more, turn again, till you get around the curve. Sew straight down to the spot between the fingers. Be sure to stop just as you get PAST the thickness of the line, but don’t go into the palm of the hand. This takes accurate stopping!
Now with the needle down, turn the paper and sew a stitch or two across to the next finger. This also takes accurate stopping, or you will sew right across a finger! NOTE…With big hands made in firm knits, you don’t even have to stitch across at the base of the fingers, because there is usually enough space between the fingers anyway.
With woven fabrics, you always have to do the stitching across; otherwise when you clip and trim between the fingers they will tear out. With wovens it is best to put some Fray Check along the tiny seam allowances too. Let it dry before you try to turn them right side out.
Now, back to the paper practice. We will start with straight lines and move on to more and more detail. Sew with 15 to 20 stitches per inch. Sew slowly and carefully, trying to stay right on the lines. Use a clear sewing machine foot if you have one, so you can see the lines all of the time. It is best to use a clear foot for your actual doll sewing too.
You may need to enlarge these exercise papers, because your computer may print them out even smaller than needed for good practice.
If you start on a big hand, and find yourself going off the lines, practice on the big ones until the lines are perfect and the tips done in a smoothe curve. No little jerky points allowed! When you feel good about the sewing on a big hand, move down a size. Continue moving down a size each time you feel comfortable with the size you are working on.
You may need to make several copies of the exercises to really get “practiced” enough to feel really confidant when you start sewing on your dolls.
Following the four paper sewing practice sheets, there is a sheet with three shapes on it to be sewn with fabric. Instructions for these shapes will follow the pattern sheet of the shapes. These shape will be used to practice the LADDER STITCH.
Practice Sheets – These Sheets are in another file labeled “CHAPTER 3 – Practice Sheets” - Click HERE
- Straight lines and gently curved lines (Graphic I -1).
- Very curved lines and right angle turns (Graphic I - 2).
- Hands (Graphic I - 3).
- Noses (Graphic I - 4).
- Pattern sheet for practice shapes to sew, stuff and close ( Graphic I-5).
Draw around the shapes on doubled fabric with a colored pencil…OR…Cut the shapes from Freezer paper, iron the shiny side onto doubled fabric and sew around the freezer paper. Be sure to leave openings where shown, so you can stuff these shapes very firmly. The openings will then be closed with a ladder stitch.
NOTE: the freezer paper methods will be used for the first two dolls, and for the legs and arms of the other dolls. After sewing, just peel the freezer paper off. It can be re-used several times.
Sew, trim seams to 1/8” except at the openings, and turn the shapes right side out. Stuff them very firmly. These little shapes will make good dog or cat toys when you are done. Or put a face, hair etc. on the oval one and make a Christmas decoration. Add some wings to the back and you have an angel head for the tree. Or how about a Barrette holder doll to hang on a little girls bedroom wall.
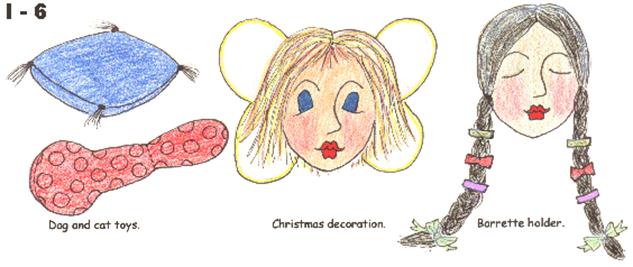
Graphic I-6
For hair for
the heads, simply lay out a number of strands of yarn, sew them down the middle
and sew or hot glue them on the heads down the stitched line. For the Angel,
arrange the “hair” all about the head, glue it down and trim it as desired. Add
purchased wings to the back of the head and a loop to hang it by.
For the Barrette holder make the strands very long. Sew or glue them to the center of the head, pull the strands to the sides and hand stitch them down there. Braid the strands and fasten the ends with a small rubber band. Tie ribbons at the ends too. Sew a hanging loop to the back of the head. Barrettes can be clipped to the long braids.
A ladder stitch is the miracle, invisible closing stitch that is the very best for closing openings in your dolls. When done right, it is so invisible, you can even close little breaks in a seam, if one should occur. NOTE…You most likely won’t have those little breaks, if you use Metrosene thread.
I use a Quadruple thread for closing openings. You can pull very hard without fear of the thread breaking. I tend to be a very strong “thread puller” so the quadruple thread is insurance.
NOTE…Whenever you need to pull firmly on thread for either closing openings or for needle sculpture; pull on the thread itself, right near the stitch. Don’t pull on the needle and let it pull the thread. The thread will often break if you pull on the needle.
A quadruple thread is 2 strands of thread about 36” long, threaded through the needles eye and then pulled 1/2 way, so you have 4 strands of thread to knot. Knot all 4 strands together.
NOTE…For closing
openings and needle sculpture that enters from the back of the head, the knot
can be on the end of the threads. For some applications you will use later, the
knotting will be done part way up the thread, leaving loose tails. We’ll talk
more about that later, but I will picture it below.

Graphic I-7

Graphic I-8
First, put your needle in from the wrong side, right where the machine sewing stops, on one side of the seam or the other. It makes no difference on which side you start.
After the first stitch, which hides the knot under the surface of the doll skin, the ladder stitch ALWAYS ENTERS AND EXITS ON THE RIGHT SIDE OF THE FABRIC, right along the seam line.
Lightly mark the seam line along both sides. It is easier to keep track of where to sew if you do this at first. When the ladder stitch becomes second nature, you won’t need the marks.
Take one stitch, about 1/8” long, right along the seam line on one side. REMEMBER! The needle ENTERS AND EXITS on the RIGHT SIDE of the fabric. Take another stitch on the opposite side of the opening, right along the seam line. REMEMBER!!! The RIGHT SIDE! Repeat on the other side.
You will take 3 or 4 stitches and pull them so the thread makes a little “ladder” going across from side to side. After 3 or 4 stitches, poke your finger where you stitched, pull the thread tight, and watch the seam close and the stitches disappear! The raw edges will just magically go inside!
Continue to the end of the seam, adding stuffing as needed to finish filling the opening so it will be smoothe. DESIGNERS HINT…Add cotton balls as you finish closing the openings. They stay put better than soft fluffy polyester stuffing.
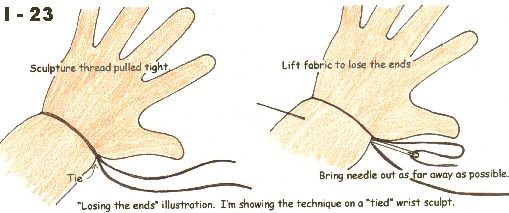
When you get to the end, stitch in place with very tiny stitches a couple of times and then “LOSE THE ENDS” of your thread.
You LOSE THE ENDS by bringing your needle out as far away from the last stitch as possible. Cut the thread at the fabric surface, and then lift the fabric with the tip of your needle, so the thread gets LOST under the fabric skin. A “LOSE THE ENDS” illustration follows the ladder stitch illustration.
You can close straight openings, curved
openings and pointed openings with this stitch. Once you get the “hang” of it
you will find it very fast and easy to do.
No more ugly whip stitching marring your dolls bodies!
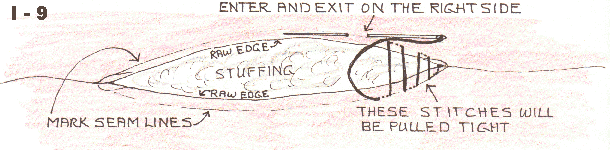
Graphic I-9
The ladder
stitch drawn BIG So it is easy to analyze. The dash lines are just ONE stitch under the fabric. The dark lines are the threads going across to the other side. Note
the needle ENTERING and EXITING on the RIGHTSIDE right along the seam line.
This stitch is also used to attach two stuffed parts together easily and invisibly. For instance, you can sew a stuffed nose in place, or a stuffed arm to a stuffed body. For these things, you would place the items together and hold them in place by sticking long straight pins straight into the parts. Enter your needle so the knot will be hidden under the pieces being sewn together.
Take a stitch in the body, then a stitch in the edge of the arm; another in the body and another in the arm. These stitches are taken all around the edges, where the parts touch each other when you press down on them. Pull the thread tight; REMEMBER Pull the thread, not the needle. Repeat, all the way around. Stitch in place and lose the ends. Illustration of stitching two parts together follows. Again, the dash lines are one stitch under the fabric.
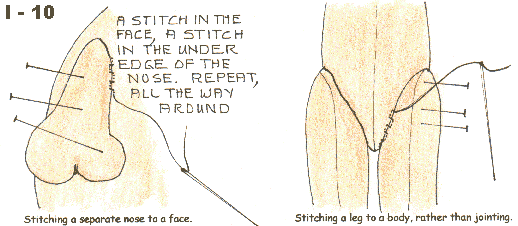
Graphic I-10
These “ladder stitching”, parts onto parts, skills won’t be used on every doll you make, maybe on none of them, but are good to know just in case you get a pattern that calls for it. Most dollmakers, when faced with the dilemma of hand stitching a fully stuffed, “part to a part”, try to put the needle into both parts at once. This results in bent and even broken needles, and the thread shows too, so you have an unsightly joining.
The 3rd. and 4th. Dolls in this class can have their limbs attached to their bodies in the above way. If you decide to wire the limbs too, you will have a doll that is in a set position, but can be posed at the elbows, knees, wrists and ankles. Many “art” dolls are made in these set positions, and mounted on stands. By attaching the limbs at the hips and shoulders in a fixed position, the dolls will maintain the position you choose as best to portray the “feeling” you wish to portray. NOTE>>> A hint for positioning….Use a small blob of HOT GLUE on the inner limb, then press it in place and hold for a few seconds. This will hold better than pins to start with. You can even twist the limb a bit as you press to achieve the exact position you desire. Then sew it on….
NOTE 2>>>Metrosene thread is not the ONLY thread that is good. I am editing this in 2011 and Gutterman, and even Coats are now much better than in 90s.
Let’s talk about some basic needle sculpture stitches. I don’t do heavy needle sculpture. I prefer it to be subdued, easy to do and easy to control. I like to add shape and form, but not wrinkles when designing dolls for my patterns.
Once in a while I will do nylon stocking needle sculpture, for Father Christmas one of a kinds. Never 2 alike and never the same way twice. The same techniques are used, but with more stitches, and more wrinkles created.
Lisa Lichtenfels needle sculpting methods are state of the art, very difficult, time consuming and really not practical for most dollmakers. That level of needle sculpture is a completely different level and type of cloth dollmaking. There are no patterns that are needle sculpted in that way. All of “Lisa’s'’ incredible dolls are several layers of nylon stocking material, built over a skeleton, batting muscles and even ligaments! Lisa has books teaching the methods. You can get the books from various doll magazines, bookstores, or from Lisa herself. Lisa Lichtenfels POB 90537 Springfield, Ma. 01139-0537 The basic head is about $30.00. The Basic Body is about $35.00
What I will teach you here is what I call “single stitch” sculpting. Except for noses, each stitch is started and ended at the back of the head. For noses, you start at the back of the head, but need to take a number of stitches, which will be diagrammed, before exiting at the back of the head.
When planning a sculpture stitch, you need to think about what you want it to do. Do you want it to pull the center of the mouth up? Down? Do you want it to pull and eyelid bulge in place for closed eyes, or a cheekbone bulge in place? Do you want just the corners of the eyes pulled in, to round the eyeball more?
Do you want to pull in jowls or dimples? A chin cleft or a double chin? Each sculpting stitch needs to enter and exit at a different place on the back of the head to achieve the various results.
I sculpt with at least a double thread. Not quilting thread, just ordinary Metrosene. Sometimes, especially for pulling in the mouth line, I use a quadruple thread. Remember; always pull on the thread not on the needle. Also, “help” the stitch pull the area in, by pressing on the area with your finger to indent it. If you try to let the thread do all the work, it will often break!
Tie your thread off using a “nurses knot”.
This is an automatic “Square knot”. You don’t have to think, right over
left-left over right. Simply start the first tie as usual, but take the
loose end of the thread around once more. Pull, “help” and tighten that first
tie. Then just tie the second tie as you normally would. The first tie, done
the “nurses knot” way, won’t loosen up easily either, while you are tying the
second tie.

Graphic I-11
Always use a needle/needles that are long enough to reach from the sculpted part to the back of the head, without “squishing” the head to do so.
Why did I say needles? Because if you have ever done any needle sculpting, you will remember how hard it is to get the needle to come out where you want it to on the face! I solve that by using 2 needles! I start each stitch exactly where I want it on the face and then exit where I desire on the back of the head. The exit spots on the back of the head aren’t so exactingly crucial.
I will diagram some face stitches one at a time below. Note where they enter and exit to achieve the desired result. I am drawing the first one showing the use of 2 needles. The others I will just label “enter” and “exit”. You will know to use 2 needles, and to always enter in the face. This method really solves the poking around, trying to get the needle to come out where you want it! Honest!
Sheets below are in another file labeled “CHAPTER 3 – Practice Sheets”
- Face Stitches - Graphic I - 12
- Face Stitches - Graphic I - 13
- Face Stitches - Graphic I - 14
As you can see, if you tie at the top of the head, the feature will pull up. If you tie down low on the head, the feature will pull down. If you tie on the back of the head the feature will pull straight in. For the forehead line/lines you can pull to the top of the head and the fabric will puff over the top of the line of thread. If you pull to the back of the head, the fabric will puff equally on the top and bottom of the line of thread. If you pull to the lower back of the head, the fabric will puff below the line of thread.
Simply changing where you exit and tie, can change the “look” of the face a lot. If you tie eye corners up high, the eyeballs will kind of face downward. If you tie the corners down low, the eyeballs will kind of face upward.
I always use thread the same color as my fabric. For long sculpts, like the jowl stitch, the thread hardly shows, and just becomes the crease made by the jowl.
If you plan to needle sculpt some features on your dolls; lightly mark the features or even just the corners of the mouth and eyes. Sculpt first, and then paint. The only exception to this is for eyes that are going to have only the corners pulled in. I find it is much easier to paint the eye whites first. Let dry and then sculpt the corners in. It is very difficult to get the paint into the corners of the eyes after they are pulled in.
Something else you will need to do for many sculpts, is pull stuffing into place with the tip of a needle after you pull the sculpting stitch in.
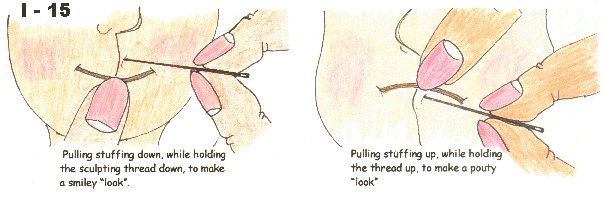
For the mouth, it is almost always
necessary to pull some stuffing into place above the thread, to give the mouth
more of a smile. If you are making a pouty mouth, pull the stuffing in place
below the thread, to look like a pouty lower lip. Eyelids will need some
stuffing pulled in place above the thread and cheekbones will need it below the
thread line.
Graphic I-15
When you are stuffing, think in terms of where you will want extra stuffing to fill in, either above or below the sculpting stitches, and add it as part of the stuffing process. We will talk more about this “added stuffing” in chapter 4.
It is much easier to pull the stuffing into place, when you don’t have to dig around for some extra. It is especially important to put a little extra stuffing at the sides of the nose, when doing a sculpted, profile, nose. You will need it to form the nostril flares.
I often use the “Clay In the Nose” method for lady dolls. It is daintier and makes a prettier face, but I still put the extra stuffing at the sides, so I can pull some into place to hint at nostril flares. I then use either colored pencil or paint to draw in the little curve of the nostril flares. Use a color slightly darker than your doll fabric for these little curves. The “Clay In The Nose” directions will follow at the end of this chapter.
Many of my dolls don’t have the sides of the nostril flares sculpted. I find that a prettier, daintier face is achieved by just lightly drawing the nostril flares in (with paint or colored pencil) If I am going for a more “character” face, I usually make a bigger nose and sculpt the whole thing, including the nostril flares.
In your dollmaking you will find places where you want the heavier nose sculpting and places where lighter is better. Even if you are using a pattern that calls for a heavily sculpted nose, you may decide to do clay in the nose and lightly drawn nostril flares, or vice-versa.
There are various “levels” of nose sculpting too. Perhaps just the nostrils and flares will be sculpted. Perhaps the bridge of the nose will be sculpted just at eye level, along with the nostrils and flares. Perhaps the bridge will be sculpted all the way down to the nostril flares, and then the nostrils and flares will be sculpted too.
Whenever you are sculpting noses, your needle digs down into the stuffing, so that the thread that will follow, will be holding stuffing up, into the sculpted area. If you don’t “dig down” into the stuffing it will be impossible to keep stuffing in place to form the desired sculpt. Think of the thread that will be under the fabric and stuffing as a “net” that holds the stuffing up in place.
Nose sculpting is probably the hardest part of face sculpting. It is so easy to make a crooked, lopsided nose, and so hard to make a nice even nose! NOTE..Perhaps a crooked, lopsided nose is just what you want though, so you are in luck! That’s easier! The techniques will be the same for either kind, you just have to be more careful when you desire a nice, even, pretty nose!
One thing that helps greatly when you get ready to sculpt a nose, is to decide first what part you are going to sculpt, and then VERY LIGHTLY draw a line or make dots along the sides of the bridge of the nose to guide you as you stitch. Also VERY LIGHTLY mark the nostril spots and the nostril flares.
|
|
|
If you are going to sculpt the nostril flares, draw them on larger than you want the finished flares to be. The sculpting draws them in and makes them smaller. Always use a colored pencil just a shade lighter or darker than the doll’s “skin”. Draw the lines and/or dots as lightly as possible. You want them to disappear after stitching. If you draw them dark they will always show. NOTE….I DON’T recommend using any of the disappearing pens for doll faces. I have had bad experiences with them in testing. Sometimes they disappear, only to re-surface on your doll’s face at a later date. I had blue one re-surface days later on the doll’s cheek, as an ugly blue blob.
Colored pencils are the best choice for marking on your dolls, no matter where or what you are marking.
I will give you a head pattern here to practice sculpting on. You may want to wait until the stuffing chapter to actually do the work, but go ahead and sew it up, stuff it and practice if you feel like you can.
This head pattern has a character face and a big nose to make the sculpting practice easier. You can add the eye sculpts and mouth sculpts too if you wish, following the previous diagrams. This is just for practice, so “play” with it.
Directions for sewing the head. Sew center front seam. Sew center back seam, leaving open between dots for stuffing. Sew front to back all around sides. Stuff the top of the head, then the nose. Stuff more in the head and then add extra balls of stuffing at each side of the nose. HINT… White pom poms make excellent stuffing for the nose sides. Finish stuffing the rest of the head very firmly. You can make this head any size. For practice, bigger seems to be easier though.
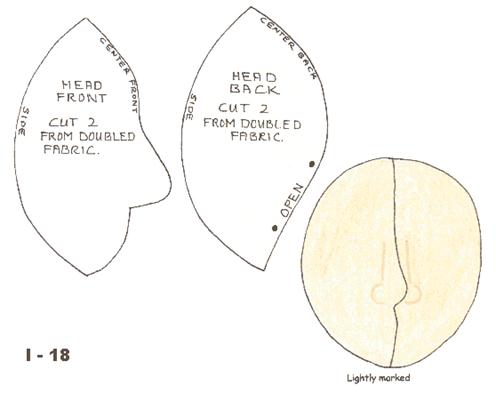
Very lightly mark down each side of the nose and mark the nose flares. Remember, mark lightly using a colored pencil.
With the drawing guidelines done, it’s time to sculpt the nose. Put your needle in at the back of the head, and then bring it out at the top of the line on one side of the nose #1. Go back in just a little bit away from where you exited, and dig down into the stuffing, and then exit out at the other side at the top of the line on that side, #2. Re-enter just a little ways from #2, dig under the stuffing, and exit just below the last stitch on the other side. Pull the thread fairly tightly with each stitch, to pull the nose bridge in. You will want the bridge wider at the bottom than at the top, so don’t pull the thread as tight as you work your way down. Repeat this, always digging under the stuffing, all the way down to the beginning of the nostril flare line.
These stitches
will simply go back and forth, under the nose bridge. Nothing fancy or
complicated.
For some noses, You may not want the bridge of the nose to be started up in the
eye area. You may want it to start very near to the nostril flares. It depends
on the “look” you desire to achieve. If you wish, you can retrace the stitches
you already made, but place the new stitches in between the previous ones. I,
personally, don’t find this necessary, the first lines of stitches hold the
sides in just fine, and adding more stitches and holes weakens the fabric.
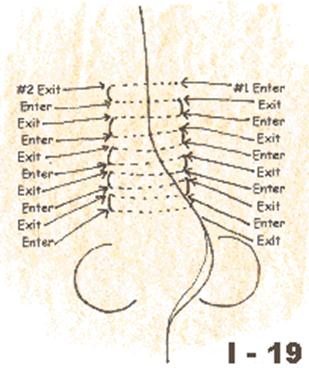
First, enter at the back of the head
The dash lines are one continuous stitch under the fabric. Remember to dig
down under the stuffing and let the stitches become a “net” to hold the
stuffing up in place.
Next, the nostril flares need to be sculpted. I do it a “fewer stitches” way. The drawings for this will follow.
First, enter where you ended your last “nose bridge” stitch (#A in the drawing) and exit out in the nostril area. #B.
Enter back in at #A, leaving a loop of thread that will follow the nostril flare shape. Exit back at #B. Don’t pull the loop tight yet.
Now re-enter at #B, and exit at the side of the nostril flare, with the loop on the outside of exit thread. Dig some more stuffing up into the nostril area, and pull on your thread, so the loop starts to pull the nostril side in.
Re-enter right next to where your thread exited, catching the loop in the stitch. Dig under the stuffing, and exit on the other side of the nose, at the top of the other nose flare.
Carefully pull the thread tighter, pulling on the “loop” thread if needed also. The sides of the nostril flare will pull in, and the little stitch you took will hold the loop out to the side of the nostril flare. At this point the nostril flare will come to kind of a point where the stitch holds it out to the side. Dig up more stuffing to fill out and round the nostril flare.
Now stitch a couple of times from the top of the other nostril flare, #C, to the nostril, #B, on the side you just sculpted. This secures all of the previous stitching.
Repeat the above for the other nostril flare. And then exit out at the back of the head and stitch in place.
I will illustrate the above procedure fairly large so it is more easily understood. Bear in mind, this is not the only way to sculpt a profile nose. It is just the way I do it, and it turns out very well for me. I can sculpt a nose this way in less than 5 minutes. The drawn lines keep you directed, so you don’t get one big nostril flare and one little one. By digging into the face, and pulling stuffing into the nostril flare area with your needle, you have control over how fat you want the nostril flare to be.
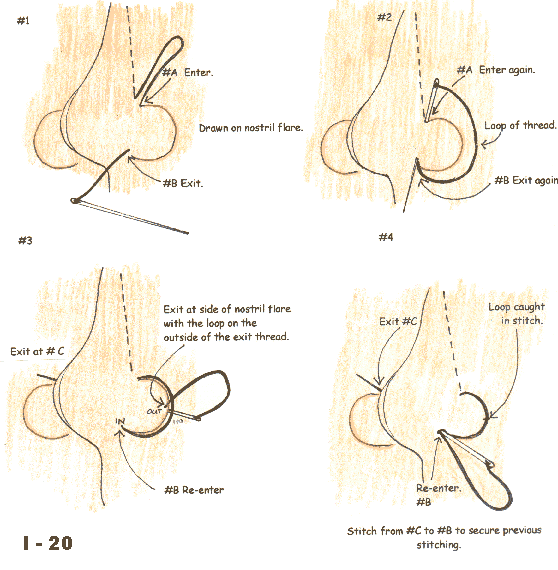
Once in a while, I will make a couple of extra stitches over the loop, spaced at about 2 o’clock and 5 o’clock, for the left side, and about 8 o’clock and 11 o’clock, for the right side, to hold the loop out better. This is sometimes needed for big noses.
After the nose is sculpted, you can use black 1/2 ball buttons for eyes. Simply pull them in like a sculpture stitch, as illustrated. Pull the mouth in as shown in the illustration with the 2 needles. This face can have eyebrows and shading added. You can draw on a mouth and paint it or just color the bottom lip area in a little curve with a colored pencil.
I’ve kept the face simple, but if you do faces with joy and skill, make it as detailed as you desire. This head is not part of the pattern set that you will be making. It is just a head to practice nose sculpting on.
If you have taken, or plan to take the
design classes at Crafty College, you can design a body for this head.
A simple finished head
idea.
No ears or hair added yet.
Something to notice when you are making cloth dolls, and especially those with sculpted features. They change from elf to lady, from guy to gal. Etc. before your eyes. As you sculpt, don’t judge until you are done.
The face on Jennifer, the #4 doll in this class will look so elfin when she just has her mouth pulled in, that you will wonder how on earth she can become a pretty girl doll. As soon as you draw and paint her mouth on, she changes before your eyes!
If you leave her with just her mouth pulled in and perhaps a bit of colored pencil on her bottom lip, you can easily turn her into a cute fairy.
Below is the same face shown 3 ways.
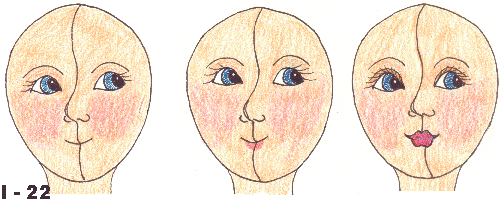
Just the
mouth pulled
in.
The bottom lip
shaded.
The lips painted.
Let’s stitch and/or sculpt a few more
things, and learn to “lose the ends” of the sculpting threads.
Whenever you end your stitching anyplace where it will show, you need to “lose
the ends” of the thread. Don’t cut the thread at the place where you tied or
stitched in place. Thread the thread ends onto your needle, and put the needle
in right where you tied or stitched in place. Bring the needle out as far away
as you can from the entry point. Clip the thread at the surface of the fabric.
Lift the fabric with the point of your needle right where the thread was
clipped, to let the ends of the thread slip under the surface of the fabric.
Remember the quadruple thread, tied a little ways up the length of the thread that was shown near the beginning of this chapter?
You use this method for sculpting parts that both start and end where a tied and clipped end would show.
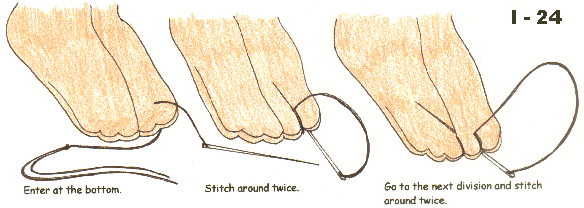
Let’s sculpt some toes, using this method. Tie the knot at
least 4” from the end of the thread.
Enter at the bottom of the foot, between the first and second toe. The thread
end will be hanging loose. Sew around twice, letting the thread pull the
“between the toes” area in tightly. Go from between the first and second toe to
between the next two toes. Sew around twice again, and go to the next and the
next. (NOTE…4 divisions between the toes, make 5 toes. In almost every
class I teach I catch someone as they are making 5 divisions. Don’t do it, it
makes 6 toes!)
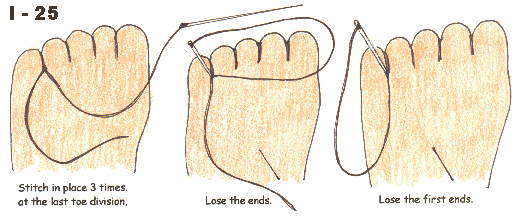
At the bottom of the foot, between the last two toes, take 3 tiny stitches to
secure your stitching. Now, lose the ends of the thread that is still on the
needle.
Put the thread that is hanging between the first and second toe, onto your needle, and lose those ends too.
I like to put the tiniest bit of white glue or Crazy Glue? on the knots and the places where I stitched in place to assure they won’t ever come loose on their own.
You can use the above “toe sculpting” method, to make fists on baby dolls with mitt hands too. Just roll the mitt to the inside slightly and proceed to sculpt, just as for the toes.
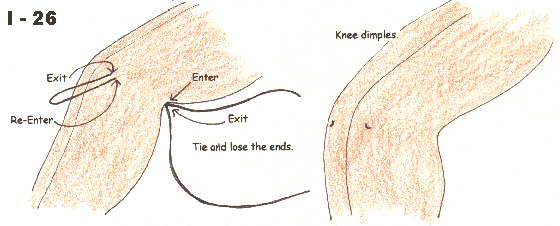
You can use the tied sculpt, like at the wrist; for ankles, behind the knees, in front of the elbows, to make the “crack” between the bottom cheeks on smaller dolls, and at various other places.
Knee dimples can be made the same way as cheek dimples on the face. Tie at the center back of the knee, and then lose the ends. Elbow dimples work the same way.
Different patterns will tell you to sculpt here or there, but often don’t give you clue as to how. Now you can deduce and try the method that will work best.
You won’t of course use every sculpture stitch on one doll, and perhaps the only one you will choose to use for some dolls is the mouth stitch.
Flat-faced dolls don’t usually respond well to much sculpture, and usually end up looking pinched rather than sculpted. Pulling in eye buttons or the corners of the mouth and eyes is about all that you can do to a flat face without getting the puckered and pinched look.
Something I have noticed when viewing needle-sculpted dolls at shows is that a lot of them are “worried to death” The faces actually look worn from all the stitching, pulling, poking and tugging. Sculpt with a light touch, one stitch at a time for the best and the cleanest results.
Also: be sure to use excellent quality thread and help the stitches pull in by pressing and/or pinching with your fingers.
Remember; when making a doll that you plan to do some needle sculpture on, plan for it. Add those extra pieces of stuffing to form nostrils and cheekbones, upper and lower lips, eyelids and even brow ridges! You can add so much to a doll with your stuffing techniques, which we will address in chapter 5.
Following is the clay in the nose instruction sheet. This is included in some of my patterns and in the Advanced Design Class.
I decided to include it here rather than waiting until the stuffing chapter, so you can “play” with it if you want, before starting to work on stuffing techniques. Use it with any pointy nosed patterns you have in your pattern collection. The clay technique is wonderful for those pointy nosed dolls, for big witch noses, even for feet and high heel shoes. You can also use air-drying clay like paper clay too. When you get to Jennifer, doll #4 in this class, you may choose to use the clay method for her nose. I have done her nose both sculpted and with clay. Both work fine, but the clay is easier and eliminates the chance of getting a big looking nose in a dainty face.
Practice the machine sewing control, make up some of the shapes for practicing the ladder stitch, and make up the head for the needle sculpture practice. All of the practice will prepare you for the actual doll making, and make the dollmaking much easier and more satisfying!
More sewing techniques and places to hide knots and “stitch in place” areas will be shown as the actual dolls are made.
See you in a week for stuffing techniques to shape, form and mold all of your dolls beautifully!
Dolly Hugs, Judi
BAKED CLAY DIRECTIONS FOR FILLING POINTED NOSES SO THEY NEVER FLOP
AND WRINKLE!!!!
© Judi Ward, Judi’s Dolls 1997
Stop the presses! Stop the presses! A pointy nose break through follows!!!
Previous
to 1997 I hadn’t put out a pattern for a profile face, pointy or protruding
nose cloth doll because it was always so hard to make the stuffing stay in the
nose. Those pointy noses on every doll I saw at shows, classes etc. Were always
bent and wrinkled. I have several patterns that I've designed over the
years that I use only for gifts and myself, because the protruding noses need
so much work and needle sculpture to make them stay nice. No amount of gluing,
poking, pushing etc. would guarantee a nice wrinkle free, well shaped, pointy
nose, until now!!! I sculpt with the polymer clays to make one of a kind art
dolls, so I thought I'd try it as stuffing in the nose of a pointy nose cloth
doll. Great
results!!!!
If you make pointy nose dolls, run, don't walk to your nearest craft or fabric store and buy a package of plain old Sculpey®. The white stuff, not the flesh toned Super Sculpey®. The sculpey comes in quite a large box and costs about ten dollars. If you make quite a few dolls this would be your best buy.
If you only make a very few pointy nose dolls, buy a small package of white Fimo® ...or...white Sculpey 111®...or...white Promat®. All of the above are polymer clays that you bake in your home oven at a very low temperature.
The reason you want white clay is because the nose filling needs to be the same color as your stuffing, or you will see where the clay ends and the stuffing begins...Note... If you are making ethnic dolls, using the new ethnic color stuffings, then match the clay you buy to your stuffing color.
Make your dolls head as usual, up to the stuffing point. You can make it from muslin, broadcloth; any all cotton or cotton poly fabric, felt, and even velour and Doesuede. I tested all of the mentioned fabrics with perfect results every time. Velour and Doesuede are my favorite doll making fabrics, so I was surely hoping that it could take the baking, since it has a high polyester content. It took it fine.
Go turn your oven on to 225 degrees, not higher!!!. Turning the oven higher won't hurry anything up. It will only burn your fabric and ruin your doll’s head.
Now, knead a small (nose sized) piece of the clay, and push it into that pointy nose. Push it hard to fill and shape the nose the way you want it to look. Really get it into that aggravating point and shape the clay in there so the nose matches on both sides.
The design class clay directions have a sentence about putting needles in where the nostrils go, and then suggest light sculpting through the needle holes in the clay. You don’t need that here, because it was for bigger nosed dolls, and proved to be too difficult for most dollers. But it does work for big noses.
Don't stuff the head yet. Put a folded up towel in the oven, and then lay your doll head on it. Close the oven door and set a timer for 10-15 minutes. (Smaller noses 10 min) at the end of 10-15 minutes turn the oven off, open the door and let the head and oven cool. The reason it's best to let the head cool before you take it out of the oven, is because the temptation to push on the newly baked nose is almost too much when you first take it out of the oven. The clay is tender while it is still hot and can be broken easily. So just be patient and let it cool in the oven. It's real sturdy after it's cool. By the time you have the remainder of your doll sewn and even stuffed, the head should be nice and cool.
Stuff and finish the dolls head as you normally would, but you don't have to mess with trying to keep the stuffing in the nose and you don't have to worry about it ever backing into the head and leaving a wrinkled, baggy nose on an otherwise delightful doll.
Sometimes when you stuff the head after doing the clay in the nose, a little “ring” will form around the base of the nose. It only happens sometimes, and I haven’t figured out why. If this happens to your doll, unstuff the head, pinch off some of the clay with needle nosed pliers, put some glue stick glue on the broken part and re-stuff the head. That has always worked to “fix” the problem when it occurs. You can also put glue stick glue on the back of the nose even if you didn’t need to break it off some.
Try the clay in the nose technique especially for dolls with very pointed noses, or noses that you want to look dainty.
Yea!!! For Clay
Judi
Go to.. Classroom...
Copyright Notice: All pages and graphics are copyrighted by the Internet Visions Company and/or Judi Ward. You may print these out for the use of the class only. All other uses or distributions are forbidden.
Crafty College and Doll
Net are Divisions of
the Internet
Visions Company.
© 1998-2017, Internet
Visions Co. All rights reserved.
All trademarks are owned by Internet Visions Company.
http://JudisDolls.com http://DollNetMarket.com