Go to.. Classroom...
Cloth Dollmaking for Everyone
© 1998, © 2012 Judi Dolls/Judi Ward
Taught by Judi Ward of Judi's Dolls
http://JudisDolls.com
…CHAPTER 4 …
Stuffing techniques
for smooth, lump free dolls. To be used for all of the dolls.
Includes finger articulation and wiring with chenille stems
instead of hard to find and easily broken wire.
Stuffing is an art. BUT…It is an art that can be practiced and learned. It is not just filling up a space with a bunch of soft fluffy stuff. Different spaces need to be filled in different ways, to different levels of hardness and even with different kinds of filling!
The main product you will be filling with is Polyester stuffing. The best you can get. Don’t scrimp in this department. Again, your dolls will thank you!
Something else, will of course be Chenille Stems. They come in many sizes, and for fingers you want to use the largest size that will fit into a finger, when the chenille stem is folded in half. Believe it or not you will probably be using the big ones, 9mm and 15mm a lot! The dolls in this class, when made full-sized, easily use the 12mm size stems in their fingers. CRs Crafts carries these. They are a little hard to find in most craft and fabric stores. You can also use the 9mm size, but their fingers won’t be as firm.
Your local craft or fabric store can get
them though if they carry West Trim or Darice products.
The smaller sizes, 9mm down are usually available at crafts and fabric stores,
but again, if not, they are available from CRs Crafts.
Always match the chenille stem color to your stuffing color. This is especially true when making dolls from light colored fabrics. (If you are making a doll from dark fabric that DOESN’T “show through” you can use about any color chenille stems in the fingers. I actually have a dark brown Doesuede doll here, with some green chenille stems in his fingers!)
In a light colored doll, if you use white stuffing, use white chenille stems. Beige stuffing, use beige chenille stems. Etc.
Several dollers who make primitive/country type dolls here, are using the beige stuffing in muslin dolls. It gives the muslin a sandy tone and looks sort of aged, without tea dying. You could do the same thing with a detailed muslin doll, to give your doll a different skin tone, without using a different color fabric.
I haven’t seen any light dolls, stuffed with the dark brown polyester fill, but it would give you yet another “look”. Note….When you stuff light dolls with darker stuffing the seam allowances show though.
Something else you will need to use for stuffing some areas, especially in detailed dolls, are cotton balls! Just buy the plain old cosmetic puffs from the grocery store or drug store. These make a harder stuffed area and are VERY useful in necks. They also make good kneecaps and elbows. VERY IMPORTANT NOTE!!! You can’t needle sculpt through cotton ball stuffed areas. You also can barely get a jointing needle through a cotton ball stuffed area, so you don’t want to put them in the shoulders or hip areas of dolls you wish to joint.
Let’s talk about different levels of stuffing for different areas of a doll.
Detailed heads need to be stuffed very firmly, and shaped as you stuff. A detailed head is one with a shaped head back, or a profile face, or a sewn, curved cheek area. You can stuff a head all out of shape more easily than you can stuff it into shape.
Some dolls will be stuffed from the top of the head, some from the neck area, some from the back of the head, and some from both areas. Your stuffing “attack” must be planned and altered for the different kinds of heads.
Some kinds of heads will need stuffing added to cheek areas from the top and near the surface of the “skin”. Some kinds of heads will require that you add stuffing from the back and let it push the stuffing in front of it, forward into the cheek area. Some kinds will stuff easily and fast, others will require extra work and shaping to get the “look” you want.
I have given you 4 kinds in this class, so you can experience the different types. There are other types of heads too, but with these 4 styles you will get a feel for how and where the stuffing goes in.
Angelique’s head stuffs from the neck up
(Or from the top down, if you choose that place to leave
open. This will be explained in her pattern directions).
Maria’s head stuffs from an opening left in the seam at the top of the head.
Susannah’s head stuffs from the top (which will then be gathered) and then additional shaping, especially in the cheek and chin area, is done from the opening in the back of the head.
Jennifer’s head is stuffed from only the
opening in the back of the head. The extra shaping for the cheeks and chin are
done the same as for Susannah.
|
|
|
|
|
|
|
Susannah’s head stuffs from both the top and the back. |
Jennifer’s head stuffs from only the back. |
Please do not make your dolls yet.
Detailed instructions will be given for each doll in it’s own separate chapter.
The stuffing
techniques in this chapter will be used for stuffing your dolls for this class,
and for just about any other dolls you make. I will give techniques for many areas
and styles to help with all of your stuffing needs. You will want to
refer back to the following methods as you progress through making the class
dolls.
Use your screwdriver for stuffing. It does a much better job and is easier to hold onto and push with.
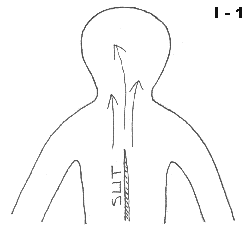
Angelique, as a whole doll, is the easiest to stuff, but getting the neck firm takes a little technique. Being a flat doll, her head doesn’t require much shaping. Do be sure to stuff the “crinkles” out though.
Put the stuffing into her head in large pieces. Pressing each piece down firmly towards the top of her head with your screwdriver. Stuff her head fully and smoothly all the way INTO the neck.
Put a large piece of stuffing up into the upper body area, and use your screwdriver to push part of that stuffing into the neck. By having some stuffing going from the body into the neck too, it helps prevent neck wobble for this type of doll. Some dollmakers like to put something in the neck area to help prevent wobble.
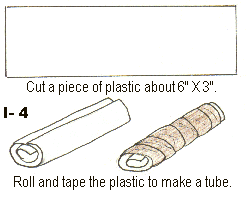
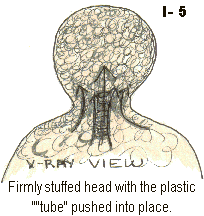
I don’t like the idea of putting a stick in
the doll's neck, especially if the doll might be played with. Something
that does work very well in this type of neck, is a rolled up piece of plastic
bottle. Cut a strip of plastic about 6” long by 3” wide from a milk or bleach
bottle. Roll it tightly and wrap it with tape. This can be inserted in the neck
area, after the head is stuffed hard. Push it firmly against the head stuffing
and then stuff around it.
|
|
|
Note…The arms and legs need to be stuffed before you finish stuffing the body. Those directions will be talked about later and also in the actual pattern directions for Angelique.
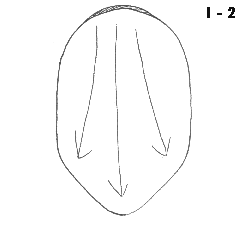
Stuff Maria’s head from the top down, with large pieces of stuffing. Be sure the stuffing is smoothe in the chin and cheek areas before going on to the eye area and then to the top of the head. Maria’s head should stuff with about 4 large pieces of stuffing pushed all the way down firmly. Be sure there are no “crinkles” in the jaw area.
You will have a harder time getting the “crinkles” out if your doll is made from muslin or other woven fabric. If you are making your doll from a firm knit, the “crinkles” won’t be a problem.
Most stuffing should be done with as large a piece at a time as you can put in. I actually “feed” the stuffing into large areas. I pull off a piece that is much too large to put into the opening at once, sort of stretch it out, and keep “feeding” it in with my screwdriver. This “feeding” method omits so many breaks in the stuffing. Every break in the stuffing has the potential to be a lump.
For some reason when I teach “hands on” classes, I find many people have the idea that you put stuffing into large areas by pulling off many little pieces, and sticking them in here and there. Where the idea came from I don’t know! But it just doesn’t make for nice smooth dolls. The fewer separate pieces of stuffing you put in, the fewer lumps you will have. Of course there are exceptions to this rule when dealing with very small areas.
Remember though, the size of the pieces must be compatible with the size of the area you are stuffing. You can’t stuff a thin leg with a big blob of stuffing the size of your head! But you can “feed” stuffing into a long thin area, by stretching the stuffing out into a long thin piece and then “feeding” it in with your screwdriver.
NOTE>>>Airtex soft and silky stuffing won't
"feed" well. It is too slippery. You must first get it
slightly "packed" before you can even force it down. I don't like it
for detailed dolls. Makes things too difficult. Airtex Premium works the way I
like stuffing to work….Also Buffalo Bat and
Putnam are great stuffings for dolls.
If all else fails and you are just having fits with stuffing, go for wool stuffing!
Just Google Woll Stuffing and a bunch of places will come up.
It
“streams” and does not break apart as you feed it in…..
Back to heads.
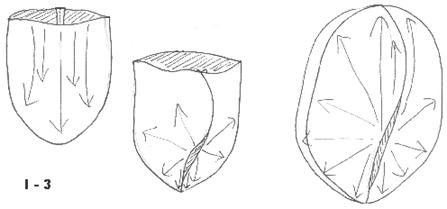
Susannah’s head will first be stuffed with big pieces from the top down. When it is full and firm. Gather the top of the head and pull the gathers tight.
Now, push the stuffing that wants to pop out of the back of the head back in. Stuff more in from the opening in the back of the head to form the cheek and chin areas. You can really get a lot more stuffing in there. The stuffing you add from the back will push the stuffing already there into all of the areas, to eliminate wrinkles and puckers. If the cheeks need more stuffing, push the newly added stuffing in that direction. If the chin needs more, push the new stuffing in that direction etc.
As you are stuffing through the back of the head, turn the face around to check for uniformity on both sides of the face. If you are using a firm knit for your dolls, you can really shape the face and even change the shape by the addition of the stuffing through the back of the head. Each new piece of stuffing pushes against the stuffing that is ahead of it, forming the face more and more. Leave a finger sized hollow in the back of the head for the neck to fit up into. Be sure to stuff down into the chin. The chin area of this type of head will take more stuffing than you think!
Jennifer’s head stuffs completely from the opening in the back of the head. Stuff (feed) a large piece up into the top of the head. Don’t even think about the face until the top of the head is full all the way around. If you are doing the “clay in the nose” method for her, her nose is already baked in. You will force another big piece against the front of the face. Now force another big piece at each side of the face and another down into the chin area. Keep forcing more into the head from the back, letting the new stuffing additions push the ones already there forward.
If you are doing the “clay in the nose”, and the ring appears around the nose, remember from the previous lesson what to do. It always fixes it. After you have done a few “clay in the nose” dolls you will get the “feel” for it and won’t have that problem. The “clay in the nose” does make for much daintier noses, and some noses just won’t stuff and hold with stuffing! The clay is the only way to get them to look nice and stay nice.
NOTE>>> You can also stuff the whole head, after putting the clay in place in the nose, and then bake it with the stuffing in it.
If you are going to sculpt the nose on your Jennifer, here is a Designers Hint for stuffing a nose….Before you stuff the point of the nose, rub some Glue Stick glue all on the inside of the nose. It helps hold the stuffing in there. White glue doesn’t work well for that, because it is too wet. Glue Stick glue is sticky right away.
Stuff the top, back and sides of the head really full. Put the stuffing into the nose, using your stuffing fork. You can actually twirl a piece of stuffing onto your fork, making a little Q-tip or Cotton swab looking piece, on the end of your fork. This tight little piece will stay in the nose better.
IMPORTANT NOTE… Don’t use cotton in the nose! You won’t be able to sculpt through it!
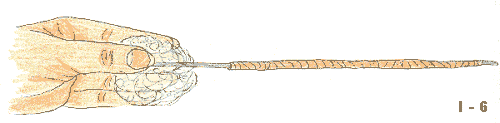
Graphic I-6
This is how to “twirl” a
piece of stuffing onto your stuffing fork.
Hold the pieces fairly
tightly with your fingers and thumb. Twirl your stuffing fork in the
middle of the stuffing,
wrapping the stuffing tightly around the “fork”.
Push small pieces into place at each side of the nose too, so there will be extra stuffing there for sculpting the nostrils. I have used small pom poms in each side for nostrils too, and they work very well. Remember that they need to be the same color as your stuffing.
Now, finish pushing stuffing through the back of the head, forming the cheek and chin areas. Keep adding stuffing until the head is HARD. Each piece you add will push the stuffing that is already there forward to fill the areas smoothly and fully. Remember the chin! It holds more than you think!
Be sure to stuff out into the front of the mouth area. That will give you a “bulge” to pull in when you sculpt the mouth. You do that, by pushing more stuffing straight in from the back, which forces the stuffing already there out into the mouth area.
Leave a finger-sized area in the back, for
the neck to fit up into. This area will form all by itself, as you force more
stuffing into the opening.
…Let’s make wobble free “tab” necks…
Cotton balls and your screwdriver to the rescue.
How many dolls
have you seen or made that had severe neck wobble? It is a real problem with
tab head dolls. The necks are often long and thin, and the stuffing never seems
to stay up in there.
Polyester stuffing is rather bouncy and doesn’t stuff as hard as cotton, that’s why cotton is so great for necks. Pull the cotton balls apart into a pile of fluff. Push, feed and force the necks full. Make them HARD.
Most stuffers also stop stuffing long before the neck is really full.
The “stopping too soon” syndrome is especially true if the doll has a bust. The excitement of stuffing a bust makes the dollmaker rush to stuff it, before there is anywhere near enough stuffing in the neck and shoulders. Don’t even think about the bust, or chest or tummy, or anything below the neck, until the neck is as hard as a rock!
I have watched people in classes frantically trying to stuff a bust, when there is just not enough above it to hold anything in place. I know it is so hard to keep stuffing in that boring old neck when the excitement of stuffing the bust is calling to you! Of course I stop them, and of course they still want to get to those “boobs”, so they usually stop too soon again!
The neck stuffing holds the chest and shoulder stuffing, the chest and shoulder stuffing holds the bust stuffing and on down the body. Remember the old jingle? The foot bone connected to the ankle bone, the ankle bone connected to the leg bone, the leg bone connected to the knee bone etc. etc. That’s how it goes with stuffing. Each area must be full, for the next area to push against.
When you are stuffing a long thin area like a neck, hold around the whole piece, like holding a banana.
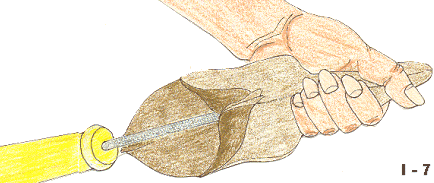
Graphic I-7
This is how to hold the
body while stuffing the neck.
It is also how you should
hold the legs and arms for stuffing.
You will have far fewer
popped seams if you stuff this way whenever possible.
Don’t hold the edge of the opening, and especially don’t hold the seamed part. Pushing stuffing down hard, while holding the seamed edge causes most popped seams. Also, don’t put a piece of stuffing in and then “tap, tap, tap it down. Always hold the area and twist and push down firmly with your screwdriver.
The one time you will hold the edge of the opening is when the whole part that you are stuffing is nearly full and you have to add the final stuffing as you are closing the opening with a ladder stitch.
NOTE…I add cotton balls to the openings in legs and arms as I close them. They stay in there better and it is easier to close the openings smoothly, with a ladder stitch.
When the neck is really full and HARD, change to your polyester stuffing. Stuff the upper chest and shoulders full, packing that stuffing down very firmly. Use large pieces and “feed” them in as much as possible. NOTE…Using your screwdriver, force some of the polyester stuffing you put in the chest, up into the neck too, all around the sides.
BIG HUGE NOTE!!!! Since this class was first written, I devised turning heads for tab neck dolls and the concept is being used by many doll designers and dollmakers. If you are going to use that concept, you can’t use cotton in the necks because you can not get a big needle all the way through a cotton stuffed neck….Soooo, you will have to work harder at getting the neck hard with polyester stuffing.
The best place to hold a doll for stuffing the body is between your knees/legs. You can’t get enough leverage to really stuff firmly if you stuff up on a table or out in mid air. The exception to this, is for small doll bodies, that you can grip all the way around, like for stuffing a neck, leg or arm.
Once the neck, upper chest and shoulders are very firm, you can stuff the bust area. At first FILL THE WHOLE AREA FULL. If the doll doesn’t have “boobs”, just continue filling the body fully, smoothly and firmly to the opening in the bottom.
If the doll has “boobs”, you will need to stuff each “boob” separately. Remember… The stuffing won’t stay in the “boobs” until there is something for it to press against. See FILL THE WHOLE AREA FULL above.
Your trusty screwdriver will push a big piece of stuffing into each “boob” even after you have filled the chest area full of stuffing. Some dolls will require a couple of pieces of added stuffing to fully shape the “boobs”.
There are many different styles of “boobs” in patterns out there, and all will stuff differently. Some require needle sculpturing to form well. The ones in this class don’t need any needle sculpture to form beautifully.
No matter what style the “boobs” are though, you need to stuff the area behind them full, before trying to get any stuffing to stay in the “boobs”
After the “boobs” are fully stuffed, shaped and formed, continue stuffing the rest of the body fully and firmly with large pieces of stuffing. Note…Finish details will be in the pattern directions. Jennifer has a belly button and bottom too.
These same stuffing techniques are needed for legs and arms too. You must fully and firmly fill the front of the foot, before filling the heel. The ankle needs to be firm before trying to get anything to stay in the calf.
It is best to treat the heel and ankle like the head and neck of a pancake doll, or the neck and chest of a tab head doll. Have you ever stuffed a doll’s leg, only to have it “break” at the thin ankle? To solve this, first stuff the front of the foot and heel very firmly. Put a fairly large piece of stuffing down into the ankle and then with your trusty screwdriver, force some of the stuffing that is in the ankle, into the heel area all the way around. That flat screwdriver blade will push the stuffing down in smooth flat lengths. A hemostat or rounded stuffing tool will push it down in rounded blobs. You don’t want rounded blobs. Now, press down on that ankle stuffing very hard, to pack it in. The next level of stuffing, packs down on the previous level, and repeat guiding lengths of that stuffing down into the ankle, firming the ankle even more.
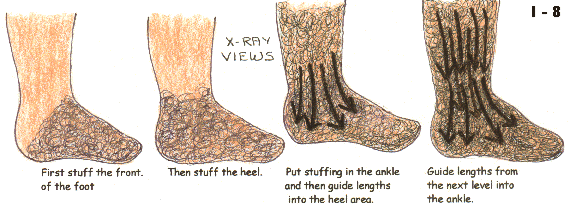
Diagrams for stuffing feet (Graphic I-8).
Every type of foot, that is an extension of the leg needs to be stuffed this way. Flat, rounded, pointed, high heel, it makes no difference whose pattern it is or what kind of doll it is. NOTE…Some patterns have separate feet that are pillow like. You would just stuff them like little pillows.
Remember when I talked about holding the whole unit to be stuffed, in your hand like holding a banana? For legs this is especially important! This holding technique allows you to get the stuffing pushed down firmly, without popping seams.
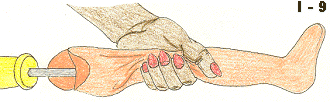
Graphic I-9
Hold the whole unit like a
banana while stuffing.
Kneecaps can be guided down into place with your screwdriver after the whole leg is stuffed. A small cotton ball makes a great kneecap. Be sure the location of the kneecaps matches for both legs!
Arms with mitt hands need to be stuffed just like the legs. First the mitt part, then the thumb, then the palm part of the hand and wrist. Be sure the hand is stuffed well before you start up the arm. It’s very difficult to “fix” a poorly stuffed area, when the next level of stuffing is in the way.
I know I keep harping on this, but I can’t begin to tell you how important it is to fully stuff one area, before moving to the next. If there is nothing for the next level of stuffing to push firmly against, it won’t stay in place. Each succeeding level will have nothing to push against, and the whole thing will be a misshapen, lumpy, wobbly disaster.
Now lets stuff a fingered hand.
It makes no difference whether the hand has the fingers all together and stitched between to designate fingers, or if the fingers are all apart.
The easiest thing to stuff them with are chenille stems. Use the largest size that will fit into the fingers when the chenille stem is bent in half. This technique gives your dolls poseable hands that can hold things too.
Remember the “stuffing fork” you made in chapter 1? If you didn’t make one yet, you will need to do so because you will need it for the level 2 and above dolls.
![]()
Graphic I-10
My stuffing fork. It
is actually 12” long.
You can make one by using a hacksaw or strong pliers type cutters, to cut off the top part of the needle eye on a 10” to 12” long upholstery needle.
Wrap the shaft of the needle with masking tape to make it easier to hold onto. You can blunt the point of the needle too if you wish, by rubbing it on some cement or on a file.
Bend a chenille stem in half and hook it on
your stuffing fork. Be sure to pinch the chenille stem tight against the
needle. Don’t leave it in a loose loop.

Graphic I-11
My stuffing fork with a
chenille stem hooked in the fork, ready to be guided into a finger.
Guide the stems down into each finger one at a time. You will use 5 stems bent in half for each hand.
When a stem is fully to the end of a finger, pinch the finger quite tightly and then pull the stuffing fork out.
If you notice that a stem hasn’t gone all the way to the end, take it out and do it over. It just doesn’t work to try to put the stuffing fork back into the finger and try to “hook” the chenille stem again to push it down properly.
I read some directions recently in a magazine that had you bend the chenille stems back and forth into a hand shape, and then put this wiggly thing down into the fingers. It would be nearly impossible to do! If you have any patterns that say that, just put the chenille stems down into the fingers one at a time. The smaller the fingers and arms, the smaller the chenille stems.
After each finger is stuffed with the chenille stems, use your hemostat to bend the sharp ends in the arm area over a little bit, and then squeeze the long ends of the chenille stems together and wrap thread around them to bundle them together. This makes it easier to stuff the arms. If you just leave the chenille stems loose, they will bend all about as you stuff.
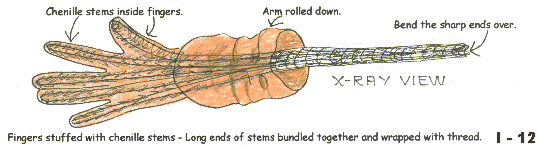
Diagram of fingers stuffed with chenille stems (Graphic I-12).
Stuff the hands and arms, (stuff the hands very lightly) making sure that you stuff just a thin layer over all of the stems in the hand area. NOTE…I have even stuffed only the palms of the hands very lightly and left the backs of the hands unstuffed. The chenille stems actually look like tendons on the backs of the hands! This makes very dainty lady hands.
You don't need to stuff the fingers; the
chenille stems do that very well. As you stuff the hands, shape
them, and tip the two center fingers gracefully inward. Bend the thumb slightly
toward the palm, and the pointer and little finger slightly up. It's fun to
play with the fingers to achieve natural looking hands. If you made the
all-together fingers, curve them slightly inward.
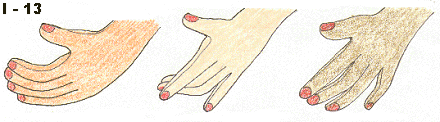
Curved, all-together
fingers. Two center fingers together. All
separate fingers.
Don't leave any of the chenille stem bundle that is in the arms, touching the inside of the arm fabric. Carefully guide stuffing down all around the bundle with your flat screwdriver. The arms don’t have to be very hard either, if they have the chenille in them. For many dolls, the chenille stems will reach past the elbow and you can then bend the arm at the elbow.
If you make very large dolls, like life-sized babies, you can use more than one chenille stem in each finger and even stuff around the stems. Your stuffing fork will help guide the stuffing down into the fingers too.
You can also stuff fingers completely with stuffing instead of chenille stems. Twirl your stuffing fork in a piece of stuffing to make the Q-tip or cotton swab looking thing on the end of your stuffing fork. The amount of stuffing you use will vary with the size of the fingers. This is a technique that takes a few tries, both to figure out how much stuffing to twirl on, and how to twirl it on. Practice until you can make a tight, firm Q-Tip on your stuffing fork.

Stuffing fork with a
“Q-tip” of stuffing on it, ready to stuff a finger
If you have stuffed the fingers and hands with stuffing, then stuff the arms as you would the legs. Stuff very firmly all the way up to the top.
The chenille stems make great wires for legs too. First stuff the feet fully and firmly. Bend the sharp tips of the stems over, just like for the arms. Bundle the chenille stems together with thread. For the dolls in this class, if made full sized, you could use 5 –6 stems for each leg. Of course for different sized legs, you would use different numbers of stems. You will also have to cut the stems off to a length that will fit in the legs.
Set the long bundle down on the foot stuffing, and then finish stuffing carefully all the way up the legs. Use the same skills that you would use if you weren’t putting the chenille stems in. Remember…Push stuffing from the ankle area into the heel area etc.
It is harder to stuff around the wires, (chenille stems) so be sure to turn the leg as you stuff so you don’t stuff one side fully, while pushing the chenille stems into the other side!
I have tried so many types of wire for dolls, and been very disappointed with their sturdiness! Every kind I have tried has broken very easily, with just a few position changes! I have tested aluminum wire, coat hanger wire, steel wire that comes in a roll, lead wire used for making fishing weights, Romex wire with the plastic on it and copper wire!
The chenille stems have proven to be the strongest when bundled together like taught previously.
Actually though, if you stuff a doll properly, wires aren’t needed for sturdiness, or even to allow a doll to stand alone. They are only needed for posing purposes. For a doll that you are going to wire with chenille stems so you can change a pose, let up some on the firmness of the stuffing in the places you want to bend. Knees and elbows especially. If the stuffing is too firm in those areas, the wires won’t be strong enough to hold a bend.
NOTE…Repeatedly bending the joints of a wired doll, no matter what it is wired with will result in breakage.
SECOND NOTE…Don’t wire a doll for a child to play with.
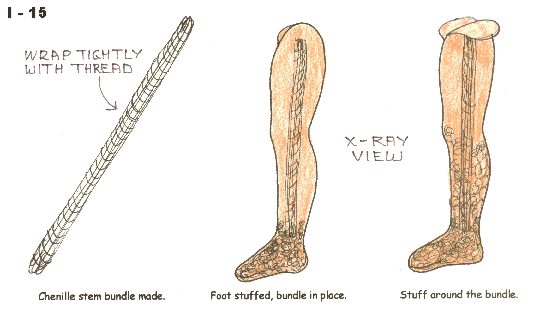
Diagram of Chenille bundle and stuffing (Graphic I-15)
Now after teaching you all this stuff about stuffing very firmly, let’s talk about places and kinds of dolls that can be stuffed softly.
No matter what kind of doll you are making it is best to stuff the heads and necks firmly… BUT…Dolls that are Pancake, Raggedy, or flat tab head style can be stuffed softly if that is the look you want.
- Many of the wildly colored, silly, floppy and clown type dolls fare well with soft stuffing.
- Many primitive and country dolls depend on soft stuffing to give them a time worn look.
- Legs and arms that are stitched across at the knees and elbows need to be soft near the stitching.
- Legs and arms with bead knees and elbows need to be soft near the beads.
- Legs and arms that have tied knees and elbows need to be soft near the ties.
- The upper legs and upper arms for stitched on limbs need to be soft.
- Dolls that can be softly stuffed are almost always less detailed than those that require hard stuffing.
Angelique and Maria in this class can be soft stuffed, because they aren’t jointed and they fall into the “flat” category.
Susannah and Jennifer must be very firmly stuffed, because they have far more shape, form and detail, and they are jointed.
Most play dolls that will be dragged around and loved are more loveable if softly stuffed. Most decorator and art dolls should be hard stuffed.
As we progress through each pattern, stuffing techniques can be practiced and perfected. Each doll is progressively more detailed and challenging to stuff properly. If you really want to get the most out of this class, I suggest that you make 2 dolls from each pattern. One from Velour, Doesuede or Ponti and one from 100% cotton woven fabric like muslin or broadcloth.
By doing this you will really get a feel for the different ways the fabrics act and react with the different levels of stuffing.
If you just don’t have time to make 2 whole dolls from each pattern, at least make the arms from both types of fabric.
Other head styles
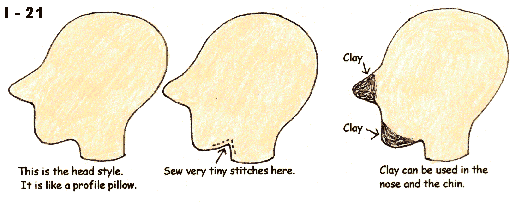
Another head type you will often see in patterns (many of my patterns are this type) is the head with a center panel and 2 sides. This type of head must be stuffed very hard and the one place most people forget to stuff, is out into the front of the chin. Some of these patterns have a dart in the chin area to help form the chin, but for some reason most people just don’t stuff out into it. The poor dolls have terribly receding chins as a result.
A profile for this type of head should look like a true head profile, without a nose. Many of the dolls made this way have little gathered ball noses which are sewn on with a ladder stitch and then little nostrils are sculpted in. Then you have a profile with a nose. This type of head is usually for child and baby dolls.
If you make dolls with this type of head, be sure to stuff out into the chin!
|
The center panel head |
The panel head doll stuffed |
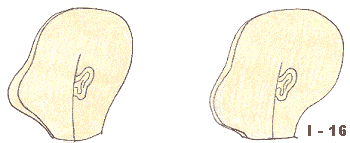
The dolls in this class don’t have the stitched on noses, but you will often come across this style when you are buying patterns. We talked about the shaped, stitched on nose in chapter 3.
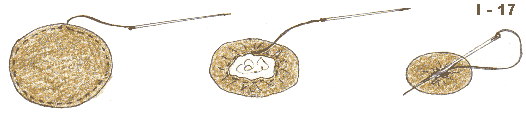
The little ball nose for child and baby dolls is made from a gathered oval or circle. Run a gather stitch around the oval or circle pattern, using a quadruple thread. There is nothing more frustrating than have a gather thread break! I don’t recommend quilt or buttonhole thread either. It is coated, and will sometimes cut your fabric! Pull the gathers up a little and put a piece of wadded up stuffing in the opening.
This is about the only time you get to wad the stuffing up. DON”T use a cotton ball !!!! You can’t needle sculpt through it.
Add more stuffing if needed, and this is
one place that a hemostat helps with the stuffing. Stuff the nose very firmly.
|
|
||
|
Gather around the |
Pull gathers up and |
Tighten gathers and
secure |
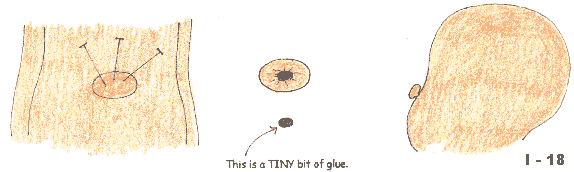
Pin the nose in place on the face with the
pins sticking straight in, just like for the other nose type and for sewing
arms or legs on with a ladder stitch. NOTE… Another way to get the little nose to
stay put until you get it stitched in place is to put a TINY, repeat TINY, dot
of hot glue on the back of the nose and stick the nose on. The reason I say
TINY, is because if you get a lot of glue on the back of the nose, you won’t be
able to sew through it to needle sculpture the nostrils.
|
|
||
|
Stuffed nose pinned in place. |
.......................................................... |
Stuffed nose glued in place. |
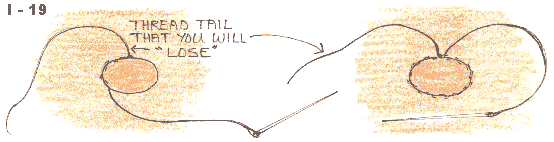
Carefully stitch the nose in place on your doll's face using tiny ladder stitches, and a quadruple thread. Do not try to stitch into the face and the nose with the same stitch.
Stitch one stitch in the face, then one
stitch in the back edge of the nose, repeat this all around, pulling the
stitches tight after every three or four stitches. When you pull the stitches
tight they will disappear.
|
|
|
|
I like to start the stitching at the top. |
Stitch nose on all around, ending at the top. |
When the nose is stitched in place, stitch from the top to the nostril on one side, and then back to the top of the nose. Repeat this 3 times, pulling the nostril in. Repeat for the other nostril.
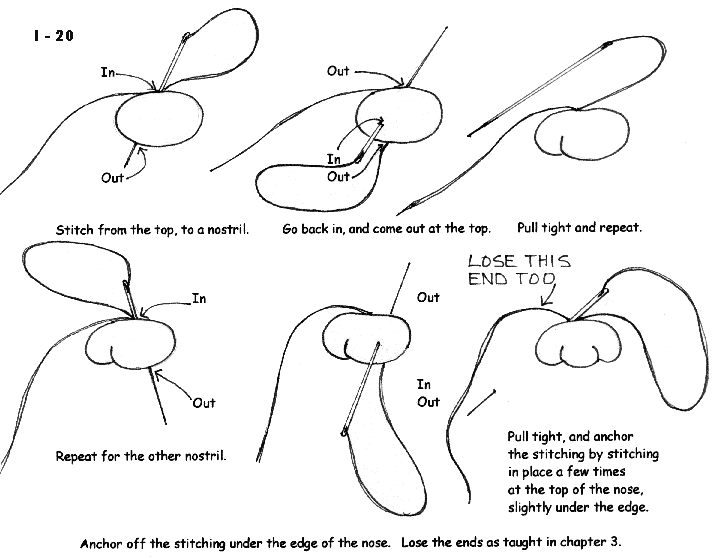
Another head style you will encounter is the flat side view head. This head style stuffs very narrow, and usually has a pointed nose and chin. It is often difficult to get the stuffing to stay in the nose. The “clay in the nose” method solves that. For big “Witchy” noses, you can use the clay inside to really get a great nose shape.
If the chin is very exaggerated and large, like for a witch, try clay in it too.
One note about this type of head. It
usually has a neck attached, and the V seam where the neck and chin converge is
a really easily “popped” while stuffing. This is one place where very tiny
stitches are really needed!
The next chapter will be making Angelique. To get ready for class, copy her body pattern onto Freezer paper if you have it. It is available in the canning supplies section of most grocery stores. If you don’t have it, there will be another way taught to get the stitching lines to the fabric and sew her body.
Angelique can also be made into a primitive/country doll, and the adaptation for that version will be part of her instructions.
Her face will be put on using the “Reverse Template” method. Her face is simple and is done with button or felt eyes. Felt cheeks for the country/primitive version, and a few simple embroidery stitches.
Angelique is a perfect doll project to work on with a young person who wants to make dolls. She is easy to sew and stuff, but there is also enough detail and shape that you won’t die of boredom.
Her angel gown is pretty, but requires only limited sewing and finishing skills. If you choose the country/primitive version, you don’t even need to apply lace or do any hemming.
A pretty handkerchief or doily can be used for the apron on the country/primitive version.
You can use purchased wings, instead of making them to make her even simpler.
Angelique’s sandals are a really fun cut and glue project, and are very easy too.
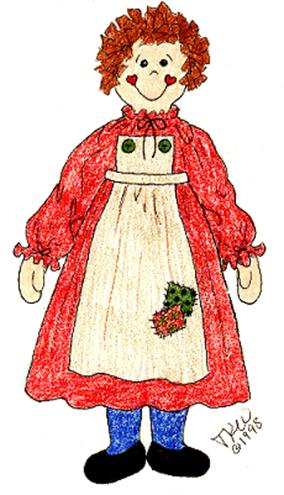
Angelique
The
Country Version
Judi Ward
Judi's Dolls
Go to.. Classroom...
Copyright Notice: All pages and graphics are copyrighted by the Internet Visions Company and/or Judi Ward. You may print these out for the use of the class only. All other uses or distributions are forbidden.
Crafty College and Doll
Net are Divisions of
the Internet
Visions Company.
© 1998-2017, Internet
Visions Co. All rights reserved.
All trademarks are owned by Internet Visions Company.
http://JudisDolls.com http://DollNetMarket.com