Go to.. Classroom...
Cloth Dollmaking for Everyone
© 1998, © 2012 Judi Dolls/Judi Ward
Taught by Judi Ward of Judi's Dolls
http://JudisDolls.com
…CHAPTER 5 …
From True Beginners to the dollmaker
who has made many dolls, but feels a desire or
need to learn a whole lot more!
The pattern directions will follow and be in the format that my patterns follow. There will some new techniques taught within the pattern that were not addressed in the previous lessons.
At the end of Angelique’s pattern directions, directions for the Country/Primitive adaptation will be given also. The basic directions for the Country/Primitive doll are the same as for Angelique. The directions will be for the changes only. There is a country face choice on the pattern pages, and the “hair” will made from torn fabric.
If this is your very first cloth doll, or if you are going to share this project with a beginner, or a child, you may want to dress the doll in the Country/Primitive style because there is no hemming or lace or elastic! You may want to anyway, because she is cute, quick and fun! Add twig or raffia wings to make a country angel.
I will give you 3 choices of where to leave the doll body open for turning and stuffing. You will notice that there are no marks for the opening on your pattern piece. Different patterns that you will get will have openings in different places. Starting right out with a choice will free you up to be open to different ways.
Leave one side open. OR Cut a slit in the center back. OR Leave the top of the head open.
Leaving the opening in one side of the body works fine, but sometimes results in lopsided stuffing. It is easier to stuff the far side than the near side. If you leave this opening, be sure to check your doll as you stuff, to be sure both sides match. An advantage to this method is you get 2 tries to make a nice face! Do the face on one side, and if you don’t like it, go to the other side. The hair will cover the bad face.
The side opening is easy to close with a neat ladder stitch too, because it is nearly a straight line.
Cutting a slit in the back of the body, is another option. You can stuff all of the parts from about an equal distance from the opening. This method makes it easier to balance your stuffing. The slit closes up beautifully with a neat ladder stitch, and you can even thin the waist of the doll, by tapering the fold in more towards the center of the closing as you take the ladder stitches.
The stitches taper away from the opening and then back to form a
“dart” with your ladder stitches.
The other place to leave your doll open is at the top of the head. When you close this opening, you don’t even need to make a ladder stitch if you don’t wish to. The advantage to this opening is again, 2 tries at doing a nice face. The disadvantage is you may flatten the top of the head as you sew it closed, if you don’t add more stuffing as you close to keep it rounded.
The pattern directions will tell you to retrace all of your pattern pieces to other paper or Pellon® You have already done that though, so you will start with tracing your body pattern to freezer paper if you are going to use that method.
For any other patterns you might use though, always start by re-tracing the pieces to other paper or Pellon®. Keep your original pattern complete and intact!
Angelique
© Judi Ward-Judi’s Dolls 1998
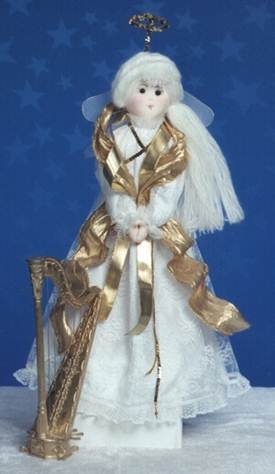
Angelique is an easy, yet shaped, pancake style doll. Her stuffing will give her a lot of shape too. Her clothes are very easy to make, and will be drawn up at the neck, wrists and legs of the pantaloons with cord or ribbon.
The only elastic will be at the waist of the pantaloons, and it will be threaded through a casing.
Angelique can be made plain or fancy, as you please.
She can have button, bead or felt eyes. Her mouth, nose, eyelashes and eyebrows are simply embroidered.
Her yarn hair is very simple, yet when you twist it and arrange it on the top of her head it looks very detailed. Of course you can leave it down too, for a flowing long hairdo.
Angelique makes a delightful Country/primitive doll too. She is even easier to make this way because there is no lace or hemming!
A purchased embroidered doily makes the apron for the Country/primitive doll.
Painted shoes and stockings on the country/primitive version, introduce you to a different skill too.
Materials needed: For the Angel version with a “lace over lining” dress.
1. 1/2 yard of 45” or 60” wide fabric for the body. This doll can be made from woven or firm knit fabric.
2. 1 pound of excellent quality polyester stuffing.
3. 1 yard of all over lace fabric. (Look for one with a soft feel rather than a stiff feel.)
4. 1 yard of thin lining fabric, like polyester lining used for “people” clothes.
5. 2 yards of 1” wide gathered lace for the over gown. (The lace one)
6. 5 yards of 1/2" wide flat lace for the bottom edge of the under gown, pantaloons, sleeves and neck of the gown.
7. 1 and 1/2 yards of gold or silver sequin or braid trim for the Angel gown.
8. Strong thread, crochet thread or 1/8” silk ribbon for gathering the neck and sleeves of the gown, and the legs of the pantaloons.
9. 1/4 yard of 1/4” wide elastic for the pantaloons waist.
10. 2 metallic pipe stems for the Halo.
11. 1 skein of soft yarn for hair, or, machine knitting yarn which comes in big cones, and makes lots of hairdos. I especially like a fuzzy, mohair type yarn for this doll.
12. A pair of purchased angel wings at least
7” wide. CRs Crafts has several styles. Craft stores do too.
OR. 1/4th yard of pretty metallic fabric to make the wings.
13. 2 small, about 3/8”, black half ball buttons for eyes…OR…Two black beads…OR…black felt for eyes.
14. Freezer paper if you want to use the freezer paper method for sewing the body…OR…a colored pencil slightly lighter or darker than your body fabric if you want to use the “draw around then sew” method. The freezer paper method is easiest and the most accurate.
15. A piece of typing or notebook paper for making the “reverse template” for putting the face features in place.
16. White craft glue or hot glue for securing the hair if you are going to leave it long and flowing.
17. Pink thread for embroidering the mouth.
Tan for the nose and black for the eyelashes and eyebrows.
For this beginner doll I will suggest and show embroidery with felt or
button/bead eyes. If painting is your thing though, please do paint the
features.
18. A small piece of corrugated cardboard (5” X 5” is plenty) for the sandal soles.
19. A small piece of felt for the sandal tops and bottoms. (6” X 6” is plenty)
20. 2 yards of 1/8” wide ribbon for the sandal ties and 1 yard of ¼” wide ribbon for around the outside edge of the sandals. I like wired edge ribbon for around the edges of the sandals.
21. Ordinary sewing and stuffing supplies for both machine and hand sewing.
22. Thread to match your fabrics, for doll and clothing. Thread to match the yarn you have chosen for the hair.
23. Powdered “people” blush for tinting the cheeks and the tops of the hands.
Let’s Begin......
Read through all instructions and familiarize yourself with the pattern pieces. Retrace pieces to other paper or Pellon®. Do not cut your original pattern. Keep it intact for future reference or to retrace a piece if a piece should get lost.
Make the body pattern from regular paper or Pellon® (to draw around)…OR…From freezer paper (to iron on, and sew around)
Decide where you want to leave the dolls body open for turning and stuffing, and then mark that place. Leave at least 2” open to turn and stuff through.
If you are making your doll from Velour or Doesuede, note the “Stretch Direction” of your fabric, and place the body pattern correctly. Pull on the fabric lightly to feel which way it stretches the most. The firm knits will stretch more one direction than the other. The stretch goes up and down.
If you are making your doll from a woven fabric, it really doesn’t make any difference whether you put the pattern parallel to the selvage, or in the opposite direction.
If you are making your doll from Velour or Doesuede, fold the fabric with the SMOOTH sides together.
You will be sewing on the “fuzzy” side. After you sew your doll the smooth side will be the right side.
If you are going to use the Freezer paper method, cut a whole doll body pattern from freezer paper. Put the freezer paper shiny side down on your doubled fabric. Iron the pattern onto the fabric with your iron set at a wool setting. The Freezer paper pattern can be used several times. It is such a great way to sew parts that are the same both front and back! It eliminates marks on your doll, which sometimes show after sewing.
Pin the fabric together in a few places just for the purpose of keeping the 2 layers together.
If you are going to use the “draw around and sew” method. Put your paper or Pellon® pattern down on your doubled fabric and pin it in place in a few places. Draw around it with a colored pencil a shade lighter or darker than your fabric. I don’t recommend fade away pens, or lead pencils. Fade away pens sometimes don’t fade, or they fade before you get done sewing! Lead pencils often show an ugly gray line even after you turn your doll right side out. YUCK!

Iron freezer paper pattern to your doubled fabric…..OR….Draw around your pattern with a colored
pencil.
Freezer paper method…After you iron the freezer paper pattern on, trim some of the excess fabric from around the pattern. Don’t cut the pattern out, just trim some excess off to make it easier to handle while sewing.
Draw Around and Sew Method…Trim some of the excess fabric from around the drawn lines, to make it easier to handle while sewing.
Trim some excess fabric away from
the freezer paper pattern…OR…Trim some excess fabric drawn lines.
Now let’s sew your doll’s body.
1.
Using the correct
needle for your chosen fabric, sew with a very small stitch all around the
freezer paper or on the lines you drew. Remember to sew-sew-lift-turn at all
sharp curves. You will need to do this at the hands, thumbs, feet and head to
really make nice even seams. Be sure to lift and turn at all Vs too. Be sure to
leave an opening at the chosen spot…OR…Sew all the way around if you are going
to make the slit in the back for the opening.
2.
Cut your sewn doll
body out, leaving a ¼” seam allowance all around. Clip into the Vs right to the
stitching. Careful! Don’t cut the stitching. NOTE>>>If you made
your doll from a loosely woven fabric like Osnaburg or linen, be sure not to
make the seam allowance any smaller than ¼” and don’t clip quite to the
stitching at the Vs.
3. If you have chosen to slit your doll in the back for turning, carefully do so. Be sure to cut only one layer of fabric! It helps if you draw a line with a straight edge to cut on. Make the slit about 2”-3” long.
Draw a line to cut on.
Carefully slit through one layer of fabric at the center
back.
4.
Turn your doll
right side out. Use the rounded end of your closed hemostat to push the toes,
thumb and hands out nice and smooth.
5. One at a time, hold both sides of each V area and rub them back and forth between your fingers to take the wrinkles out of the V areas. These V areas on any doll you make will need to be rubbed like this. DON”T pull the areas apart trying to work the wrinkles out. Pulling will often result in tearing on woven fabrics.
Work the Vs gently back and forth, while holding on both sides.
Make sure the head is fully turned, with all the sides and edges nice and smooth. Lay your doll on a table, face side up. Remember, you can put a face on each side if you left the openings either at the top or side. (I don’t like to do that with the slit method, because the sewed up slit could end up on her tummy, and I just don’t like the looks of a closing in the front.) You will be using a reverse template method if free-handing is not your “cup of tea”.
6.
Trace the
head/face pattern onto a piece of freezer paper. Poke a hole where the eyes go.
Cut the mouth shape out. Cut the eyebrows and nose shape out. They will just be
very thin lines. You don’t need to cut the eyelash shapes out. They are just
straight lines, that you can put on freehand or with a ruler.
7.
Lay your face template
over the head of your doll, lining up the sides etc. evenly. Iron the template
in place on your doll’s head.
8.
LIGHTLY! Draw through
the cut outs in the face template. I like to use a colored pencil in a pink or
red for the mouth. And a tan colored pencil for the nose, eyebrows and eye
position. Don’t use a lead pencil. It makes hard to conceal gray marks.
NOTE>>>If you don’t use the Freezer paper method, you can make
the template from regular paper, pin it in place, and draw through the cut
outs. It isn’t as accurate though.
If you like to draw faces, please wait until your doll is stuffed to do
so. It is much better to do free-handing on a stuffed head.
9. Remove the paper template, Either freezer paper or regular paper.
|
Cut out the features, leaving |
Iron or pin the “template” |
Draw through the “holes” |
Your doll’s face will be embroidered or painted after your doll is stuffed.
Now it is time to stuff your doll.
1.
Stuff your doll
firmly. Feet and hands first. Be sure to get stuffing into the thumb. The
easiest way to do that is to make a little Q-tip on the end of your stuffing
needle/fork. Guide a little Q-tip into each thumb and then stuff the hands.
2.
For this simple doll,
I like to stuff the feet, hands, and head very firmly, and the body, legs, and
arms less firmly. Since the Angel is meant to be posed standing, I don’t stitch
across at the knees or elbows.
NOTE>>>For stitched across limbs, some length will
need to be added to the legs and arms. We will do that for the
Country/primitive version.
3.
Stuff the neck very
firmly and stuff extra stuffing out into the front of the face in the chin
area, to give her face some definition if desired. If you have a face on both
sides for “Face Insurance” stuff this extra in the chin area on both sides of
the head.
4. After your doll is stuffed and shaped to your satisfaction, close the opening with a ladder stitch if you chose the back or side opening. You can use a whipstitch for the top of the head opening.
Now it is time to embroider the face.
1.
It is always best to
do embroidery after stuffing. You have more control of the tension on the
stitches, and you can adjust the features as you embroider. I like to use plain
old sewing thread for embroidery. It is finer and makes flatter embroidery.
When using embroidery floss, there is a tendency to use too many strands,
resulting in thick heavy embroidery that looks very amateurish. Embroidery
floss also tends to pull stuffing out with it as you stitch. Ordinary thread
doesn’t do that.
2. As you begin a new color of thread for your embroidery, enter at the side of the head, right in the seam. This way all of the knots will be hidden under the hair. When you finish a feature (or run short on thread) exit in the seam at the side of the head too, and stitch in place a few times to secure the stitching.
Enter at the side of the head.
Embroider the feature.
Exit at the side of the head.
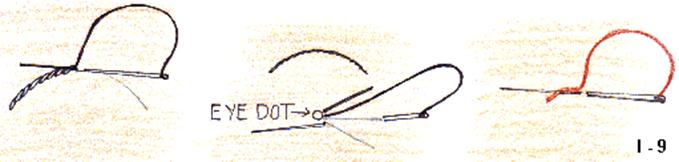
The eyebrows and nose are done in a simple backstitch, using a double thread. (Those pretty, shiny Sulky? brand threads make nice embroidery thread too.) The eyelashes are just straight, single stitches radiating from the eye dot out to the sides. See the illustrations that follow.
The lips will be done in a satin stitch, going from the center to the top edges, and from the center to the bottom edges. A little straight stitch will be made from each corner of the mouth to give your Angelique a smile.
I like to use black for the eyebrows and eyelashes. Tan for the nose, and pink for the lips.
Outline stitch the eyebrows.
Straight stitch the eyelashes.
Outline stitch the nose.
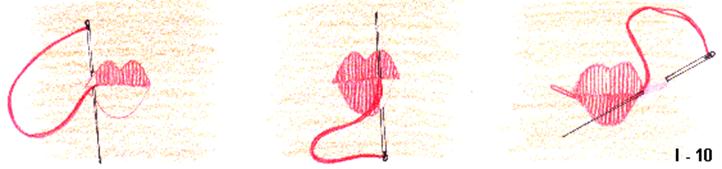
Satin stitch the top lip.
Satin stitch the bottom lip.
Add the straight “smile” lines.
Remember; enter at the seam
on the side of the head and exit at the feature you are going to embroider.
Do the embroidery and then exit at the side of the head. Stitch in place to secure the stitching.
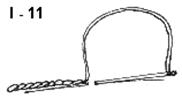
The embroidery stitches to use.
|
|
|
|
|
The Outline Stitch. Work from the left to the right. |
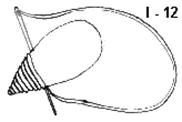
The Satin Stitch. Satin stitches need to be very |
The Straight Stitch. Each eyelash is one straight |
The little lines at the corners of the mouth are straight stitches too.
After the embroidery is done, you can put the button, bead or felt eyes on.
For felt eyes, cut 2 small circles from black felt. They need to be about 1/2" across. Glue them in place with hot of white craft glue.

Felt eye circles.
If you are going to use buttons or beads, thread a long, (at least 3”) needle with strong black thread like buttonhole twist, upholstery or quilting thread. Use it doubled.
Enter at the back of the head; exit at the eye spot. Go through the bead hole or button shank. Go back in at the eye dot and exit out the back of the head. Tie the cords at the back of the head. The eyes will indent a little and give some shape to the face. Don’t indent them too much.

Now let’s make the simple parted in the middle hairstyle, that we will “jazz” up with some spiraling, or braiding, or leave it hanging down!
This style will have a stitched center part that goes all the way from the front of the forehead to the nape of the neck in back.
Measure that distance on your doll. On my doll it was 5”.
1.
Pull off enough 24”
long strands of your chosen yarn to fully and thickly cover that distance. I
can’t tell you the exact number of strands because we aren’t all using the same
yarn. I just pull off one length and then fold the yarn back and forth in my
hands, until I think I have enough. I cut the loops later.
2.
Sew by machine down
the center of the strands. Press down on the yarn on both sides of the sewing
machine presser foot. Push the yarn under the presser foot, while pressing
down, to keep it close together. If you have a “persnickety” sewing machine
that doesn’t like to sew on yarn, putting a piece of tissue paper under the
yarn helps. You can also mark the 5” measurement on the paper, to help you with
keeping the seam the correct length. If this is your first try at sewing
yarn on a sewing machine, the tissue paper method is probably the best for you
to use. After the yarn is sewn, tear the paper away.
NOTE>>>I know there are special products on the
market that you sew on and then tear away. I think one is called Stitch and
Tear. But tissue paper works fine, and most everybody has some around.

Enough strands to fully and thickly cover the measurement.
3.
Now place the sewn
yarn with the seam going right down the center of Angelique’s head, from about
1 ¼” above her eyebrow level to the back of her neck. Hand stitch or hot glue
the center seam to the doll’s head.
4.
Pull the yarn to each
side of the head and put a piece of yarn, about 24” long, through the sides of
Angelique’s head at about lip height. (Thread the yarn onto a large eye needle
to put it through the sides of the head.)
5. Tie the yarn in place at each side of the head with the yarn you put through with the needle.
Sew or glue the yarn in
place.
Tie
the yarn at each side of the head.
6.
Cut the loops and trim
the ends of the yarn to even them and then divide the yarn on one side into 4
about equal parts.
7.
Twist one section, and
bring it over the top of the head. It should reach about to where the yarn is
tied on the other side. Stitch the ends down or use my favorite method, which
is to hot glue the ends down.
Repeat for the other 3 sections, securing them down either with stitches or hot
glue
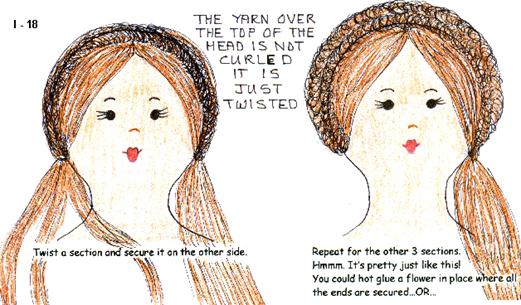
8. Do the same for the sections on the other side, tucking the ends under the twists on the other side and sewing or hot gluing them in place. You will need to take a few stitches or put a little hot glue here and there to keep the twists in place on top of the head too.
If you choose to leave the hair down, smooth it down all around. Yarn will hang over the part in the back.
Lift small sections of yarn and apply tacky or hot glue to the doll’s head and then press the yarn into the glue. The bottom layer of yarn will adhere to the head and cover the scalp. Trim the yarn evenly all around.
 .
.
If you want bangs.
1. Lay out about 12-20 strands about 3”
long.
2. Sew them down the center.
3. Tie
them in place right at the part in front.
4. Fluff
and trim the bangs so they don’t cover Angelique’s eyes.
Just a though>>>Angelique doesn’t have to be an angel. How about braiding the yarn at the sides for a “Drag Around” doll. She could be someone’s best “bed time” buddy. The braided yarn hair is the very best “play doll” hair.
Now let’s make the clothes.
Cut the Angel Gown from your fabrics on a double fold. Fold in half down the 45” width of the fabric first and then fold in half again as illustrated.
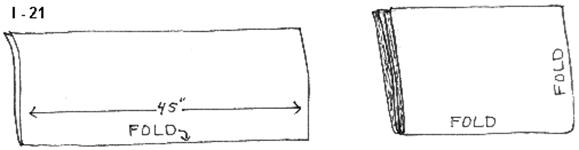
Fold fabric in half
down the 45”
width.
Fold in half again.
You will be cutting the gown on a double fold. Do this for the lace fabric and for the lining fabric. Lay the fold side of the gown pattern on the longest fold line of your lace fabric. Pin in place and cut the lace gown out.
Repeat for the lining.
Lay pattern on double folded lace. Cut
out.
Lay pattern on double folded lining. Cut out.
NOTE>>>This simple gown is all in one piece. It is also designed to be very long on your doll. My doll is displayed on a stand, standing on a painted coffee can. That makes her taller and lets her gown flow nicely.
NOTE #2>>>This simple doll could also be a Baby Doll in a long nighty. Tie in short pieces of yarn all over her head for hair. Stuff her softly and she becomes another version of a “drag around” doll.
Cut the pantaloons from lining fabric, or from a scrap of white broadcloth. You will need to cut the pantaloons out twice on the fold of the fabric. These pantaloons have no side seams.

|
Cut pantaloons once on the fold. |
Cut pantaloons again on the fold. |
You will have 2 pieces that |
If you are going to make the wings, cut 2 from your chosen, pretty metallic fabric and 1 from felt or pellon.
The felt or Pellon piece will stabilize the wings and help to hold them up.
Cut 2 sandal soles from corrugated cardboard, with the corrugation running side to side. Corrugated cardboard is the kind shipping boxes are made from. It has those little channels running between 2 layers of flat cardboard
Cut 4 sandal shapes from felt. 2 will glue to the bottoms of the cardboard soles, and 2 will glue to the tops of the cardboard soles.

Let’s make the sandals first.
1. Cut the 2 yards of 1/8” wide ribbon into two 12” long pieces and two 24” long pieces. The two 12” pieces are the front ties for the sandals. The two 24” pieces are for the ankle ties.
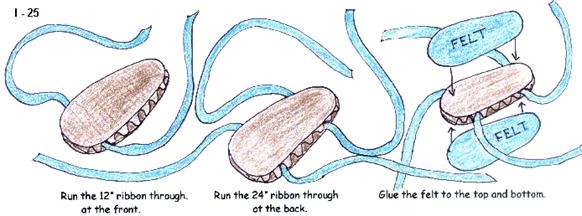
2. Thread one 12” long piece of ribbon onto a needle with a big eye, and then run the needle carrying the ribbon through one of the corrugated channels in one cardboard sole, about 3/4" back from the front of the sole.
3. Repeat with one 24” piece of ribbon, but run it through a corrugated channel about 3/4" from the back of the sole.
4. Glue a felt sole onto both the bottom and the top of the cardboard sole.
5. Repeat the above for the other sandal. Let the glue dry.
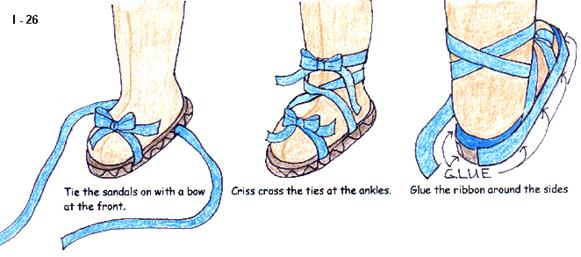
6. Tie the sandals on Angelique’s feet, criscrossing the ties at the ankles. Tie the ribbons in bows and trim the ends.
7. Carefully spread tacky glue around the edges of the soles, and then glue the 1/4" wide ribbon around the soles. I start and end at the center back. You may need to push a pin into the center back to keep the ribbon in place until it dries. You could also use hot glue, if you are a quick and very neat “hot gluer”. No waiting for tacky glue to dry.
sandal making diagrams:
Now let’s make the pantaloons.
1.
Lay the 2 pantaloon
pieces right sides together as shown in the following illustration. The curved
seams are the center front and the center back seams. There are no side seams.
The folds are where the side seams would be.
2. Sew the curved seams.
3. Zig-Zag stitch the flat lace over the raw edge of the leg openings of the pantaloons.
Eliminating bulk is one goal when making doll clothes. Sewing lace on with a Zig-Zag stitch is one way to eliminate bulk, and finish the edges at the same time. This method is perfect for the wrist edges of sleeves and the legs of the pantaloons. It is also perfect for the bottom edges of some skirts and petticoats.
NOTE>>>If you have a serger, you can of course serge the raw edges and then sew the lace over the serging.

Zig-Zag stitch the lace over the raw edge.
4.
Make a casing in the
waist edge of the pantaloons, by first pressing a ¼” fold to the wrong side and
then a ½” fold to the wrong side.
5.
Sew the casing all the
way around, but leave a small (1/2” spot) open to thread the elastic through.
6. Pin one end of the 9” long elastic with a small safety pin and then thread the elastic through the casing. Sew the ends of the elastic together, and then sew the little opening in the casing closed.
First fold a ¼” hem. Next fold a ½” hem. Sew
all around, leaving an opening to thread the elastic through.
1. Pin a safety pin to one end of the elastic.
2. Thread it through the casing.
3. Sew the ends together.
4. Sew the opening closed.
7.
Sew the inner leg
seam.
8.
Put the pantaloons on Angelique.
9.
Thread 18” of crochet
cord or preferably 1/8” wide silk ribbon, onto a sharp needle with a big eye,
and then run a gathering stitch around one leg of the pantaloons, about 1” up
from the lace edge. Start and end at the center front. Repeat for the other
leg.
10. Pull the gathers up and then tie the cords or ribbons in bows at the front of the pantaloons. The gathering stitches can be at least ¼” long
Run a gather stitch
all around.
Tie the ribbons in bows at
the front.
Let’s make the Gown.
1.
Zig-Zag stitch flat
lace at the sleeve edges of both the lace and the lining.
2.
Right sides together,
sew the side and under arm seams of the lace gown.
3.
Repeat for the lining
gown. Clip the V at the underarms, and then turn both right side out.
4.
Put the lace gown over
the lining gown, and then pin both layers together at the neck edge. Be sure to
put the lining sleeves into the lace sleeves.
5.
Zig-Zag stitch flat
lace over the raw edge all around the neck opening.
6.
Zig-Zag stitch flat
lace over the bottom edge of the lining.
7.
Zig-Zag stitch the
gathered lace all around the bottom edge of the lace gown.
|
|
|
||
|
Zig-Zag stitch flat lace around neck |
Zig-Zag stitch flat lace over bottom edge of lining. |
|
|

8.
Put the gown on
Angelique, with the back of the gown being the side where the lace comes
together around the neck.
9.
Use about 1 yard of
1/8” wide silk ribbon or cord on a large eye needle, to run a gather stitch all
around the neck, about ½” from the lace. Start and end at the center front if
using ribbon. Start and end at the center back if you are using cord.
10. Pull the gathers up and tie the ribbon in
a bow. If you are using cord like crochet thread for the gathering, just tie
the cord off and trim the ends short.
11. Gather each sleeve the same way you did the neck, either with ribbon or cord, about 1” from the lace. You will be gathering through both the lace and the lining at the same time.
1. Gather around the neck, and then tie
the ribbon in a bow.
2. Gather around the sleeves and tie in a bow.
Now take the 1 and 1/2 yard piece of sequin or braid trim and drape it over Angelique’s neck, having the center of the 1 1/2 yard piece at the center back neck. Bring the trim to the front and cross it over her chest. Take it to the back and cross it at the waist. Bring it back to the front and tie it very loosely in front. Let the ends hang down long.
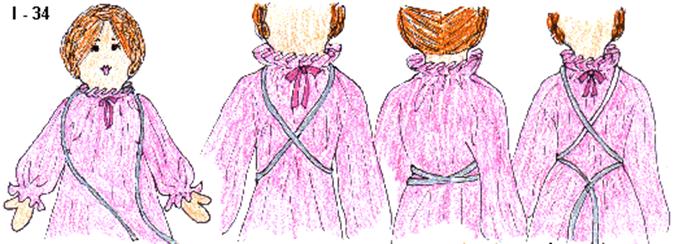
Drape the trim from back to front. Cross in
front. Cross
in back. Bring to front and tie.
Now let’s make the wings.
If you purchased wings, stitch them in place at the center
back of the gown. This doll, when made as an Angel is not a toy, so you can
also sew through the gown and into the doll’s back to secure the wings firmly
in place.
To make the wings.
1.
Lay the wing pieces
down on a table in this order. One metallic wing piece right side up. One
metallic wing piece wrong side up on top of the other piece. The felt wing
piece on top of that. Pin the pieces together and then sew all around the outer
edge of the wings.
Remember to sew slowly and carefully at all the little curves and Vs. Remember
the sew-sew-lift-turn method.
2.
Cut a slit in the
metallic wing piece that you can see (the other is covered by the felt) where
shown on the pattern.
3.
Carefully clip all Vs,
and trim the seams to 1/8th inch.
4.
Turn the wings right
side out through the slit. Carefully poke out all the tips and curves with a
closed hemostat.
5.
Sew the slit closed by
hand using a ladder stitch.
6.
Top stitch through all
layers on the wings where shown on the pattern to accent them. You may
want to mark the lines first with a sliver of soap or chalk. Don’t mark them
with a pen. The pen marks will show
7. With strong thread or cord, tie the wings in the center to gather them up.
Top stitch through
all
layers
Tie wings in the center
8.
Sew, the wings to the
back of the gown. If they are too heavy and pull the gown down, simply take a
few stitches into the body, to fasten them securely.
9. You can decorate the center of the wings with ribbons and flowers as desired.
The simple Halo.
The Halo is made, by first twisting 2 gold or silver chenille stems together. Then bend down 4” for the part that will hold the Halo up. Now, bend the rest around in a circle and twist a little of the ends around the top of the shaft.
Stitch or glue the Halo in place at the back of Angelique’s head. Don’t have the Halo sitting right on top of her head. The shaft will allow it to stand up a ways.
Some extras…..Place Angelique’s hands together in front and stitch or Hot Glue them together in a praying position if desired.
A pretty addition….Wrap a 1 yard piece of wide, metallic, wired edge ribbon around her shoulders like a shawl. Drape the ribbon under her arms in front, and then bend it back and forth so it looks like it is flowing down along both sides.
Angelique as an Angel is done!
…..Let’s make a very simple Country Version…..
Angelique
The
Country Version
Make your doll body from unbleached muslin or Osnaburg fabric. Both have the country look. Osnaburg is courser and has little dark flecks in it. Before you use the fabric, press wet tea bags here and there all over it to stain it if desired. Dry the fabric.
Make the doll just the same, But stuff the legs softly and stitch at the top of the legs so she flops. You can also stuff the arms softly and stitch from the top of the shoulder to under the arms so that they move too.
Do these stitching lines before you stuff the body and head.
Stitch at the top of the
legs. Stitch from
the shoulder to the underarm.
Use the cute face with the heart cheeks. Use the same “Reverse Template” method to put the face on.
Finish stuffing your doll and close the opening.
Embroider the face features.
Make the cheeks from felt and glue them in place.
Make felt or button eyes.
Paint the legs with a coat of white Gesso from the foot up about 4” - 5”.
Let the Gesso dry. Paint a coat of off white acrylic paint over the dry Gesso. Let Dry.
Draw and paint on a simple shoe with acrylic paint.
Paint stripes on the legs if desired.
1. Paint on the Gesso coat and the off
white paint.
2. Paint the shoes on.
3. Paint stripes on the legs if desired.
Cut only one gown from a calico print, and shorten it to the Blouse Slip length. You can shorten more if desired of course. Sew the dress and pantaloons just as you did Angelique’s gown and pantaloons.
You don’t need to hem anything, or use elastic anywhere.
Simply gather the neck, sleeves, pantaloon legs and waist with off white
crochet cotton, and ties the cords in bows.
For the apron, buy a rectangular shaped doily about 4” by 6” …OR…Cut a piece of
off white fabric that size.
Place the “apron” top just below the neckline of the dress, and sew or tie 2 big buttons in place to hold the top up.
Tie a ribbon around the apron and dress just under the arms.
Arrange the apron so it looks gathered. Hand tack the ribbon to the sides of
the apron to hold the ribbon in place.
Decorate the apron with patches or more buttons if desired.
The hair can be the braided yarn hair or torn cloth.
For the torn cloth hair, tear 9 strips of calico or broadcloth about 1” wide by the full width of the fabric (45”)
Cut these strips in 5” long pieces. Tie each piece in the center, and stitch or Hot Glue them all over the head.
Make one row right along the seam, and another row in front of that. Finish filling in the entire back of the head.
Be sure to sew or glue the knots close together so there are no bald spots.
Fluff the “hair up after it is all on.
Sewing the “Rag Hair” on is a little time consuming, but makes a good “sit down” project.
NOTE>>>Don’t Hot Glue the rag hair on, unless you are a very neat Hot Glue!
Next is Maria. You will learn to “stretch and sew” narrow elastic on in a bulk free way, and many more techniques for the next step in the dollmaking journey.
Happy Dollmaking, Judi
Judi Ward
Judi's Dolls
Go to.. Classroom...
Copyright Notice: All pages and graphics are copyrighted by the Internet Visions Company and/or Judi Ward. You may print these out for the use of the class only. All other uses or distributions are forbidden.
Crafty College and Doll
Net are Divisions of
the Internet
Visions Company.
© 1998-2017, Internet
Visions Co. All rights reserved.
All trademarks are owned by Internet Visions Company.
http://JudisDolls.com http://DollNetMarket.com