Go to.. Classroom...
Cloth Dollmaking for Everyone
© 1998, © 2012 Judi Dolls/Judi Ward
Taught by Judi Ward of Judi's Dolls
http://JudisDolls.com
…CHAPTER 6 …
“Maria’s” Directions
Maria’s complete directions will follow.
Maria is a 6 part, tab head style doll. This doll (the body parts, not the clothes) can be made completely using the “freezer paper” or “draw around and sew” method.
This is by far the easier way to sew small doll parts. It can’t be used for parts that are not the same on both sides though.
It also can’t be used for the side seams of 4 part profile heads, but can be used for the center front and back seams of 4 part profile heads. NOTE>>>> We will address that in Jennifer’s pattern directions.
You will learn the “fold seam to seam” foot front method, which is used in a lot of patterns, and to use a template to sew the foot front. You will also learn the foot sole method used in many patterns, by sewing the shoe top to the shoe sole. This way you can learn 2 foot methods in the same pattern, even though one will be done while making the shoes.
Maria’s face will be embroidered with more detail, and will be shaded with colored pencils. We will use the reverse template method of putting the features on, with a little bit of free handing. We will have a mini anatomy lesson for the face too, so you can see how you can make Maria look older or younger with a slight movement of the features.
The more detailed embroidery is another step in the progression towards more advanced cloth dollmaking. Again, if you paint your doll’s features as a general rule, do so for Maria.
You will also learn the reverse template method for marking darts within a pattern part.
In Maria’s pattern you will learn a way to “stretch and sew” narrow elastic, and make a thread casing, rather than a bulky fabric casing. The thread casings allow you to draw up far more width and get fuller sleeves etc.
If you look at a lot of ready made clothes and doll clothes, you will notice very little fullness at the wrists and legs of pantaloons. The reason for this is, if you stretch and sew right into elastic, you can’t gather up much fullness. Also, when you sew into elastic, you break some of the elastic cords and weaken the elastic.
You will learn how to “fold back a placket” to eliminate raw ends when you sew a waistband on, and how to sew a waistband on quickly and easily all by machine. This “fold back a placket” method will be used for the dresses later too.
Maria’s clothes are loosely fitted, and don’t require much in the way of fitting at all, no matter what you make her from.
Directions are given for basic sewing machine sewing. If you use a serger, please do use it as you normally would for the doll’s clothes. For doll clothes, raw edges are often Zig-Zag stitched with lace over them, rather than hemmed.
Something to bear in mind when making cloth dolls. No 2 dolls will turn out exactly the same size. Even if you cut and sew them at the same time, from the same pattern, from the same fabric etc. It takes only a little extra stuffing to make a doll fatter. Joint a little higher or lower, or attach the head onto the neck a little higher or lower to make a doll taller or shorter.
You may in fact decide to add a little length to a doll’s legs, arms or body after you make it once. This is an easy adjustment to make, which adds even more variety to your dollmaking.
This is part of the magic, fascination and joy in cloth dollmaking. Every doll is a new personality. They will tell you who they are! What they want to wear! Sometimes they will even change genders!! That is the most disconcerting of all. Your heart is set on a pretty young lady, and suddenly an ornery little freckle faced boy wants out!
My Jennifer could have been changed into a lanky little boy if made with Susannah’s flat chested body, a slight face change, short hair and the addition of freckles!
Choices, choices! Variety, variety! And most of all FUN!
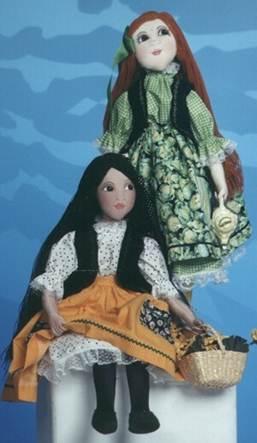
Maria
© Judi Ward-Judi’s Dolls 1998
Maria is an easy 6 part doll who will make up well in either firm knit, excellent quality felt or woven cotton fabric.
Her style is a frequently seen and used cloth doll style.
Her face is embroidered, and then shaded with colored pencils for added depth and beauty.
Her long yarn hair is styled with a side part or center part, and is made in such a way that it can be pulled to the sides into low ponytails or braids if desired.
Maria wears a slip/blouse, skirt, pantaloons, long stockings and simple felt shoes.
If you make just the slip/blouse, from flannel, in the longer version, it can be a soft night gown, and Maria can be a favorite bed time friend for a special little girl (or big girl) HMMMM-CHRISTMAS GIFT?
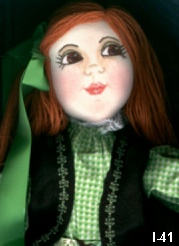
When made in a tan skin tone, with big black eyes, dark hair, and the clothes she is shown in, she looks like a pretty, young gypsy girl. This is a very versatile pattern, and makes up quite quickly. Her clothes are a second level, easy fit style, and she can wear purchased “real” doll shoes which are available for the 18” American Girl® dolls.
Materials Needed for one Maria.
1. 1/2 yd of either 45” wide or 60” wide fabric. Either firm knit, woven or felt. You will have some left over. Maria does make up well in either, due to less detail. She will be shorter in woven. Clothes still fit!
2. 1 pound of excellent quality polyester stuffing. You won’t use it all.
3. 1/2 yard of lightweight woven fabric like broadcloth, percale, calico etc. for skirt.
4. 3/4 yard of coordinating lightweight woven fabric for the blouse/slip.
5. A small piece of woven fabric, 1/3rd yard is plenty: Or use scraps from the blouse/slip for the pantaloons by adding the seam allowance to the fold edge, and cutting the pantaloons to have a seam on the sides.
6. A 9” X 12” piece of felt for the vest.
7. A little piece of another coordinating woven fabric for the pockets if desired.
8.
A package of Baby
Ric-Rac to trim the skirt bottom and the pockets. You can also use it on the
vest
…OR… if you have a sewing machine that makes fancy stitches, do that around the
edges of the vest…Or…Hand embroider a design around the edge…OR…Work a blanket
stitch around the edge…OR…Leave it plain.
9. 2 yards of 1/2" wide flat lace for the blouse/slip neck, sleeves and pantaloons legs. And 1 yard of 1” wide gathered lace for the blouse/slip hem.
10. 1 yard of 1/8” wide elastic for sleeves and pantaloons, and about 10” of 1/2" wide elastic for waist of pantaloons.
11. Ten, 12mm or 15 mm chenille stems, if you wish to stuff Maria’s fingers with chenille stems. It is the easiest way to stuff fingers, no matter if they are all together, all apart, or anything in- between.
12. 1 skein of soft yarn. A mohair blend, with the little fuzzy “hairs” is nice. Machine knitting yarn (it comes only on cones from a knitting shop that sells supplies for knitting machines) is wonderful, because it is so fine and in scale with your doll’s size. Sport yarn is fine too of course, and might be the best choice for a play doll. Choices, choices, choices! HMMM? Do you want the hair to match the clothes? To match the ethnicity? To contrast with the clothes? Dollmaking is a series of fun choices!
13. A 9” X 12” piece of felt for shoe tops. You will have extra. You can make the shoe soles from the vest felt scraps or from the shoe top felt.
14. A small piece of soft cotton knit or, my favorite, very stretchy Lycra swimsuit fabric for the stockings. ANOTHER CHOICE…You can make the whole legs from a colored fabric, either woven or knit to look like stockings, and you don't even have to sew stockings.
15. Thread for embroidery in black, tan, white, dark peach and a lighter peach. Also thread in two coordinating colors for the iris of the eyes. Examples…Brown and tan…Dark blue and light blue…Dark green and light green, etc. I like ordinary sewing thread for embroidery on dolls. It is finer and you usually have a zillion colors to choose from.
16. Colored pencils or even crayons for shading. I like Berol, Prismacolor pencils. Tan for over the eyes…OR…A shade to match the clothes. A color slightly darker than the skin for other shading. The shading you will do is very subtle and simple. If you don’t want to do it, Maria is just as pretty without it, but it’s another skill to practice with. White Out or a bit of white acrylic paint for highlights
17. Powdered “people” blush in a pink shade. The darker mauve and rusty shades look muddy on doll skin.
18. Paper or Pellon® to retrace your patterns onto, and freezer paper to use for the “iron on and sew” method, if you are going to use that method. If you are going to use the “draw around and sew” method, you will need a colored pencil in a shade slightly lighter or darker than your doll’s skin.
19. Thread to match your doll’s skin, the clothes and the chosen hair color.
20. All of your ordinary sewing and stuffing supplies.
Let’s begin . . .
Read through all instructions and familiarize yourself with the pattern pieces. Retrace pieces to other paper or Pellon®. Do not cut your original pattern. Keep it intact for future reference or to retrace a piece if a piece should get lost.
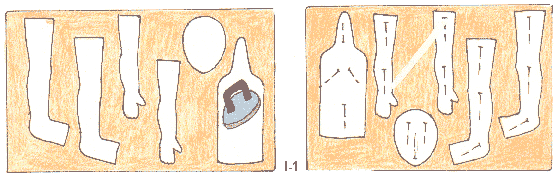
Make all of the doll pattern pieces from regular paper or Pellon® (to draw around)…OR…From freezer paper (to iron on, and sew around)
If you are making your doll from Velour or Doesuede, note the “Stretch Direction” of your fabric, and place the body pattern correctly. Pull on the fabric lightly to feel which way it stretches the most. The firm knits will stretch more one direction than the other. The stretch goes up and down.
If you are making your doll from a woven fabric or felt, it really doesn’t make any difference whether you put the pattern parallel to the selvage, or in the opposite direction.
If you are making your doll from Velour or Doesuede, fold the fabric with the SMOOTH sides together.
You will be sewing on the “fuzzy” side. After you sew your doll, the smooth side will be the right side.
If you are going to use the Freezer paper method, put the freezer paper pattern pieces, shiny side down on your doubled fabric. BE SURE TO LEAVE AT LEAST 1/2" BETWEEN EACH PIECE! Iron the pattern onto the fabric with your iron set at a wool setting. The Freezer paper pattern can be used several times. It is such a great way to sew parts that are the same both front and back! It eliminates marks on your doll, which sometimes show after sewing.
Pin the fabric together in a few places just for the purpose of keeping the 2 layers together.
If you are going to use the “draw around and sew” method. Put your paper or Pellon® pattern pieces down on your doubled fabric and pin them in place in a few places. BE SURE TO LEAVE AT LEAST 1/2" BETWEEN EACH PIECE! Draw around them with a colored pencil a shade lighter or darker than your fabric. I don’t recommend fade away pens, or lead pencils. Fade away pens sometimes don’t fade, or they fade before you get done sewing! Sometimes they fade, but come back as a stain on your doll! Lead pencils often show an ugly gray line even after you turn your doll right side out. YUCK!
Iron freezer
paper patterns to your doubled fabric…..OR….Draw around your patterns with a
colored pencil.
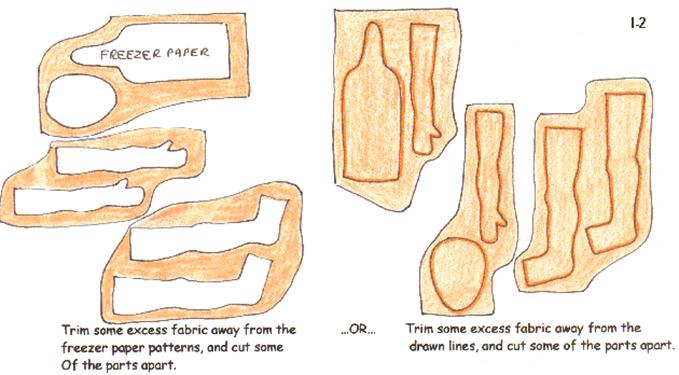
For the “Freezer Paper method”…After you iron the freezer paper pattern on, trim some of the excess fabric from around the pieces. I often will cut the arm pieces away from the leg pieces etc. So all of the sections are smaller and easier to handle. Don’t cut the pattern out, just trim some excess off to make it easier to handle while sewing.
For the “Draw Around and Sew Method”…Trim some of the excess fabric from around the drawn lines, and cut some of the pattern sections apart, to make it easier to handle while sewing.
Now let’s sew your doll’s parts
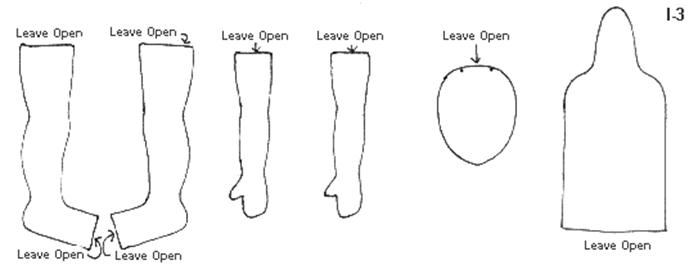
1. Using the correct needle for your chosen fabric, sew with a very small stitch all around the freezer paper or on the lines you drew. Remember to sew-sew-lift-turn at all curves. You will need to do this at the finger tips, thumbs, heels and head to really make nice even seams. Be sure to lift and turn at all Vs too. Be sure to leave an opening at the top of the head, bottom of the body, top of the legs and top of the arms. AND LEAVE OPEN AT THE FRONT OF THE FOOT TOO.
2. Cut your sewn doll body parts out, leaving a 1/8” seam allowance all around. Clip into the Vs right to the stitching. Careful! Don’t cut the stitching. NOTE>>>If you made your doll from a loosely woven fabric like Osnaburg or linen, be sure not to make the seam allowance any smaller than 1/4". Don’t clip quite to the stitching at the Vs either. Remove the freezer paper if you used the freezer paper method, from all parts except the body.
3. Draw through the 2 side darts on this side of the body. Use a colored pencil slightly lighter or darker than the doll’s skin. Remove the freezer paper from the body.
4. Now lay the body pattern, with the darts cut out of the Freezer Paper, on the other side of the sewn body. Draw through the center dart on this side of the body. Use your colored pencil.
NOTE>>>If you used the “draw around and sew” method, lay the body pattern on one side of the body and draw through the center dart on that side. Lay the body pattern on the other side of the body and draw through the side darts on this side.
Draw through the
darts on one side. Draw through the dart on the other side.
5. Pinch the center dart up and sew it in. Pinch the side darts up, one at a time and sew them in.
NOTE>>>Sew just on the outside of the drawn lines. This way the doll’s waist will be slim, and no marks will show on your doll after you turn her right side out. BE SURE NOT TO SEW THROUGH BOTH LAYERS OF THE BODY when you sew the darts in!
Pinch the darts up
and sew them in.
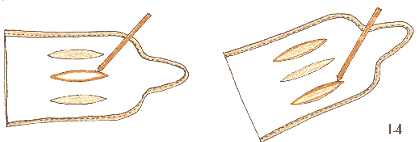
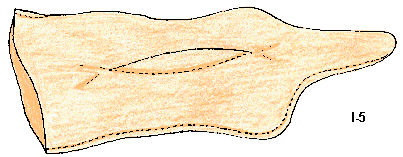
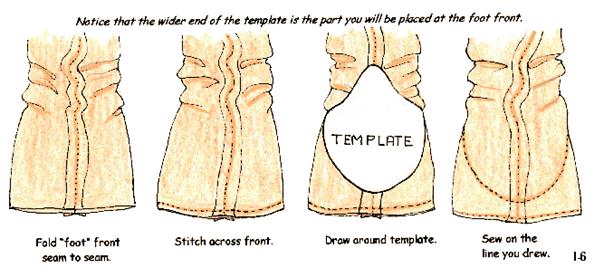
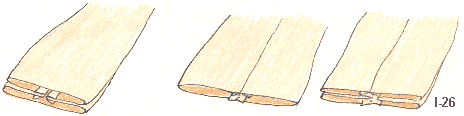
6. Fold the foot front “seam to seam” and then sew across the front, close to the edge, to hold the front together. If you pin it together the pins get in the way of working with your template.
7. Draw around the toe template on the top of each “foot”, tapering the line to the sides of the feet…OR…Iron your freezer paper toe templates in place on each “foot” front, to sew around. NOTE...The “foot” front shape, is drawn about 1/2" back from the front of the fabric. If you draw it right at the edge, where you sewed across to hold the fabric together, it will make the foot too big, and may be hard to sew a nice shaped “foot” front because as you get so close to the edge while trying to sew a nice curve, it is so easy to sew right off the fabric.
8. Sew the “foot” front seams that you have drawn, starting at one tapered edge. Sew slowly around the front, using a very tiny stitch and lifting the presser foot of your machine as you did for the fingers and other curves. End at the opposite tapered edge. Repeat for other “foot” front. Of course if you ironed freezer paper templates to the fronts of the feet, sew around those. I LOVE! The freezer paper method. It is so much easier to achieve accuracy!
(OR USE THE FREEZER PAPER METHOD.)
9. Trim away the excess fabric at the foot fronts.
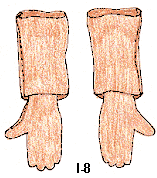
10. Turn your doll’s parts right side out. Use your hemostat to reach inside, grip some fabric in their jaws, and slowly and carefully turn everything but the head and body only ½ way to the right side. Turn the head and body all the way right side out. Use the rounded end of your closed hemostat to push the feet, neck, shoulders, head, thumb and fingertips out nice and smooth. NOTE>>>It is easier to stuff long doll parts, at least partially, while the parts are only 1/2 way right side out.
|
|
|
|
|
|
11. One at a time, hold both sides of each V area and rub them back and forth between your fingers to take the wrinkles out of the V areas. These V areas on any doll you make, will need to be rubbed like this. This rubbing softens up the fibers in the seam allowance, to allow the V to let go of the wrinkles. This rubbing is kind of like rubbing wet fabric to get a stain out, but gentler! DON'T pull the areas apart trying to work the wrinkles out. Pulling will often result in tearing on woven fabrics.
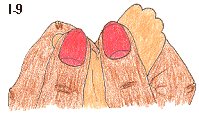
Work the Vs gently
back and forth, rubbing
the fabric together, while holding at each side.
12. The divisions between the fingers need to be sewn by machine before you stuff the fingers. If you sew them now, rather than by hand after stuffing the stitching will nearly disappear.
Be sure you have poked each fingertip out nice and round, using your closed hemostat to help. Draw the lines to sew on with a colored pencil a shade lighter or darker than your skin fabric.
Think about the lines you draw>>>Try to make the fingers proportional in width. You don’t want the “pinky” finger to be fatter than the “pointer” finger! You can of course draw along a straight edge, to make nice straight lines.
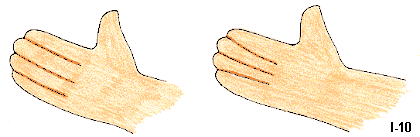
Draw the fingers with proportional widths. Don’t draw
them like this with helter skelter widths.
13. You will top stitch between the fingers, now, by machine, before stuffing. Start in the hand area, rather than at the seam edge, so that your sewing machine won't "eat" the fabric right at the edge where the seam is. Be sure to back tack at the beginning of your sewing (in the hand area). Back tack at the ends too, if your sewing machine will let you. ( Refer to “eating” the fabric, above) Tie the threads at the ends of your sewing if your machine won’t let you back tack.
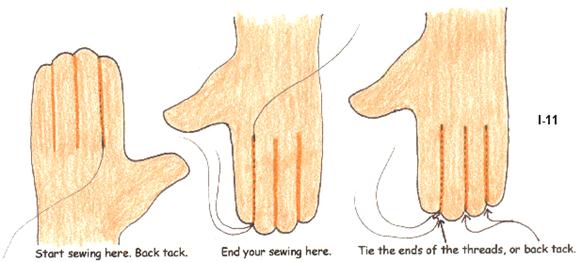
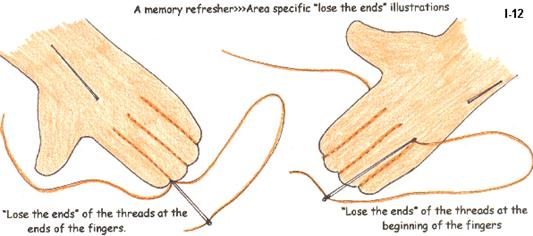
Remember the lesson in chapter 3 about “losing the ends” of your thread? For a really fine finish for the “between the finger” sewing, “lose the ends” of the threads that are hanging from the sewing of the finger divisions.
Don’t clip the threads short if you want to “lose the ends”. Just leave them hanging until the hands and arms are stuffed, and then put the threads at the ends of the fingers onto a needle and “lose the ends” down in the hand. Repeat for the threads on both sides of the hands, at the base of the fingers.
A TINY (pin point size) dot of white glue or Crazy Glue? where the threads are taken back into the hands will assure that they won’t pull back out.
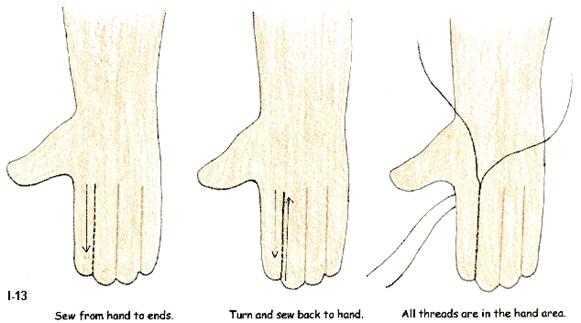
I want to teach you another option for sewing these finger divisions too. IF, your sewing machine will let you sew from the seam edge, and IF, you can sew back on the same line.
Sew from the hand to the end, and then turn your fabric around and sew back to the hand again. This way all of the threads to be “lost” will be in the hand end. There will be no thread ends to lose at the ends of the fingers.
Now let’s put the face features in place.
Make sure the head is fully turned, with all the sides and edges nice and smooth. Put the doll head on a table, face side up. Remember that you can put a face on each side with this flat head style. So you have 2 tries at a good face. You will be using a reverse template method if free-handing is not your “cup of tea”.
NOTE>>>If faces are just not your thing at all, and you just dread the though of putting them on, don’t despair! One and Only Creations and CRs Crafts both have iron on faces that you can use. They come in assorted sizes, and are very pretty. I do suggest that you at least paint in the eye whites on them though, and add white highlights too.
1. Trace the head/face pattern onto a piece of freezer paper or regular paper. Cut the mouth and eye shapes out. If desired cut the eyebrow shapes out. They will just be very thin lines. You don’t need to cut the eyelash shapes out. They are just simple lines that you can put on freehand. The nose will need to be free handed too, as will the eyelid lines, unless you want to very carefully cut the little curved shapes with a razor or small very pointed scissors. These little curves are really very simple to freehand. Remember to mark LIGHTLY!
2. Lay your face template on top of the head of your doll, lining up the sides etc. evenly. Iron the freezer paper template in place on your doll’s head…OR…Just lay and carefully pin the paper template on.
3. LIGHTLY! Draw through the cut outs in the face template. I like to use a colored pencil in a pink or red for the mouth. And a tan colored pencil for the nose, eyebrows and eye position. Don’t use a lead pencil. It makes hard to conceal gray marks.
NOTE>>>If you like to draw faces, please wait until your doll is stuffed to do so. It is much better and more creative to do free-handing on a stuffed head.
NOTE #2>>>If you are going to iron a One And Only Creations face on, very lightly mark the center of the eyes and the center of the mouth through your face template. This will give you the relative position for the iron on features. The large size face fits perfectly. The one shown in a following pictures is called Crystal. There are other ones too. CRs has them in their catalog and many craft stores carry them too. They usually need to have the whites painted in, and the addition of Mod Podge over the eyes gives the eyes a glass like look! I haven’t tried clear fingernail polish over the eyes, so I don’t know how it will affect the decal. Someone try it for the class, on a scrap piece of fabric and one of the test prints in the package. Please let us know how it works, O.K.
|
|
|
Now, back to the train of thought about the paper templates. Sorry for the brain de-railment!
4. After drawing through the template VERY LIGHTLY, remove the paper template, Either freezer paper or regular paper.
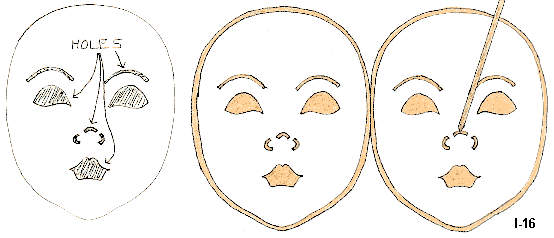
a. Cut out the features from the paper, leaving “holes” in
the face shape.
b. Iron or pin the “template” in
place.
c. Draw through the “holes” onto your doll’s face.
Your doll’s face will be embroidered or painted after your doll is stuffed. The irises of the eyes will be drawn in then too.
<<<Now for a Very Mini Face Anatomy Lesson>>>
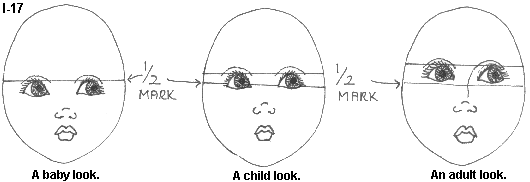
Face features are placed and spaced differently to depict different ages.
All of a babies features are on the lower 1/2 of the face.
A young child’s features are a little higher up, and spaced a little farther apart.
A young adult’s features are spaced about the same as an adults, but their nose is often not as long
(Nor is the nose tip as far from their eyes)
An adult’s features are divided in about thirds. The eyebrows at the top third. The top of the lip at the bottom third line and the nose in the middle third.
I have looked at a number of face anatomy books, and they say the middle of the eyes are at the 1/2 way mark on an adult face, but every diagram shows a lot more face below the eyes than above, so the 1/2 doesn’t work out right! I “just know” where the features belong, and many of you do too.
For those of you who find this a puzzle, I am including a Mini Doll Face Anatomy Lesson. I am not going into medical detail with this.
Study people faces too. You will notice that there are so many variations to the general rules! You will also notice that if you see a small child with a long and prominent chin or nose, that child will look “old” for their age.
You will see adults with childish “low on the face” features too.
What I want to show you is what happens with the age of a simple face by very small movements of the exact same features. Even though features and face shape would also change from child to adult, you can see the difference just the movement of the features makes.
In later patterns we will be doing the actual template method of feature placement, so this is just a pre-taste to familiarize yourself with the differences.
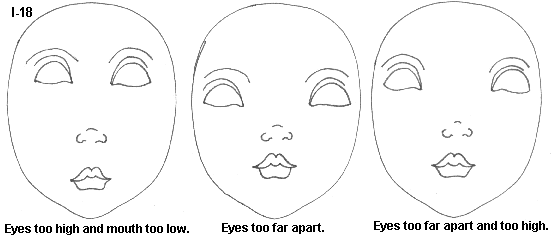
How many of you have seen dolls or drawings, done with the features all wrong? Often the eyes are on the forehead and the mouth is on the chin. Or the eyes are so far apart that the poor doll needs facial surgery.
NOTE>>>Eyes are “usually” one eye width apart.
Children, with their limited skills and short observational time spans, often draw this way. These are very common placement mistakes, that practice and observation will help correct.
If you really want to make cloth dolls, this is an area that needs to be honed to a fine point with lots of observation and drawing practice. Many patterns you will get will simply say…draw the face on the doll, using the picture as a guide. You will succeed at this far better if you give over some time and practice to feature placement.
Following are some examples of features in the wrong place for “human” dolls!
NOTE>>>Country and Primitive dolls often have their features way out of position, but that is part of their charm.
Crazy Fantasy dolls often have their features out of whack too, but again, it is part of the “look”.
2011 note>>> The wide eyed, eyes too far apart look is very popular right now. I even have a FREE pattern at my web site called Wide Eyed Wendy who has that “look”.
Now it is time to stuff your doll.
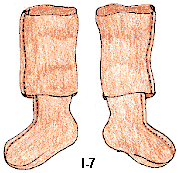
1. Stuff your doll’s feet firmly, shaping as you stuff. Be sure to stuff out into the heel. See it’s easier to get the stuffing down into the feet when part of the leg is rolled down. Lighten up on the stuffing as you stuff towards the knee.
You will also need to finish turning the rest of the leg right side out as you get towards the knee.
I will give you 3 ways to make the knees bend, or you can stuff the whole leg to within about 1 1/2" of the tops and Maria will have straight legs. Options, Options, Options! More cloth dollmaking fun!

Any of these ways work fine and are suitable for this type of leg. Stuff fairly firmly right above the knee, and then lighten up on the stuffing as you get towards the top of the leg. Stuff to within about 1 1/2" of the top.
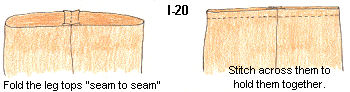
2. Fold the top of the legs “seam to seam” and stitch across the tops to hold them together.
NOTE>>>Some dolls with this leg style will call for the leg tops to be pleated in on the sides, and then stitched.
Maria’s arm tops are done this way, so you have both methods in this one doll. Her hips were designed wide to accommodate the un-pleated leg tops.
3. Now stuff the neck very firmly, using COTTON BALLS for an extra hard and wobble free neck. (Just ordinary cosmetic puffs from your cosmetic drawer work just great.) Pull them apart and fluff them up before putting them into the neck. Use your screwdriver to really pack the COTTON in there. The COTTON should be used in the whole neck, all the way down to where the curve to the shoulders starts. REMEMBER how to hold your doll for neck stuffing from chapter 4? Holding it this way is very important if you want the neck really wobble free, and you don’t want to pop the stitches!
Memory refresher
picture of the holding
position for stuffing the neck VERY firmly.
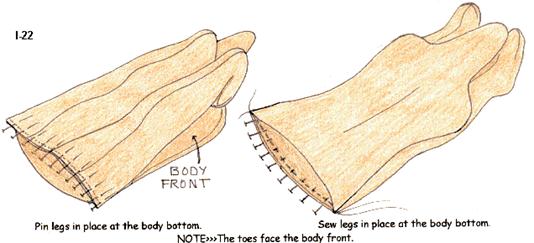
4. Now it is time to sew the legs to the front edge of the body bottom by machine, before you finish stuffing the body. Why are we doing it in this order you ask? It is easier to stuff the neck really hard without the legs flopping about, and it is easier to sew the legs on without any stuffing in the body. (Just in the neck)
5. Place and pin the tops of the legs on the body front (the front has the 2 darts in it) with the toes facing the body.
6. Machine sew the legs to the open edge of the body front. You may have to overlap the leg edges in the center. This usually occurs when the doll is made from woven fabric. It doesn’t happen with firm knit, because the knit gives a little, and lets you “cheat” with a little tug to make it all fit perfectly!
7. Finish stuffing the body quite firmly, shaping as you stuff. Take special care to get the shoulders smoothe and matching in firmness and shape. Stuff all the way to the bottom of the body.
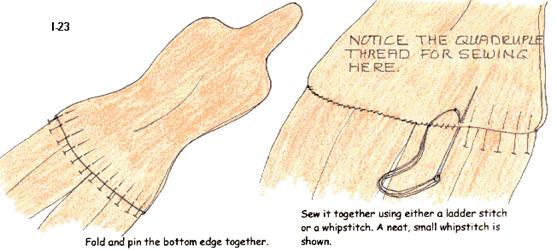
8. Now, fold the bottom edge that doesn’t have the legs attached to it to the inside, and pin both bottom edges together. Work carefully to get a nice neat edge. I put the pins quite close together, to hold the edges securely, so I don’t have to worry about them pulling apart as I sew them. You will need to add stuffing as you pin the edges, to finish filling the area fully.
9. Hand sew the bottom together using either a small ladder stitch or a very neat, close together whip stitch.
10. Now let’s stuff the arms…I am going to
give you a choice of 2 ways. All stuffing or Chenille stem fingers and lower
arms, with stuffing in the upper arms.
STUFFING FINGERS…
11. Remember how I showed you how to twirl stuffing on your stuffing fork, to make a little Q-tip type thing on the end of your stuffing fork? This was in chapter 4.
This is the way you will need to stuff the fingers and thumbs with stuffing. This is the best stuffing method for a doll that a child will play with.
Make and guide the little Q-tips, one at a time down into the fingers and thumb. It will take a little practice to make these the right size for the fingers. A piece about as big as a walnut is about right for stuffing these fingers. The Q-tip needs to be about 1 ½” long and very tightly “twirled” onto the stuffing fork.
One Q-tip to each finger and thumb. NOTE>>>In Australia these are just called cotton swabs.
After you guide the Q-tip stuffing into a finger, squeeze the finger, and pull your “fork” out, leaving the stuffing in place.
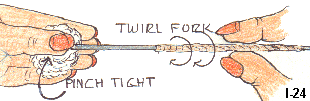
Twirl the stuffing
tightly onto your “fork”

Guide the stuffing into each finger on
your.
12. After the fingers and hands are all stuffed, finish pulling the rest of the arm right side out. Did you remember to leave it part way wrong side out for stuffing the fingers and hands?
Finish stuffing the arms 1/2 way. … Put a large hole bead on…or…tie…or…stitch across at the elbow area, just like you did for the knee area of the legs…OR…You don’t have to do anything at the elbow. Just stuff the whole arm.
13. Finish stuffing the rest of the arms softly to within about 1 1/2" of the top.
14. Pleat the seamed sides in…or…fold the arm tops “seam to seam” and pleat the un-seamed sides in. A picture below will show you this. Zig-Zag stitch across the raw edge of the arm tops.
NOTE>>>I have found that if you fold the raw edge to the inside, and then pleat the top in, the fabric is so thick it is hard to sew through. That is why I just neatly Zig-Zag the tops.
NOTE 2>>>Some patterns will have you sew the arms into the seams of the body. This is not possible with the freezer paper or draw around and sew method.
Pleat the
seamed sides in …..or….. Fold “seam to seam” and pleat the
un-seamed sides in.
We will sew the arms on in a minute. First I want to show you the…
CHENILLE STEM STUFFED FINGERS AND LOWER ARMS.
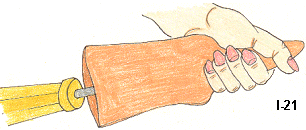
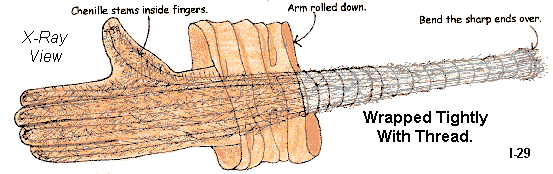
1. To stuff the fingers/arms with the chenille stems, fold 10 stems in half. Keep the arms rolled down so you can get to the fingers more easily. Insert the folded end of a chenille stem into each finger. I use my 12” long broken upholstery needle to guide the chenille stems into place. You can also use a commercially made stuffing fork.
Below is a picture of my 20-year-old stuffing fork, made when I accidentally broke the eye of one of my long needles. I then wrapped the shaft with masking tape, and blunted the sharp point on the sidewalk! This has served me well all these years and I couldn’t be without it. It’s ugly, but oh-so useful! This ugly old stuffing fork is getting embarrassed at all the exposure it is getting! LOL

My “accidental”
stuffing fork. It is actually 12” long
You can make one by using a hack saw or strong pliers type cutters, to cut off the top half of an upholstery needle’s eye.

My stuffing fork with a chenille stem hooked in the fork,
ready to be guided into a finger. Be sure to pinch the chenille
stem tight against the needle. Don’t leave it in a loose loop.
2. After each finger is stuffed with the chenille stems, use your hemostat to bend the sharp tips over a little bit, and then squeeze the long ends of the chenille stems together and wrap thread around them to bundle them together. This makes it easier to stuff the arms. If you just leave the chenille stems loose, they will bend all about as you stuff.
3. Stuff the hands and arms, (stuff the hands very lightly. For adult dolls, I just stuff the palms a little. The stems showing on the backs of the hands look like the tendons on the backs of real hands!) You don't need to stuff the fingers; the chenille stems do that very well. As you stuff the hands, curve the fingers slightly to the inside and pull the thumb towards the palm to achieve a natural looking position.
4. Don't leave any of the chenille stem bundle in the arms touching the inside of the arm fabric. Your flat point screwdriver will allow you to slide stuffing down along the stem bundle in long thin strips.
Be careful as you stuff the arms, that you don’t stuff them all out of shape! This doll’s design has straight arms, so that isn’t much of a problem…But…When dealing with arm patterns that bend at the elbow, and woven fabric too, the elbow area falls on the bias, and it is really easy to get these bulgy, weird looking elbows!
5. When the hands and arms are stuffed and shaped to your satisfaction, close the tops just the same way that you did for the “all stuffing” stuffed hands and arms.
Now you can sew the arms in place at the shoulders.
1. Place and pin them in position at the shoulders from the underside. Start your sewing inside a pleat so the knot is hidden. Sew them on securely with a neat backstitch first, and then with a small, neat whipstitch across the Zig-Zagged edge. Sew in place at the end of your stitching, and then “lose the ends” of your thread.
Be sure to position the arms in a natural position, with the thumbs to the front, no matter which way you pleated and closed the tops of the arms.
|
|
|

Now for the all important head! This is a simple, flat head, but your stuffing can make it smooth, wrinkle free and charming; or lumpy, misshapen and not so charming.
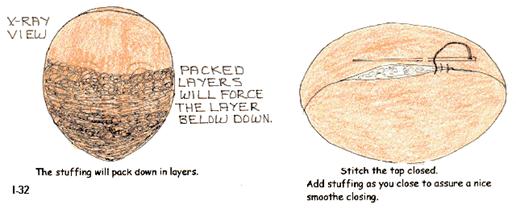
Stuff the head very firmly, shaping as you stuff. Be sure to get stuffing fully into the chin, and cheeks. This little “sort of” pointed chin is practice towards stuffing really shaped and pointed areas on the next dolls.
Pack each layer of stuffing down firmly on top of the next. Don’t put a bit in here and a bit in there, trying to make it smooth. That will only cause lumps. NOTE>>>If you sewed points into the curves, no amount of stuffing will eliminate them.
Back to sewing practice, do not pass go, do not collect graduation certificate!
When the head is stuffed to your satisfaction, whipstitch or ladder stitch the top of the head closed.
Now it is time to embroider the face,
and then we will attach the head to the body.
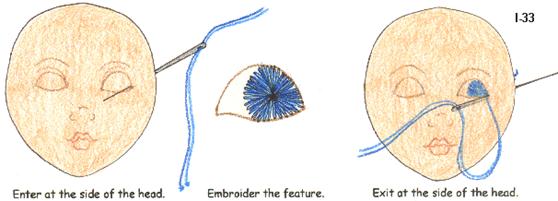
1. It is always best to do embroidery after stuffing. You have more control of the tension on the stitches, and you can adjust the features as you embroider. I like to use plain old sewing thread for embroidery. It is finer and makes flatter embroidery. When using embroidery floss, there is a tendency to use too many strands, resulting in thick heavy embroidery that looks very amateurish. Embroidery floss also tends to pull stuffing out with it as you stitch. Ordinary thread doesn’t do that. (Those pretty, shiny, Sulky? brand threads make nice embroidery thread too.)
2. As you begin a new color of thread for your embroidery, enter at the side of the head, right in the seam. This way all of the knots will be hidden under the hair. When you finish a feature (or run short on thread) exit in the seam at the side of the head too, and stitch in place a few times to secure the stitching.
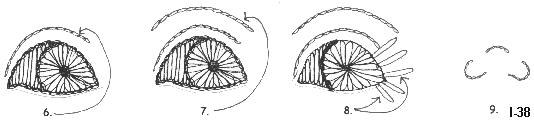
The eyebrows, eye outline and nose are done in a simple outline stitch, using a single or double thread. The eyelashes are just straight, single stitches, or can be done in three or four outline stitches for each eyelash.
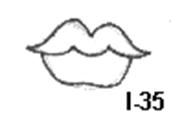
The lips will be done in a satin stitch, going from the center to the top edges, and from the center to the bottom edges. The top lip will be done in the lighter lip color. The bottom lip will be done with both the light and dark color on your needle at the same time. A dividing line will be done in the darker color lip thread.
The irises of the eyes will be done with 2
colors of thread on your needle at the same time.
I like to use black or dark brown for the eyebrows and eyelashes. Tan for the
nose, and pinks or peaches for the lips.
The whites of the eyes will be done in a satin stitch. The pupil will be a French knot.
The irises can of course be any color you choose. Satin stitched irises make very flat, dull looking eyes. You will be stitching from the center to the sides, all the way around. A little of the “skin” will show through the iris stitching, and that is fine. It gives the eyes another color dimension.
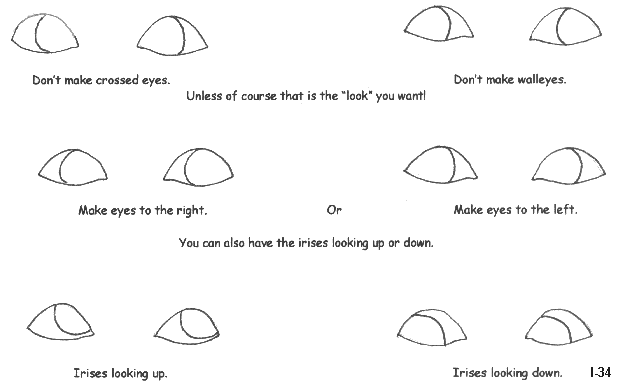
To draw the irises in, if freehand isn’t comfortable, use something round and size appropriate to draw around. Be sure the eyelids cover part of the iris at both the top and bottom. Also be sure the eyes are looking to one side or the other. Not both to the center (cross-eyed) or both to the outside (walleyed) Don’t try to center the eyes in the middle of the eyeshapes either. It is so easy to get them “off” a bit, and your doll will always have a bit of a strange “look”
The center line on the mouth will need to be freehanded. It is a very simple M shape, with the center curving, rather than coming to a point. Look at the picture of the face design for the shape. Remember, draw very lightly!
Freehand the center
line for the mouth.
It is very easy to do.
The embroidery stitches to use ---->

I like to use two different colors of thread at the same time for the irises. Like dark blue and light blue, brown and black, etc. A single strand of each color.
I also use two different colors for the lips. I like to make the top lip the lighter color of peach or pink, two strands of one color. I like the bottom lip to be a combination of both the light and dark, pink or peach. A single strand of each.
I do the dividing line in the dark shade.
If you embroider all the time, you can of course get creative with the face work. I embroider very little and have to really think about it as I do it, even the simple stitches. But for beginning dollmakers embroidery is the best way to go.
If you normally do your doll faces in paint or other mediums, please do so.
Following are the numbered steps for the embroidery.


After the embroidery is done you can really make the face special with simple crayon or colored pencil shading.
Do it lightly at first, and then darken it where you want deeper color.
Use a color to co-ordinate with the clothes for the eyelids right above the eyes.
Use a shade or two darker than the skin for the shading below the eyebrows and for the shading down the sides of the nose.
Light, nearly skin tone lines at the sides of the mouth, sides of the nose, right above the top lip in the center, and below the bottom lip looks nice too.
After you are done shading, blush the cheeks with powdered blush applied with a soft brush.
NOTE>>>Very dark skin doesn’t take as well to this simple shading, unless you have some art training under your belt. Blush doesn’t show up on very dark skin either.
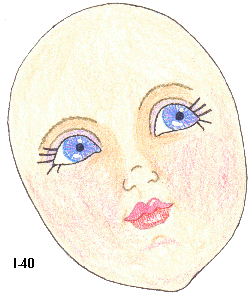
Shaded face, done on paper
(I-40).
The actual
embroidered and shaded face.
Note the highlights in the eyes and on the lips. Liquid Paper, or White Out works well for this. You can also use white acrylic paint for the white highlights.
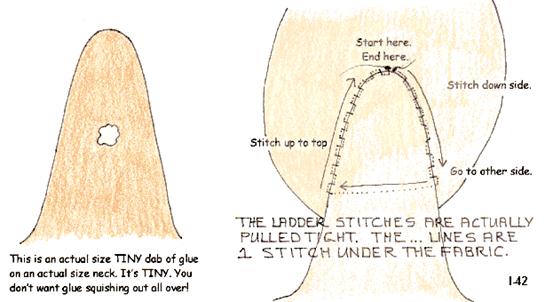
To put Maria’s head on is very simple. I like to put a TINY dab of hot glue on the neck, and then quickly push the head against it. You can tip the head to one side for a coy look.
The glue will hold the head in place while you ladder stitch the head to the neck.
It is easiest to start the ladder stitch at the top of the neck. Go down one side to about 1” above the chin. Pass your needle through the back of the head to the other side, and then ladder stitch up to the top again. Stitch in place at the top to secure your stitching.
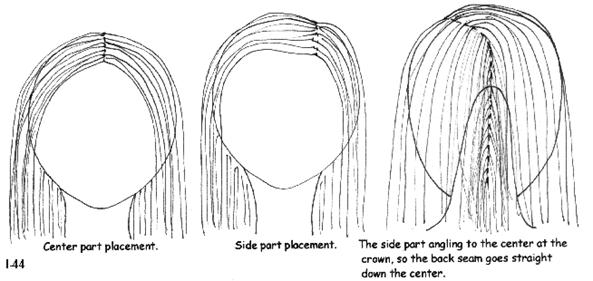
Now lets make the simple parted in the middle or on the side hairstyle.
This style will have a stitched part that goes all the way from the front of the forehead to the nape of the neck in back.
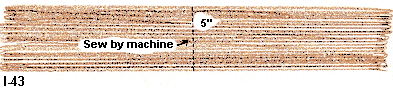
Measure that distance on your doll. On my doll it was 5”.
1. Pull off enough 24” to 36” long strands of your chosen yarn to fully and thickly cover that distance.
I just love long hair on dolls! You can make yours shorter if you want to though!
I can’t tell you the exact number of strands because we aren’t all using the same yarn. I just pull off one length and then fold the yarn back and forth in my hands, until I think I have enough. You can always add some more strands if you need to. I cut the loops later. I did count the strands of machine knitting yarn. It was 300!
2. Sew by machine down the center of the strands. Press down on the yarn on both sides of the sewing machine presser foot. Push the yarn under the presser foot, while pressing down, to keep it close together. If you have a “persnickity” sewing machine that doesn’t like to sew on yarn, putting a piece of tissue paper under the yarn helps. You can also mark the 5” measurement on the paper, to help you with keeping the seam the correct length. If this is your first try at sewing yarn on a sewing machine, the tissue paper method is probably the best for you to use. After the yarn is sewn, tear the paper away.
NOTE>>>I know there are special products on the market that you sew on and then tear away. I think one is called Stitch and Tear. But tissue paper works fine, and most everybody has some around.
Enough strands to
fully and thickly cover the measurement.
3. Now place the sewn yarn with the seam going right down the center of Maria’s head, from about 1 1/4" above her eyebrow level to the back of her neck. This makes the center part style. Stitch or hot glue the seam onto Maria’s head.
If you want a side part, start the hair in front, off to the side, instead of right in the center. Angle the seam towards the crown as you stitch or glue the center seam. From the crown down to the nape of the neck the seam will go right down the center again. Stitch or hot glue the center seam in place.
4. Finger arrange the yarn all around the head. The hair will hang down in back from the part that goes all the way to the nape of the neck. It fills the head out in back when done this way, and the seamed hair covers the neck stump much better than loose hair strands.
5. After the “hair” is finger arranged neatly
all around, lift a section at a time and then spread hot glue, thinly and
carefully on the head. Press the “hair” into the glue. Repeat for the next
section, etc. The seam and “hair” is already glued at the center.
6. If you just can’t bring yourself to glue the hair down, you will need to sew an under layer down to the head all around.
7. Trim the “hair” evenly all around.
8. If you made the side part style, the side opposite the part, will usually need to be fastened to the head a little better. I like to do that by sewing a piece of hair yarn through the hair and head side head at about eye level. Tie a ribbon in place with the yarn and then tie the ribbon in a bow. If the doll will be played with, sew the bow to the head too. Kids are really rough on bows!
NOTE>>>You can forego the gluing or sewing of the loose hair completely if you wish, and simply bring it to the sides and tie it at the sides like you did Angelique's hair. You can then leave it in ponytails at the sides, or braid it. Tie ribbons at the ends of the braids. This is the best play doll hairstyle.
Now lets make the clothes.
Maria wears the shortened version of the gown as a blouse/slip. She wears a skirt, stockings, shoes and vest.
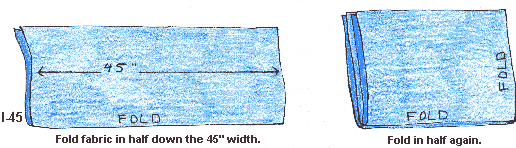
1. Cut the Blouse/slip from your fabric on a double fold. Fold in half down the 45” width of the fabric first and then fold in half again as illustrated.
NOTE>>>The simple blouse/slip is all in one piece, just like Angelique’s gown was. We will be gathering the neck and sleeves with elastic instead of cord though.
2. Cut the pantaloons from your chosen fabric. You will need to cut the pantaloons out twice on the fold of the fabric. These pantaloons have no side seams.
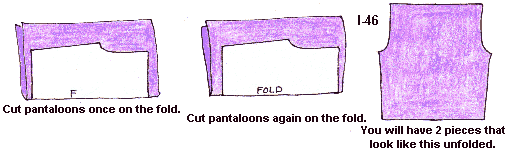
Note>>>>Remember earlier when I said you could use blouse/slip scraps for the pantaloons if you added a side seam? If you want to do that, cut the pantaloons out twice on doubled fabric. Just cut about ¼” from the “fold edge”. You will sew a side seam in these pantaloons.
3. Cut the vest, on the fold from felt.
4. Cut the skirt, (11” X 22 1/2”) on the fold, and waistband from your chosen fabric.
5. Cut the shoe tops from felt, and the shoe soles from scraps left from the vest, or another color of felt.
Now let’s make the pantaloons.
1. Lay the 2 pantaloon pieces right sides together as shown in the following illustration. The curved seams are the center front and the center back seams. There are no side seams. (OR>>>See NOTE>>> about the side seams, and sew them, right sides together, first. Proceed as if the sewn seams were the fold.)
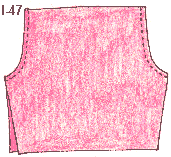
The folds are where the side seams would be.
2. Sew the curved seams.
3. Zig-Zag stitch the flat lace over the raw edge of the leg openings of the pantaloons.
Eliminating bulk is one goal when making doll clothes. Sewing lace on with a Zig-Zag stitch is one way to eliminate bulk, and finish the edges at the same time. This method is perfect for the wrist edges of sleeves and the legs of the pantaloons. It is also perfect for the bottom edges of some skirts and petticoats.
NOTE>>>If you have a serger, you can of course serge the raw edges and then sew the lace over the serging.

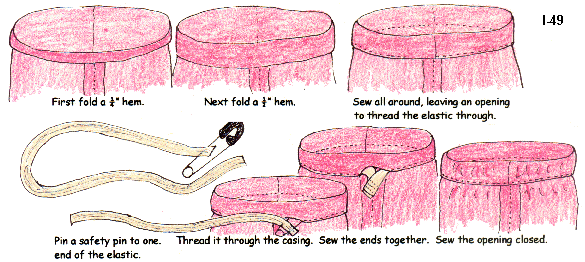
4. Make a casing in the waist edge of the pantaloons, by first pressing a 1/4" fold to the wrong side and then a 1/2" fold to the wrong side.
5. Sew the casing all the way around, but leave a small (1/2” spot) open to thread the elastic through.
6. Pin one end of the 9” long elastic with a small safety pin and then thread the elastic through the casing. Sew the ends of the elastic together, and then sew the little opening in the casing closed.
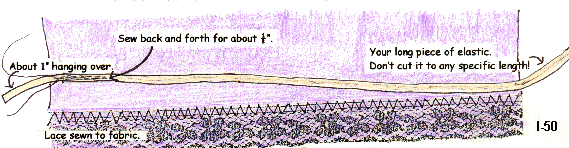
7. Now let’s learn to “stretch and sew” 1/8”
elastic onto your fabric with a wide Zig-Zag stitch. This makes a thread
“casing”, that is so much less bulky than a fabric casing. It also lets you
gather up far more fullness with the elastic, than is possible when you sew
directly on the elastic. The Zig-Zag stitching gets lost in the gathers,
so you don’t even see it.
We are going to do this first on the straight edge of the pantaloons legs. When you get the Blouse/Slip, we will do this on the slightly curved edge of the sleeves, and then on to the very curved neck edge.
8. The elastic will be sewn about 1” to 1 1/2" above the lace. Mark a line with a colored pencil on the wrong side of pantaloon’s legs.
9. Now get your 1/8” wide elastic. Put one end down on the line, with about 1” left hanging beyond the end of the fabric. Hold the elastic and anchor stitch it at the end of the fabric, by sewing back and forth, with a straight stitch, for about 1/2"
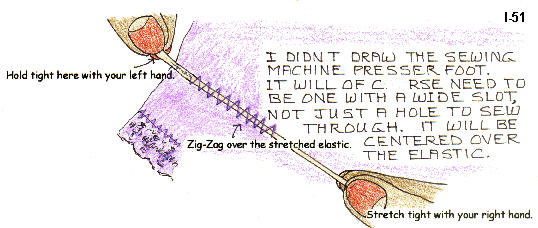
10. Now set your sewing machine to it’s widest Zig-Zag stitch. It will need to be set wide enough to Zig-Zag all the way across the STRETCHED elastic. On my machine it is #4. Yours will probably be different. See # 1-51
11. Now, while holding the thread and elastic end in your left hand, stretch the elastic with your right hand, and Zig-Zag across it. DON’T SEW INTO THE ELASTIC! Every stitch must go all the way across the elastic.
When you get to the other end, DON’T back tack yet. Take the piece off of your sewing machine, and pull on the loose elastic end. The elastic will slide through the thread casing, so you can gather the fullness up more.
12. Try it on your doll’s leg, and adjust the fullness to fit your doll. Go back to your sewing machine and sew back and forth at the end to secure the elastic.
This holding and stretching may take a few tries to feel comfortable, but once you “get it” it goes so fast!
You may want to practice on scraps before doing this on the doll’s clothes.
I do this so much that I don’t even take the piece from the machine to pull up the fullness. I do it right at the machine and secure the elastic then. If you get it a little tight, your doll won’t complain! You do need the ability to “eyeball” size to be able to pull the fullness up without trying it on though.
Some of you can eyeball sizes, some can’t. Don’t fret if you can’t. Just fit it before securing the elastic end.
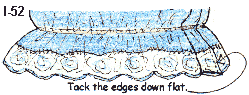
13. After the elastic is in place on both
legs, sew the inner leg seam. Tack the raw edges of the lace down flat at the
edge so there won’t be any little raw edges sticking out.
NOTE>>> If the Stretch and sew” method of applying elastic still eludes you, you can always gather the legs with silk ribbon, just like you did for Angelique.
Let’s make the Blouse/Slip.
It is made just like Angelique’s gown, but is only one layer, and the lace and elastic are sewn in place before the side seams.
1. Zig-Zag stitch flat lace at the sleeve edges of the Blouse/Slip.
2. Zig-Zag stitch flat lace over the raw edge all around the neck opening. Start and end at the center, so that part can be put to the back.
3. Stretch and sew elastic to the sleeves, about 1” from the lace, just like you did for the pantaloon’s legs.
4. Stretch and Sew elastic all around the neck opening, about 1/2" from the lace. It is harder to sew the elastic onto this curved area. You have to do it an inch or less at a time. Start and end the elastic at the same side you did the lace. Be sure to gather the fabric on the elastic tightly enough so it doesn’t hang loosely around Maria’s neck, but not so tight that you can’t get it over her head!
Remember>>>If this elastic business is just too hard, gather the sleeves and neckline with silk ribbon just like you did for Angelique’s gown.
5. Right sides together, sew the side and under arm seams.
6. Clip the V at the underarms, and then turn the Blouse/Slip right side out.
7. Zig-Zag stitch flat lace over the bottom edge of the Blouse/Slip.
8. Put the gown on Angelique, with the back of the gown being the side where the lace and elastic comes together around the neck.
9. The Blouse/Slip will look big until you put the skirt on. Then it blouses up around the skirt waist, and puffs out under the skirt to become the slip.
Next, let’s make the skirt.
1. First we will prepare the pockets. Sew a very narrow hem to one narrow edge of each pocket.
2. Fold the hemmed edge back, right sides together about 3/4". See illustration.
3. Now sew each end of that hem as illustrated.
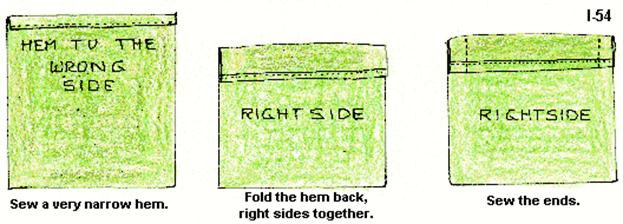
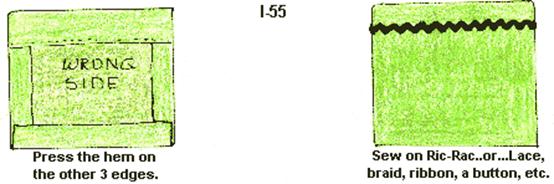
4. Turn the hem to the inside, poke out the corners and press. Also press the hem in all around the other 3 edges.
5. Sew the Baby Ric-Rac in place if desired along the top edges of both pockets, about 3/8” down. The Ric-Rac holds the hem down. You can also do decorative stitching across the hem edge, or sew a button on etc. In other words, decorate as you desire.
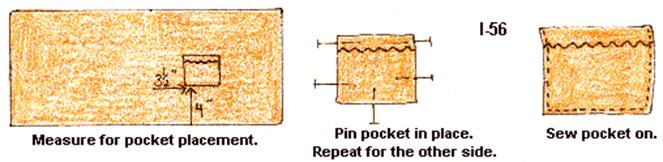
6. Press the center fold in your 11” X 22 1/2" skirt piece. This will be used to measure and place the pockets. You will press it out after the skirt is done.
7. Now lay your skirt piece out flat, and measure about 3 1/2" from that fold, and about 4” up from the bottom of the skirt on one side. Place, pin and sew the pocket on that side. Repeat for the other side.
8. Fold the waistband, lengthwise, right sides together. Sew both ends of the waistband. You can put a piece of interfacing in the waistband if desired, but for this narrow waistband it isn’t really needed.

Fold waistband and
sew the ends.
9. Turn the waistband right side out and press.
10. Narrowly hem both short, back edges of the skirt.
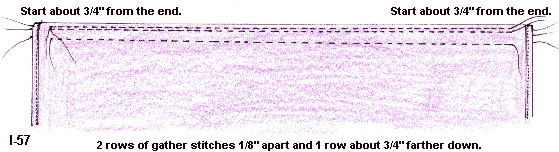
11. Now let’s gather the top edge. It is best to run 3 rows of stitching along the top edge. 2 rows will be within the seam allowance, about 1/8” apart. 1 row will be about 3/4” farther down.
This extra row of gathering stitching helps keep the gathers even and smoothe as you sew the waistband on. It will be pulled out after the waistband is sewn on.
The gathering stitching is done with the wrong side of your fabric facing up. Set your sewing machine stitch length to the longest stitch it will make.
Start about 3/4" from the end, and stop about 3/4" from the other end. The 3/4" ends will fold back around the edge of the waistband, when you sew the waistband on.
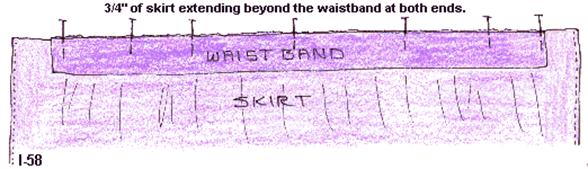
12. Pin the center of the skirt edge to the center of the waistband. Pull the BOBBIN threads and adjust the gathers evenly to fit the waistband, with the 3/4" ends of the skirt extending beyond the waistband ends. Pin the skirt to the waistband.
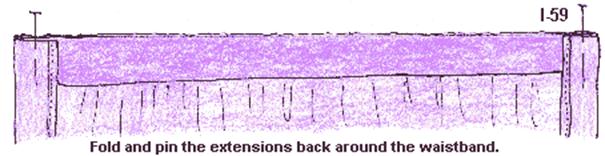
13. Now, fold the 3/4" extensions back around the waistband. Pin them down too. By doing it this way, you won’t have any little raw ends showing at the center back. You won’t be sewing one edge of the waistband to the skirt, and then hand tacking the other edge over the seam. NOTE>>>You can of course do it that way though if you want to! I just like the speed and ease of doing it all at once on the machine.
14. Sew the skirt to the waistband, with the skirt part facing you so you can keep an eye on those gathers! That 3rd. row of gathering really does help to keep the gathers going nice and even though.
15. Zig-Zag stitch over the raw edge of the joining of the gathered skirt to the waistband. Serge if you have a serger.
16. Pull the skirt down, which will fold the skirt ends to the inside.
17. Remove that 3rd. row of gathering stitching.
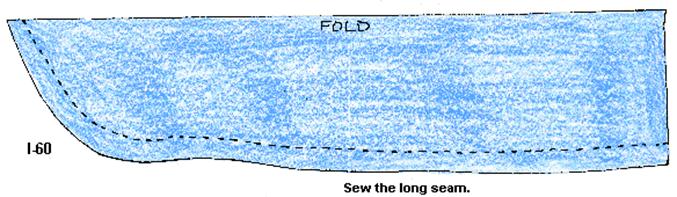
18. Sew the center back seam of the skirt to within about 4” of the waistband.
19. Sew a very narrow hem all along the bottom edge of the skirt.
20. Now, press about a 1” wide hem at the bottom of the skirt. NOTE>>>You may want to try the skirt on your Maria before deciding on the hem width. The skirts on my Maria’s fall between the knees and ankles. The lace on the Blouse/Slip hangs below the skirt.
21. Sew baby Ric-Rac on the skirt to hold the hem in place.
22. Put the skirt on Maria, over the pantaloons and Blouse/Slip. Decide how far the waistband needs to overlap, and sew either a hook and eye or a snap to the waistband.
The stockings, if you are making them.
You don’t need them if you made your doll’s legs from colored fabric.
1. Cut the stockings from your stretchy fabric, with the stretch going across.
2. Sew the long back seam. Be sure to use the correct needle type for your fabric choice.
3. Turn the stockings right side out and pull them up on Maria’s legs. They will extend beyond her knees. The pantaloons will cover the tops of the stockings.
The Shoes.
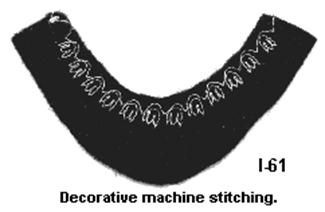
1. Sew a decorative machine stitch around the inner edge of the shoe tops…or…Work a hand embroidered edge of your choice…or…paint a design around the edge…or???
2. Sew the heel seams.
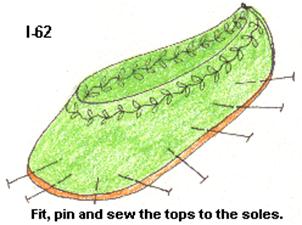
3. Right sides together: fit, pin and sew the shoe tops to the shoe soles. Start at the center back, and carefully work the tops around the soles, pinning as you go.
You will need to use the sew-sew-lift-turn method of sewing around the curves.
Don’t try to sew with the shoe soles up, facing you. It is impossible to prevent the tops from getting little sewn in pleats when you try to do it this way!
NOTE>>>many doll patterns have the foot tops sewn to the foot soles this way. Remember to sew the tops to soles for feet too, not the soles to the feet.
Felt is very forgiving, and allows you fit and sew it together easily. If you make the shoes from real leather, it is quite forgiving too.
Ultra suede and Facile are not very co-operative! You will have to work harder at getting the tops sewn to the soles with those materials.

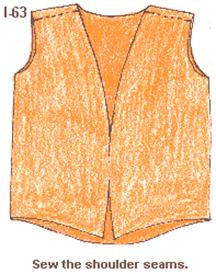
Let’s make the very simple vest.
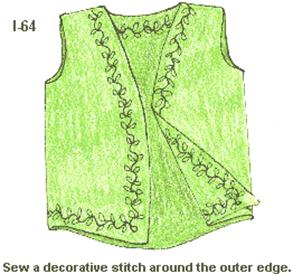
1. Sew the shoulder seams.
2. Sew a decorative stitch around the outer edge, by machine or hand. A blanket stitch is nice too, done in a very fine yarn or crochet thread.
|
|
|
Put the vest on your Maria and you are done!
In the next chapter you will be making Susannah.
She is entirely different in many ways with some new skills being introduced.
She has outside button joints, the next step in making jointed cloth dolls.
Things that are just the same as for Maria or Angelique will be noted as such, and there won’t be as many redundant directions, simply repeating what you have already been taught.
I will begin to write the instructions with less intricate detail too, to encourage you to reach back into your memory bank for things already learned.
You will find that you need to be able to do this for a great many patterns you will buy, because they assume that all dollmakers already know a gazillion things. After this whole class is done, you will know a gazillion things, and you will have a big reference book to refer to refresh your memory when needed.
Anything new, will still be in great detail.
The goal for this class is to give you the ability to do things, no matter what the directions in a pattern are like.
Let me re-state something else too. If you like to do a lot of (or even a little) hand work on your doll clothes, please do. I do factory sewing methods for almost all doll clothes. I do very little hand work. That is what I like. That doesn’t mean it is the only or best way for you.
Many doll patterns don’t even have real clothes. Their bodies are the clothing, with perhaps sleeves and a skirt added. Or even just a collar or a ruffle.
I realize that many of you have a lot of Home Ec classes under your belts, and for the most part you sew clothing differently. Please use the methods you prefer if you have skills in place already.
Also notice, in the colored drawings, that the color for something, say the dolls skin tone or the pantaloons, change from drawing to drawing. This is to keep your mind out of the “exactly alike” mode.
Keep those creative brain cells working overtime!
Dolly Hugs, Judi
Judi Ward
Judi's Dolls
Go to.. Classroom...
Copyright Notice: All pages and graphics are copyrighted by the Internet Visions Company and/or Judi Ward. You may print these out for the use of the class only. All other uses or distributions are forbidden.
Crafty College and Doll
Net are Divisions of
the Internet
Visions Company.
© 1998-2017, Internet
Visions Co. All rights reserved.
All trademarks are owned by Internet Visions Company.
http://JudisDolls.com http://DollNetMarket.com