Go to.. Classroom...
Cloth Dollmaking for Everyone
© 1998, © 2012 Judi Dolls/Judi Ward
Taught by Judi Ward of Judi's Dolls
http://JudisDolls.com
…CHAPTER 7 …
“Susannah’s” Directions.
Susannah’s complete directions will follow.
Susannah is a 6 part, outside jointed doll with a 4-piece body and 3-piece head. This doll’s legs and arms can be sewn using the Freezer Paper or Draw Around and Sew method. This is by far the easier way to sew small doll parts. It can’t be used for parts that are not the same on both sides though, and Susannah’s head and body cannot be sewn this way.
You will learn the “fold seam to seam” foot front method, which is used in a lot of patterns, and to use a template to sew the foot front. You will also learn the foot sole method used in many patterns, by sewing the shoe top to the shoe sole. This way you can learn 2 foot methods in the same pattern, even though one will be done while making the shoes.
Susannah’s face will be painted, and will be shaded with colored pencils. We will use the reverse template method of putting the features on, and you will learn the regular template method too. You will need to do a little bit of free handing.
You will use the reverse template
method for marking darts within a pattern part.
In Susannah’s pattern you will “stretch and sew” narrow elastic, and make a
thread casing, rather than a bulky fabric casing. The thread casings allow you
to draw up far more width and get fuller sleeves etc.
If you look at a lot of ready made clothes and doll clothes, you will notice very little fullness at the wrists and legs of pantaloons. The reason for this is, if you stretch and sew right into elastic, you can’t gather up much fullness. Also, when you sew into elastic, you break some of the elastic cords and weaken the elastic. Ready-made clothes do not use bulky fabric casings either.
You will learn how to “fold back a placket” to eliminate raw ends when you sew a waistband on, and how to sew a waistband on quickly and easily all by machine. This “fold back a placket” method will be used for Susannah’s dress too.
Susannah’s clothes are more fitted, and will require some trying on and fitting. The clothes will fit a little differently for each doll, depending on what you make her from.
Directions are given for basic sewing machine sewing. If you use a serger, please do use it as you normally would for the doll’s clothes. For doll clothes, raw edges are often Zig-Zag stitched with lace over them, rather than hemmed.
Something to bear in mind when making cloth dolls. No 2 dolls will turn out exactly the same size. Even if you cut and sew them at the same time, from the same pattern, from the same fabric etc. It takes only a little extra stuffing to make a doll fatter. Joint a little higher or lower, or attach the head onto the neck a little higher or lower to make a doll taller or shorter.
You may in fact decide to add a little
length to a doll’s legs, arms or body after you make it once. This is an easy
adjustment to make, which adds even more variety to your dollmaking.
This is part of the magic, fascination and joy in cloth dollmaking. Every doll
is a new personality. They will tell you who they are! What they want to wear!
Sometimes they will even change genders!! That is the most disconcerting of
all. Your heart is set on a pretty young lady, and suddenly an ornery little
freckle faced boy wants out!
My Jennifer could have been changed into a lanky little boy if made with Susannah’s flat chested body, a slight face change, short hair and the addition of freckles!
The outside jointing you will learn with Susannah is a very commonly used jointing method. You will be using ordinary clothing buttons for this. REMEMBER>>>You need to choose strong ones. I will show you how to use either two hole buttons or shank buttons.
You can also purchase Prym/Dritz
buttons to cover from a fabric store, cover them with fabric and use those
tried and true, strong shank buttons. NOTE>>>When you get the
Prym/Dritz joint buttons from me they are closed, because my doll patterns use
them inside. You will learn the inside joint method with Jennifer’s directions.
That method will also be used for the high heel version of Jennifer.
If you ordered a supply kit for the class, you have 2 sets of joint buttons.
One set is for Jennifer with flat feet and one set is for Jennifer with high
heels.
Choices, choices! Variety, variety! And most of all FUN!
Susannah
© Judi Ward-Judi’s Dolls 1998
Susannah is 6-part doll who will make up well in either firm knit or excellent quality felt. She can be made from woven fabric, will be harder to keep smooth and wrinkle free.
She will outside jointed, which is a frequently used jointing method.
Her painted face will be shaded with colored pencils for added depth and beauty.
Her long yarn hair is styled with a center part, and has bangs and side pieces added which are drawn up into a pony tail at the crown.
Susannah wears a dress, a skirt as a petticoat, pantaloons, a felt vest, long stockings and simple felt shoes.
She can wear purchased “real” doll shoes which are available for the 18” American Girl(r) dolls.
Materials Needed for one Susannah.
1. 1/2 yd of either 45” wide or 60” wide fabric. Either firm knit, woven or felt. You will have some left over. Susannah makes up best in firm knit. You won’t be able to turn her fingers if you make her from 100% wool felt.
They will be hard to turn if you make her from the thick 45” wide robe velour. She makes up the very best in 60” wide craft velour or Doesuede. She will be shorter and you will have to work harder to stuff her smoothly in woven.
2. 1 pound of excellent quality polyester stuffing. You won’t use it all.
3. 1/2 yard of lightweight woven fabric like broadcloth, percale, calico etc. for petticoat. (which is the skirt pattern)
4. 3/4 yard of coordinating, lightweight woven fabric for the dress…OR…1/2 yd for the dress skirt and 1/4yd. For the bodice and sleeves.
5. A small piece of woven fabric for the pantaloons, 1/3rd yard is plenty…Or… buy a “fat quarter” for the bodice and sleeves and you can get the pantaloons from it.
6. A 9” X 12” piece of felt for the vest, and another for the shoes. Get 2 different colors, that co-ordinate with the clothes.
7. 2 yds. Of 1/4" wide ribbon to trim the dress skirt bottom, and to use for the waist tie ribbon.
8. A package of Baby Ric-Rac to trim
the petticoat bottom. You can use it on the vest too
…OR… if you have a sewing machine that makes fancy stitches, do that around the
edges of the vest…Or…Hand embroider a design around the edge…OR…Work a blanket
stitch around the edge…OR…Leave it plain.
9. 1/2 yd. of 1/2" wide flat lace for the pantaloons legs. And 1 1/2 yards of 1” wide gathered lace for the petticoat hem and the neck edge of the dress.
10. 1/2 yard of 1/8” wide elastic for the pantaloons, and about 10” of 1/2" wide elastic for waist of pantaloons.
11. Ten, 9mm or 15-mm chenille stems, if you wish to stuff Susannah’s fingers with chenille stems. It is the easiest way to stuff fingers, no matter if they are all together, all apart, or anything in- between.
12. 1 skein of soft yarn. A mohair blend, with the little fuzzy “hairs” is nice. Machine knitting yarn (it comes only on cones from a knitting shop that sells supplies for knitting machines) is wonderful, because it is so fine and in scale with your doll’s size. Sport yarn is fine too of course, and might be the best choice for a play doll. Choices, choices, choices! HMMM? Do you want the hair to match the clothes? To match the ethnicity? To contrast with the clothes? ! Dollmaking is a series of fun choices!
13. A small piece of soft cotton knit or, my favorite, very stretchy Lycra swimsuit fabric for the stockings.
14. Acrylic paints for face painting in black, tan, white, red, dark peach and a lighter peach. Also paint for the irises of the eyes. Susannah’s irises will be one solid color.
15. Colored pencils or even crayons! for shading. I like Berol Prismacolor pencils. Tan for over the eyes…OR…A shade to match the clothes. A color slightly darker than the skin for other shading. The shading you will do is very subtle and simple. If you don’t want to do it, Susannah is just as pretty without it, but it’s another skill to practice with. White acrylic paint will be used for the “lights” in the eyes and on the lips.
16. Powdered “people” blush in a pink shade. The darker mauve and rusty shades look muddy on doll skin.
17. Paper or pellon to retrace your patterns onto, and freezer paper to use for the “iron on and sew” method, if you are going to use that method. If you are going to use the “draw around and sew” method, you will need a colored pencil in a shade slightly lighter or darker than your doll’s skin.
19. Thread to match your doll’s skin, the clothes and the chosen hair color.
20. All of your ordinary sewing and stuffing supplies.
Let’s begin
Read through all instructions and familiarize yourself with the pattern pieces. Retrace pieces to other paper or pellon. Do not cut your original pattern. Keep it intact for future reference or to retrace a piece if a piece should get lost.
Make all of the doll pattern pieces from regular paper or Pellon® (to draw around)…AND/OR…Make 2 leg and 2 arm patterns from freezer paper (to iron on, and sew around)
If you are making your doll from
Velour or Doesuede, note the “Stretch Direction” of your fabric, and place the
body pattern correctly. Pull on the fabric lightly to feel which way it
stretches the most. The firm knits will stretch more one direction than the
other. The stretch goes up and down.
If you are making your doll from a woven fabric or felt, it really
doesn’t make any difference whether you put the pattern parallel to the
selvage, or in the opposite direction.
If you are making your doll from Velour or Doesuede, fold the fabric with the SMOOTHE sides together.
You will be sewing on the “fuzzy” side. After you sew your doll, the smooth side will be the right side.
If you are going to use the Freezer paper method for the legs and arms, put the freezer paper pattern pieces, shiny side down on your doubled fabric. BE SURE TO LEAVE AT LEAST 1/2" BETWEEN EACH PIECE! Iron the pattern onto the fabric with your iron set at a wool setting. The Freezer paper pattern can be used several times. It is such a great way to sew parts that are the same both front and back! It eliminates marks on your doll, which sometimes show after sewing.
Pin the fabric together in a few places just for the purpose of keeping the 2 layers together.
If you are going to use the “draw around and sew” method. Put your paper or Pellon®, leg and arm pattern pieces down on your doubled fabric and pin them in place in a few places. BE SURE TO LEAVE AT LEAST 1/2" BETWEEN EACH PIECE! Draw around the leg twice and the arm twice with a colored pencil a shade lighter or darker than your fabric
I
don’t recommend fade away pens, or lead pencils. Fade away pens
sometimes don’t fade, or they fade before you get done sewing! Sometimes they
fade, but come back as a stain on your doll! Lead pencils often show an
ugly gray line even after you turn your doll right side out. YUCK!
Iron freezer paper patterns to your
doubled fabric….OR….Draw around your patterns with a colored pencil.
For the “Freezer Paper method”…After you iron the freezer paper pattern on, trim some of the excess fabric from around the pieces. I often will cut the arm pieces away from the leg pieces so the sections are smaller and easier to handle. Don’t cut the pattern out, just trim some excess off to make it easier to handle while sewing.
For the “Draw Around and Sew Method”…Trim some of the excess fabric from around the drawn lines, and cut some of the pattern sections apart, to make it easier to handle while sewing.
Pin the head and body pieces in place and cut them out neatly and carefully. If you cut with wiggly, uneven lines it makes it very hard to sew with nice even seams!
REMEMBER>>> Draw, cut, and sew on the “fuzzy” side of velour or Doesuede…UNLESS…You have decided that you want your doll to have the “fuzzy” side as the right side. There is no law against that, and I have a lot of dolls with the fuzzy side showing. The fuzzy side is warm and soft. It is especially nice for Baby dolls. I do prefer the smooth side out for adult or nearly adult dolls.
ANOTHER NOTE ABOUT THE FUZZY SIDE OUT DOLLS>>> The fuzzy side hides a multitude of stuffing mistakes. It seems to absorb light, and cellulite just disappears! I wish I could turn me “fuzzy side out”!
Decide
if you want to close the arms and legs at the tops or backs, and remember to
leave your chosen area open when you sew the arms and legs.
1. Using the correct needle for your chosen fabric, sew with a very small stitch all around the freezer paper or on the lines you drew for the legs and arms. Remember to sew-sew-lift-turn at all curves. You will need to do this at the fingertips, thumbs, and heels. Be sure to lift and turn at all Vs too. Be sure to leave an opening where you chose for the legs and arms. AND LEAVE OPEN AT THE FRONT OF THE FOOT TOO!
Be sure to leave the front of the foot open.
2. Cut the arms and legs out leaving a 1/8” seam allowance all around. Clip into the Vs right to the stitching. Careful! Don’t cut the stitching. NOTE>>>If you made your doll from a loosely woven fabric like Osnaburg or linen, be sure not to make the seam allowance any smaller than 1/4". Don’t clip quite to the stitching at the Vs either. Remove the freezer paper if you used the freezer paper method, from the legs and arms.
3. Fold the foot front “seam to seam” and then sew across the front, close to the edge, to hold the front together. If you pin it together the pins get in the way of working with your template. NOTE>>>Illustrations will follow.
4. Draw around the toe template on the top of each “foot”, tapering the line to the sides of the feet…OR…Iron your freezer paper toe templates in place on each “foot” front, to sew around. NOTE...The “foot” front shape, is drawn about ½” back from the front of the fabric. If you draw it right at the edge, where you sewed across to hold the fabric together, it will make the foot too big, and may be hard to sew a nice shaped “foot” front because as you get so close to the edge while trying to sew a nice curve, it is so easy to sew right off the fabric.
5. Sew the “foot” front seams that you have drawn, starting at one tapered edge. Sew slowly around the front, using a very tiny stitch and lifting the presser foot of your machine as you did for the fingers and other curves. End at the opposite tapered edge. Repeat for other “foot” front. Of course if you ironed freezer paper templates to the fronts of the feet, sew around those. I LOVE! The freezer paper method. It is so much easier to achieve accuracy!
6. Trim away the excess fabric at the foot fronts, and turn the feet and lower legs right side out. Use your hemostat to work out nice rounder feet and heels. Leave the upper 1/2 of the legs wrong side out until you get the lower parts stuffed.
7. Trim seam allowances to 1/8” around the arms and hands. Clip into the space between each finger and trim the excess fabric from between the fingers. Turn the hands to the right side, one finger at a time.
NOTE>>>These little fingers may prove hard to turn. (The 2 middle ones are easy) Remember, these fingers won’t turn if made with thick fabrics! They turn easily in Doesuede, Craft velour, and light weight woven cotton.
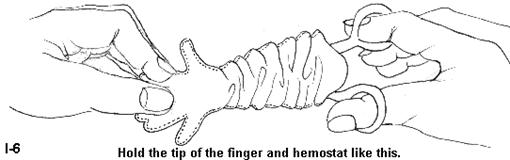
8. One way to turn the separate fingers is to reach inside one finger with small pointed hemostats. Open the jaws of the hemostat inside the finger. It will only open a little. Poke a bit of the tip of the finger into the jaws with your fingernail. Close the jaws, and get your fingernail out quick, or you will attach you to the end of the finger!
9. Now gently pull up on the fabric at the tip of the finger, while pulling back on the hemostats. It is imperative that the tip of the finger starts in, before you try to get the rest of the finger to go.
You will have to kind of “wiggle” the hemostat as you pull back. THE MOST IMPORTANT TIP THOUGH IS, only pull the tip of the finger to the inside first, and the rest will follow.
10. Don’t pinch the base of the finger and push up. It will not turn, it will just bunch up and frustrate you to death! The tip has to go to the inside first! Remember our stuffing lesson on stuffing the neck before the chest etc. With turning tiny fingers it is the same lesson, different technique. The tip goes inside before the first knuckle. The first knuckle goes inside before the second knuckle. The second knuckle goes inside before the base.
I hold the tip as illustrated and gently wiggle and pull with my fingers, as I gently wiggle and pull back on the hemostat.
11. Turn each finger and the thumb into the palm. When they are all in the palm, grip them with your hemostat, and pull the hands and lower arms to the right side. Leave the upper arms wrong side out, turned down over the lower arms. This makes it easier to access the fingers for later stuffing.
If the fingers are too small for your hemostat to turn them, go to the needle and thread method. With this method you can turn the tiniest little fingers! The Needle and Thread method will follow as a separate lesson, with it’s own numbering.
After the needle and thread and tube turning lesson, we will continue with the construction of your doll.
If you have a finger turning method that you use and it works, use that method.
The fabulous, incredible,
miraculous, NEEDLE, TUBE AND THREAD, finger turning method!
© Judi Ward, Judi’s Dolls 1998
Those tiny little fingers are no
longer a problem to turn, once you get the “feel” for this method!
You don’t need any special, expensive tools or gadgets! You can do this method
with coffee stirrer straws! Even with ½ of the double type of a coffee stirrer
straw! Or you can use my favorite for really tiny fingers, which are the
tubes from canned air or WD 40. I cut them in half. You can make the tiniest
little fingers, just big enough to put the tiny tube into!
Remember, the tinier the fingers, the
thinner the fabric needs to be for making your dolls.
The hands for the class dolls were done and turned from Doesuede, the 60” wide
sleepwear velour, washed muslin, sand washed silk and CRs Crafts Wool/Rayon
felt. You need 4 of the 12” X 18” pieces of the felt to make one doll. There
are thicker velours too, which are 45” wide. They are too thick for very thin
fingers. Stiff poly cotton broadcloth, and stiff 100% cotton broadcloth may be
too thick and unyielding for tiny fingers too. Washing the broadcloth fabrics
will often soften them enough to make tinier fingers though.
1. You will need… Small tubes, like coffee stirrers, the tube from canned air, or tiny brass tubes if you have them. Actually any stiff tube that you can put a thin, needle sculpture needle through, and that fits into your sewn fingers. Cut the double coffee stirrers down the center lengthwise, so you only have one tube. Cut the coffee stirrers/tubes just shorter than your needle. Cut brass tubes with a hack saw if they are too long.
2. A long, thin needle sculpture needle.
3. Sewing thread, or quilt thread, and the sewn hand/arm that you wish to turn right side out.

1. Put the appropriate sized straw or tube inside the finger to be turned.
2. Put the threaded needle, with a sturdy knot 4” from the end into the tip of the finger.
3. Pass it down the tube, and out of the open end of the arm. You will have to roll the arm fabric up and out of the way.
4. Pull on the thread and the tube together, as you carefully and gently work the tip of the finger to the inside. The finger won’t go into the tube, It will just press against it as you slowly pull back on the thread and the tube. Sometimes the knot is too big, and keeps the finger from turning. Sometimes the knot is too small, and pulls right through. You may need to practice with your knot sizes. When you first start to pull the tip in, you will think it is not working, and then, POP! The finger turns like magic! It may take you a few tries to get the “feel” of pulling on the tube and the thread, while working the cloth up, so the tip can pull inside, but once you “feel” it, it becomes so fast and easy you will be in shock!!!
5. Remove the tube, cut the thread and re-knot it. NOTE>>> You can pull on the loose threads in the fingers and pull them out, so no knot or thread is left in the fingers.You do have to be careful when doing this so you don’t pull the fingers back wrong side out!
6. Repeat for all of the fingers, turning them all into the palm of the hand.
7. Finish pulling the hand and arm, right side out, just like you normally would.
12. With the fingers all turned right side out, you need to, one at a time, hold both sides of each V area and rub them back and forth between your fingers to take the wrinkles out of the V areas. These V areas on any doll you make, will need to be rubbed like this. This rubbing softens up the fibers in the seam allowance, to allow the V to let go of the wrinkles. This rubbing is kind of like rubbing wet fabric to get a stain out, but gentler! DON”T pull the areas apart trying to work the wrinkles out. Pulling will often result in tearing on woven fabrics.
Work the Vs gently back and forth, rubbing
the fabric together, while holding at each
side.
13. The divisions between the middle fingers need to be sewn by machine before you stuff the fingers. If you sew them now, rather than by hand after stuffing the stitching will nearly disappear.
Be sure you have poked each fingertip out nice and round, using your closed hemostat to help. Draw the lines to sew on with a colored pencil a shade lighter or darker than your skin fabric.
14. You will top stitch between the middle fingers, now, by machine, before stuffing. Start in the hand area, rather than at the seam edge, so that your sewing machine won't "eat" the fabric right at the edge where the seam is. Be sure to back tack at the beginning of your sewing (in the hand area). Back tack at the ends too, if your sewing machine will let you. ( Refer to “eating” the fabric, above) Tie the threads at the ends of your sewing if your machine won’t let you back tack.
Remember the lesson in chapter 3 about “losing the ends” of your thread? For a really fine finish for the “between the finger” sewing, “lose the ends” of the threads that are hanging from the sewing of the finger divisions.
Don’t clip the threads short if you want to “lose the ends”. Just leave them hanging until the hands and arms are stuffed, and then put the threads at the ends of the fingers onto a needle and “lose the ends” down in the hand. Repeat for the threads on both sides of the hands, at the base of the fingers.
A TINY (pin point size) dot of white glue or Crazy Glue? where the threads are taken back into the hands will assure that they won’t pull back out.
I want to teach you another option for sewing these finger divisions too. IF, your sewing machine will let you sew from the seam edge, and IF, you can sew back on the same line.
Sew from the hand to the end, and then turn your fabric around and sew back to the hand again. This way all of the threads to be “lost” will be in the hand end. There will be no thread ends to lose at the ends of the fingers.
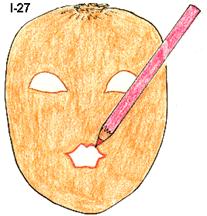
Now let’s put the face features in place using the already familiar, Reverse Template method.
When using the reverse template method, for this head style, the face features have to be put on BEFORE you sew the head.
1. Trace the head/face pattern onto a piece of freezer paper or regular paper. Cut the mouth and eye shapes out. If desired cut the eyebrow shapes out. They will just be very thin lines. You don’t need to cut the eyelash shapes out. They are just simple lines that you can put on freehand. The nose will need to be free handed too, as will the eyelid lines, unless you want to very carefully cut the little curved shapes with a razor or small very pointed scissors. These little curves are really very simple to freehand. Remember to mark LIGHTLY!
2. Lay your face template on top of the fabric face piece for your doll, lining up the sides etc. evenly. Iron the freezer paper template in place on your doll’s head…OR…Just lay and carefully pin the paper template on.
3. LIGHTLY! Draw through the cut outs in the face template. I like to use a colored pencil in a pink or red for the mouth. And a tan colored pencil for the nose, eyebrows and eye position. Don’t use a lead pencil. It makes hard to conceal gray marks.
NOTE>>>You will also learn the regular template method for face placement in this pattern. This will be done on a fully stuffed head, so you may want to make 2 heads, so you can try both methods.
NOTE 2>>>If you like to draw faces, please wait until your doll is stuffed to do so. It is much better and more creative to do free-handing on a stuffed head.
4. After drawing through
the template VERY LIGHTLY, remove the paper template, Either freezer paper or
regular paper.
The directions for using the regular template method will be given after your doll is stuffed.
Now let’s continue with your doll’s head and body.
…The head…
1. Sew the center back seam of the head parts, leaving the opening where designated in that seam. That opening is where the neck will go. Do Not trim this seam at all.
2. Fit, pin and sew the head back to the head front. I like to start at the chin, and fit and pin up one side. Go back to the chin and fit and pin up the other side. If the top edge doesn’t line up exactly, don’t worry about it. That edge is going to be gathered all around, and hidden under the hair.
3. Trim the seam, and turn the head right side out. Use your closed hemostat to poke the chin out nice and round.
Sew the center back seam of the
head. Fit, pin and sew the front to the back.
…The body…
1. Lay the cut out body front pattern piece on one side of the cut out, right sides together, body fronts and draw through the dart you cut out of the paper pattern piece. Turn the fabric “sandwich” over, still right sides together, and put the paper on the other side. Draw through the cut out dart on that side. DON’T CUT THE DART OUT OF YOUR FABRIC!!! You are just drawing it on the fabric.
Repeat for the body backs. Use a
colored pencil slightly lighter or darker than the doll’s skin.
Draw through the dart on one side, turn the
parts over and draw through the dart on the other side.
This picture shows doing this for only the
body fronts. You repeat it for the body backs.
The body fronts (or backs) are kept right
sides together for this dart drawing.
2. Now, sew the center front seam of the body.
3. Sew the center back seam of the body.

a. Sew the body fronts together down the
center front seam.
b. Sew the body backs together down the
center back seam.
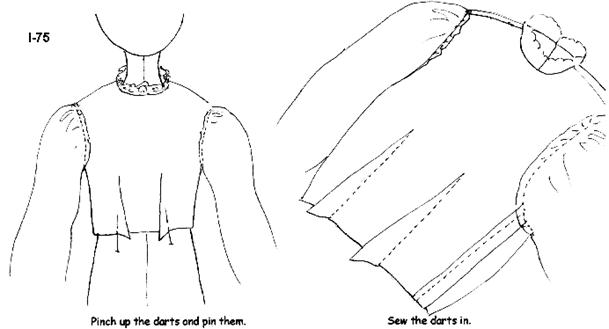
4. Fit, pin and sew the body front to the body back at the sides, as illustrated below. You will be sewing from the top of the neck to the first dot. Sew from the top of the neck to the dot on the other side. Now sew up about about ¾” from the crotch seam at each side. The illustration will make it very clear.
Why do we do it this way? These bodies are quite narrow and pointed at the bottom, and if you leave the entire crotch area open for turning and stuffing, it is hard to close that point with your ladder stitch. This way, you only need to close the 2 straight openings. When you joint the legs, they cover up the closings.
I haven’t put this in a pattern yet, but now that I have tested this method on several hands on classes during the last few months, I find it is much easier for everyone to close those pointed crotch areas by machine. There is not a place on the pattern that is marked for this technique, and won’t be on other patterns you might order in the future, from me or anybody else, but this is a technique that works well for many very tapered lower body designs.
The seam at the crotch goes about 3/4" up the side, from the center body seam. Note the word About. If it goes 1” that’s O.K. A little less than 3/4", that’s O.K too. You can even close up one side completely, and leave just one area open to stuff through! Be very careful as you stuff, if you leave just one side open. It is easy to get lop-sided shoulders, when stuffing from just one side.
The illustration of how to sew the side seam,
and where to leave it open.
5. Now pinch up the darts, one at a time and sew them in. Be sure you don’t pinch up and sew through both sides of the body when you do this!
The reason for sewing the front, back and side seams before sewing in the darts, is because it is better to have the body as flat as possible while fitting, pinning and sewing the long seams. The darts are just little, and pinch up and sew in just fine after the body is all sewn together.
6. Turn the body right side out through one of the openings at the bottom of the body.
Now it is time to stuff your doll.
…The legs…
1. Stuff your doll’s feet firmly, shaping as you stuff. Be sure to stuff nice rounded foot fronts and be sure to stuff out into the heel. See it’s easier to get the stuffing down into the feet when part of the leg is rolled down. You will need to finish turning the rest of the leg right side out as you get towards the knee.
REMEMBER FROM CHAPTER 4>>>to hold the whole leg unit as you stuff. Don’t hold it by the opening and poke, poke, poke the stuffing in. You only hold the edge as you get up towards the top.
2. Stuff, shaping as you stuff all the way to the top of the leg. Add cotton balls to the opening and then close the opening with a ladder stitch.
3. When you get to the end of the closing, instead of stitching in place where it will show, bring your needle out on the inside of the upper leg, and stitch in place there. That part of the leg will be against the body after jointing, so it won’t show. Repeat for the other leg. Be sure to plan a right and left leg, with both your stuffing and with where you do the stitching in place.
NOTE>>>Watch the legs as you stuff to make them match each other. These legs are quite shapely, with calves, kneecaps, and curved upper thighs. Set the legs aside for later jointing.
Memory refresher picture of the holding position
for stuffing long parts VERY firmly.
…The body…
1. Now stuff the neck very firmly, using COTTON BALLS for an extra hard and wobble free neck. (Just ordinary cosmetic puffs from your cosmetic drawer work just great.) Pull them apart and fluff them up before putting them into the neck. Use your screwdriver to really pack the COTTON in there. The COTTON should be used in the whole neck, all the way down to where the curve to the shoulders starts. REMEMBER how to hold your doll for neck stuffing from chapter 4? Holding it this way is very important if you want the neck to be really wobble free, and you don’t want to pop the stitches! The memory refresher is in a previous picture too.
2. Finish stuffing the body very firmly, taking care to stuff nice smooth shoulders that match. Stuff a nice shaped and smooth body, with sides that match and a rounded bottom. You can add stuffing through both openings in the bottom of the body, to help you balance the stuffing.
3. With a quadruple thread, close the openings in the body with a ladder stitch, adding more stuffing as needed to finish out the nice smooth body sides. NOTE>>>Don’t put cotton balls here. They are very hard to get a jointing, or any other kind of needle through. Stitch in place to anchor your stitching, then “lose the ends”.
…The head…
1. Stuff the head, fully and firmly almost all the way to the top. REMEMBER TO SHAPE AS YOU STUFF. The stuffing that is poking out of the neck hole will be worked back in, and more stuffing will be added there later.
2. Stuff until you are fairly satisfied with the face and head shape, and it feels very firm. The reason I say “fairly satisfied” is because you have the second chance for shaping the face and head through the opening in the back of the head. I always shape the chin area more from that opening. Sometimes I even put a cotton ball in the chin area.
3. Using a quadruple thread, gather all around the top opening and then pull the gathers tight. This firms up the head even more. Stitch in place to secure your stitching. Set the head aside for later “finish stuffing” through the neck opening.
…The arms…
1. To stuff the fingers/arms with the chenille stems, fold 10 stems in half. Roll the arms down so you can get to the fingers more easily. Insert the folded end of a chenille stem into each finger. I use my 12” long broken upholstery needle to guide the chenille stems into place. You can also use a commercially made stuffing fork. Below is a picture of my 20-year-old stuffing fork, made when I accidentally broke the eye of one of my long needles. I then wrapped the shaft with masking tape, and blunted the sharp point on the sidewalk! This has served me well all these years and I couldn’t be without it. (I also use it to stuff fingers with stuffing. I “twirl” a piece of stuffing in the forked end, while pressing and holding the stuffing fairly tightly between my fingers, making a Q-Tip like piece of stuffing on the needle. This is then guided into the fingers, on the end of the needle.)

My “accidental” stuffing fork. It is actually 12” long.
You can make one by using a hack saw or strong pliers type cutters, to cut off the top part of the needle eye.
The “fork” needs to be short, no more than 1/8” long.
![]()
My stuffing fork with a chenille stem hooked
in the fork,
ready to be guided into a finger. Be sure to pinch the chenille stem
tight against the needle. Don’t leave it in a loose loop.
2. After each finger is stuffed with the chenille stems, use your hemostat to bend the sharp tips over a little bit, and then squeeze the long ends of the chenille stems together and wrap thread around them to bundle them together. This makes it easier to stuff the arms. If you just leave the chenille stems loose, they will bend all about as you stuff.

3. Stuff the palms of the hands lightly. I like to put a little pad of stuffing at the base of the thumb, just like a real hand. You get to actually put in a little wad of stuffing there!
4. Stuff a very thin layer of stuffing over the backs of the hands if desired. (If you used 15mm chenille stems for the fingers, the backs of the hands are usually stuffed enough.) The stems actually look like the tendons in the backs of our hands. You don't need to stuff the fingers; the chenille stems do that very well.
As you stuff the hands, shape them, and tip the two center fingers gracefully inward. Bend the thumb slightly toward the palm, and the pointer and little finger slightly up. It's fun to play with the fingers to achieve natural looking hands. Be sure to plan a right and a left arm. These hands will hold accessories in a lifelike manner.
5. Finish stuffing the lower arms, by sliding long “streams” of stuffing down along the chenille stem bundle. Use your flat screwdriver to “slide the streams of stuffing down. Turn the arm around as you are doing this, so the lower arm gets stuffed lightly all the way around. Don't leave any of the chenille stem bundle in the arms, touching the inside of the arm fabric.
6. Stuff very firmly above the chenille stem bundle, all the way to the top of the arm. When the hands and arms are stuffed and shaped to your satisfaction, close the opening with a ladder stitch, adding cotton balls as you close to assure a nice smooth closing.
7. With the chenille stems in the arms, you can really tip the hands in or up at the wrists. You can bend the arms at the elbows too. A wrinkle will appear at the bend, just like a real arm. Be careful to bend the arms only where they actually would bend if they had a real bone in them!
Now you have all of the doll’s parts firmly, neatly and smoothly stuffed and closed where needed, add some more stuffing into the back of the neck area of the head. Be sure to make that chin smooth and full, and the cheeks even and wrinkle free. Work a space up in the back of the head, by forcing the stuffing already there to the front, sides and chin. The neck will fit up into that space after the face is on.
For those of you who freehand faces, do so now, after the face and head is shaped to your satisfaction.
For those of you who don’t freehand, and who didn’t use the reverse template method, let’s learn the regular template method for putting the main features in place.
Remember the Mini Anatomy lesson in Maria’s pattern? Refer to it to help with feature placement.
Don’t put the head on yet, just in case you need to make another, because you didn’t like the first one. This happens! Especially if you are new to applying and painting faces.
...FACE...
To make stick on, eye and mouth templates, you will need a sticky label. Avery® is one brand. Any paper that you can cut the shapes from, and then stick them in place on the face will work, even the sticky part of Post It Notes®!
1. Find the eye and mouth shapes on your pattern sheet. Using the side of a lead pencil, cover the BACK side of the features with pencil. This makes a carbon. Lay the “ pencil carboned” paper over a label and draw over the features. The features will be transferred to the label/labels. Note on the pattern page the where it says “fold the label in half, to cut the eye shape, and you have a left and a right eye”.

Trace over the features with a
Label underneath - Diagram I-25a
2. Now cut the eyes and mouth shapes from sticky labels. Cut just inside of the lines, so the features don’t get bigger. To get the backing off of the labels is a trick at times! The easiest way is to slide the point of a needle between the label and backing. Get your bi-focals out for this, or take them off, whatever works!
3. Stick the cut out features on your doll’s face using these guidelines. The bottom of the mouth will be from 1/2" to 1” above the point of the chin. The bottom of the eyes will be about 1” above the top of the top lip.
You can adjust the features a little at this time. Perhaps slant the eyes a little, or move the mouth up or down a little. Each tiny move of the features will give your doll a different look. You can even color the sticky label parts to get a better "pre look" at what the finished face will look like. When you have them placed where you want them, Draw VERY LIGHTLY! JUST UNDER THE EDGE of the shapes, with a sharp, brown colored pencil for the eyes, and a sharp, red or pink colored pencil for the mouth.
NOTE>>>The reason I have you draw JUST UNDER THE EDGE OF THE SHAPES is because when you draw around something, it gets bigger. You can also cut a sliver (1/32”) off of the features all around, so you can simply draw around them on the face, rather than drawing slightly under the edge.
4. Lightly draw in the tiny nose lines, eyebrows and eyelids with a light brown colored pencil. Use the face picture on your pattern sheet as a guide. These are just little curves and not hard to do freehand. Practice on paper first if you are a little dubious about it.
Draw around the features with colored
pencils.
Don’t mark eyelashes, these need to be done freehand. You can even just shade darkly over the finished eyes to allude to eyelashes, which is by far the easiest.
When painting doll faces the first, foremost and most important thing to remember is that you don’t get to freely stroke the paint on in flourishes like an artist doing an oil painting….Unless you are an artist, and know what you are doing! The minute you start to stroke the paint on with the side of your paintbrush, is the minute your paint will go out of the lines!
When painting doll faces, you are just filling in pre designated spaces, neatly and fully. You need to paint with very tiny (000 to 00000) pointed paintbrushes, and you need to learn to paint with your paintbrush held STRAIGHT UP AND DOWN. The weight of your hand will rest on your little finger.
I call it “assuming the position” and below is what it looks like. If you want to learn a whole lot about painting doll faces (Over 60 pages worth) I do teach that class at Crafty College too.
5. I do, and highly recommend, a first fill in, on the eye and mouth shapes with Gesso. Gesso seals the fabric and readies it for the paint. Gesso also prevents any “paint bleed” from occurring, as long as you keep the paint on top of the Gesso. Once in a great while, acrylic paint will bleed. It usually occurs when the paint hasn’t been shaken up really well. Some of the “watery” liquid comes out first, and that is what bleeds.
ALWAYS SHAKE YOUR PAINTS REALLY WELL BEFORE USING.
6. After the Gesso is dry, paint a coat of white paint on the eyes first, and then paint a coat of peachy pink on the mouth. Simply fill the spaces in fully and thickly. Let dry, then repeat with a second coat of peachy-pink on the mouth. Let the second coat dry.
7. Use a button to draw around for the iris of the eyes, if you don’t feel confident drawing them freehand. Be sure it is slightly larger than the height of the eye so your doll won't look "bug-eyed". Make the eyes looking either to the right or left. If you are going to center them, do so very carefully, it's easy to get them "off" a little and your doll will have a slightly strange, “spaced out” look.
8. If you paint the irises solid black, let the first coat dry, then paint on a second coat. Let the second coat dry. You will add the life-lites later, but there is no need for a pupil.
9. You can of course paint the irises any solid color. The painting directions for Susannah are for solid color irises. If you choose to paint the irises any color but black, you will need to add a pupil in black.
9b. To outline the eyes, use black paint and carefully paint a VERY THIN LINE around them. Don't try to work the paint down into the fabric. To paint a VERY THIN LINE of paint, your paintbrush needs to be loaded with paint, and you need to hold the paintbrush STRAIGHT UP AND DOWN, so the paint flows off of the tip, rather than off the side of the paintbrush. The paint right at the tip is the only thing that touches the fabric. You will have to reload the paintbrush after about 1 / 4 " to 3/ 8 ".
10. Do the eyebrows in light brown paint or fill them in darker with brown colored pencil. Do the eyelid lines in colored pencil too. Fill in the eyelids with colored pencil to co-ordinate with your doll’s dress.
11. Wispy eyelashes can be added with dark brown or black paint. The eyelashes are each one single, very fine, stroke of paint. They radiate out to the sides. Don’t paint them like the rays of the sun. REMEMBER>>>Hold the paintbrush STRAIGHT UP AND DOWN. Don’t press down at all! The paint at the tip of the paintbrush is the only thing that touches the fabric. Practice this on paper first to get a feel for LIGHTLY painting one stroke of paint for each eyelash.
12. If the eyelash painting is just too difficult, simply darkly shade in over the eyes to hint at eyelashes. For some dolls this looks best anyway, and it is just fine for Susannah.
Eyes with the “eyelashes simply hinted at
with colored pencil shading.
13. To finish the mouth add a little brown to the lip color and paint the dividing line, between the top and bottom lip, curving the line up a little at the corners. Look at the face on the pattern to see the shape of the dividing line. With the darker shade of peach, paint a few thin lines from the center to the edge of the lips. Do both the top and bottom lip.
Always let everything dry between going on to the next step when painting. It is so easy to get your hand in wet paint, and mess up a face. Aim a blow dryer on the face to hurry up the drying process.
14. For the final touch with the paint, add the “lifelites” to the eyes, and a little “lite” to the lips.
Add the “lifelites” to the eyes and “lite” to
the lips.
You can of course blush the cheeks with
powdered blush on a soft brush, now or after your doll is completely done.
Bear in mind that this is not the only face painting technique that works. There are as many techniques as there are designers and dollmakers. This is just a technique that is basic and produces clean lines and nice features with a minimum of practice.
Some dollmakers do wonderful faces, but they aren’t easily reproducible for the average doll maker. This almost “paint by number” method is reproducible for most anyone with the will to give some time over to practice, if it doesn’t come real easy.
As you practice painting more, a “style” may find its way out that you didn’t even know you had! People who make a lot of dolls tend to produce a “look” that is recognizable on any work they do.
Of course, if the painting is just too scary, you can always embroider the features and shade them with colored pencils like for Maria’s face.
Now let’s put the head on.
1. The head fits down on the neck stump, and ladder stitches in place. With your fingers, make a hollow in the stuffing in the head, so that the head can fit down on the neck, with the neck fitting up inside the head a little ways.
You can tip, or turn the head to the side etc. to give your Susannah more personality.
2. When the head is in place the way you want it, stitch it on with a ladder stitch. NOTE>>>When sewing the head on, start at the center top, And then go down one side to the bottom of the opening in the head. Take the needle through the neck and across to the other side. Go back and forth through head then neck a couple of times. This secures the under chin area. It is hard to ladder stitch under the chin.
Stitch back up the other side to the top, and then stitch in place there.
Before we go on to jointing, you need to sew and put Susannah’s ears on. NOTE>>>You may choose a hairstyle for Susannah that would cover the ears, and ears wouldn’t be needed then, but if you are going to make the hairstyle which will be taught here, she will need ears.
…Ears…
1. On doubled fabric, folded right sides together, either draw around your ear pattern or cut 2 patterns from freezer paper and iron them to your fabric, at least 1/2" apart.
2. Sew around the curved edge of each ear. Leave the straight edge open to turn and stuff through.
3. Turn the ears right side out, and mark the inner ear stitch lines with a colored pencil, a little lighter or darker than the skin. Look at the pattern piece to see what the inner ear stitch lines should look “something like”

Draw the inner ear stitch lines on the right
side out ears.
NOTICE how the ears are laid on the table to draw the stitch lines. This way the drawing is on a right and a left ear. If your sewing machine “makes a mess” on the back side when it sews through stuffed things, the “mess” will be on the back side of each ear, and hidden when the ears are in place on your doll.
4. VERY LIGHTLY stuff the ears, and then top stitch on the inner ear stitch lines.
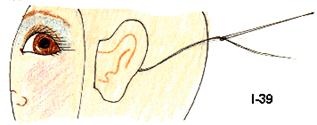
5. Now, position the ears in the reverse direction at the sides of Susannah’s head. The straight edge will be back about 1/2" from the side seam. The top of the ears will be about level with the eyebrows. NOTE>>> The widest part of the ear is the top edge.
6. Pin the ears in place and then hand sew them in place, along the straight edge.
Pin and sew the ears in place at the sides of
the head, in the reverse direction.
7. Turn the ears back into the correct position for ears to be in, and hand tack them down in a few places on the inner ear stitch lines. Secure your stitching, and lose the ends.
Hand tack the ears into the correct position.
Let’s joint Susannah, using the outside button joint.
I have seen numerous directions in magazines for this type of jointing, and they never, show opposing cords, so you can actually tie the cords. They also show a process where you go through the body 2 or more times. It is hard enough to get through a properly stuffed body once! With the method you will learn here, you only go through the body once for the legs and once for the arms.
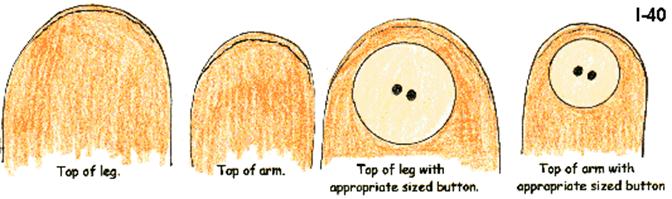
Choose strong shank buttons or thick, strong 2 hole buttons. They should be about as big around as the tops of the limbs.
1. With all of the limbs
fully stuffed and closed, you are ready to joint your doll. Thread 2, ONE-YARD long strands of heavy nylon cord, (I have it in my catalog for 10 cents a yard)
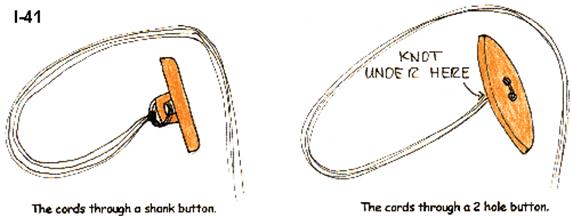
Or… 4, One-yard long strands of nylon dental floss, through the shank of the
button for one arm, then pull it 1/2 way through and tie it in a knot.
***OR***
Put the cords through a 2 hole button
as illustrated, and tie a knot.
2. NOW, put all 4 (or 8) cord ends through the eye of your jointing needle, and pull them only a little ways through.

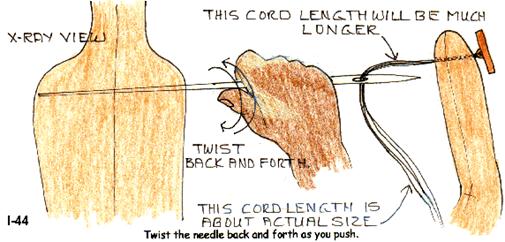
Cords threaded through the jointing needle.
3. NOW, put your needle, with all of the cords, through the doll’s arm top. Sometimes it is a little hard to get the needle through. If you twist the needle BACK AND FORTH in your hand AS YOU PUSH IT, it will go through quite easily, without pushing a blob of stuffing ahead of it.
4. NOW, With the cords through the arm, put the that arm up against the body side to see where the arms should be located, before you put the needle and cords through the body.
5. NOW, put the big upholstery/jointing needle through the body, twisting as you push. Sometimes it is quite hard to get the needle through the body. Don’t get frustrated!! Don’t panic. It goes through, with the twisting motion and a little patience. Think Happy Thoughts, and think “this too shall pass” as you are twisting and pushing at the same time. If you timed this process, I know it wouldn’t be longer than 60 seconds, but it seems like an eternity until that needle point pops out the other side of the body! Think of it as “drilling” it’s way through, and drilling takes a little time.
…VERY, VERY HELPFUL HINTS…
DON’T try to jam the needle through. It will jam stuffing ahead
of it, and be impossible to get through.
DON’T twirl the needle around and around. It will wrap stuffing
around the cord and you will never get it through!
6. NOW, put the needle with the cords through the other arm top, and take the needle off.
7. NOW, take 1/2 of the cords and put them through the shank of the button from the left to the right. Take the other 1/2 of the cords and put them through the shank of the button from the right to the left.
The cords must be coming out of the shank in opposite directions so you can pull them tight and tie them.
NOTE>>>Directions for pulling them tight will follow after the directions for using 2 hole buttons.
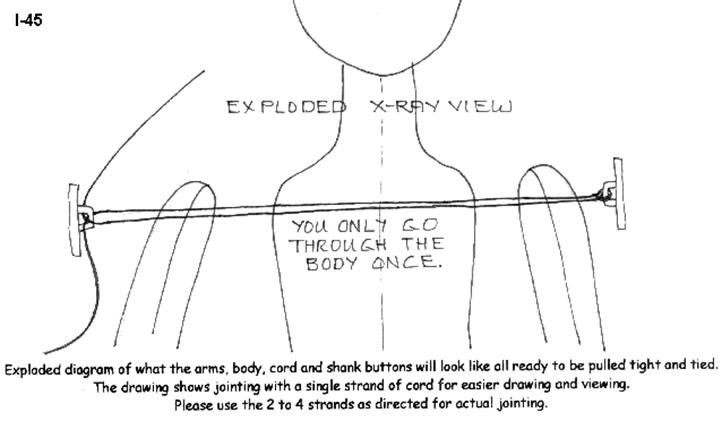
NOW, if you are using 2 hole buttons, put 1/2 of the cords through one hole and the other ½ through the other hole. AND THEN, and this is very important! Put the cords coming out of HOLE A back down through HOLE B.
Put the cords coming out of HOLE B back down through HOLE A. This way, when you pull the cords tight and tie them, the knot will be under the button and hidden.
Please use the 2 to 4 strands as directed for actual jointing.
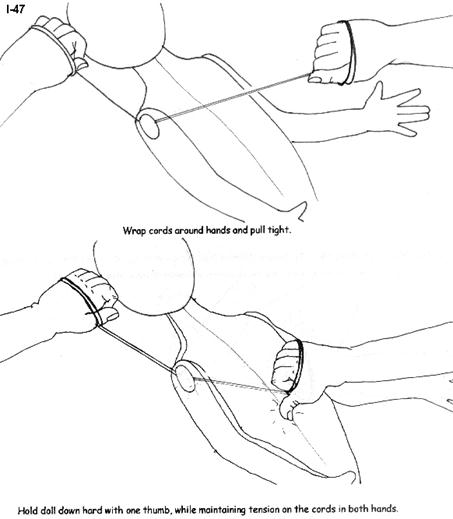
Now you can pull the cords very tightly, because they are opposing, and pull the arms in firmly against the body. BUT, YOU SAY, OH DEAR! How can you keep them tight while I tie them?
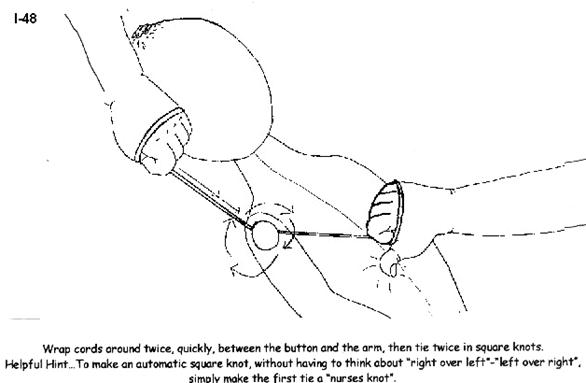
Here’s how.
You should have plenty of cord to wrap it around your hands as you pull. YOU DIDN’T CHEAT, AND CUT SHORTER CORDS THAN 1 YARD, TRYING TO SAVE CORD DID YOU? Pull the cords tight, then with one thumb; hold your doll’s body down firmly on a table, while wrapping the cords that are tightly held in the other hand around between the button and arm. You only need to wrap it around twice, and it will hold the arm tightly in place. Now you can tie the cords in a square knot between the button and arm. I like to tie them twice. Cut the ends of the cords, but not right at the knots. Poke the loose ends into the area between the button and arm. See the following illustrations
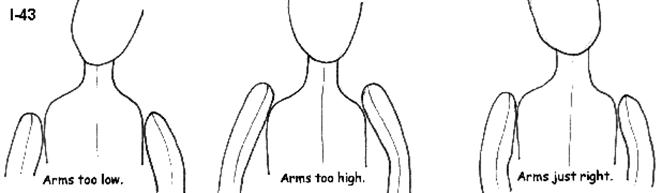
NOW, for the leg placement. You don’t want the legs too high or too low. Plan the button placement and where the cord will go through the body so that when they are pulled in you will have a nice hip line. Place the legs at the sides of the body, and push in on them to see how they will look after the are pulled in.
Repeat the arm jointing steps, for jointing the legs. It is easier to get the cords through the body for jointing the legs because you will have less body to go through.
NOTE>>>If you aren’t satisfied with the arm or leg placement, clip the cords and start over. Once in a while I will get a set of legs on too high or low and have to do it over too.
...Hair...
Now, let’s make the simple, parted in the middle hairstyle, with bangs and pulled up sides. This style will have a stitched part that goes all the way from the front of the forehead to the nape of the neck in back.
Measure that distance on your doll. On my doll it was 5”.
1. Pull off enough 24” to 36” long strands of your chosen yarn to fully and thickly cover that distance.
I just love long hair on dolls! You can make yours shorter if you want to though! In fact a Susannah with Bobbed hair would be very pretty.
I can’t tell you the exact number of strands because we aren’t all using the same yarn. I just pull off one length and then fold the yarn back and forth in my hands, until I think I have enough. NOTE>>>This is a great waist exercise! Tip your body back and forth as you wrap the strands from hand to hand. Hey! No more Gym dues, just make more dolls! You can always add some more strands if you need to. I cut the loops later. I did count the strands of machine knitting yarn. It was 300!
2. Also measure off 2 sets of strands the same length, that will measure about 3/4" when sewn down the center.
3. You can also make add-on bangs. Either left in loops or trimmed. Sew another bunch of strands down the center, and then sew or tie them in place right at the beginning of the center part. You can bunch the strands together to make fluffy, loopy bangs, or sew them on straight across to make wider bangs. You can also glue them on, but be very careful to keep the glue hidden.
Wrapping the “hair” fiber around a few fingers is the quickest way to make the loops for the bangs.
(I don’t teach the “wrapping the fiber around a cardboard with a slit in it method” because it is a problem when making different length hair-dos. I have a wonderful “hair loom” that I hardly ever use either.)
A small bundle of strands sewn down the middle for bangs. Optional of course.
About 1” of stitching.
4. Sew by machine down the center of the strands. Press down on the yarn on both sides of the sewing machine presser foot. Push the yarn under the presser foot, while pressing down, to keep it close together. If you have a “persnickity” sewing machine that doesn’t like to sew on yarn, putting a piece of tissue paper under the yarn helps. You can also mark the 5” measurement on the paper, to help you with keeping the seam the correct length. If this is your first try at sewing yarn on a sewing machine, the tissue paper method is probably the best for you to use. After the yarn is sewn, tear the paper away.
NOTE>>>I know there are special products on the market that you sew on and then tear away. I think one is called Stitch and Tear. But tissue paper works fine, and most everybody has some around.
5. Now place the sewn yarn with the seam going right down the center of Susannah’s head, from about 1 1/4" above her eyebrow level to the back of her neck. This makes the center part style. Stitch or hot glue the seam onto Susannah’s head.
Center part placement.
6. Finger arrange the yarn all around the head. The hair will hang down in back from the part that goes all the way to the nape of the neck. It fills the head out in back when done this way, and the seamed hair covers the neck stump much better than loose hair strands.
7. After the “hair” is finger arranged neatly all around, lift a section at a time and then spread hot glue, thinly and carefully on the head. Press the “hair” into the glue. Repeat for the next section, etc. The seam and “hair” is already glued or sewn at the center.
Lift hair a section at a time and
glue the lower layer down.
8. If you just can’t bring yourself to glue the hair down, you will need to sew an under layer down to the head all around.
9. Trim the “hair” evenly all around.
10. NOTE>>>You can forego the gluing or sewing of the loose hair completely if you wish, and simply bring it to the sides and tie it at the sides like you did Angelique's hair. You can then leave it in ponytails at the sides, or braid it. Tie ribbons at the ends of the braids. This is the best play doll hairstyle.
If you want bangs they can be tied or sewn in place.
11. To tie the bangs in place, thread a needle with a strand of the fiber you are using for the “hair”. Put the needle with the strand, through your doll’s head right at the center part. Place the “bangs” there, and then tie the strand tightly in place.
12. To sew the bangs in place, lay the sewn section of yarn along the forehead, right where the “hair” begins. Sew the section on with it opened out flat. After you are done sewing it, lay the bangs down and trim them shorter and evenly.
NOTE>>>Sometimes it is hard to get the sewn on bangs to lay flat. This is especially true for small dolls, where the bangs are not very long. I usually put glue between the head and the bottom layer and between the bottom and top layer, if the bangs won’t lie down. Another way to encourage them to lay down, is to wet the fiber, and tape or tie it down. Leave it until it is dry. (Sometimes glue is the only way to get them to lay down though.)
Now let’s attach the side “pull-ups”
13. Take the 2 long, “stitched down the center” pieces that you have sewn. These pieces are going to be tied at the sides of your doll’s head, at about eye height. Tie them in by passing a strand of the yarn through the side of your doll’s head, at the place you want the strands tied in. Use a large eyed needle to do this.
I like for the piece I am using to tie the side pieces in with, to be as long as the “hair”. That way the ties get pulled up too, and you don’t have to deal with short ends.
The tied in strands will then be pulled up to the back of the head and tied at the crown, with a piece of the yarn. It’s very easy to do, and gives you a cute little girl style or a romantic style. You can braid the side strands before you pull them back, for a different “look”. You can braid the strands that are hanging down the back for still a different “look”.
You can tie the strands low on the back of the head, rather than up high at the crown, for a still different “look”.
The Clothes.
Now lets make the clothes.
From here on, the color will be gone from the directions. Read carefully, as there will be no color to keep your eye directed and interested.
The directions for patterns that you purchase and use won’t be in color. The color does help keep your eyes happy, but at this point in your dollmaking, it is time to break away from it.
If the color really helps to keep you focused, color the print outs with colored pencils, or crayons.
Susannah wears the skirt as a petticoat, A Dress with long sleeves with cuffs, The pantaloons, stockings, shoes and a shorter vest. REMEMBER>>>Every doll will be slightly different in size. Some trying on is recommended, especially for the dress, before you put the darts in the waist, and for the skirt to adjust the waistband.
The sleeves will be all the way to the wrists on some dolls and may even be ¾ length on others. I recommend that you cut a sleeve from scrap fabric and try it on your doll, before cutting the sleeve from your dress fabric.
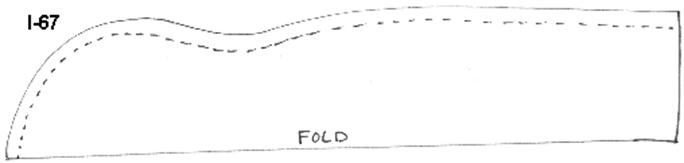
1. Cut the pantaloons from your chosen fabric. You will need to cut the pantaloons out twice on the fold of the fabric. These pantaloons have no side seams.
2. Cut the dress from your chosen fabrics. Perhaps you want the skirt of the dress and the bodice to be from the same fabric, or perhaps you wish them to be made from 2 different fabrics. The bodice is lined, so needs to be cut out twice.
3. Cut the vest, on the fold from felt.
4. Cut the skirt/petticoat, (11” X 22 1/2”) on the fold, and waistband from your chosen fabric.
5. Cut the shoe tops from felt, and the shoe soles from scraps left from the vest, or another color of felt.
6. Cut the stockings from the stretchy fabric you have chosen for them.
Now let’s make the pantaloons.
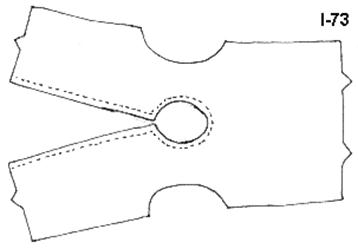
1. Lay the 2 pantaloon pieces right sides together as shown in the following illustration. The curved seams are the center front and the center back seams. There are no side seams. The folds are where the side seams would be.
2. Sew the curved seams.
3. Zig-Zag stitch the flat lace over the raw edge of the leg openings of the pantaloons.
Eliminating bulk is one goal when making doll clothes. Sewing lace on with a Zig-Zag stitch is one way to eliminate bulk, and finish the edges at the same time. This method is perfect for the wrist edges of sleeves and the legs of the pantaloons. It is also perfect for the bottom edges of some skirts and petticoats. NOTE>>>If you have a serger, you can of course serge the raw edges and then sew the lace over the serging.
4. Make a casing in the waist edge of the pantaloons, by first pressing a 1/4" fold to the wrong side and then a 1/2" fold to the wrong side.
5. Sew the casing all the way around, but leave a small (1/2” spot) open to thread the elastic through.
6. Pin one end of the 9” long elastic with a small safety pin and then thread the elastic through the casing. Sew the ends of the elastic together, and then sew the little opening in the casing closed.
7. Now let’s learn to “stretch and sew” 1/8” elastic onto your fabric with a wide Zig-Zag stitch. This makes a thread “casing”, that is so much less bulky than a fabric casing. It also lets you gather up far more fullness with the elastic, than is possible when you sew directly on the elastic. The Zig-Zag stitching gets lost in the gathers, so you don’t even see it.
8. The elastic will be sewn about 1” to 1 ½” above the lace. Mark a line with a colored pencil on the wrong side of pantaloon’s legs.
9. Now get your 1/8” wide elastic. Put one end down on the line, with about 1” left hanging beyond the end of the fabric. Hold the elastic and anchor stitch it at the end of the fabric, by sewing back and forth, with a straight stitch, for about 1/2"
10. Now set your sewing machine to it’s widest Zig-Zag
stitch. It will need to be set wide enough to Zig-Zag all the way across the
STRETCHED elastic. On my machine it is #4. Yours will probably be different.
11. Now, while holding the thread and elastic end in your left hand, stretch the elastic with your right hand, and Zig-Zag across it. DON’T SEW INTO THE ELASTIC! Every stitch must go all the way across the elastic.
When you get to the other end, DON’T back tack yet. Take the piece off of your sewing machine, and pull on the loose elastic end. The elastic will slide through the thread casing, so you can gather the fullness up more.
12. Try it on your doll’s leg, and adjust the fullness to fit your doll. Go back to your sewing machine and sew back and forth at the end to secure the elastic.
This holding and stretching may take a few tries to feel comfortable, but once you “get it” it goes so fast!
You may want to practice on scraps before doing this on the doll’s clothes.
I do this so much that I don’t even take the piece from the machine to pull up the fullness. I do it right at the machine and secure the elastic then. If you get it a little tight, your doll won’t complain! You do need the ability to “eyeball” size to be able to pull the fullness up without trying it on though.
Some of you can eyeball sizes, some can’t. Don’t fret if you can’t. Just fit it before securing the elastic end.
13. After the elastic is in place on both legs, sew the inner leg seam. Tack the raw edges of the lace down flat at the edge so there won’t be any little raw edges sticking out.
NOTE>>> If the Stretch and sew” method of applying elastic still eludes you, you can always gather the legs with silk ribbon, just like you did for Angelique, and Maria.
Next, let’s make the skirt,
which will be used as a petticoat for Susannah.
The directions will say “skirt” but you are making Susannah’s
petticoat.
1. Fold the waistband, lengthwise, right sides together. Sew both ends of the waistband. You can put a piece of interfacing in the waistband if desired, but for this narrow waistband it isn’t really needed.

Fold waistband and sew the ends.
2. Turn the waistband right side out and press.
3. Narrowly hem both short, back edges of the skirt.
4. Now let’s gather the top edge. It is best to run 3 rows of stitching along the top edge. 2 rows will be within the seam allowance, about 1/8” apart. 1 row will be about 3/4” farther down.
This extra row of gathering stitching helps keep the gathers even and smooth as you sew the waistband on. It will be pulled out after the waistband is sewn on.
The gathering stitching is done with the wrong side of your fabric facing up. Set your sewing machine stitch length to the longest stitch it will make.
Start about ¾” from the end, and stop about ¾” from the other end. The ¾” ends will fold back around the edge of the waistband, when you sew the waistband on.
5. Pin the center of the skirt edge to the center of the waistband. Pull the BOBBIN threads and adjust the gathers evenly to fit the waistband, with the ¾” ends of the skirt extending beyond the waistband ends. Pin the skirt to the waistband.
¾” of skirt extending beyond the waistband at both ends.
6. Now, fold the 3/4" extensions back around the waistband. Pin them down too. By doing it this way, you won’t have any little raw ends showing at the center back. You won’t be sewing one edge of the waistband to the skirt, and then hand tacking the other edge over the seam. NOTE>>>You can of course do it that way though if you want to! I just like the speed and ease of doing it all at once on the machine.
Fold and pin the extensions back around
the waistband.
7. Sew the skirt to the waistband, with the skirt part facing you so you can keep an eye on those gathers! That 3rd. row of gathering really does help to keep the gathers going nice and even though.
8. Zig-Zag stitch over the raw edge of the joining of the gathered skirt to the waistband. Serge if you have a serger.
9. Pull the skirt down, which will fold the skirt ends to the inside.
10. Remove that 3rd. row of gathering stitching.
11. Sew a 1/4" wide hem all around the bottom edge of the skirt, and then press a 1” wide hem up NOTE>>>You may want to try the skirt on your Susannah before deciding on the hem width. The skirts on my Susannah falls between the knees and ankles and the lace hangs below the dress skirt.
12. Lay a piece of gathered lace about 1/4" from the press line, on the right side, as illustrated, and sew it in place. The lace will be facing towards the skirt at this time.
13. Turn the 1” hem to the inside again and hand or machine sew the hem in.
On the right side, sew Ric-Rac or braid trim over the hem stitching if desired.
14. Sew the center back seam of the skirt to within about 4” of the waistband. Fold the corners of the lace at an angle and sew the fold. This keeps the lace from sticking out at the lower back of the skirt.

15. Put the skirt on Susannah, over the pantaloons. Decide how far the waistband needs to overlap, and sew either a hook and eye or a snap to the waistband. I like the skirt waistband to be loose, so it stays below the dress waist. If you put the pantaloons and skirt waistband underneath the dress waist, it gets really bulky.
The stockings,
1. Cut the stockings from your stretchy fabric, with the stretch going across.
2. Sew the long back seam. Be sure to use the correct needle type for your fabric choice.
3. Turn the stockings right side out and pull them up on Susannah’s legs. They will extend beyond her knees. The pantaloons will cover the tops of the stockings.
Sew the long seam.
The shoes.
1. Sew a decorative machine stitch around the inner edge of the shoe tops…or…Work a hand embroidered edge of your choice…or…paint a design around the edge…or???
Decorative machine stitching.
2. Sew the heel seams.
3. Right sides together: fit, pin and sew the shoe tops to the shoe soles. Start at the center back, and carefully work the tops around the soles, pinning as you go.
You will need to use the sew-sew-lift-turn method of sewing around the curves.
Don’t try to sew with the shoe soles up, facing you. It is impossible to prevent the tops from getting little sewn in pleats when you try to do it this way!
NOTE>>>many doll patterns have the foot tops sewn to the foot soles this way. Remember to sew the tops to soles for feet too, not the soles to the feet.
Felt is very forgiving, and allows you fit and sew it together easily. If you make the shoes from real leather, it is quite forgiving too.
Ultra suede and Facile are not very co-operative! You will have to work harder at getting the tops sewn to the soles with those materials.
Fit, pin and sew the tops to the
soles.
Turn the shoes
right side out.
Let’s make the very simple vest.
1. Sew the shoulder seams.
2. Sew a decorative stitch around the outer edge, by machine or hand. A blanket stitch is nice too, done in a very fine yarn or crochet thread.
Sew the shoulder seams.
Sew a decorative
stitch around the outer edge.
Now let’s make the dress.
1. Sew the shoulder seams of the bodice and the bodice lining.
The
bodice.
The bodice lining.
2. Pin gathered lace in place around the neckline of the bodice, tapering it off the edge at the center backs.
Pin the lace in place on the right side
of the bodice. Taper the ends off the neck edge.
3. Sew the bodice and the bodice lining together down the back edges and around the neck. Clip the curves, turn the bodice right side out and press. NOTE>>>Be sure to poke the corners at the center back neckline out nice and smooth.
Sew the bodice and bodice lining
together.
Cut a sleeve from a scrap or even cut one from paper toweling, to make a try-on sleeve. You don’t need to sew it, just kind of bunch it up at the top, and fold it around the arm to see how it will fit. You may need to add length at the wrist edge. There will be a 3/4" wide cuff at the end of the sleeve too, but you may still need to add some length to the sleeve itself.
4. Gather the curved edge of the real sleeves, about 1 ½” either side of the center notch. Remember 2 rows of gather stitching. For this little sleeve you can omit the 3rd. row of gather stitching if desired.
Run 2 rows of gather stitching at the
sleeve tops.
5. Fit, pin and sew the sleeves into the arm openings, matching the notch with the shoulder seam.
6. Gather the wrist edge of the sleeves.
7. Fold the sleeve cuff in half lengthwise and press. NOTE>>>You can put interfacing in the cuff if desired, but it isn’t really needed for this small cuff.
8. Sew the sleeve and side seams of the bodice.
9. Try the bodice on Susannah wrong side out. Overlap and pin the center back together.
10. Pinch up the darts as needed to fit Susannah’s waist snug, but not tight. Take the bodice off and sew the darts. NOTE>>>This isn’t a “real” lining job, where everything is between the layers. The lining is just the best way to finish the neck and back edges of dress bodices for doll clothes.
11. Narrowly hem the back edges of the dress skirt, just like you did for the petticoat skirt.
12. Gather the skirt top just like you did for the petticoat skirt too.
13. Fit, pin and sew the skirt to the bodice, folding the back edges of the skirt over the back edges of the bodice Just like you folded the back edges of the petticoat skirt back over the waistband.
14. Sew the center back seam to within about 4” of the waist.
15. Narrowly hem the bottom of the skirt. Try the dress on your doll to decide how much real hem you want to put in. I like for the petticoat lace to peek out from beneath the dress skirt.
16. Take the dress off and press the hem up.
17. Hem the skirt bottom, by hand or machine. If you hem it by machine, definitely sew narrow ribbon or braid over the hem stitching.
18. Sew buttons on the left side of the bodice back, and make button holes on the right side of the bodice back…OR…Sew on small snaps or Velcro® for closing the back.
19. Press " Susannahs" dress and put it on your doll. Tie a ribbon around the waist with the bow in front.
Put the stockings on, then the pantaloons, then the petticoat under the dress. Put the vest and shoes on add a bow to Susannah’s hair, and you are done…Except…Way back when the paint was out, I should have had you paint Susannah’s fingernails.
NOTE>>>If you paint the thumbnail over the seam, it looks like an opposing thumb!
Paint Susannah’s
fingernails.
Paint the thumbnail over the
seam.
Your Susannah is done, except for final check over. Are there any loose threads hanging? If so clip them off.
Is there any glue showing anywhere? If so pick it off or hide it with a strand of yarn.
Are the stocking seams straight up the back of the legs?
Check Susannah all over to be sure everything is as neat and clean as possible.
Next chapter we will make Jennifer. She is similar to Susannah in many ways, but has a pretty profile face with “clay in the nose”, a bust, toes, and invisible jointing.
Enjoy,
Judi
Judi Ward
Judi's Dolls
Go to.. Classroom...
Copyright Notice: All pages and graphics are copyrighted by the Internet Visions Company and/or Judi Ward. You may print these out for the use of the class only. All other uses or distributions are forbidden.
Crafty College and Doll
Net are Divisions of
the Internet
Visions Company.
© 1998-2017, Internet
Visions Co. All rights reserved.
All trademarks are owned by Internet Visions Company.
http://JudisDolls.com http://DollNetMarket.com