Go to.. Classroom...
Cloth Dollmaking for Everyone
© 1998, © 2012 Judi Dolls/Judi Ward
Taught by Judi Ward of Judi's Dolls
http://JudisDolls.com
…CHAPTER 8 …
Jennifer’s
Directions
The complete directions will follow after a short talk.
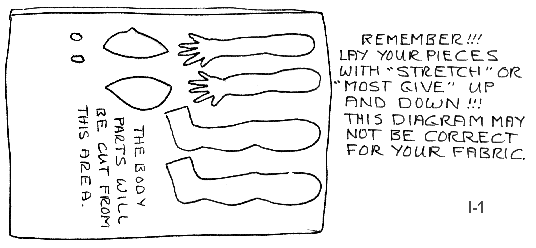
Jennifer is a 6 part, invisibly jointed doll with a 4-piece body and 4-piece profile head. Jennifer’s legs and arms can be sewn using the Freezer Paper or Draw Around and Sew method. This is by far the easier way to sew small doll parts. It can’t be used for parts that are not the same on both sides though.
Jennifer’s head can be partially sewn using the Freezer Paper or Draw around and sew method. I will show you both the Freezer Paper or Draw around and sew method, and the “cut the parts out with seam allowances, and then sew” method. The body has to have seam allowances all around, and then be cut and sewn.
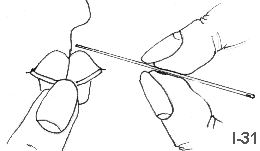
You will use the “fold seam to seam” foot front method, and use a template with toes to sew the foot front. The toes will be sculpted as taught in chapter 3. Painted toenails are fun, for Jennifer!
Jennifer’s face will be painted, and
will be slightly shaded with colored pencils. Because the face is already a
profile, lightly sculpted and has a lot of shape and form, very little shading
is needed.
We will use the regular template method of putting the features on. You will
need to do a little bit of free handing.
Jennifer will have either painted eyelashes or “real” people eyelashes, which are the prettiest, and a great “escape route” if painting lashes is too hard.
Jennifer will use the “clay in the nose” technique if desired.
Jennifer has all separate fingers that are slim and pretty. You will almost surely need to use the needle, thread and tube method to turn her fingers, unless you have another special way you have devised or learned, to turn tiny fingers. If you have Alligator clips (Easy Stuff) or a very slim jawed hemostat they may work too.
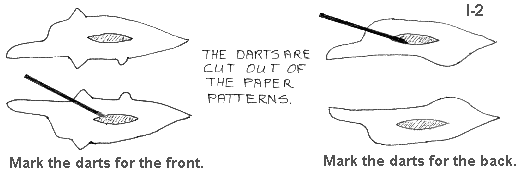
You will use the reverse template method for marking darts within a pattern part, for the body darts.
In Jennifer’s pattern you will “stretch and sew” narrow elastic, and make a thread casing, rather than a bulky fabric casing. The thread casings allow you to draw up far more width and get fuller sleeves etc.
You will use the “fold back a placket” method to eliminate raw ends when you sew a waistband on, quickly and easily all by machine. This “fold back a placket” method will be used for Jennifer’s dress and pinafore too.
The center back seam of the skirt (petticoat) and the dress will be handled a little differently for Jennifer’s clothes, resulting in a smoother lap over.
Jennifer’s clothes are more fitted, and will require some trying on and fitting. The clothes will fit a little differently for each doll, depending on what you make her from.
Directions are given for basic sewing machine sewing. If you use a serger, please do use it as you normally would for the doll’s clothes. For doll clothes, raw edges are often Zig-Zag stitched with lace over them, rather than hemmed.
Something to bear in mind when making cloth dolls. No 2 dolls will turn out exactly the same size. Even if you cut and sew them at the same time, from the same pattern, from the same fabric etc. It takes only a little extra stuffing to make a doll fatter. Joint a little higher or lower, or attach the head onto the neck a little higher or lower to make a doll taller or shorter.
You may in fact decide to add a little length to a doll’s legs, arms or body after you make it once. This is an easy adjustment to make, which adds even more variety to your dollmaking.
This is part of the magic, fascination and joy in cloth dollmaking. Every doll is a new personality. Often, a new personality you didn’t even know was in there!
Almost nothing is written in stone, and all designers and all dollmakers like and dislike different things where dollmaking is concerned.
To really get the most joy from your dollmaking you must be ready to “play” a little. Practice a little. Experiment a little, and just have fun with your dollmaking, all within the context of striving for a clean, smooth quality look and feel for your creations.
The invisible jointing you will learn with Jennifer is a method I devised many years ago, when the fuss about toys being safe for children first began. I had a doll and craft shop in Idaho, and sold lots of cloth dolls. I had been using buttons to cover from the fabric stores, covering them with “skin” fabric and using them for joints on the outside. They looked very nice, and matched the doll’s “skin” when done this way.
Suddenly there was a lot of press about child safety with toys, so I decided to put the buttons inside where they were safely away from children’s hands and mouths. It works great, is tight, and looks better than outside buttons for most dolls. It is especially nice for “art” dolls.
When you are doing the jointing, REMEMBER, DO NOT, let up on the tension on the cords as you pull them extremely tight, and then proceed to wrap the cords in one hand, between the body and limb. ALSO REMEMBER! The big jointing needle and cords go through the body ONLY ONCE!
When you get to the jointing part of these directions, come back and read the above at least twice more. The invisible jointing method is really very easy, but most dollmakers make it hard, by adding steps that aren’t needed. When you get to it, follow the steps 1 at a time, slowly. And go back to our mantra, Don’t Panic.
The directions are written very much like my current, pattern directions style.
I have increased the detail in my directions over the years as more and more beginners began making my detailed cloth dolls. For advanced Dollmakers, many of the directions are redundant.
Certain basic skills need to be in place to make most cloth dolls with success. The lessons you have received in this class will stand you in good stead, for “figuring out” directions that may not go into every little detail.
All of these directions will be in black and white, just like a regular pattern is. If the color on the previous lesson pages helps you to focus on details, print the lessons and then color the diagrams with colored pencils. The colored pencil coloring is also a great way to practice your colored pencil techniques for faces!
Because the directions are “stand
alone”, many things that you have already been taught will be re-stated in the
directions, but the directions will not go into deep detail about simple
techniques that you have learned from the class. REMEMBER>>>Many
techniques are usable for many, many different dolls.
When you tackle a new pattern, reach back in your memory for a method or
technique that might work for the problem at hand, even if the directions are
not very explicit.
NOTE>>>If you ordered a supply kit for the class, you have 2 sets of joint buttons. One set is for Jennifer with flat feet and one set is for Jennifer with high heels.
You have probably been wondering when we were ever going to use those buttons!
***SPECIAL NOTE***
When you get to the jointing part of these directions, you will be referred to Skill Sheet #1. It is printed at the end of the chapter. This skill sheet goes with all of my patterns. The jointing directions for Susannah have more illustrations and detail. The difference is simply that the buttons are inside for Jennifer.
Use Skill Sheet #1 and the directions for Susannah’s jointing, together, to give you a full picture.
By using both sets of directions in tandem, and figuring out the slight differences, you will be prepared to convert any jointed doll to inside jointing if desired.
More choices and variety to come.
Again, Remember, Almost nothing in the cloth doll world is written in stone, and Don’t Panic!
Jennifer
©Judi Ward-Judi’s Dolls 1998
Jennifer is a pretty profile faced young lady with a nicely shaped bust. She has very slender, separate, articulated fingers, and is jointed at the hips and shoulders.
SPECIAL NOTE.>>>A turning head technique will be taught when we do the little changes for Jennifer in High Heels and a Formal Gown!
Included in this pattern are the instructions for my exclusive “Clay in the Nose” method for stuffing a profile nose, which is small and dainty. Her nose will also be very lightly needle-sculpted. The clay eliminates “nose flop”, “nose bend” and “nose squish”. Do try it, it is GREAT!
Jennifer wears pantaloons, a petticoat (skirt), a dress, pinafore, and wide brimmed hat. I like her barefooted, with her cute toes showing. She is adorable with a little watering can in her hand.
MATERIALS NEEDED FOR ONE DOLL
Please note: The sentences in italics give you more information about a supply item, like where to get it or why.
- 1/2 yard of sleepwear velour or slightly stretchy, Doe Suede® suedecloth. Do Not Use Ultra Suede! It doesn’t have any give, and creates a bent and wrinkly doll! You can use the velour or Doe Suede? with the smooth side as the right side, or the napped side. For this doll I prefer the smooth side out. You can make Jennifer from firmly woven cotton, but she will be harder to shape. You will also have to work harder to get the wrinkles out at the fingers, and the curved closures won’t be as nice and smooth. She may also be smaller in woven fabric. Also if you use the firm knits, you can throw the fray check away!
- About 1 pound of excellent quality polyester stuffing. You want to be sure the stuffing has no unexploded fibers in it. By now if you have followed along and made the dolls you will have found a stuffing you like best.
- 1 skein of a soft, fine, fluffy yarn or a real doll wig for Jennifer’s hair. Doll wigs are available from Doll Supply catalogs, and CRs Crafts. Box 8 Leland, Ia. 50453. Jennifer wears a size 9” –10” wig.
- 1 set of “real” fake eyelashes. These are available at drug stores, and variety stores. They are also available from Doll Supply catalogs.
- 1 pair of size 36mm, and 1 pair size 45mm, Prymm-Dritz buttons to cover. These are available in fabric stores, be sure they are the kind with the “teeth” all around the inside of the cap! The kind without the teeth, pull apart, and your doll’s limbs will fall off!
- Paper or Pellon® to retrace your pattern pieces onto. Do not cut your original pattern. More on that later.
- Freezer paper, to retrace the arms, legs, ears, and head pieces onto, if you want to use the Freezer Paper method for sewing those parts.
- 4 yards of strong nylon cord for jointing the arms and legs. I carry it in my catalog. It is 10 cents per yard. You can also use waxed linen from the jewelry dept. of a craft store, or Dental Floss. You will need twice as many yards of dental floss, because it isn’t as strong. Some of the waxed linen is very thick, so you need only 2 yards of it. I personally find the waxed linen to be difficult to pull through.
- A long upholstery needle for jointing, and one to make into a finger-stuffing fork, if you don’t already have a stuffing fork. I carry these in my catalog, and they are available from any upholstery shop and many fabric stores. I use an 8” long one for jointing, and a 12” long one for a finger-stuffing tool. Directions for making a finger-stuffing fork will be given later in the text. I like this “home-made” finger stuffing tool better than the commercially made ones, because it is much longer and thinner.
- Acrylic paint in white, black, brown, and red for the face features, and 2 colors for the irises of the eyes, like dark blue and light blue, or dark green and light green etc. You can also get a bottled lip color, rather than mixing it from red, white and brown. You can also make the iris’s of the eyes solid black.
- White Gesso, For undercoating the eye shape and mouth shape.
- Very sharp, red and brown colored pencils. I prefer
Berol, Prisma Color brand. The red to draw the mouth on with. The brown to
draw the eyes on with.
NOTE>>>Of course, if you are using very dark brown fabric, you will need to draw the features on with different colors of colored pencils.
NOTE # 2>>>You may want another color for shading over the eyes for an eye shadow look. If your Jennifer is dressed in blue, you may want blue eye shadow, etc. - Ordinary, powdered “people” blusher in a soft pink or peach.
- Clear coating like Mod Podge® or clear, fingernail polish. This is for coating the eyes, mouth and fingernails, after the painting is done and dry, to give them a nice shine.
- 10, 15mm chenille stems if you want to articulate the fingers. Michaels Crafts carries them. If you can’t find the 15mm size, ask your craft store to order them. West Trim makes them. Most craft stores can get West Trim products. Depending on how you actually sew the fingers, and what fabric you are using, the smaller ones, 9mm or 6mm may work the best for you. CRs Crafts carries the Chenille stems too., in several sizes.
- A small piece of Super Sculpey® or Fimo® clay in White if you are using white stuffing. The nose clay must match the color of stuffing you are using. If you are using the ethnic colored stuffing’s, match the clay to the stuffing color. Note: You can of course, just stuff the nose, and sculpt it if desired, if that is a method you are familiar with.
- Clear drying craft glue or Fabri Tac® for holding the eyelashes on.
- Thread to match your dolls skin. I recommend Swiss Metrosene®. It doesn’t break under firm stuffing.
- A size 10 or 11 stretch, or ball point sewing machine needle for sewing the doll, and the proper needle for sewing the clothes.
- Ordinary sewing supplies, for both hand and machine sewing, and a 3” to 5” inch long doll sculpting needle.
- Ordinary stuffing supplies. My favorite stuffing tool is a flat head screwdriver that I have used for over 20 years, and my stuffing fork that I made from a 12” long upholstery needle, by breaking part of the eye off, which made a fork. I wrapped it in masking tape and have used it for over 20 years too. There are commercially made stuffing forks, but I like my home made one better. It’s longer and thinner.
- I highly recommend that you get a Hemostat for turning some fingers, and other parts too. You can get one from most medical or dental supply stores; some fabric stores even carry them now. You can also order one from CRs Crafts. They are about $5.00. There are other turning tubes and tools available from a variety of sources too. I also teach a great turning method for tiny fingers that doesn’t require any special extra tools, and that method will be included in this pattern. The method I teach will help you to turn extremely tiny fingers.
- A very tiny, excellent quality, pointed paintbrush, in size 000 or 0000 or 00000. The more 0s the smaller the brush. The smaller the paintbrush, the more control you have and any mistakes will be tiny.
- A size 1, pointed paintbrush, for filling in larger, solid color areas.
- A couple of Sticky labels, Avery is one brand, to make the eye and mouth templates from.
- 1/2 yard of lightweight woven fabric like broadcloth, percale, calico etc. for petticoat. (which is made from the skirt pattern)
- 3/4 yard of coordinating lightweight woven fabric for the dress.
- 1/2 yard of another coordinating woven fabric for the pinafore and hat. Of course the hat is optional, and can be made from the scraps from the dress etc. It can also be made from felt and left unlined.
- A small piece of woven fabric for the pantaloons, 1/3rd yard is plenty.
- Scraps from any of the fabrics for the pockets on the pinafore and the collar on the dress.
- 1/2 yd. of 1/2" wide, flat lace for the pantaloons legs. And 3 yards of 1” wide gathered lace for the petticoat and dress skirt hem.
- 1/2 yard of 1/8” wide elastic for the pantaloons, and about 10” of ½” wide elastic for the waist of the pantaloons.
·
A pretty crocheted heart about 1 1/2" wide for the pinafore
decoration, and a ribbon rose or fancy button to go on top, if desired.
Jennifer’s Directions
GENERAL DIRECTIONS
Read through all instructions and familiarize yourself with the pattern pieces. Retrace pieces to other paper or Pellon®. Do not cut your original pattern. Keep it intact for future reference or to retrace a piece if a piece should get lost or damaged.
Make the arm, leg, ear and foot front templates from regular paper (to draw around)…OR…From freezer paper (to iron on, and sew around)
NOTE>>> IF YOU WANT TO USE THE FREEZER PAPER, OR DRAW AROUND AND SEW METHOD FOR THE FACE FRONT AND THE HEAD BACK, CUT THE SEAM ALLOWANCES OFF OF THE CENTER FRONT AND THE CENTER BACK SEAM ON THE HEAD PIECES.
Cut the waist darts out of your body PATTERN pieces so you can draw through them onto your fabric. Don’t cut the bust darts out of the pattern piece, and DON”T cut any of the darts out of the fabric parts!
The legs and arms are “draw around and then sew” OR… “Freezer Paper” method pieces. They do not have seam allowances included. Draw around them twice, with a colored pencil, slightly lighter or darker than your chosen “skin” color, on doubled fabric, folded right sides together, with the stretch going up and down. Be sure to place them at least 1/2" apart, so you can cut them out after sewing them. OR…Iron the Freezer paper pieces, shiny side down, onto your doubled fabric, using the same spacing, and up and down stretch direction. Set your iron on the Wool setting for ironing the Freezer Paper on.
If you are going to sew the face front and head back as explained in the CAPITALS ABOVE, either draw around your pattern pieces or iron the Freezer Paper patterns onto your fabric at this time too. Ditto, for the ear templates.
VERY IMPORTANT NOTE>>>>BE SURE!!!! To cut the seam allowances off of the center back and center front of the head pattern, when using the “Draw around and sew” or “Freezer Paper method. If you forget, the head will be too big!!
A layout example for the “Freezer
Paper”, or “Draw Around and Sew” method.
The layout shows the head parts, and ears being done this way too.
NOTE>>>Pin the 2 thicknesses of fabric together in a few
places to prevent slipping.
The other parts have seam allowances included.
Cut the remaining pieces from the appropriate fabrics, following stretch direction markings carefully.
All parts are placed with the stretch going up and down. UNLESS!! You want to make a completely different looking doll! She will be shorter and chubbier, and look entirely different if you place the stretch across!
You will need to design the clothes yourself if you do this, but it is fun doll “play”.
Lightly draw through the waist darts on the correct body pieces. I find this method much easier for marking darts that are within a pattern piece.
Mark the bust darts on the body front pieces if you don’t feel that you can eyeball them. They fold nicely though, and you can probably fold and sew them without marking them.
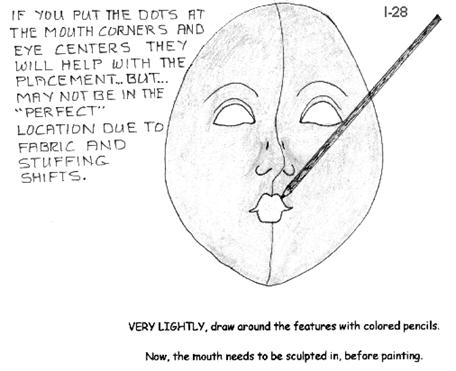
Put a VERY LIGHT DOT with a colored pencil, at the center of each eye, and the dots at the corners of the mouth for the sculptured mouth. Just poke a hole in your pattern piece at the eye and mouth, to mark through.
I much prefer the sticky label method, for putting faces on dolls (if you don't draw freehand faces) because sometimes as you stuff, the features get out of line if they are fully transferred, and it's hard to adjust them without having some marks left showing. Eyebrow lines don't need to be transferred. They are simple to freehand...or...you can use the edge of a coin or jar lid to draw around, to make curved lines for eyebrows. The light, tiny nose flare lines need to be put on after the face is finished too. They need to be VERY LIGHT and under stated. I like to put the nose flare lines on with a light brown colored pencil. NOTE: The eye and mouth shapes, and template directions are later in the directions, and on the pattern pages if you choose to use the template method of putting the face features in place. If freehanding is your thing, please do so for Jennifer’s face.
Cut all clothing pieces from the appropriate fabrics.
All sewing is done right sides together, unless noted otherwise.
Now you are ready to sew... All machine sewing is done using a small stitch length. About 15-20 stitches per inch. All hand sewing is done with a quadruple thread. (Two strands of thread 40" long, pulled 1/2 way through so you are sewing with 4 strands.) Unless stated otherwise. Knot the end.
Quadruple thread illustration

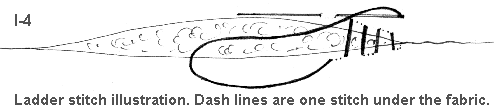
Closing openings is done with a ladder stitch. A ladder stitch enters and exits on the right side of the fabric. After taking three or four stitches, you pull the thread tight, and the raw edges fold in and disappear with a slight nudge from your finger.
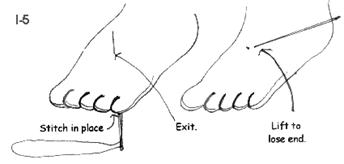
After any hand sewing, you will anchor the stitches, by stitching in place, and then " lose the ends" by bringing your needle out a little ways from your stitching, clip the thread close to the fabric, and then lift the fabric with the point of your needle so the thread ends get " lost” inside your doll.
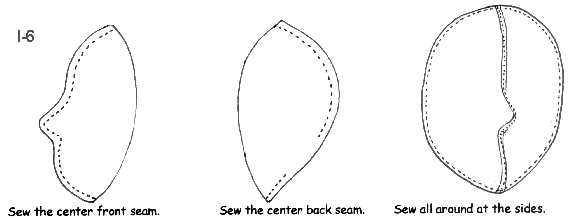
DIRECTIONS FOR SEWING THE HEAD WITH THE FRONT AND BACK SEAM ALLOWANCES LEFT ON, AND CUTTING THE HEAD PARTS OUT FULLY, BEFORE SEWING.
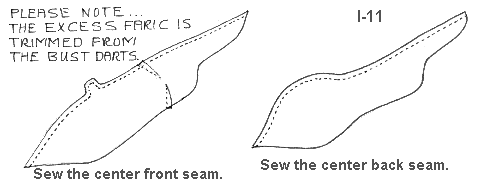
1. Sew the center front face seam. Be very careful, and sew slowly around the nose, so you don’t get funny little points. To do this, sew a couple of stitches, then lift your presser foot a little, and turn the fabric slightly. Continue this way all around the curve. Trim the front seam allowance to 1/8”. Clip under the nose.
2. Sew the center back head seam, leaving it open between the dots. This is where the neck will fit up into. You don’t need to trim the back seam allowance, and do not trim it at the opening.
3. Sew the front and back together all around the sides. Sew very carefully at the chin area, so you don’t get little jerky points around the chin either. Trim the seam allowance to 1/8”
4. Turn head right side out through the opening in the back where the neck fits into. Be sure to poke the nose and chin out nice and round. Set aside.
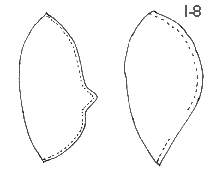
DIRECTIONS FOR SEWING THE HEAD, USING THE DRAW AROUND AND SEW, OR THE FREEZER PAPER METHOD.
You will already have the parts ironed on or drawn around. This is my preference for profile heads, especially small ones. I am especially fond of the iron on, Freezer Paper method for profiles.
1. Sew the center front seam of the head.
2. Sew the center back seam of the head, leaving the opening in the back for the neck to fit up into.
3. Cut the parts out, leaving a 1/8” seam allowance for the front. Leave a ¼” seam allowance at the back. Cut right on the line you drew, or on the edge of the freezer paper for the un-sewn head sides. (Remove Freezer Paper)
4. Fit, pin and sew the head front to the head back, all around the sides. Take great care to sew evenly, without little pointy parts. Use the sew-sew-lift-turn method around the chin area especially. Trim the seam allowance to 1/8”
5. Turn the head right side out through the opening in the back of the head. Be sure to poke the nose and chin out nice and round.
|
|
|

Sew the front to the back at the
sides.
The Body.
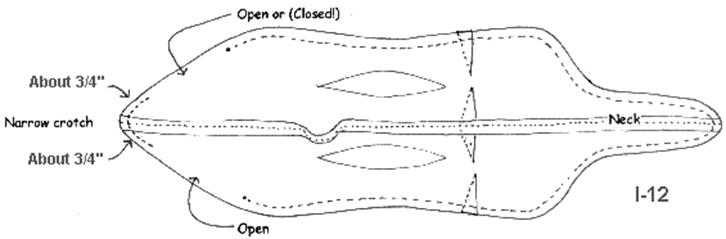
1. Sew the bust darts in both body front pieces.
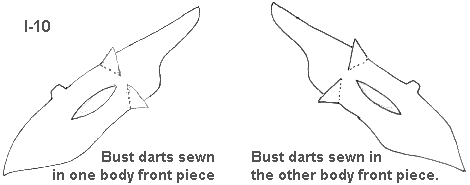
2. Sew the center front seam of the body front, as illustrated. The “bump” will be an “Inny” belly button when you are done. I promise, you won’t have a bubble on your doll’s tummy!
3. Sew the center back body seam, as illustrated.
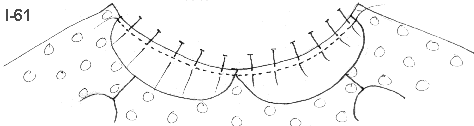
4. Fit, pin and sew the body front to the body back at the sides, as illustrated below. You will be sewing from the top of the neck to the first dot. Sew from the top of the neck to the dot on the other side. Now sew up about about ¾” from the crotch seam at each side. The illustration will make it very clear.
Why do we do it this way? These bodies are quite narrow and pointed at the bottom, and if you leave the entire crotch area open for turning and stuffing, it is hard to close that point with your ladder stitch. This way, you only need to close the 2 straight openings. When you joint the legs, they cover up the closings.
I haven’t put this in a pattern yet, but now that I have tested this method on several hands on classes during the last few months, I find it is much easier for everyone to close those pointed crotch areas by machine.
There is not a place on the pattern that is marked for this technique, and won’t be on other patterns you might order in the future, from me or anybody else, but this is a technique that works well for many very tapered lower body designs.
The seam at the crotch goes about ¾” up the side, from the center body seam. Note the word About. If it goes 1” that’s O.K. A little less than ¾”, that’s O.K too. You can even close up one side completely, and leave just one area open to stuff through! Be very careful as you stuff, if you leave just one side open. It is easy to get lop-sided shoulders, when stuffing from just one side.
The illustration of how to sew the side
seam, and where to leave it open.
5. Now, pinch up the waist darts, one at a time, and sew them in. Be sure you don’t pinch up and sew through both sides of the body when you do this! Sew the darts just outside of the lines you drew. That will assure a nice slim waist.

The reason for sewing the front, back and side seams before sewing in the darts, is because it is better to have the body as flat as possible while fitting, pinning and sewing the long seams. The darts are just little, and pinch up and sew in just fine after the body is all sewn together.
6. Turn the body right side out through one of the openings at the bottom of the body. Set aside.
The arms and legs.
1. Lightly trace around arm and hand templates on doubled fabric, if you haven’t done so yet…OR…Make two arm/ hand templates from freezer paper. Iron the freezer paper templates in place on doubled fabric, using a wool setting on your iron. Be sure to leave space between the parts, so you can cut them out! You will sew around the paper then remove it.
2. Sew arm and hand seams. Use a very tiny stitch and sew slowly around fingers ...NOTE...lift the presser foot of your sewing machine every couple of stitches at the finger tips, and then turn the hand a little to get nice round finger-tips. NOTE>>>If you are using woven fabric, sew 2 stitches across, between each finger. If you are using a firm knit fabric, you don’t have to do this, but you can if you wish.
Repeat this “lift-turn-sew” method, around each fingertip. Leave arms open at the top or back for turning and stuffing.
3. Cut the arms out, leaving a very small seam allowance.
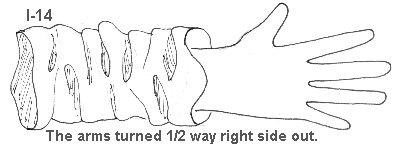
4. Clip between the fingers and trim excess fabric from around the fingers. Turn arms and hands ½ way right side out.
If you have a hemostat that is small enough, reach inside each finger with your hemostat, grip a little of the finger tip with the hemostat, and then slowly work the finger into the palm. Turn one finger at a time, until they are all in the palm. Finish turning the rest of the hand/arm ½ way right side out.
Poke each fingertip out nice and round, using your stuffing tool, Phillips screwdriver or the hemostat to help. NOTE: There is a needle and thread turning sheet included with this pattern, if you don’t have a very small hemostat or other turning tool. The Needle and Thread Turning method will be at the end of the pattern directions.
5. Draw around the leg templates twice on doubled fabric if you haven’t done so already. Or use the Freezer paper method. Sew the leg seams, LEAVE OPEN AT THE FRONT OF THE FOOT, and between the dots at the tops of the legs or the backs of the legs, whichever you have chosen.
6. Cut the legs out, leaving a very small seam allowance.
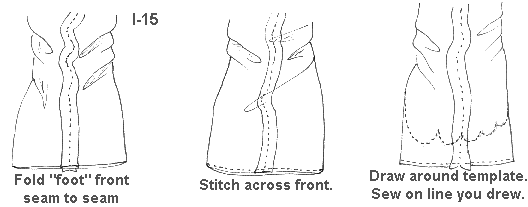
7. Now fold the toe area of the “foot”, "seam to seam" as illustrated below. First, sew across the toe area right at the edge to hold it together. This way you don’t have pins in the way of your sewing the actual “foot” shape. Repeat for the other “foot”.
7a. Draw around the toe template on the top of each “foot”, tapering the line to the sides of the feet…OR…Iron the freezer paper toe templates in place on each “foot” front, and sew around them. NOTE...The “toes” are drawn about ½” back from the front of the fabric. If you draw it right at the edge, where you sewed across to hold the fabric together, it will make the foot too big, and may be hard to sew nicely shaped “toes”.
8. Sew the “toes” on the lines that you have drawn, starting at one tapered edge. Sew slowly around each toe, using a very tiny stitch and lifting the presser foot of your machine as you did for the fingers and nose. End at the opposite tapered edge. Repeat for other “foot” front. Of course if you ironed freezer paper templates to the fronts of the feet, sew around those. Again, my favorite method.
(Or use the freezer paper method.)
9. Trim away the excess fabric at the foot fronts, and clip between the toes.
10. Turn the feet and legs ½ way right side out, using your screwdriver, hemostat or stuffing tool to help with the turning. Poke the heel out nice and round. Work each toe out, fully and smoothly to the right side.
11. With all parts turned right side out you are ready to start stuffing...stuffing note... All parts, except the hands, need to be stuffed VERY FIRMLY. I mean hard, and shaped as you stuff. You can actually mold and shape your doll almost like clay when you make dolls from velour or Doe Suede®. It stretches just enough to allow this shaping but doesn't stretch so much that it goes all out of shape easily.
12. First, if you are going to use my exclusive “Clay in the Nose” method for your doll, go to the instruction sheet which teaches this method. I love this method! It totally eliminates the floppy, wrinkled pointy nose syndrome. The revised instruction sheet is at the end of this entire chapter. The clay in the nose technique can be used for many dolls! You can also use air drying paper clay. The directions are written for Sculpey® or Fimo® but air drying clay works great too, you just don’t bake it.
I have revised this method over the past year. I have found that it works better to go ahead and stuff the whole head after putting the clay in the nose. If you wish to do any needle sculpting at the bridge of the nose, you can do it before the clay is baked.
NOTE: Follow the clay instructions carefully. The 225-degree oven doesn’t hurt the fabric, but let it cool before you take it out of the oven. Of course, if you don’t want to do the clay method, simply stuff the nose with polyester stuffing, and sculpt it. The nose may have a wrinkled end without the clay though.
13. After you put the clay in the nose, stuff the head very firmly, pushing
the stuffing firmly against the clay and down evenly all around the jaw area
and into the top of the head. You can actually change the shape of the face by
just adjusting the stuffing in the jaw area.
Stuff out into the front of your doll’s face where the lips will be, so
they don't go flat when you pull the sculpture thread in later. Carefully
stuff the cheek area nice and smooth. Stuff into the chin, to lengthen the
face.
Stuff fully and firmly up into the back of the head. REMEMBER TO SHAPE AS YOU STUFF. The stuffing that is poking out of the neck hole will be worked back in when you put the doll together. Your doll's personality will start to emerge now. Stuff until you are satisfied with the face and head shape, and it feels very firm.
NOTE>>>You will probably add a little more stuffing too, after the head is baked, especially in the jaw and chin areas.
14. Pinch the nose a little to shape it again, and then, using a long thin needle with a double thread, with a nice fat knot in the end, enter at the back of the head, and exit at one side of the nose about ¼” above and to the side of the tip.
15. Go across to the other side, and then back where you started. Pull gently, to pull the nose in a little at the sides. Repeat, the back and forth once more, and then exit out the back of the head again. Stitch in place to secure your stitches. Pinch the nose a little to shape it yet again. See the illustration following to clarify this easy sculpturing. NOTE>>>You can also leave the nose completely un-sculpted. It is actually daintier un-sculpted, but has more personality sculpted, with the clay in it, just to keep the point.

The back and forth stitching, is of course Under the doll’s “skin”. The dotted lines in the illustration are 1 stitch under the "skin", going from side to side.
After doing whatever sculpting you have chosen, re-shape the clay in the nose, before baking.
Of course, if sculpturing noses is “your thing”, do a full sculpt. A fully sculpted nose will almost always result in a less “pretty” face, but perhaps you desire a more character face. This is your doll, and you may certainly partially sculpt, fully sculpt or not sculpt at all, and the design lends itself to all 3 possibilities.
BIG< BIG NOTE>>>At this point, your doll’s face will be nothing like the finished face will look. It will look a little like an eyeless Martian! As soon as you put the features on, the whole face will change right before your eyes!
Later, after you pull the mouth up, but before you paint the lips, your doll will look like a pixy! Be patient, this too shall pass!
When doing faces on profile heads, there is a metamorphosis as each step in the process progresses.
This is one of the hardest things to realize! As soon as the head is stuffed, the doll maker wants it to look like the vision in their mind. Won’t happen! Again, be patient, a lovely face will emerge…OR…Maybe you want a Martian or a Pixy!
NOW>>>>Go to the CLAY IN THE NOSE directions at the very end of the chapter, and bake the head according to the directions. We will draw the features on after the head is baked.
NOTE>>>The 225 degrees is for your home oven, NOT a toaster oven. I have a toaster oven to use at classes, and the temperature needs to be 150 degrees for baking noses in it. 225 degrees in a toaster oven will melt and/or burn your fabric. Been there, done that!
16. Now, stuff the body very firmly, especially the neck. If you stuff the neck fully with cotton balls, it will be harder and stiffer, which it needs to be to hold the head up, without bending or wrinkling. Ordinary cosmetic puffs work just fine for the cotton. Pull them apart before using them as stuffing. Stuff nice round shoulders that match, and a smooth, firm, well shaped bust area. DON”T stuff cotton ball stuffing in the shoulder area. We have to get a jointing needle through there, and you will never get a needle through the dense cotton.
Stuff down to just below the belly button. Remember, SHAPE AS YOU STUFF.
17. Put a needle with a quadruple thread, into the " stickout” part of the belly button, from the INSIDE of your doll. See illustration to see where to bring it out.
18. Sew a gather stitch around the "stickout" part, and then, pull the gathers tight. Now, insert the needle into the middle of the “stickout” part, and then back into the body. Again, see illustration.
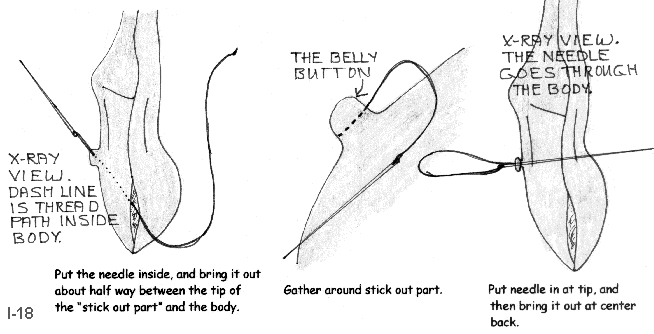
19. Bring the needle out of the body at the center back, at the top of the “crack”. See previous illustration.
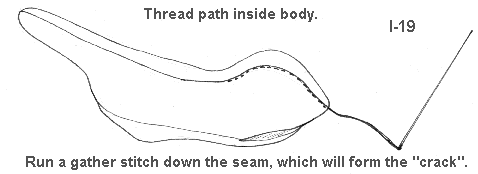
20. Run a gathering stitch right down the center of the lower back seam, (the crack) to the end of the seam. Pull it up a little to start the gathering. Don't cut the thread yet.
21. Finish stuffing the body, carefully stuffing out into each side of the “bottom”, as you pull the gathering thread tighter. When the body is fully and very firmly stuffed, with nice rounded “cheeks”, anchor the gathering stitching, by stitching in place a few times at the end of the seam. Lose the ends of your thread.
The belly button will pull in and become an "inny" as you gather and finish stuffing. The crotch area will also pull in and sometimes the doll turns out anatomically correct!
See, you don’t have a bubble on your doll’s tummy! You should have a real looking “inny” belly button, and a nice “bottom” with rounded “cheeks”.
22. With another quadruple thread, close the opening/openings in the body with a ladder stitch, adding more stuffing as needed to finish out the nice rounded bottom, and a “tapered at the sides”, lower body. Don’t put cotton balls here. It is very hard to get a jointing needle through cotton. Stitch in place to anchor your stitching, then “lose the ends”.
23. Stuff the “feet” and legs very firmly, shaping as you stuff. Be sure to get stuffing out into each toe, and really firmly into the heel. Your stuffing fork is great to stuff the toes with. Twirl just a little stuffing onto it for each toe, and then guide the stuffing into place. The rest of the foot stuffing will hold the toe stuffing in place.
NOTE>>> You will sculpt the toes after all of the stuffing is done.
Stuff the ankles firmly and be sure to make nice rounded calves, thighs and the little kneecap. A small piece of cotton ball, guided down with your screwdriver makes great kneecaps.
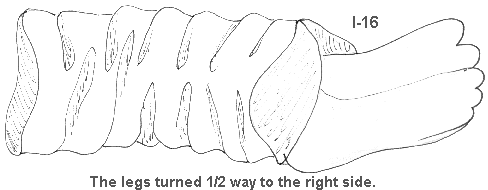
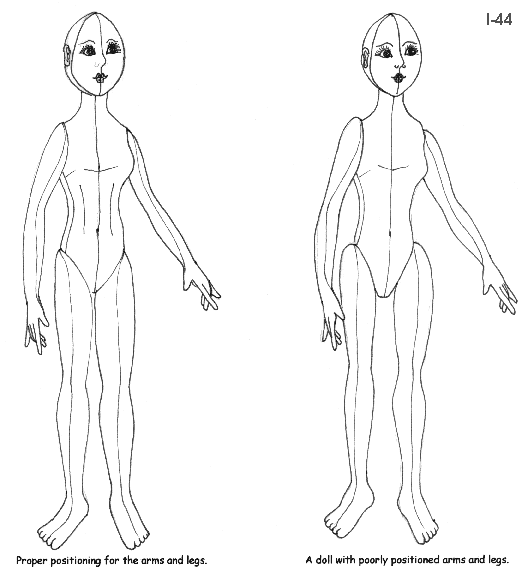
Jennifer’s legs are very well shaped, when sewn and stuffed properly. They are also long and slim. As you stuff, plan a right and a left, leg and foot.
If you have some “cellulite”, roll the legs in your hands like a sausage. This will smooth them, and then the “release” the stuffing will undergo overnight, will smooth them more. Pinch the area behind the knee to taper it in more there too. If you have stuffed very firmly, you will be able to mold and sculpt the legs with your fingers, almost like clay.
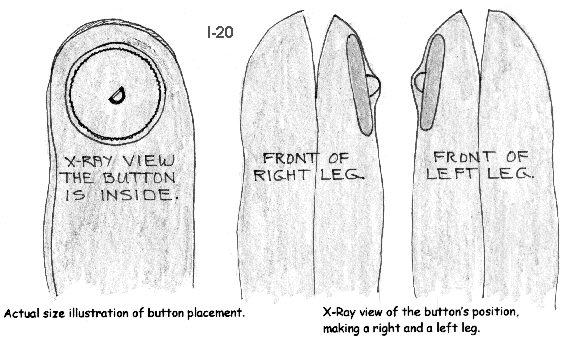
24. NOW…It is time to put the CLOSED, 45 MM METAL, SHANK BUTTON down inside the leg tops, and close the opening with a ladder stitch. Be sure the buttons are placed in the inner side of the legs. REMEMBER, You need a right and a left leg!
The edge of the button needs to be almost even with the seam allowance at the top of the leg. Don’t push the button way down in the leg. An actual size illustration follows. The shank of the button will push against the dolls “skin”.
25. Close the openings in the legs with a ladder stitch, adding cotton balls as you close to make it easier to make nice smooth closings.
26. When you get to the end of the closing, bring your needle out near the button, and stitch in place there, rather than at the end of the seam. This way, the stitching in place, to secure your stitching, will be hidden after your doll is jointed.
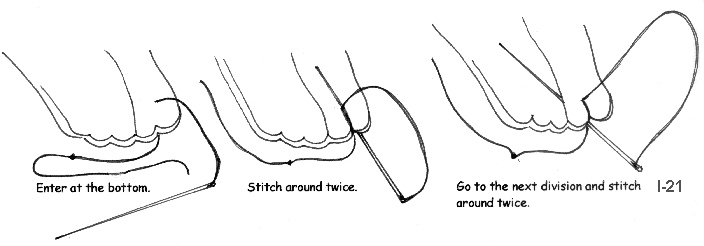
27. Now, let’s sculpt Jennifer’s toes. Tie the knot at least 4” from the end of the thread. Use at least a double thread, and start off with it at least 18” long after tying the knot.
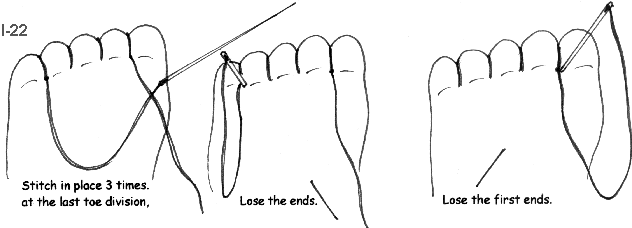
Enter at the bottom of the foot, between the first and second toe. The 4” thread end will be hanging loose. Sew around twice, letting the thread pull the “between the toes” area in tightly. Go from between the first and second toe to between the next two toes. Sew around twice again, and go to the next and the next. (NOTE…4 divisions between the toes, make 5 toes. In almost every class I teach I catch someone as they are making 5 divisions. (Don’t do it, it makes 6 toes!)
At the bottom of the foot, between the last two toes, take 3 tiny stitches to secure your stitching. Now, lose the ends of the thread that is still on the needle.
Put the thread that is hanging between the first and second toe, onto your needle, and lose those ends too.
I like to put the tiniest bit of white glue or Crazy Glue? on the knots and the places where I stitched in place to assure they won’t ever come loose on their own.
Set the legs aside, we will joint them to the body later.
28. To stuff the fingers/arms with the chenille stems, fold 10 stems in half. Roll the arms down so you can get to the fingers more easily. Insert the folded end of a chenille stem, (9 to 15 mm size) into each finger. I use my 12” long broken upholstery needle to guide the chenille stems into place. You can also use a commercially made stuffing fork.
Below is a picture of my 20-year-old stuffing fork, made when I accidentally broke the eye of one of my long needles. I then wrapped the shaft with masking tape, and blunted the sharp point on the sidewalk! This has served me well all these years and I couldn’t be without it. (I also use it to stuff fingers with stuffing. I “twirl” a piece of stuffing in the forked end, while pressing and holding the stuffing fairly tightly between my fingers, making a Q-Tip like piece of stuffing on the needle. This is then guided into the fingers, on the end of the needle.)

My “accidental” stuffing fork. It is actually 12” long.
You can make one by using a hacksaw or strong pliers type cutters, to
cut off the top part of the needle eye.
The fork should be no more than 1/8” long.

My stuffing fork with a chenille stem hooked in the fork, ready to be
guided into a finger.
Be sure to pinch the chenille stem tight against the needle. Don’t
leave it in a loose loop.
25. After each finger is stuffed with the chenille stems, use your hemostat to bend the sharp tips over a little bit, and then squeeze the long ends of the chenille stems together and wrap thread around them to bundle them together. This makes it easier to stuff the arms. If you just leave the chenille stems loose, they will bend all about as you stuff.
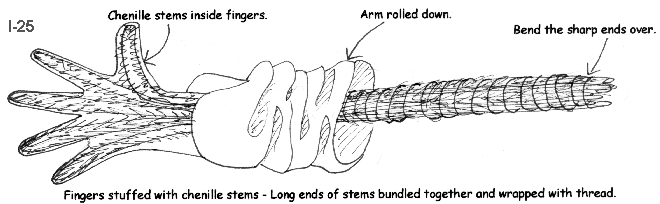
26. Stuff the hands and arms, (stuff the hands very lightly) making sure that you stuff just a thin layer over all of the stems in the palm area. You can add a little “pad” at the base of the thumb, for more realism.
Don't leave any of the chenille stem bundle in the arms touching the inside of the arm fabric. You don't need to stuff the fingers; the chenille stems do that very well. As you stuff the hands, shape them, and tip the two center fingers gracefully inward. Bend the thumb slightly toward the palm, and the pointer and little finger slightly up. It's fun to play with the fingers to achieve natural looking hands.
27. When the hands and arms are stuffed and shaped to your satisfaction, insert the # 36 joint buttons, and close the arm tops as you did the legs. Be sure to plan and make a right and a left arm! Set the arms aside.
NOTE: The legs and arms will be attached after the face is painted. The long legs and arms get in the way while you are trying to paint.
Now let’s put the head on.
28. The head fits down on the neck stump, and ladder stitches in place. With your fingers, make a hollow in the stuffing in the head, so that the head can fit down on the neck, with the neck fitting up inside the head a little ways.
You can tip, or turn the head to the side etc. to give your Jennifer more personality. You can adjust the neck length too. Do you want a long neck? A short neck? A middle length neck? It’s your choice. This is one reason that cloth dolls can not be measured in exact sizes.
29. When the head is in place the way you want it, stitch it on with a ladder stitch. NOTE>>>When sewing the head on, start at the center top, And then go down one side to the bottom of the opening in the head. Take the needle through the neck and across to the other side. Go back and forth through head then neck a couple of times. This secures the under chin area. It is hard to ladder stitch under the chin.
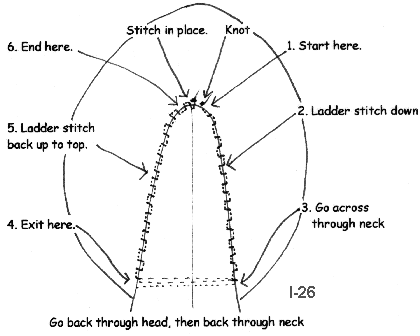
THE LADDER STITCH AS USED FOR SEWING ON THE HEAD.
A stitch in the neck, a stitch in the head, a stitch in the
neck, a stitch in the head,
All the way down and back up
Now let’s put the features on, and pull the mouth in. The mouth will be pulled in before painting. The eye corners will be pulled in after they are painted and dry.
1. Find the eye and mouth shapes on your pattern sheet. Using the side of a lead pencil, cover the BACK side of the features with pencil. This makes a carbon. Lay the “ pencil carboned” paper over a label and draw over the features. The features will be transferred to the label/labels.
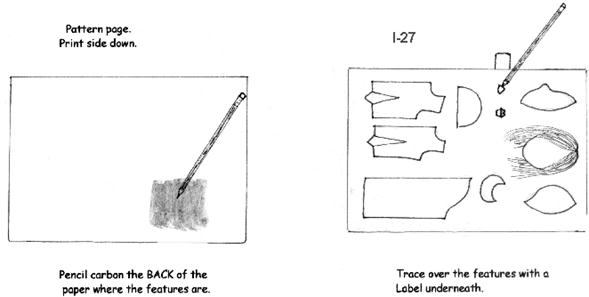
3. You may wish to put the mouth on one label, and trace the one eye on another label. Fold the label in half, and cut 2 eye shapes at once.
4. Now, cut the eyes and mouth shapes from sticky labels.
Cut just inside of the lines, so the features don’t get bigger. You can
also cut another sliver, (1/32”) off of the features all around, so you can
simply draw around them on the face, rather than drawing slightly under the
edge.
NOTE>>>To get the backing off of the labels is
a trick at times! The easiest way is to slide the point of a needle between the
label and backing. Get your bi-focals out for this, or take them off, whatever
works!
5. Stick the cut out features on your doll’s face using these guidelines. The bottom of the mouth will be about 1” above the seam at the chin. The bottom of the eyes will be about 1” above the top of the top lip. There needs to be about one eye width between the eyes. This placement is not written in stone, but be very careful not to put the eyes up on the forehead, and the mouth down on the chin!
You can adjust the features a little at this time. Perhaps slant the eyes a little, or move the mouth up or down a little. Each tiny move of the features will give your doll a different look. You can even color the sticky label parts to get a better "pre look" at what the finished face will look like. When you have them placed where you want them, Draw VERY LIGHTLY! JUST UNDER THE EDGE of the shapes, with a sharp, brown colored pencil for the eyes, and a sharp, red or pink colored pencil for the mouth. (Draw around them if you cut some off.)
NOTE>>>The reason I have you draw JUST UNDER THE EDGE OF THE SHAPES is because when you draw around something, it gets bigger.
4. Lightly draw in the tiny nose lines, eyebrows and eyelids with a light brown colored pencil. Use the face pictures as a guide. These are just little curves and not hard to do freehand. Practice on paper first if you are a little dubious about it.
5. Don’t mark the eyelashes, these need to be done freehand…OR…I will show you how to apply “real” eyelashes for a really special Jennifer. BONUS!!!! It’s easier than painting too, if painting is not your thing!
I sculpt with at least a double thread. Not quilting thread, just ordinary Metrosene®. Sometimes, especially for pulling in the mouth line, I use a quadruple thread. Remember; always pull on the thread not on the needle. Also, “help” the stitch pull the area in, by pressing on the area with your finger to indent it. If you try to let the thread do all the work, it will often break!
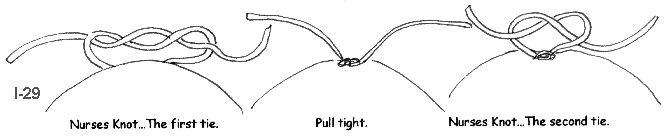
6. Tie your thread off using a “nurses knot”. This is an automatic “Square knot”. You don’t have to think, right over left-left over right. Simply start the first tie as usual, but take the loose end of the thread around once more. Pull, “help” and tighten that first tie. Then just tie the second tie as you normally would. The first tie, done the “nurses knot” way, won’t loosen up easily either, while you are tying the second tie.
7. Always use a needle/needles that are long enough to reach from the sculpted part to the back of the head, without “squishing” the head to do so.
Why did I say needles? Because if you have ever done any needle sculpting, you will remember how hard it is to get the needle to come out where you want it to on the face! I solve that by using 2 needles! I start each stitch exactly where I want it on the face and then exit where I desire on the back of the head. The exit spots on the back of the head aren’t so exactingly crucial.
This method really solves the
problem of poking around, trying to get the needle to come out where you want
it! Honest!
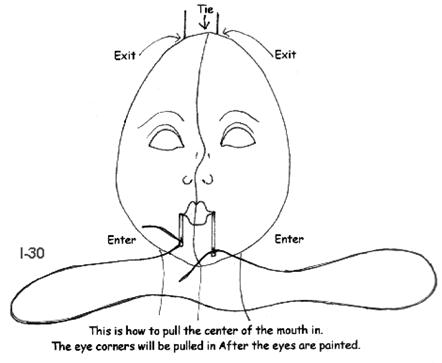
8. For the mouth, it is almost always necessary to pull some stuffing into place above the thread, to give the mouth more of a smile.
Pull stuffing into place, with the point
of your needle, while holding
the sculpting thread down, to make a “smiley” mouth.
Now it is time to paint the features.
When painting doll faces, the first, foremost, and perhaps most important thing to remember is that you don’t get to freely stroke the paint on in flourishes like an artist doing an oil painting….Unless you are an artist, and know what you are doing! The minute you start to stroke the paint on with the side of your paintbrush, is the minute your paint will go out of the lines!
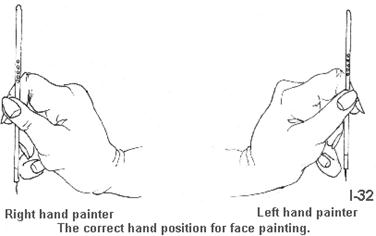
When painting doll faces, you are just filling in pre designated spaces, neatly and fully. You need to paint with very tiny (000 to 00000) pointed paintbrushes, and you need to learn to paint with your paintbrush held STRAIGHT UP AND DOWN. The weight of your hand will rest on your little finger.
I call it “assuming the position” and below is what it looks like. If you want to learn a whole lot about painting doll faces, mixing colors, etc. (Over 60 pages worth) I do teach that class at Crafty College too.
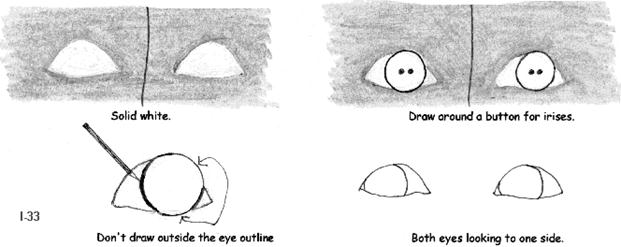
1. I do, and highly recommend, a first fill in, on the eye and mouth shapes with Gesso. Gesso seals the fabric and readies it for the paint. Gesso also prevents any “paint bleed” from occurring, as long as you keep the paint on top of the Gesso. Once in a great while, acrylic paint will bleed. It usually occurs when the paint hasn’t been shaken up really well. Some of the “watery” liquid comes out first, and that is what bleeds.
ALWAYS SHAKE YOUR PAINTS REALLY WELL BEFORE USING.
2. After the Gesso is dry, paint a coat of white paint on the eyes first, and then paint a coat of peachy pink on the mouth. Simply fill the spaces in, fully and thickly. Let dry, then repeat with a second coat of peachy-pink on the mouth. Let the second coat dry.
3. Use a button to draw around for the iris of the eyes, if you don’t feel confident drawing them freehand. Be sure it is slightly larger than the height of the eye so your doll won't look "bug-eyed". Make the eyes looking either to the right or left. If you are going to center them, do so very carefully, it's easy to get them "off" a little and your doll will have a slightly strange, “spaced out” look.
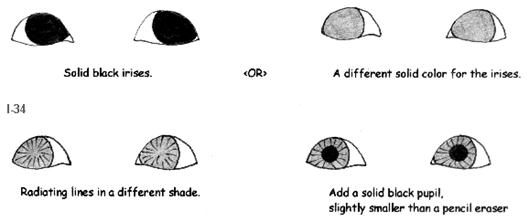
4. If you paint the irises solid black, let the first coat dry, then paint on a second coat. Let the second coat dry. You will add the life-lites later, but there is no need for a pupil.
5. For more detailed eyes, paint the irises any solid color, and then add little lines from the center to the sides in a different shade. Perhaps blue irises with dark navy lines…OR…Green irises with dark green lines, Etc.
The little lines are the “threads” in the irises. Do them thin and random.
6. To outline the eyes, use black paint and carefully paint a VERY THIN LINE around them. Don't try to work the paint down into the fabric. To paint a VERY THIN LINE of paint, your paintbrush needs to be loaded with paint, and you need to hold the paintbrush STRAIGHT UP AND DOWN, so the paint flows off of the tip, rather than off the side of the paintbrush. The paint right at the tip, is the only thing that touches the fabric. You will have to reload the paintbrush after about 1 / 4 " to 3/ 8 ".
7. Do the eyebrows in light brown paint or fill them in darker with brown colored pencil. Do the eyelid lines in colored pencil too. Fill in the eyelids with colored pencil to co-ordinate with your doll’s dress.
8. Wispy eyelashes can be added with dark brown or black paint. The eyelashes are each one single, very fine, stroke of paint. They radiate out to the sides. Don’t paint them like the rays of the sun. REMEMBER>>>Hold the paintbrush STRAIGHT UP AND DOWN. Don’t press down at all! The paint at the tip of the paintbrush is the only thing that touches the fabric. Practice this on paper first to get a feel for LIGHTLY painting one stroke of paint for each eyelash.

The eyelashes properly painted.
Don’t paint them like the rays of the sun.
9. If the eyelash painting is just too difficult, you can simply shade darkly in over the eyes to hint at eyelashes…OR…Apply “real” eyelashes. This is such a pretty finish, and is very easy to do around the thickly painted eyes. Of course wait until all of the paint is dry before you do this. I have also found that it is better to put the eyelashes on before you sculpt the corners of the eyes in too.
10. Simply remove the eyelash strip from the plastic. Form it over the upper eye, and cut off the extra length. Note that the eyelashes are a right and a left, and use them that way. Usually, the lashes are shorter at the inner corner of the eyes. For Jennifer, the ones called Demi Lashes, from the drugstore, work really well. The Natural lashes from CRs Crafts work very well too.
11. After you have the eyelashes in place, put clear drying tacky glue along the edge using the point of a needle to do so. Let dry.
NOTE>>>I also coat the entire eye shape with Mod-Podge® to give the eyes shine, and to hold the lashes on even better. Wait to do the Mod-Podge® until the whole face is finished and dry.
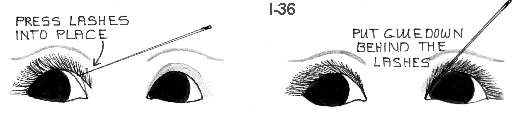
(Left Picture) - Apply the lashes, using
the “self Adhesive” on them to stick them in place.
The point of a needle will help to press them down.
(Right Picture) - Apply tacky glue to the edge to hold them really securely. Let Dry.
12. Now let’s finish the mouth. Add a little brown to the lip color and paint the dividing line, between the top and bottom lip, curving the line up a little at the corners. Look at the face on the pattern sheet to see the shape of the dividing line. With the darker shade, paint a few thin lines from the center to the edge of the lips. Do both the top and bottom lip.
Dividing line with
slightly curved up corners. A few thin
lines painted on.
Always let everything dry between going on to the next step when painting. It is so easy to get your hand in wet paint, and mess up a face. Aim a blow dryer on the face to hurry up the drying process.
13. For the final touch with the paint, add the “lifelites” to the eyes, and a little “lite” to the lips.

Add the “lifelites” to the eyes and “lite” to the lips.
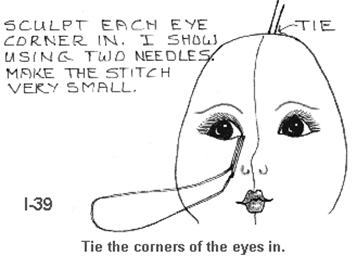
When all of the paint and glue is dry, you can pull the corners of the eyes in. Do it just like for the mouth, but take only a tiny stitch at each corner, and tie it at the top or back of the head.
After the painting and sculpting is done, I like to coat the whole eye with Mod Podge® to give the eyes a lot of shine. The Mod Podge® also helps hold the eyelashes on better. A coat of Mod Podge® is nice on the mouth too.
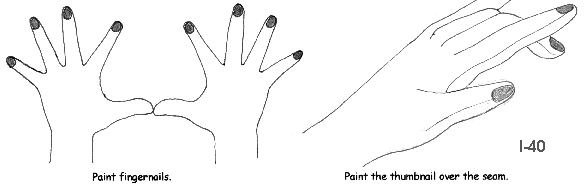
While the paints are out, paint Jennifer’s fingernails with paint or Mod Podge®. If you paint the thumbnail across the seam, it will give the appearance of an opposing thumb. Be sure to paint the nails on so you have a right and a left hand! Let Dry before jointing.
You can of course blush the cheeks with powdered blush on a soft brush, now, or after your doll is completely done.
With colored pencil, shade over the eyes if desired. Darken the eyebrows with colored pencil or paint too.
If you haven’t done so already, draw the tiny nostrils and nose flares on with a brown colored pencil.
Bear in mind that this is not the only face painting technique that works. There are as many techniques as there are designers and dollmakers. This is just a technique that is basic and produces clean lines and nice features with a minimum of practice.
Some dollmakers do wonderful faces, but they aren’t easily reproducible for the average doll maker. This almost “paint by number” method is reproducible for most anyone with the will to give some time over to practice, if it doesn’t come real easy.
As you practice painting more, a “style” may find it’s way out, that you didn’t even know you had! People who make a lot of dolls tend to produce a “look” that is recognizable on any work they do.
Of course, if the painting is just too scary, you can always embroider the features and shade them with colored pencils. Be sure to enter and exit at the sides of the head, where the hair will cover the beginning and ending of your embroidery.
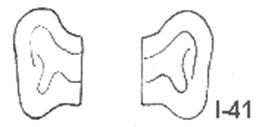
…Ears…
1. On doubled fabric, folded right sides together, either draw around your ear pattern or cut 2 patterns from freezer paper and iron them to your fabric, at least ½” apart.
2. Sew around the curved edge of each ear. Leave the straight edge open to turn and stuff through.
3. Turn the ears right side out, and mark the inner ear stitch lines with a colored pencil, a little lighter or darker than the skin. Look at the pattern piece to see what the inner ear stitch lines should look “something like”
Draw the inner ear stitch lines on the right side out ears.
NOTICE how the ears are laid on the table to draw the stitch lines. This way the drawing is on a right and a left ear. If your sewing machine “makes a mess” on the back side when it sews through stuffed things, the “mess” will be on the back side of each ear, and hidden when the ears are in place on your doll.
4. VERY LIGHTLY stuff the ears, and then top stitch on the inner ear stitch lines.
5. Now, position the ears in the reverse direction at the sides of Jennifer’s head. The straight edge will be back about ½” from the side seam. The top of the ears will be about level with the eyebrows. NOTE>>> The widest part of the ear is the top edge.
6. Pin the ears in place, and then hand sew them in place, along the straight edge.
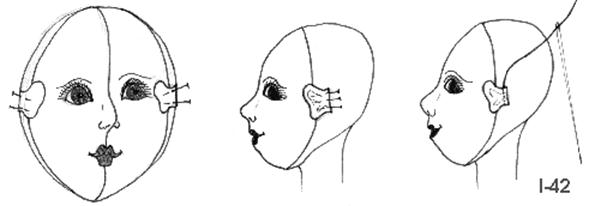
Pin and sew the ears in place at the sides of the head, in the reverse
direction.
7. Turn the ears back into the correct position for ears to be in, and hand tack them down in a few places on the inner ear stitch lines. Secure your stitching, and lose the ends.
Hand tack the ears into the correct
position.
Jointing
1. Now you are ready to joint the arms and legs to the body. Get your Skill Sheet #1 out and follow those instructions. Be sure the limbs are pulled in very tightly. Your doll should stand alone, if the legs are jointed tightly, and she has on hard soled shoes.
The legs are placed low on the body. Sometimes, depending on your
stuffing, you will need to press in on the lower body sides to narrow the
crotch area. After the legs are jointed, you may also need to press in on the
“hips” to narrow the hip area. The body is designed to be narrow in the crotch
area, but sometimes, vigorous stuffing will widen it too much, especially if
you are not accustomed to making jointed dolls. Once you have made a few
jointed dolls, you will stuff to plan for the narrow crotch area.
The arms are of course jointed, so they make a nice line from the shoulders. An invisibly jointed cloth doll will resemble a vinyl, composition, or porcelain doll in appearance and movement.
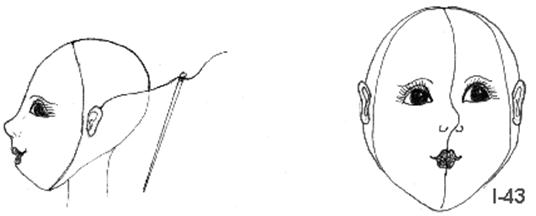
Once Jennifer is securely jointed, we can do her hair. Jennifer has the simplest of all hairstyles. Long and flowing from a center part. It is best to use very fine yarn or fiber. I prefer machine knitting yarn.
Jennifer is also an excellent candidate for a real doll wig.
If you want to put a real doll wig on Jennifer, measure her head from the front of the forehead, to above the right ear, to the nape of the neck, to above the left ear and back to the front of the forehead. If the measurement comes out a fraction of an inch over a whole size order the next size up. For instance, if the measurement comes up 9 1/2” Order a size 10” wig.
NOTE>>>Many, Many hairstyles and techniques are taught in my Hair class at Crafty College, if you want to do a lot more with hair. That class also contains dozens of face ideas!
Now, let’s make the simple, parted in the middle hairstyle. This style will have a stitched part that goes all the way from the front of the forehead to the nape of the neck in back.
Measure that distance on your doll. On my doll it was 5”.
1. Pull off enough 24” to 36” long strands of your chosen yarn to fully and thickly cover that distance.
I just love long hair on dolls! You can make yours shorter if you want to though! In fact a Jennifer with shoulder length hair would be very pretty. Or even bobbed hair.
I can’t tell you the exact number of strands because we aren’t all using the same yarn. I just pull off one length and then fold the yarn back and forth in my hands, until I think I have enough. NOTE>>>This is a great waist exercise! Tip your body back and forth as you wrap the strands from hand to hand. Hey! No more Gym dues, just make more dolls! You can always add some more strands if you need to. I cut the loops later. I did count the strands of machine knitting yarn. It was 300!

Enough strands to fully and thickly
cover the 5” measurement.
2. Sew by machine down the center of the strands. Press down on the yarn on both sides of the sewing machine presser foot. Push the yarn under the presser foot, while pressing down, to keep it close together. If you have a “persnickity” sewing machine that doesn’t like to sew on yarn, putting a piece of tissue paper under the yarn helps. You can also mark the 5” measurement on the paper, to help you with keeping the seam the correct length. If this is your first try at sewing yarn on a sewing machine, the tissue paper method is probably the best for you to use. After the yarn is sewn, tear the paper away.
NOTE>>>I know there are special products on the market that you sew on and then tear away. I think one is called Stitch and Tear. But tissue paper works fine, and most everybody has some around.
3. Now place the sewn yarn with the seam going right down the center of Jennifer’s head, from about 1 1/4" above her eyebrow level to the back of her neck. This makes the center part style. Stitch or hot glue the seam onto Susannah’s head.
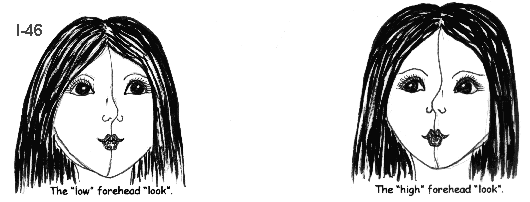
NOTE>>>Jennifer’s “look” can be altered a lot by the placement of her hair at the forehead. You can give her a “low” forehead or a “high” forehead.
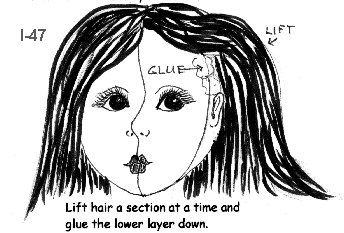
4. Finger arrange the yarn all around the head. The hair will hang down in back, from the part that goes all the way to the nape of the neck. It fills the head out in back when done this way.
5. After the “hair” is neatly finger arranged all around, lift a section at a time and then spread hot glue, thinly and carefully on the head. Press the “hair” into the glue. Repeat for the next section, etc. The seam and “hair” is already glued or sewn at the center. You can also use clear drying Tacky glue to glue the hair down, But you will have to wait for it to dry before doing anything else with the hair.
6. If you just can’t bring yourself to glue the hair down, you will need to sew an under layer down to the head all around.
7. Trim the “hair” evenly all around.
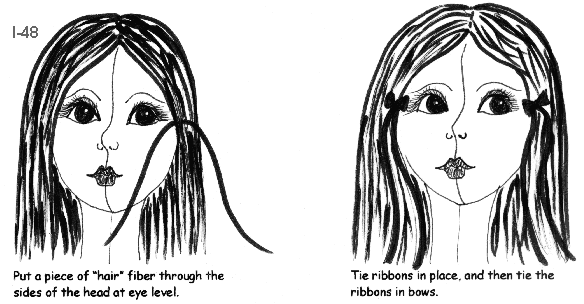
After the “hair is all arranged and secured down, you may wish to put a strand of “hair” fiber through the head at eye level on each side to tie a narrow ribbon in with. Tie the ribbon in place and then tie the ribbon in a small bow, with long streamers.
If you have decided to put a real doll wig on your Jennifer, simply pull it down on her head, and adjust it so it is nicely positioned. Sew or glue it to her head.
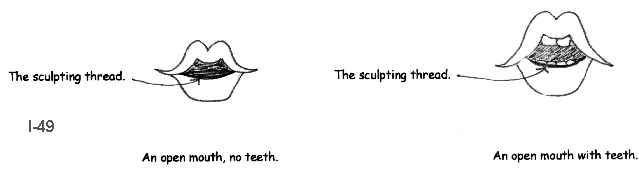
Before we go on the clothes, let me give you some ideas for different mouths for Jennifer. The thread that pulls the mouth in, can become the top of the lower lip. You can make a more open mouth and paint the inside a darker, “browned down” peach or pink. I like to make these open mouths on dolls, and even add teeth. You can really add a lot of character to your dolls by “playing with the mouths.
If you do add teeth, be sure the dividing line between each tooth is very light and thin. If you make them a dark tan, and thick, it will look like tooth decay!
Now let's make the clothes.
Jennifer wears pantaloons, a skirt as a petticoat, a dress with long sleeves, with elastic at the wrists, a pinafore and a floppy brimmed hat.
I like Jennifer with bare feet to show her cute toes. You did paint her toenails didn’t you? If you wish, you can of course make her shoes and stockings. She can also wear shoes made for the 18” American Girl® type dolls. Some of those shoes are very wide, but some fit really well. Look for the narrower ones.
I suggest that you make a paper towel sleeve, to try the sleeves on for length before cutting them from fabric.
With cloth dolls, some arms will be longer than others. If the sleeves are too short, simply add some length at the wrist edge.
Every doll will be slightly different in size. Some trying on is recommended, especially for the dress, before you put the darts in the waist, and for the skirt to adjust the waistband.
You may also need to adjust the length of the pinafore waistband. Wait until the dress is made and on Jennifer before you cut the pinafore waistband out. Measure her waist, and decide if you are going to fasten the back with ties or a hook and eye. The waistband must fit all the way around her waist if you are going to use a hook and eye.
If you are going to make the pinafore with ties, it shouldn’t go all the way around her waist. A gap of about 1” in the back is good, if you are going to make the pinafore with ties. When we get to the pinafore directions I will give you the dimensions for the ties.
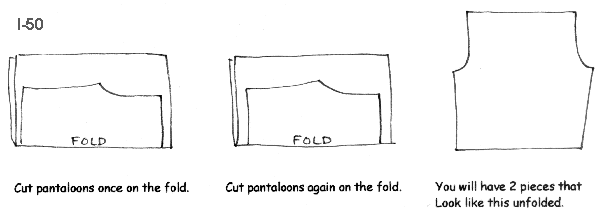
1. Cut the pantaloons from your chosen fabric. You will need to cut the pantaloons out twice on the fold of the fabric. These pantaloons have no side seams.
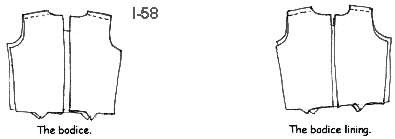
2. Cut the dress from your chosen fabrics. The bodice is lined, so you need to cut out 2 fronts on the fold, and 2 backs on doubled fabric.
3. Cut 2 collars from doubled fabric. Cut 2 collar pieces from lightweight interfacing too.
4. Cut the skirt/petticoat, (11” X 22 1/2”) on the fold, and waistband from your chosen fabric.
5. Cut the pinafore skirt from your chosen fabric.
6. Cut out the pinafore bib front, twice on the fold.
7. Cut out the pinafore straps, twice on doubled fabric.
NOTE>>>You can cut the pinafore waistband out now, if you are going to make the pinafore with ties. If you are going to make it close with a hook and eye, cut the waistband to the needed size after you have finished the dress.
8. Cut the hat crown on doubled fabric.
9. Cut the hat brim on doubled fabric, and cut one interfacing from the brim pattern too.
10. If you are going to make the shoes and stockings, cut the shoes from felt and cut the stockings from very stretchy knit. Watch the stretch direction markings for the stockings.
Now let’s make the pantaloons.
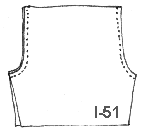
1. Lay the 2 pantaloon pieces right sides together as shown in the following illustration. The curved seams are the center front and the center back seams. There are no side seams. The folds are where the side seams would be.
2. Sew the curved seams.
3. Zig-Zag stitch the flat lace over the raw edge of the leg openings of the pantaloons. Eliminating bulk is one goal when making doll clothes. Sewing lace on with a Zig-Zag stitch is one way to eliminate bulk, and finish the edges at the same time. This method is perfect for the wrist edges of sleeves and the legs of the pantaloons. It is also perfect for the bottom edges of some skirts and petticoats.
NOTE>>>If you have a serger, you can of course serge the raw edges and then sew the lace over the serging.
4. Make a casing in the waist edge of the pantaloons, by first pressing a ¼” fold to the wrong side and then a ½” fold to the wrong side.
5. Sew the casing all the way around, but leave a small (1/2” spot) open to thread the elastic through.
6. Pin one end of the 9” long elastic with a small safety pin and then thread the elastic through the casing. Sew the ends of the elastic together, and then sew the little opening in the casing closed.

7. Now let’s “stretch and sew” 1/8” elastic onto your fabric with a wide Zig-Zag stitch. This makes a thread “casing”, that is so much less bulky than a fabric casing. It also lets you gather up far more fullness with the elastic, than is possible when you sew directly on the elastic. The Zig-Zag stitching gets lost in the gathers, so you don’t even see it.
8. The elastic will be sewn about 1” to 1 ½” above the lace. Mark a line with a colored pencil on the wrong side of pantaloon’s legs.
9. Now get your 1/8” wide elastic. Put one end down on the line, with about 1” left hanging beyond the end of the fabric. Hold the elastic and anchor stitch it at the end of the fabric, by sewing back and forth, with a straight stitch, for about ½”
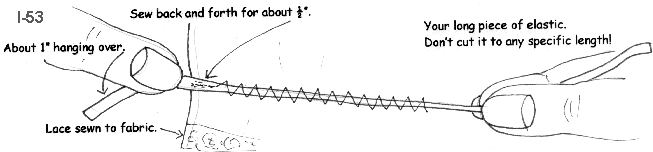
10. Now set your sewing machine to it’s widest Zig-Zag stitch. It will need to be set wide enough to Zig-Zag all the way across the STRETCHED elastic. On my machine it is #4. Yours will probably be different.
11. Now, while holding the thread and elastic end in your left hand, stretch the elastic with your right hand, and Zig-Zag across it. DON’T SEW INTO THE ELASTIC! Every stitch must go all the way across the elastic.
When you get to the other end, DON’T back tack yet. Take the piece off of your sewing machine, and pull on the loose elastic end. The elastic will slide through the thread casing, so you can gather the fullness up more.
12. Try it on your doll’s leg, and adjust the fullness to fit your doll. Go back to your sewing machine and sew back and forth at the end to secure the elastic.
This holding and stretching may take a few tries to feel comfortable, but once you “get it” it goes so fast!
You may want to practice on scraps before doing this on the doll’s clothes.
I do this so much that I don’t even take the piece from the machine to pull up the fullness. I do it right at the machine and secure the elastic then. If you get it a little tight, your doll won’t complain! You do need the ability to “eyeball” size to be able to pull the fullness up without trying it on though.
Some of you can eyeball sizes, some can’t. Don’t fret if you can’t. Just fit it before securing the elastic end.
13. After the elastic is in place on both legs, sew the inner leg seam. Tack the raw edges of the lace down flat at the edge so there won’t be any little raw edges sticking out.
NOTE>>> If the Stretch and sew” method of applying elastic still eludes you, you can always gather the pantaloons legs with silk ribbon. Thread 1/8” wide ribbon on a large eye needle: (Your sculpting needle works fine.) Sew a running stitch around the leg openings, starting and ending at the front. Tie the ribbons in a bow.
Next, let’s make the skirt, which
will be used as a petticoat for Jennifer.
The directions will say “skirt” but you are making Jennifer’s petticoat.
1. Fold the waistband, lengthwise, right sides together. Sew both ends of the waistband. You can put a piece of interfacing in the waistband if desired, but for this narrow waistband it isn’t really needed.

2. Turn the waistband right side out and press.
3. Narrowly hem both short, back edges of the skirt.
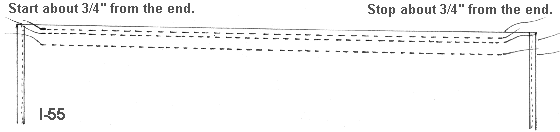
4. Now let’s gather the top edge. It is best to run 3 rows of stitching along the top edge. 2 rows will be within the seam allowance, about 1/8” apart. 1 row will be about 3/4” farther down.
This extra row of gathering stitching helps keep the gathers even and smooth as you sew the waistband on. It will be pulled out after the waistband is sewn on.
The gathering stitching is done with the wrong side of your fabric facing up. Set your sewing machine stitch length to the longest stitch it will make.
Start about ¾” from the end, and stop about ¾” from the other end. The ¾” ends will fold back around the edge of the waistband, when you sew the waistband on.
2 rows of gather stitches 1/8” apart and 1
row about ¾” farther down.
5. Pin the center of the skirt edge to the center of the waistband. Pull the BOBBIN threads and adjust the gathers evenly to fit the waistband, with the ¾” ends of the skirt extending beyond the waistband ends. Pin the skirt to the waistband.
6. Now, fold the ¾” extensions back around the waistband. Pin them down too. By doing it this way, you won’t have any little raw ends showing at the center back. You won’t be sewing one edge of the waistband to the skirt, and then hand tacking the other edge over the seam. NOTE>>>You can of course do it that way though if you want to! I just like the speed and ease of doing it all at once on the machine
3/4" of skirt that extended beyond the
waistband at both ends,
folded and pinned back around the waistband.
7. Sew the skirt to the waistband, with the skirt part facing you so you can keep an eye on those gathers! That 3rd. row of gathering really does help to keep the gathers going nice and even though.
8. Zig-Zag stitch over the raw edge of the joining of the gathered skirt to the waistband…OR… Serge if you have a serger.
9. Pull the skirt down, which will fold the skirt ends to the inside.
10. Remove that 3rd. row of gathering stitching.
11. Sew a ¼” wide hem all around the bottom edge of the skirt, and then press a 1/2” wide hem up NOTE>>>You may want to try the skirt on your Jennifer before deciding on the hem width. The skirts on my Jennifer falls between the knees and ankles.
12. Press and sew a machine hem about ½” wide at the skirt bottom. Sew gathered lace over the hem stitching.
13. On the right side, sew Ric-Rac or braid trim over the edge of the lace if desired.
14. Sew the center back seam of the skirt to within about 4” of the waistband. Fold the corners of the center back seam at an angle and sew the fold. This keeps the raw edges from sticking out at the lower back of the skirt.

At the center back, fold the raw edges at an
angle and sew them down.
15. Put the skirt on Jennifer, over the pantaloons. Decide how far the waistband needs to overlap, and sew either a hook and eye or a snap to the waistband. I like the skirt waistband to be loose, so it stays below the dress waist. If you put the pantaloons and skirt waistband underneath the dress waist, it gets really bulky.
Now let’s make the dress.
1. Sew the shoulder seams of the bodice and the bodice lining.
2. Sew the curved seams of the collar pieces. Lay them right sides together with the interfacing piece on the bottom.
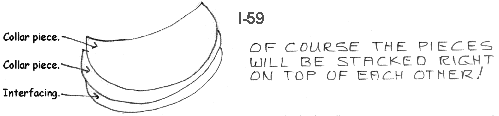
A SPECIAL “MAKE IT EASY” NOTE>>> An easy way to sew the little collar, is to treat it as a template. First, cut the seam allowances off of the outer edges only … Cut 2 collars from freezer paper… Lay your collar fabric right sides together… Place the interfacing under the collar fabric… Iron the freezer paper collar templates to your fabric, leaving at least ½” between the pieces… Sew on the outside curves…Cut the collars out…Remove the freezer paper…Turn the collars right side out…Press… I find this to be much easier and more accurate for such a little collar. SECOND NOTE>>>If you desire to put lace between the layers of the collar, you can’t use the freezer paper method.
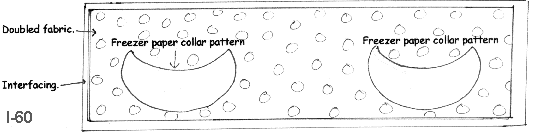
Sew around the OUTSIDE curve of the freezer
paper patterns.
3. After the collars are cut out, turned and pressed, pin them in place around the neck edge of the bodice . Sew them in place, before sewing the bodice lining to the bodice.
Pin the collars in place around the neck edge
of the bodice.
Sew the collars in place.
4. Sew the bodice and the bodice lining together down the back edges and around the neck. Clip the curves, turn the bodice right side out and press. NOTE>>>Be sure to poke the corners at the center back neckline out nice and smoothe.
Sew the bodice and the bodice lining
together
down the backs and around the neck.
If you haven’t already, cut a sleeve from a scrap or even cut one from paper toweling, to make a try-on sleeve. You don’t need to sew it, just kind of bunch it up at the top, and fold it around the arm to see how it will fit. You may need to add length at the wrist edge of the “real” sleeve.
5. Zig-Zag stitch flat lace to the wrist edge of the sleeves…OR…simply sew a very narrow double hem, (handkerchief hem) at the wrist edges of the sleeves.
6. Stretch and sew 1/8” wide elastic about 1/2" above the wrist edge of the sleeves, just like you did for the pantaloons.
7. Run 2 rows of gather stitching at the sleeve tops. The 3rd row isn’t needed for this short distance of gathering, but you can surely do it if you wish. It does keep those gathers even.
8. Fit, pin and sew the sleeves into the arm openings, matching the notch with the shoulder seam.
9. Sew the sleeve and side seams of the bodice.
10. Try the bodice on Susannah wrong side out. Overlap and pin the center back together.
11. Pinch up the darts as needed to fit Susannah’s waist snug, but not tight. Take the bodice off and sew the darts.
NOTE>>>This isn’t a “real” lining job, where everything is between the layers. The lining is just the best way to finish the neck and back edges of dress bodices for doll clothes.
SECOND NOTE>>>You can of course try on the bodice before putting it together with the lining, and decide how wide the darts need to be, and sew them into the bodice. Repeat for the lining, and then sew the two parts together. If you do this, remember to account for the seam at the center backs, and for the needed overlap.
12. Narrowly hem the back edges of the dress skirt, just like you did for the petticoat skirt.
13. Gather the skirt top just like you did for the petticoat skirt.
14. Fit, pin and sew the skirt to the bodice, folding the back edges of the skirt over the back edges of the bodice Just like you folded the back edges of the petticoat skirt back over the waistband.
15. Now, let’s do the back overlap a little differently if desired…Press the folded back part of the skirt back edges.
16. Overlap the bodice like it will be on your doll, and pin the overlap together.
17. Note where the back seam of the skirt should now be. The back edges of the skirt won’t be even.
18. Sew the center back seam from the bottom up to within about 3”- 4” of the waist. One back edge of the skirt will have a wider seam allowance than the other, but the center back of the skirt will lay nicer and have an overlap too.

16. Narrowly hem the bottom of the skirt. Try the dress on your doll to decide how much real hem you want to put in. I like for the petticoat lace to peek out from beneath the dress skirt. You can also put Gathered lace under the hem, and let it peek out.
17. Take the dress off and press the hem up.
18. Hem the skirt bottom, by hand or machine. If you hem it by machine, definitely sew narrow ribbon or braid over the hem stitching…OR…Use a decorative stitch on your machine to cover the machine hem.
19. Sew buttons on the left side of the bodice back, and make button holes on the right side of the bodice back…OR…Sew on small snaps or velcro® for closing the back.
20. Press Jennifer’s dress and put it on.
Let’s make the Pinafore.
The pinafore can be closed with a hook and eye in the back, or you can make ties, and tie the pinafore on.
If you wish to make the ties for the pinafore, cut two pieces of pinafore fabric, 2” wide by 15” long. Fold the ties lengthwise and sew them as shown in the following illustration. These will be inserted in the ends of the waistband of the pinafore. The ends that go into the waistband will need to be pleated, so they fit. The ties will be tied in a bow on your doll.

***If you are going to close the waist with a hook and eye, eliminate the directions above for the ties***
Cut a waistband from your chosen fabric. Cut it longer than the pattern at this time. Put it around Jennifer’s waist over the other clothes.
If I am going to make the pinafore with ties, I like about a 1” gap in back, to allow room to tie the ties.
If I am going to close the waist with a hook and eye, it needs to meet in back. Remember to allow room for the ends of the waistband to be sewn. I like a ½” allowance at each end.
1. To make the waistband with ties…Fold and press the waistband lengthwise.
2. Put the ties in place on the waistband, and pin in place. Fold the waistband over the ties, then stitch the ends. Be sure to leave a ¼” seam allowance at the raw edge of the waistband, so the skirt can be sewn on. Turn right side out and press.
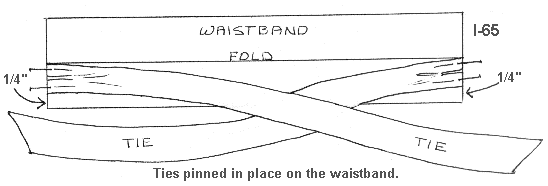
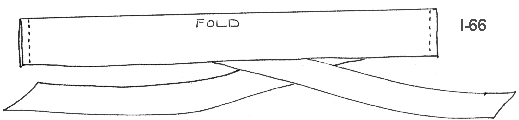
Ties pinned in place on the waistband, and
the ends sewn.
OR>>>If you are going to make the waistband that closes with a hook and eye, simply fold the waistband lengthwise, and sew the ends.

Fold the waistband lengthwise, and sew the
ends.
You should have 2 pinafore fronts, cut on the fold, and 4 pinafore straps. 2 are for lining. The pinafore straps should be cut from doubled fabric. Note and mark the notches. This will help when sewing the shoulder seams.
3. Sew the shoulder seams of the pinafore straps to the pinafore front.
4. Sew the shoulder seams of the pinafore lining straps to the lining front.
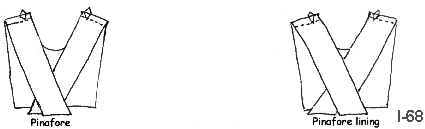
Shoulder seams
5. Sew the pinafore and pinafore lining together as illustrated. Clip curves, then turn right side out and press.
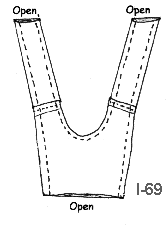
6. Center the pinafore front at the center of the waistband, matching the raw edges. Sew the waist-band to the pinafore front along the raw edge.
7. Try the pinafore bodice on your doll and then adjust and pin the straps in place in back. Sew the back straps to the waistband.
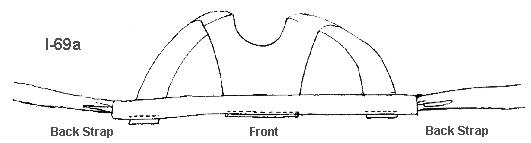
This picture shows the waistband with the
ties.
8. Narrowly hem both back edges of the pinafore skirt.
9. If you are going to put pockets on the pinafore, cut them from contrast or matching fabric.
10. Sew a very narrow hem to one narrow edge of each pocket.
11. Fold the hemmed edge back, right sides together about ¾”. See illustration.
12. Now sew each end of that hem as illustrated.
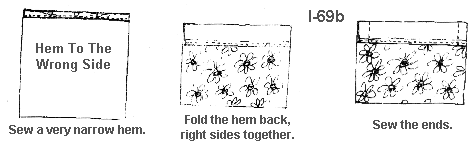
13. Turn the hem to the inside, poke out the corners and press. Also press the
hem in all around the other 3 edges.
14. Sew lace, Baby Ric-Rac or braid in place if desired along the top edges of both pockets, about 3/8” down.
Of course, fold the trim to the wrong side of the pocket at each end.
The trim holds the hem down. You can also do decorative stitching across the hem edge, or sew a button on etc. In other words, decorate as you desire.
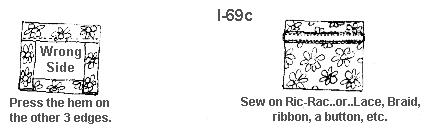
15. Press the center fold in your 11” X 17” pinafore skirt piece. This will be used to measure and place the pockets. You will press it out after the skirt is done.
16. Now lay your skirt piece out flat, and measure about 3 ½” from that fold, and about 4” up from the bottom of the pinafore skirt on one side. Place, pin and sew the pocket on that side. Repeat for the other side.
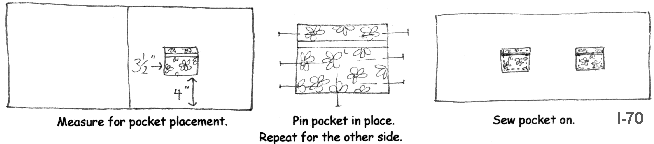
17. Gather the pinafore skirt the same way you did the dress skirt. Pull the gathers to fit the waistband plus 3/4” at each end to fold back over the waistband like you did the dress skirt.
18. Sew the skirt to the waistband, then zig zag stitch over the raw edge. (Or serge)
19. Pull the skirt down and press. The back edge will automatically be turned to the inside, with no raw edge showing where the waistband and skirt are sewn together.
20. Stitch the folded back edges of the pinafore skirt down if desired, or simply leave them pressed neatly to the inside.
21. Hem the pinafore to the desired length, and trim the hem area with decorative stitching, braid, lace, ribbon or whatever you wish to trim it with.
22. If you made the waistband to be closed with a hook and eye, sew the hook to the inside of the waistband. Sew the eye to the inside too, so just a little of it peeks out. I prefer to do it this way, and use the U shaped eye, rather than the long eye.
23. If desired sew the little doily on the pinafore front, and decorate it with a little ribbon rose or buttons.
Let’s make the hat.
1. Stack the brim pieces like you did the collar pieces…OR…You can even use the Freezer paper method for the brim. If you use the Freezer paper method …Don’t…cut the seam allowance off of the inner circle, where the crown sews in. In fact, you don’t have to cut the seam allowance off of the outer circle either. If you don’t it will just make a wider brim.
2. Sew the outer edge, trim the seams, turn the brim right side out and press.
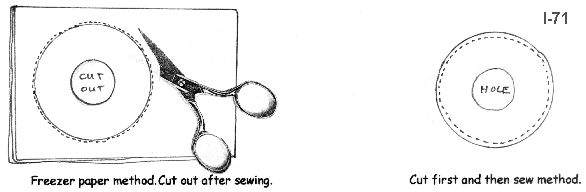
3. Sew the curved crown seam.
4. Right sides together, fit, pin and sew the brim to the crown. Zig Zag stitch or serge the raw edge of the seam.
5. Turn the seam to the inside and top stitch all around the joining of the crown to the brim.
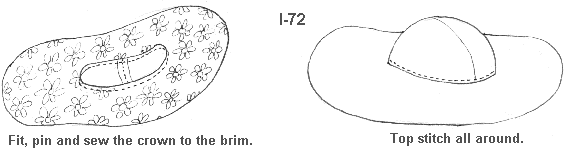
6. Flip the front of the hat back, and sew buttons or bows or both through the brim into the crown to hold the brim up at a jaunty angle.
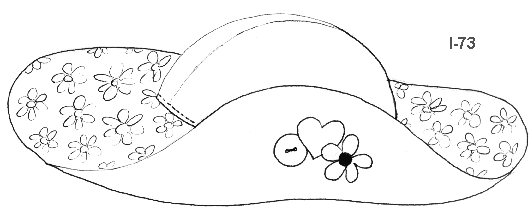
…If you are going to make the shoes and stockings…
1. Cut the shoe tops from felt, and the shoe soles, another color of felt.
2. Cut the stockings from the stretchy fabric you have chosen for them.
The stockings,
1. Cut the stockings from your stretchy fabric, with the stretch going across.
2. Sew the long back seam. Be sure to use the correct needle type for your fabric choice.
3. Turn the stockings right side out and pull them up on Jennifer’s legs. They will extend beyond her knees. The pantaloons will cover the tops of the stockings.
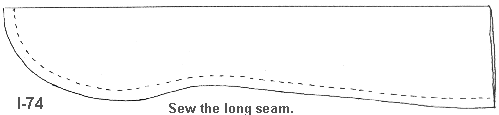
The shoes.
1. Sew a decorative machine stitch around the inner edge of the shoe tops…or…Work a hand embroidered edge of your choice…or…paint a design around the edge…or sew small piping or double fold bias tape around the edge…OR…
How about Ribbon Roses, hand made from directions in a ribbon rose book at your library. It would be best to do Ribbon Roses after the shoes are done.
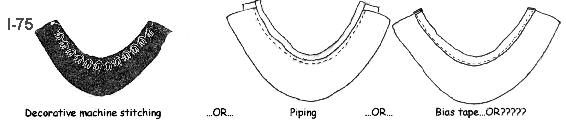
2. Sew the heel seams.
3. Right sides together: fit, pin and sew the shoe tops to the shoe soles. Start at the center back, and carefully work the tops around the soles, pinning as you go.
You will need to use the sew-sew-lift-turn method of sewing around the curves.
Don’t try to sew with the shoe soles up, facing you. It is impossible to prevent the tops from getting little sewn in pleats when you try to do it this way!
NOTE>>>many doll patterns have the foot tops sewn to the foot soles this way. Remember to sew the tops to soles for feet too, not the soles to the tops.
Felt is very forgiving, and allows you fit and sew it together easily. If you make the shoes from real leather, it is quite forgiving too.
Ultra suede and Facile are not very co-operative! You will have to work harder at getting the tops sewn to the soles with those materials.
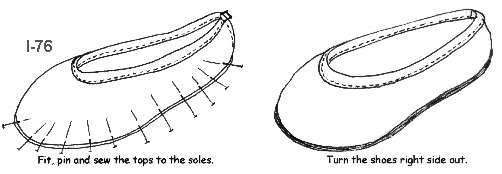
With all the clothes assembled, dress Jennifer, after you sign and date her of course!
Be sure to check for hanging threads, bent out of shape fingers, etc. Pose her hands gracefully. You can also bend her wrists up, rather than inward, for a pretty look.
Something else fun to do with her hands, is to draw the main lines in her palms with colored pencil! Look at your palms to see how the lines are arranged. This adds some more detail and realism that is fun.
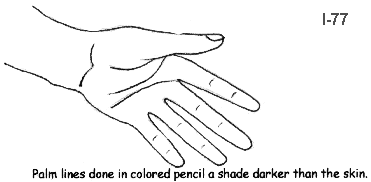
Palm lines done in colored pencil a shade
darker than the skin.
If you haven’t blushed Jennifer’s cheeks, knees, backs of hands, tops of feet etc. do so now.
In chapter 9 Jennifer will be turned into a pretty High Heeled Lady Doll in a long formal gown. All of the directions will be the same, except for the legs, and hair.
My Lady Jennifer is pictured with beautiful, brown Doesuede skin. She has on a real doll wig in an upswept style.
I will show you how to do “direct glue” hair with mohair in chapter 9 too, so that may be the way you wish to do her hair.
Following are the Clay in The Nose Directions. Skill Sheet #1, which is the Jointing Directions, and the Needle, Thread and Tube, finger turning directions. Be sure to print them too.
The directions for Jennifer are still more detailed than most patterns in magazines and elsewhere. Many patterns will have very few directions, so your “built up” skills will stand you in good stead for most anything!
SKILL SHEET # 1
PREPARING ARMS AND LEGS FOR JOINTING (STRINGING)
AND THEN JOINTING THEM.
1. Put a metal shank button down inside the opening in the top of the stuffed arm/leg with the shank against the inside fabric. The shank of the button needs to be about 1” from the top edge. (The shank, not the edge of the button) Illus. #1 below. ( When using a very large, 2” or more button, the shank will be farther down.)
2. Put a straight pin through the shank of the button from the outside. Now repeat step 1 and 2 for the other limbs. Make sure to plan a right and left arm and leg! The side of the limb with the pin, will be against the doll’s body when the doll is jointed. See illus. # 2 (The pin will be removed before jointing!)
3. Finish stuffing the arms and legs very firmly. Do not put any stuffing between the doll’s “skin” and the shank of the button! You have to be able to see and feel that shank under the fabric, for the jointing step!
4. Whip stitch, or preferably LADDER STITCH the tops shut. A ladder stitch ENTERS AND EXITS on the RIGHT SIDE of the seam line on one side, and then does the same on the other side. Take 3 or 4 stitches that way, first on one side, then on the other, and then pull them tight. Continue back and forth this way to the end of the opening. Sew in place a few times to anchor the stitching and “lose the ends”. The edges of the fabric will turn to the inside, and the finished closing will be nearly invisible. Firm knit fabrics close more invisibly than wovens.
5. Put the arms at the sides of the body, positioned so the tops of the arms will be even with the shoulders of the body.
Peek under the arm and mark a dot with a pen, at the spot where the button shank touches the body.
6. Squeeze the lower body to narrow it in the crotch area. Place the legs at the side of the body, down low, and mark a dot where the leg shanks touch the body. Be sure that the legs are low on the body! If you put them up high, the doll will be very hippy and spraddle legged, like you see with some Teddy Bears.
7. Now, thread 2 strands of heavy nylon cord, about 1 yard long (or 4 strands of nylon dental floss) through the eye of your long (8”-9”) jointing needle, and pull it only about 4” through.
8. Now, put the needle, carrying the cords through the shank of the button in one arm. Pull the cords ½ way through, take the needle off, and tie. You now have an arm tied to the cords.
9. Now, put all 4 (or 8) strands of cord through the needle’s eye, again pulling it only about 4” through.
10. Put the needle in at the mark on the correct side of the body, and twist it back and forth while pushing, until it comes out the other side, at the dot you marked there. You will need to twist and push it through.
11. Now, take ½ of the cords out of the needle’s eye. You will have either 2 (or 4) still through the eye.
12. Now, put the needle through the shank of the button in the second arm, from the left to the right, and then take the cords out of the needle.
13. Now, thread the other 2 (or 4) cords through the eye of the needle, again pulling it only about 4” through.
14. Now, put the needle with the last 2 (or 4) strands, through the shank of the button from the right to the left, and then take the cords out of the needle. The cords are now opposing, so they can be pulled and tied.
15. Now, pull the cords tightly, pulling the arms tightly against the body. When they are tight, hold the doll down firmly with one hand, all the while keeping the tension on the cords. With the cords in the other hand, quickly wrap the cords between the body and arm 2 full revolutions. This wrapping stops the cords from letting loose, and now YOU can let loose and tie the cords in at least 2 good knots.
16. Now cut the cord ends short, but not right at the knot. Tuck the ends between the body and arm. Repeat for the legs.
See Illus. #3 for the direction of the cords. NOTE: The needle goes through the body only ONCE!
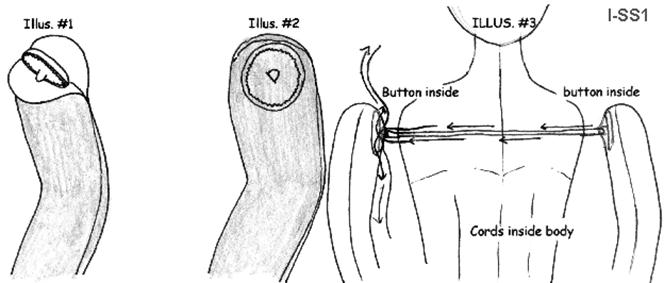
The
fabulous, incredible, miraculous, NEEDLE,
TUBE AND THREAD, finger turning method!
© Judi Ward, Judi’s Dolls 1998
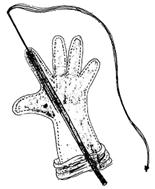 Those
tiny little fingers are no longer a problem to turn, once you get the “feel”
for this method!
Those
tiny little fingers are no longer a problem to turn, once you get the “feel”
for this method!
You don’t need any special, expensive tools or gadgets! You can do this method with coffee stirrer straws! Even with ½ of the double type of a coffee stirrer straw! Or you can use my favorite for really tiny fingers, which are the tubes from canned air or WD 40. I cut them in half. You can make the tiniest little fingers, just big enough to put the tiny tube into!
Remember, the tinier the fingers, the thinner the fabric needs to be for making your dolls.
The hands for the class dolls were done and turned from Doesuede, the 60” wide sleepwear velour, washed muslin, sand washed silk and CRs Crafts Wool/Rayon felt. You need 4 of the 12” X 18” pieces of the felt to make one doll. There are thicker velours too, which are 45” wide. They are too thick for very thin fingers. Stiff poly cotton broadcloth, and stiff 100% cotton broadcloth may be too thick and unyielding for tiny fingers too. Washing the broadcloth fabrics will often soften them enough to make tinier fingers though.
1. You will need… Small tubes, like coffee stirrers, the tube from canned air, or tiny brass tubes if you have them. Actually any stiff tube that you can put a thin, needle sculpture needle through, and that fits into your sewn fingers. Cut the double coffee stirrers down the center lengthwise, so you only have one tube. Cut the coffee stirrers/tubes just shorter than your needle. Cut brass tubes with a hack saw if they are too long.
2. A long, thin needle sculpture needle.
3. Sewing thread, or quilt thread, and the sewn hand/arm that you wish to turn right side out.
![]()
Single coffee stirrer, cut
shorter.
A tube from canned air, cut shorter.
4. Put the appropriate sized straw or tube inside the finger to be turned.
5. Put the threaded needle, with a sturdy knot 4” from the end into the tip of the finger.
6. Pass it down the tube, and out of the open end of the arm. You will have to roll the arm fabric up and out of the way.
7. Pull on the thread and the tube together, as you carefully and gently work the tip of the finger to the inside. The finger won’t go into the tube, It will just press against it as you slowly pull back on the thread and the tube. Sometimes the knot is too big, and keeps the finger from turning. Sometimes the knot is too small, and pulls right through. You may need to practice with your knot sizes. When you first start to pull the tip in, you will think it is not working, and then, POP! The finger turns like magic! It may take you a few tries to get the “feel” of pulling on the tube and the thread, while working the cloth up, so the tip can pull inside, but once you “feel” it, it becomes so fast and easy you will be in shock!!!
8. Remove the tube, cut the thread and re-knot it.
NOTE>>> You can pull on the loose threads in the fingers and pull them out, so no knot or thread is left in the fingers. You do have to be careful when doing this so you don’t pull the fingers back wrong side out!
9. Repeat for all of the fingers, turning them all into the palm of the hand.
10. Finish pulling the hand and arm, right side out, just like you normally would.
CLAY IN THE NOSE AND ELSEWHERE ADDITIONS!
Judi Ward 1996©
Now for the Fantastic, Miracle, Clay In The Nose Additions!!! O.K. a little overkill here. Sorry!
When I first "invented" the clay in the nose method, I put it in, shaped it as well as possible and baked the unstuffed head. Occasionally the little "ring around the nose" would occur when I finished stuffing the head. Needle sculpting was also not possible on the hard clay. (Big noses could have holes put through the clay for sculpting the nostrils though)
Brain Flash!! Why not put the clay in, shape it some, and finish stuffing the head?! You can even NEEDLE SCULPT IT while it is not baked or dried! NEEDLESCULPT GENTLY. You can re-shape the nose before, after, and during the needle sculpting!
When it looks the way you want it to, bake it. No little "Ring around the Nose" will appear, and Wow! can you make some cool noses! It doesn't have to be sculpted either. I usually don't sculpt my pretty doll noses. Just draw in the nostrils, so the nose stays dainty looking.
(You can also use air drying clay, like Paperclay and Model Magic)
You can put in feet, and sculpt the toes. Fill the whole foot, then stuff the leg, so the stuffing presses hard against the clay. Shape the foot, give it an arch, etc. Give it ankle bones! You can press the foot down on a table to flatten the bottom, so your barefoot dolls can stand alone!
Put it in High Heel feet, they almost always stand alone anyway, but you can shape really fantastic shoe shapes with the clay in there.
This all takes a little sculpting practice. But for those of you who are adventuresome, try it! It's Wonderful!
If you just use it for the small, pointed, profile noses, and don't sculpt it at all, it is still Wonderful!
REMEMBER!!!! And this is so important!!!! Use clay that matches your stuffing. If you try to use clay that matches your dolls skin, you will be able to see the change from clay to stuffing, through your dolls skin.
Also, remember to keep the oven temp. low. You can even cure the clay at 150 degrees, for a longer time.
I use a toaster oven for classes, and the temp. can not be over 150 degrees. The elements are so close that the 225 degrees melts the synthetic fabrics, and singes the cottons.
Have fun with this new technique.
Judi
Go to.. Classroom...
Copyright Notice: All pages and graphics are copyrighted by the Internet Visions Company and/or Judi Ward. You may print these out for the use of the class only. All other uses or distributions are forbidden.
Crafty College and Doll
Net are Divisions of
the Internet
Visions Company.
© 1998-2017, Internet
Visions Co. All rights reserved.
All trademarks are owned by Internet Visions Company.
http://JudisDolls.com http://DollNetMarket.com