Go to.. Classroom...
Cloth Dollmaking for Everyone
© 1998, © 2012 Judi Dolls/Judi Ward
Taught by Judi Ward of Judi's Dolls
http://JudisDolls.com
CHAPTER 9
The High Heel, turning head, and formal
gown version of Jennifer.
Also, direct gluing for hair;
An upswept hairdo from yarn;
Sewing tab joints, which are not part of the class patterns,
but are part of many other patterns;
and anything else I think of!
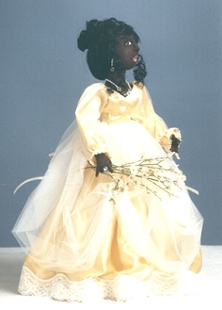 The high heel version of Jennifer can be made from any color of
fabric. My doll just happens to be made of brown Doesuede; because I try to
show dolls in several ethnicity’s whenever possible.
The high heel version of Jennifer can be made from any color of
fabric. My doll just happens to be made of brown Doesuede; because I try to
show dolls in several ethnicity’s whenever possible.
Let’s Think, Think, Think about something…I
get inquiries on a nearly daily basis that run along these lines…Hi, do you
have a “pattern” for Abigail, or Savannah, or Baby Bottoms etc., to make an
African American doll? Or a Hispanic doll? Etc. The pattern doesn’t determine
the ethnicity. The skin fabric does. You can also make features look more true
to an ethnicity if you are adept at that, or make the hair style more ethnic,
but any pattern can usually be adapted to any ethnicity.
For creative dollmaking you have to train your eyes to “see” everything, in a
different way than it is presented.
Think back to Chapter 1, and see where the colors you make dolls from are a “choice”. Learn to “see” with that in mind.
You may make some bad choices to your mind, that might be the perfect choice for another dollmaker. You will soon learn what is “you”, if you make enough dolls from different patterns. Don’t be afraid to make changes to them.
Does the pattern say to sew across the knees? Do bead knees instead. Does the pattern say to use yarn for hair? Use real or synthetic mohair instead. Does the pattern say to dress the doll in gingham and lace, dress her in natural colored, muslin instead. There are so many “instead’s” the mind boggles! I could go on listing for pages here, but you get the idea.
If you take one thing from this class, take the knowledge that YOU make the choices. The class gives you lots of basics, techniques, and an assortment of patterns to “play” with. The possibilities from these patterns are endless!
I am in the pattern business, so I shouldn’t be telling you that with a little imagination, some “choices” and some different fabrics, you can turn Susannah into a boy, Jennifer into a fairy, and on and on. Try to get away from thinking and seeing in absolutes. Think and See in possibilities!
The Design Your Own Doll Classes show you how to Design and Change doll patterns into infinity, if that is your desire.
But even with this class, and the patterns you have here, there are many, many opportunities to mix and match, change and create.
Just jump in and Create, within the context
of quality techniques so what you create is a quality doll!
The patterns in this class don’t cover every kind of cloth doll, that would be
impossible, but you have enough different things to deal with, that if you
reach back into the lessons, most kinds can be made with success.
NOTE>>> This of course excludes extreme needle sculpture and pressed felt or pressed knit dolls.
Now let’s get right to the High Heel Version of Jennifer.
All of the directions for the doll and clothes are basically the same as for Jennifer with flat feet and toes, except the feet, and dress skirt, which has an optional layer of Tulle over the skirt.
The petticoat is also different, and is a really easy petticoat to make from nylon net.
This version of Jennifer really needs the real lashes to complete her Lovely Lady look. I also recommend that you either paint her eyelids, or coat them with Mod Podge® and then sprinkle extra fine glitter on them.
You can make her hair in any of the simple styles taught previously…OR…Make the upswept hairdo…OR…The flowing Mohair hair…OR…Put a real doll wig on her…OR…??? Choices! Choices! Choices!
Now let’s start with the legs. The directions for the rest of the doll are of course in chapter 8.
1. Draw around the leg templates twice on doubled fabric… Or use the Freezer paper method. Sew center front seams of legs/feet from dot to square. Sew center back seam of legs/feet from dot to triangle. LEAVE OPEN AT THE FRONT OF THE FOOT, and between the dots at the tops of the legs.
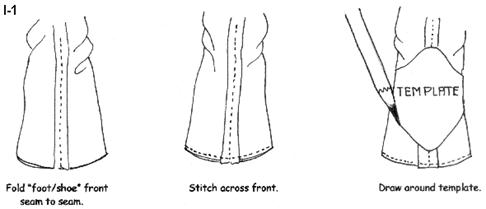
2. Now fold the toe area of the “foot/shoe”, "seam to seam" as illustrated below. First, sew across the toe area right at the edge to hold it together. This way you don’t have pins in the way of your sewing the actual “foot/shoe” shape. Repeat for the other “foot/shoe”.
3. Draw around the toe template on the top of each “foot/shoe”, tapering the line to the sides of the feet…OR…Iron the freezer paper toe templates in place on each “foot/shoe” front, to sew around them. NOTE...The “foot/shoe” front shape, is drawn about 1/2" back from the front of the fabric. If you draw it right at the edge, where you sewed across to hold the fabric together, it will make the foot too big, and may be hard to sew a nicely shaped “foot/shoe” front.
4. Sew the “foot/shoe” front seams that you have drawn, starting at one tapered edge. Sew slowly around the front, using a very tiny stitch and lifting the presser foot of your machine as you did for the fingers and nose. End at the opposite tapered edge. Repeat for other “foot/shoe” front. Of course if you ironed freezer paper templates to the fronts of the feet, sew around those. That is my favorite way.
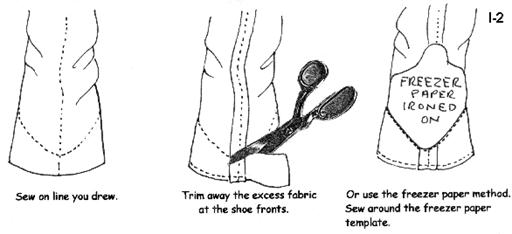
5. Turn the feet and legs right side out, using your screwdriver, hemostat or stuffing tool to help with the turning. Poke the heel out nice and square. Work the toe of the foot/shoe, fully and smoothly to the right side.
6. Stuff the “feet/shoes” and legs very firmly, shaping as you stuff. Be sure to get stuffing out into each toe front and really firmly into the heel.
Important Note…You can stuff the feet all out of shape more easily than into shape. Look at them as you stuff, so you are shaping them to be shoes. Also shape them to be a right and a left foot.
Another “clay” use… Stuff and shape the heels with clay, or even the whole shoe, and bake just like for the nose!
Note: If you do the “clay in the shoes” method, you can bake them before or after you finish stuffing the legs. I recommend that you lay the parts on a pile of stuffing in the oven, so they don’t lay on something and get a flat side or dents as they bake.
With the clay in the shoes, you can really shape wonderful shoes! It does take some sculpting ability though.
Another Note>>>Your High Heel dolls will stand alone, if stuffed and jointed firmly and properly. It makes no difference whether you stuff them with stuffing or make the clay feet. They also don’t need any armature in the legs to stand alone.
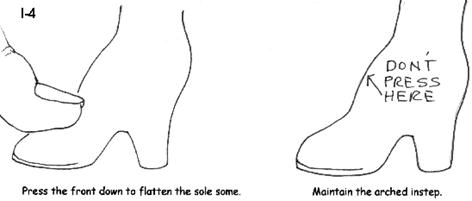
When shaping the shoes, after really stuffing them well, it helps to stand the leg up on a hard surface, and press down on the front of the “shoe” to flatten it some. While stuffing, the “shoe” tends to round out at the bottom. You want to flatten it as much as possible in the front, but maintain the arched instep.
The legs are very well shaped, with calves, thighs and kneecaps when stuffed properly. They are also long and slim.
7. When the legs and shoes are stuffed to your satisfaction, insert the joint buttons, and close the leg tops just like for Jennifer with flat feet. When all of the shoe painting is done you will also joint her the same way.
8. Before you joint your doll, let’s draw and paint the shoes on. You can make several styles of shoes, and they are really easy to draw on with the step by step method you will learn here.
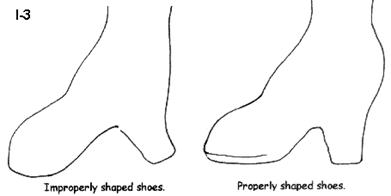
9. If you divide the shoe shape lines into sections, it is easy to draw the shape on. Always lay the shoes “toe to toe” or “heel to heel” so you make matching shoes. You will draw the parts of the shoes on in sections, rather than trying to draw all around those curves in one line. The center back and front of the shoes will be the last thing you draw. Let me show you how in illustrations. Use a colored pencil or even a lead pencil for the drawing.

and

and

10. After you have the shoes drawn on, completely paint the shoes with Gesso, and let dry before continuing.
11. After the Gesso is dry, paint the shoes with your choice of Acrylic paint. Let dry and paint with another coat. While this coat is wet, sprinkle the entire top and sides of the shoes with extra fine glitter if desired.
NOTE>>>There are so many kinds of acrylic paint to use on the shoes! There is even one that dries to look like leather! I have so much fun with the shoes!
12. After all of the shoe paint is dry, paint on the sole. Don’t get it too close to the edge, just a tear drop shape on the bottom of the foot, and a small spot on the heel is enough.

I like to paint on a sole,
after all of the shoe
paint is dry.

Some more shoe style
ideas.
Painting the shoes on is a lot of fun, and can really bring out the creativity you have inside. Look at pictures of shoes for ideas. Old catalogs are a great place to find wonderful styles. Add jewels, paint dots, beads, and ribbons. Paint two tone shoes, and just have fun with it!
Jennifer in heels dress changes.
1. Lay the tulle pieces over the silky skirt fabric (you can also lay tulle over the sleeves, for a pretty sleeve). Gather all at once, (remember 3 rows) with the tulle against the sewing machine.
2. Make the bodice the same way as the other bodice, but note it has a low back and a sweetheart neckline. (Remember, to try the bodice on)
3. Attach the sleeves and skirt to the bodice, just like the other dresses.
4. Try the dress on your doll and decide on the skirt length. I just serged the raw edge of the silky fabric and then I sewed a wide scalloped lace onto the skirt so the edge of it extended just past the serged edge.
5. Sew the center back seam of the silky skirt, up about 12”.
6. Sew the center back seam of the tulle skirt, up about 12”. Remember what to do at the raw bottom edges.
7. Measure and divide the tulle skirt into 4 equal sections. Put a pin at each ¼ line. Using needle and thread, gather the tulle along each line up about ½ way. Secure the stitching by stitching in place, and then sew a bunch of little flowers and a bow at each gathered section.
8. Sew on 2 snaps to close the back.
Now let’s make the easy nylon net
petticoat.
This petticoat style can be used for many dolls.
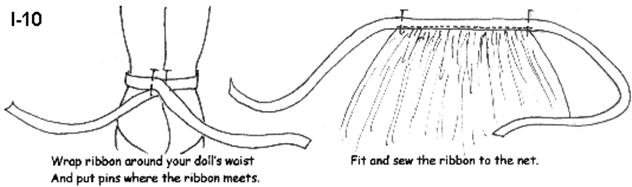
1. Cut a piece of 1/2" wide ribbon about 15” long. Wrap it around your doll’s waist, positioning the center of the 15” length at the center of your dolls tummy. Put a pin at each spot where the ribbon comes together in the back.
2. Gather one long edge of the net, and then pull the gathers up to fit between the pins on the ribbon.
3. Top stitch the ribbon onto the gathered net.
4. Sew the center back seam of the net up about 12”.
5. Put the petticoat on your doll, and simply tie the ribbon in back.
Make a necklace for your doll, by stringing beads on at least a double thread. I had some pretty crystal beads in various sizes that made a nice necklace.
Also make earings, by stringing beads and sewing them to your dolls ears.
Also sew a bead to your doll’s finger/fingers for a ring.
Another ring idea is to wire a bead to an O ring, which you can get from the jewelry making dept. of a Craft Store.
The search for beads for your doll’s jewelry can be fun, and even addictive! I have thousands!!! of beads from old jewelry and purchased from craft stores.
I think I have BAS rather than PAS or FAS
Jennifer needs ears, if you are going to do a hairdo where her ears will show.
…Now let’s do the hair…
You can of course make any hairstyle you wish to make. One of the styles from the other doll patterns in the class.
A style you like to make from other patterns, something you just made up, etc.
The easiest hairdo to “make” for Jennifer in the formal gown would be to put a real doll wig on her.
The brown skinned Jennifer pictured has on a “Kathleen” wig from Abtinas Doll Supply.
A little secret about her wig…It was too big (size 11”) But I loved the look it gave, with the back way down on her neck.
I put it on and glued it all around the front and sides. Then I pulled it way down in back, and glued it down on her neck, much lower than a “normal” hairline would be. This gave an elegant “lots of hair” look that I liked.
Jennifer normally wears about a size 9 wig, but this will vary with each doll you make. The wigs are quite adaptable, and a long flowing wig (or lots of other styles) would look beautiful too.
NOTE>>>Later in this chapter, I will teach you how to make turning heads with the head and neck style used for Susannah and Jennifer. Wigs, or hair of any kind can not be glued to the neck stump if you want a turning head.
As you design the hairdo for a turning head doll, you have to adjust center parts, or the wig gluing, or any kind of “hair” application to allow for the turning head.
…Now let’s make an upswept hairdo from very fine, fluffy yarn.
This hairdo looks so much nicer in a thin, fluffy yarn that has the little fluffy hairs all over it. This is often Mohair Yarn.
NOTE>>>The directions are written for the type of yarn that is very thin, with lots of “fluff” coming off of the thin “string” These yarns are usually not available from the dime store. I get mine from a store that specializes in yarn and latch hook rug kits. Magic Cabin also has the fluffy Mohair yarn. If you use regular sport yarn you may need to use fewer strands, because it is thicker.
First, get your jointing or finger stuffing needle out. Tightly wrap yarn all the way up and down it. I used a 12” needle, and wrapped up and down 3 times with the yarn overlapping tightly. Wet the needle and yarn very well with hot water. Set your oven at 225 degrees, and lay the yarn wrapped needle, on a folded towel in the oven. I leave mine for a couple of hours to dry completely. You will have lots of tight curls for around the face, from all the yarn wrapped on the needle. Once I left yarn on a needle in the oven OVERNIGHT! Didn’t hurt it a bit, but I’ll bet it increased the electricity bill! I don’t recommend the overnight method.
SPECIAL NOTE>>>If you want to make a “curly all over” hair-do, you can do this lots of times on your needle, or buy lots of thin brass rods or tubes from a Hobby Shop to do this on. The rods and tubes come in 3 foot lengths, and several widths. The smaller the diameter, the tighter the curls. For hair, you will need to at least cut them in half so they will fit in the oven.
NOTE 1>>>The thin brass tubes are GREAT for finger turning, especially for the tiny little fingers that require the needle and thread turning method. Of course, you will have to have them cut much shorter.
NOTE 2>>>By Hobby Shop, I mean the kind of shop that carries model train and airplane stuff, not a craft store.
1. Now pull off about 100 strands of yarn about 18” long. I just measured off the first 18”, then simply folded the yarn back and forth in my hands, leaving the ends in loops. You will cut the loops later.
2. Now, sew these strands down the middle on your sewing machine, pushing them under the presser foot as you sew. They don’t need to be exactly “side by side”. In fact, you want them a little closer together than that.
You are striving for about 9” for the finished length of the seam down the middle….OR…The measurement around your doll’s head. Remember, directions like these are usable for lots of dolls, in lots of sizes.
You have done this several times already, so I am not adding a picture of the sewing down the middle.
NOTE>>>Of course, if you want to, you can wrap the yarn around an appropriate sized cardboard.
4. Now, cut the loops at the ends, and then wrap the “hair” around your doll’s head. Start at the center back of the neck, go over one ear, across the forehead, over the other ear, then back to the back of the neck. Pin as you go, and pull the “hair” up to the top of the head as you pin, to see where you are placing the “hairline”, especially in the front.
You may decide to make the “hairline” farther up or down on the forehead. After you look and decide on the hairline, drop the “hair” back down and continue.
The “hair” on one side of the stitching will be hanging down over the doll’s face and down her back. The “hair” on the other side of the stitching will going up towards the top of the head.
5. Sew the “hair” in place, right along the machine stitching, using a back stitch.
6. Now, finger comb, and arrange all of the “hair” into a high ponytail, and tie the ponytail together with a piece of yarn or string.

NOTE>>>Another hairstyle for any of your dolls, Just leave the “hair” in the high pony tail.
7. To make the random curls, pick up 10 or so strands of “hair” and roll them around a pencil, spraying hairspray on the “hair” as you roll it. Slide the pencil out, and then stitch or bobby pin the curl in place.
Repeat this with all of the “hair”, arranging the curls all around.
See the illustrations for guidance. No two hairstyles will be the same. You can arrange most of the curls to one side, or arrange them evenly all around. You can even put the ponytail to one side, and the curls to the other side. This is a fun hairstyle to play with. Spray the finished hairstyle with a good coat of hairspray and decorate with flowers and bows etc. NOTE>>>For a really permanent hairdo, you can spray it with Clear Acrylic Spray. Protect your doll’s skin with plastic wrap or a piece of cloth, when you spray anything on her hair.
8. For the curly tendrils, take the baked curls off of the needle, and cut lengths off. Sew them in place, with perhaps 3 longer ones in front of the ears, and shorter ones on the forehead, and at the back.. You should have plenty of curls, to “play” with.

and

After the hair is all done, either hot glue or stitch the ears back to the head.
Now let’s do the Direct Glue method for loose fibers like Mohair and synthetic mohair.
Mohair comes wefted and unwefted. The synthetic “mohair” comes in packages of about 1 yard lengths, all rolled up. Folk Wool is one of the synthetic type fibers.
This method can be used for many other fibers too, even yarn.
I prefer to use whatever fiber I have chosen, in the un-wefted form. The wefting adds bulk, and it is hard to cover as you put the “hair” on.
CRs Crafts carries several types of “hair”
in their catalog, for use with the direct glue method.
100% wool roving, Wavy Hair, Folk Wool-Whimsey, Olde Country Wool,
Sheep’s Wool, Folk Wool, White Mohair, Royal Fleece, Pretty Hair, Beautiful
Braids, Curly Locks, Straight Hair, Mohair Locks, English Mohair, and Braided
Strands, are all available from CRs. Many craft stores also carry a
number of the “hair” like fibers, but usually not the selection that CRs
carries.
This method is a “glue on only” method, and again you are faced with the choice
of glues. Try them all to see what you prefer.
I prefer the low temp glue gun myself. It’s fastest. I also like it because if I want to take the hair off, I only have to heat the head with a hair dryer, and take it off. You may prefer Clear Silicone (bathtub caulking) or Tacky glue.
Silicone stays pliable when dry, but I make a mess with it because it is very sticky.
Tacky has to be held for a bit before it holds, and you may need to stop between sections to let each layer dry.
Choose the glue that you feel the most comfortable with. We are all different, and what’s best for me may not be your “cup of tea”.
Once you are at this level of doll hair
making, the level of your dollmaking will most likely be way up there too. You
have preferences for most everything, and glue is probably one of them.
If you have the patience of Job, you can sew the fibers onto the head, in tiny
tufts. Very time consuming, and not for me, but those of you who like fine
needlework, may even find that method relaxing.
I am going to show the method by gluing directly onto a piece of fabric to simulate a doll’s head. Can’t get the head in the scanner, and I am the worlds worst photographer!
I will have to use drawings to show you the pattern you will follow
in gluing the “hair” on though.
I am going to demonstrate with a fiber like Folk Wool. It comes in a 1 yard
package, and isn’t too expensive. It can not be brushed or combed though. It
has to be arranged carefully. I use a long needle to “comb” through it to
arrange it, then spray it with hairspray or acrylic spray.
If you are using a brushable fiber, you will be able to brush and arrange the hair-do after the hair is all on your doll and completely dry. Even with brush-able fibers though, you will have some hair loss, when you brush and arrange the hair.
Following, is the basic layering pattern you will use. The “hair” will be layered one row over another like laying shingles on a roof. The thickness of the finished hairstyle will depend entirely on how thickly you put the “hair” on, and on how closely together you place the layers.
You must be aware that this method takes patience and practice. It’s not for everyone, nor every doll.
To start, cut some “hair” into the length you want the finished “hair” to be. If you want your doll’s hair to be all the same length, you will have to cut your fiber to length for each layer. Leave the “hair” long over the face. You can trim it later, but can’t grow it longer if you start off making it too short!
If you want a wild, messy hairdo, you can cut a whole bunch of lengths the same. They will be graduating lengths on your doll. The length I am using for the demonstration is about 4”. It won’t make very long hair at that length, but fits on the paper better. Every computer is going to print the pictures out in a different size, so the length of the “hair” is actually immaterial. The technique is the important thing. Practicing the technique is also VERY important!
Pull off a section of the “hair” and spread it out so it is wide and flat. Usually about 1” of width is about all that can be handled at once. Apply a very thin line of glue along the lower back of your doll’s head, right at the hairline, and then press the “hair” into the glue.
Quickly, so as not to burn your fingers, if you are using Hot Glue. Carefully, so as not to get it all over your fingers, if you are using Silicone Glue.
If you are using Tacky Glue, you will be able to put it on and press it in easily, but you will have to wait awhile before you do much more.
The following series of pictures will demonstrate the method.

and

and

and

Repeat for the other side of the head. Be very careful in the front, that you don’t get glue down on the forehead. If you wish to pull the “hair” back from the forehead, after all the hair is on, glue smears there will prevent you from doing so.
Repeat for the next rows, all around the head until you get right to the crown. The crown is the tricky part. You only want to have a very small bare area at the crown. What you will do is put a dab of glue on the bare area, and then press a bunch or “hair” straight into the glue. Not pressed flat, but straight in, like pushing a pin into something.

A drawing will better show how to put the “hair” straight into the glue at the crown “cause” I can’t put the glue, the “hair” and my hand in the scanner!

This layered application method, with no part line, makes the popular “wild hair” for fantasy dolls. Just fluff it up and spray it if desired…Or… the “hair” can be arranged all around from the crown, and trimmed into a pixy or male hairstyle…Or… It can be pulled back in the front and secured in the back for a more lady like or girlish hairdo.

and

and

Remember, the direct glue method is not suitable for play dolls. It is wonderful for Art dolls and mermaids, Clown dolls and men dolls. You be the judge.
It takes some practice, and is often messy, but is another way to do doll hair that some of you might like to “play” with.
I use it on my polymer clay dolls, as do most polymer clay artists.
Now let’s make learn a different method of making the dress bodice so there is no seam down the center backs when you sew the lining to the bodice.
Materials needed for the Formal Gown.
3/4 yd. of silky fabric for the dress.
1/2 yd. of tulle for the overskirt.
1/2 yd. of nylon net for the petticoat.
15" of ribbon for the petticoat waistband.
flat narrow lace for sleeve bottoms.
Enough wide lace for the skirt bottom.
Gesso and Acrylic paint of your choice for the high heel
shoes.
You added a seam allowance at the CENTER BACKS of the dress bodice for Susannah and Jennifer. For this method you cut the seam allowance off of the CENTER BACK pattern piece. Place that edge on the fold of your fabric, twice. You will be making 2 backs on the fold.

You will also cut the bodice front out twice on the fold, just like usual.
1. Now, put one bodice front on the table in front of you, right side up.
2. Leave the backs folded wrong sides together, just like you cut them out, and put them on top of the front, aligning the shoulder seams.
3. Fold the shoulders of one layer of the back, towards you, to expose the shoulder area of the aligned shoulder seam. Pin those shoulder seams.
WHEW! Pictures needed. This method is so simple, but hard to explain!

and

4. Now, lay the other bodice front, unfolded and wrong side up, on top of the pile you have, and pin the shoulder seams of it, to the loose shoulder seams of the bodice backs. (The ones you folded back first, and then put back in place.)

5. You should now have a “sandwich” of a flat front, right side up. 2 folded backs, folded wrong sides together. And a front, wrong side up.
6. Now pick the whole she-bang up and sew all of the shoulder seams, one at a time. When they are all sewn, you will have a continuous “loop” of bodice front, bodice back, bodice front and the other bodice back, all sewn together at the shoulders only.

7. Now fold the whole thing, right sides together, with the backs folded along the original fold line.
8. Sew around the neck edge, but not down the center backs. If desired, you can add a strip of interfacing down each back edge to reinforce the edge for buttons or snaps etc.

After you sew the neck edge, turn the bodice assembly right side out just like you normally would, and finish as you normally would.
This method can be adapted to any dress bodice, from any pattern. Simply cut the center back seam allowance or the back “fold back” off, and put the bodice back on a fold.
I also do this for children’s dresses. It uses a little more fabric, but is so much smoother and easier than facings or bias tape.
It is best to make lined bodices for doll clothes. Many patterns just have you clip and turn the neckline seam allowance to the inside, and then sew it down. This makes a weak and usually very un-even neckline.
It also makes a back opening with a lot of raw edges to deal with.
Doll clothes made this way look very amateur and home made, not hand crafted. The exception is when you want the primitive “look”.
If you want to put a zipper in the dress instead of buttons or snaps (or Velcro®) you need to also cut off the allowed “overlap” at the back. For these patterns it is about 1/4"
Cut and assemble the bodice as directed above, attach it to the skirt, and then sew in the zipper.
Now let’s make a turning, inserted, tab head.
This is really
neat! The head turns like a real head and can
tip up and down too! It doesn’t turn all the way around, so is more realistic
than a head that can go round and round.
It is also easier than sewing the head on! I recommend this for Art dolls, and
set up dolls, not play dolls.
I think a child might turn it to death!
Both Susannah and Jennifer have “inserted” tab heads. So do many other patterns.
The only change you will need to do, is to add about ¼” to the opening in the back of the head pattern. That extra isn’t a requirement, but helps the seam allowance stay tucked in.
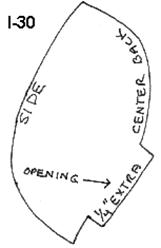
Add 1/4" to the
opening at the
back of the head.
1. Assemble and stuff the head and body as you normally would.
NOTE>>> It is very important that the neck is stuffed as hard as a rock! It should feel like an unripe avocado.
For the turning head technique, I put regular stuffing in the top 1” of the neck, and cotton balls in the rest.
Why, you ask? Remember, cotton is really hard to get a needle through, so the top 1” of the neck needs to have ordinary stuffing in it, so you can get a needle through it.
The head will be pushed down on the neck and will be moved around, so if the neck is at all soft and floppy the head will flop around, and the neck will eventually get wrinkles in it, and flop over.
NOTE 2>>>It is also very important that the head be stuffed very hard, and that you work a small hollow up in the back for the neck to fit up into, but don’t make that hollow by taking stuffing out. If anything, put more in, and push the hollow in really firmly with your fingers.
I have put cotton balls up in the hollow, but again, they are really hard to get the needle through.
2. When the head is stuffed to your satisfaction, put a little GLUE
STICK glue on the seam allowances at the back opening, and then tuck them
inside and press them against the stuffing.
I have several dolls that I didn’t even do the gluing part on, and their
heads are on just fine, and the seam allowances stay inside just fine…But…I
have found in “hands on” classes that students feel more secure if they glue
the seam allowances to the inside. Why Glue Stick glue? It isn’t wet, and it
doesn’t drip, and it doesn’t soak through.
3. Now push the head down on the neck, just to get a fit, and move it back and forth to form the hollow in the head better. If the head goes down too far, making the neck too short, add more stuffing in the head.
4. Now, thread about 18” of jointing cord (a single strand) or dental floss (4 strands) onto a 3” to 5” needle sculpture needle.
5. Stick the needle carrying the thread through the top of the neck stump, from one side to the other, about 1/2" to 3/4" down the length of the stump. And pull the cord so you have an even length on each side.

6. Now, stick the needle with the cord at the right side of
the neck, up through the opening in the head back, and out the top of the
head. Be sure the body is front down when you do this. Also BE SURE you
don’t stick the needle into any of the fabric seam allowance that is in the
head opening.
Repeat for the cord coming out of the other side of the neck. Tie the
cords at the top of the head, which pulls the head down on the neck. You will
have to use your judgement as to how far down to pull it, and if it goes too
far down, you don’t have enough stuffing in the head. The head will now
turn side to side and tilt up or down. It won’t easily turn all the way around,
that is why I said to be sure you have the body front down when you do this.

<<<A SPECIAL NOTE>>>
When you put the hair on a turning head doll, you have to adjust the application so that you don’t glue or sew anything on the neck stump, or the head won’t turn.
I just love to make tab head dolls this way. It adds so much personality to them when you can change their head position!
Now, let’s learn the easy way to sew and put together “Tabbed Joints”
I have 2 doll patterns with tabbed joints, Dahnia and Baby Darby. I have seen other dolls pictured with them too.
Akira Blount does them on most of her dolls.
For some doll types it is fun to use fancy buttons for the joints. For others, plain clothing buttons are perfect.
The dolls in this class don’t have the tabbed joints, on the original patterns…but… I thought a lesson on them would help someone having trouble with them, or afraid to tackle a doll because of the tabbed joints.
The Tabbed joint pattern following will work for either Jennifer’s or Susannah’s legs.
NOTE>>> I teach you how to design tabbed joints in the Advanced Design Your Own Doll Class.
The Tabbed joints consist of a rounded upper or lower part, and a part with tabs on each side, with a gusset set in the tabbed area.
Often the upper
knee/elbow will have the tabs, and the lower knee/elbow will be rounded.
Ditto for the ankles/wrists.
Sometimes that is reversed, and the tabs will be on the lower part with the upper part the rounded part.

A pattern for this type of leg/arm, will have a gusset that fits between the tabs. If you fit, pin and sew the tabs to the gusset, rather than the gusset to the tabs, you will achieve a much better fit, far easier, and with no chance of the seam in the tabbed area slipping away, and not being caught in the seam.

The “round topped” lower leg part will be sewn as you would normally sew a whole leg, leaving it open to stuff where you like to. For this part of the leg, I leave a spot at the back open, rather than the top.
The tabbed part will be sewn to a specified “spot”, leaving the tabs un-sewn. You will also need to leave a place open to stuff the upper leg. I leave the top open here, as is my usual method. If you don’t like closing rounded parts, leave a spot at the back open to stuff.
The gusset will be sewn into the open tabbed area as illustrated in the following diagram.

Of course turn,
stuff and set the joint button at the hips as you did for an ordinary leg.
For a large tabbed joint, it is a good idea to re-inforce the gusset with thin
plastic, cut 1/4" smaller than the gusset piece. Put the plastic (Milk
bottle plastic works fine) pieces in place before you stuff the part.
Don’t stuff the tabs real full and fat. You want them to be fairly flat.
The size of the tabs for this leg, leaves the choice of adding the plastic up to you.
After everything is stuffed to your satisfaction, it's time to put the parts together. All of the gussetted parts are put together the same way. I will illustrate the method for this leg.
The same method will be used for ankles, wrists, knees or elbows. You will use a piece of the nylon cord about 18" long for each joint so it's easy to tie. These joints are held by small buttons, either two hole or shank style. I have even used beads.
Don't try to put the needle through all of the parts of a joint at once. String each part on like stringing beads. Use your 4" or 5" needle for this jointing, or an embroidery needle with a big eye.

Well, students, that about wraps it up for this class. If you have any “puzzles” that have not been addressed, and are within the scope of this class, please post them to the Blackboard within the next few days and I will address them.
Remember, cloth dollmaking is not a
science, and not static. Cloth dolls can not be measured in exact inches. Every
one you make from the very same pattern will be slightly different in size.
Every doll you make from the same pattern will also have a different “look”. It
depends on the fabric, your mood, the stuffing, your strength that day, your
mood, the day of the week, the time of day, your mood, etc.!
In my book, that is the magic of cloth doll making!
The more detailed the doll is, the more it will vary in the making. The more adept you get at all aspects of cloth doll making, the more varied yours will be, because you want to be a creator, not a copier.
You will be able to take a single pattern and turn it into many things, many “looks” and have fun while doing it.
If you enjoyed this class, and feel you are ready to design your own dolls, I teach 2 design classes at Crafty College too.
The Beginning
Design Your Own Doll class.
And
The Advanced Design Your Own Doll Class.
The Beginning class must be taken before the Advanced class.
If you want to learn lots of hairstyles, I teach From Here to There to Hair! Hair for Cloth Dolls.
If you want to really learn to paint faces, and a lot about color mixing etc. I teach Painting Cloth Doll Faces too.
If you want to have a class that is especially for a particular doll but with lots of added skills in it too.
Whatever! Whatever! Is a saucy teen with attitude.
And Milli’ Is an elegant boudoir doll….
These 2 dolls are entirely different from each other. Not just the same patterns dressed in a different color with different hair.
All of the classes I teach are very comprehensive, and adaptable to almost all of your cloth doll making.
Except for Milli’ and Whatever my classes are not “Doll Specific” classes, that lock you into one doll, one way and that’s that….And even Milli’ and Whatever! have many options.
You will grow, learn and become better dollmakers with each class.
Huge Doll Making Hugs,
Judi
Go to.. Classroom...
Copyright Notice: All pages and graphics are copyrighted by the Internet Visions Company and/or Judi Ward. You may print these out for the use of the class only. All other uses or distributions are forbidden.
Crafty College and Doll
Net are Divisions of
the Internet
Visions Company.
© 1998-2017, Internet
Visions Co. All rights reserved.
All trademarks are owned by Internet Visions Company.
http://JudisDolls.com http://DollNetMarket.com