Ó 2000 Judi Ward -Judis Dolls
... The French Country Version of Milli' ...
This version of Milli is almost identical to the high heel version, the only difference being that she has bent arms and feet with toes. She is the Peasant Milli" and didnt want those fancy high heels!
I am not going to go over the regular directions again YEA! Arent you glad I wont subject you all to that! J
Sooooo ..You will have to go back in your directions for most of it Head, body, arm and leg sewing, clothes, (unless you are going to something more Peasant like, for this Milli) then you will have to invent some clothes.
A strip of natural fiber fabric gathered to the bodice instead of lace? A linen skirt? A shawl? Dried flowers for decoration?
My French Country Milli pictured here still has the lace skirt and trims and I love her that way, but another will be more countrified.
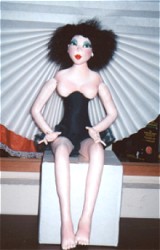 French Country Milli' without clothes. |
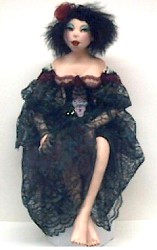 French Country Milli' dressed. |
The pictured Milli also has on a "skin wig". It is mohair still attached to the skin.
She has the "rat" on her head too or you can just stuff up under the wig before gluing it down.
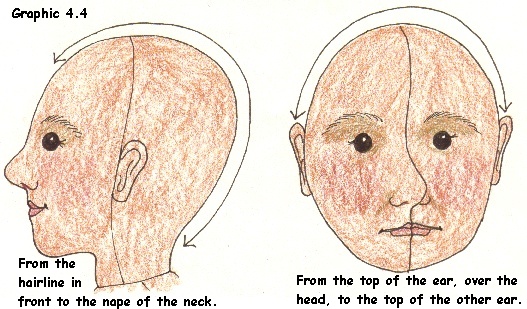
To make the wig, I cut an oval from the fur. I measured from the back of her neck to her front hairline, then the other measurement was from the top of her ear over the top of her head and to the top of the other ear.
I put 4 darts in it, (2 in back and 2 in front on either side of center) pulling the "hair" out of the darts as I sewed them. I then trimmed the excess from the darts and tried the wig on. It needed a couple more little darts to make it fit snugly.
I then glued it on with hot glue, quickly tucking the raw edge of the leather under with my thumbnail as I glued. It looks rooted.
I am going to include the text and pictures from the "Hair Class" here on making a fur wig. You can use any kind of fur for this, but for Milli the mohair on the skin is best because it is longer.
You can get the skin wigs at Sandcastle Creations. They come only in black, cream and white from them. There are other places that carry them too, but I dont have any more addresses. I bought mine at a doll show.
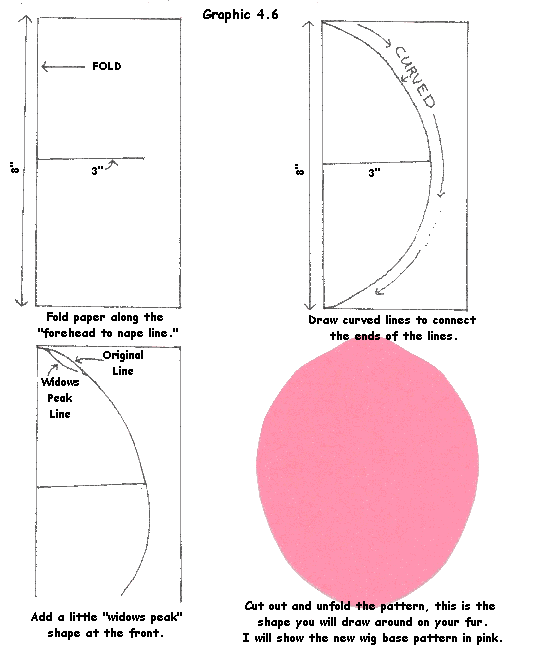
Now, let's measure for a fur wig.
You really only need two measurements.
#1...From the hairline at the front of the head to the nape of the neck.
#2...From the top of the ear, over the top of the head to the top of the other ear (See diagram below).
Now with the measurements in mind, let's say the first one was 8" and the second was 6". Draw a cross, using those measurements, with the center of each measurement crossing over each other. In this example the cross over points will be at 4" and 3". The following diagram will make it simple.
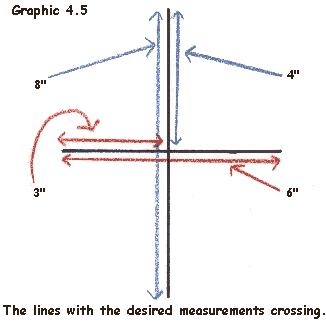
Now, you are going to connect the ends of the lines with a curved line. But, first fold your paper along the line that is the measurement from the forehead to the nape of the neck. The lines you draw don't have to be extremely, technically precise. Just casual curves to connect the ends of the lines. Sometimes you can use a plate, or jar etc. to draw around.
Depending on the measurements
for your particular doll, the "wig base" shape could
be a full circle or an oval. If you are ready for a little more precision,
you can refine the "wig base" shape, by drawing the front with a little
"widows peak" shape. This refinement is really a good idea, if the fur you
are using is very short (See Diagram Below).
Now, to cut the fur "wig base" from your chosen fur. If you already work with fur for stuffed animals, you know the importance of cutting ONLY THE BACKING not the fur itself. If this is your first time working with fur, I can't stress too much, the importance of cutting ONLY THE BACKING.
Any time you cut parts from fur you need to draw around the pattern/patterns on the backing with a soap sliver, chalk, colored pencil, chalk pencil, etc. (The soap sliver is my personal favorite. It's a renewable resource! It lasts a long time and never has to be sharpened!) Never cut fur on the fold! You always have to cut each piece from a full pattern.
Draw around your "wig base" pattern on your chosen fur. Be sure the direction that the fur "grows" is facing forward. (The only time this "growth" direction doesn't apply, is when the fur is fluffy and sticking up all over, and you can't decide which direction it grows.) (See Diagram Below).

After drawing around the pattern, carefully cut the fur "wig base" out.
Remember!!!! Cut ONLY THE BACKING!!!!
If you haven't worked with fur before, it will take some re-thinking and stopping your self in mid cut, to keep from just chopping through the backing and fur all together!
To cut just the backing, you slide your scissors along with the points slanted up slightly, and then cut a little at a time. On many furs, you can actually see the shine of your scissors showing through the backing as you slide and cut. Don't use a razor cutter on fur either. It's too easy to press too hard and cut the fur "hair" off this way too.
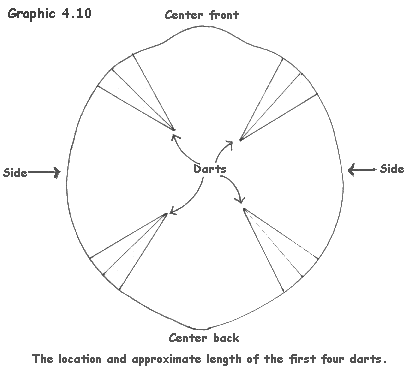
After your "wig base" is cut out it needs to have darts marked and sewn into it, to fit it to your doll's head. Four darts are sewn in first, then you need to try the wig on your doll to decide where more fitting darts need to be sewn in. The first four darts are sewn in approximately where shown in the following diagram. Their length will depend on the size of the wig base. About 1/3rd of the full distance across the whole wig base is a good rule of thumb.
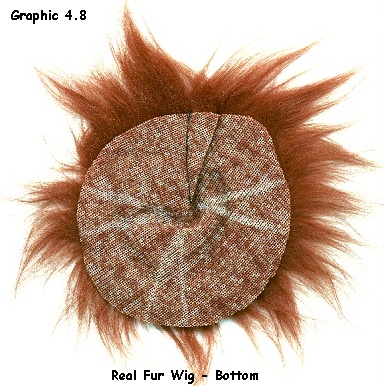
Graphic 4.8 is a picture of the wig from the bottom while Graphic 4.9 is from the top.

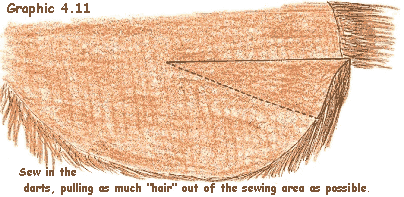
Before sewing the darts in, brush the "hair" out all the way around, from the "crown". For short fur this isn't necessary, but for long fake fur it is.
To sew the darts in, pinch them up and then pull as much "hair" out of the sewing area as possible. Sew the darts in just like sewing darts in clothing. Trim the excess fabric from the darts, so the "wig" lays nicer on your doll's head.
Try the wig on your doll after 4 darts are sewn in. (NOTE...If your doll is flat headed, the wig won't, and shouldn't fit tight at the crown. You will stuff the crown area, giving dimension to your doll's head.) After the first 4 darts are in, you will usually have to put at least 2 more in to make the wig cap fit your dolls head. It should fit snugly all around (See Diagram Below).

After the wig cap fits snugly, stuff some stuffing up in the crown area if needed. Pin the wig down to your doll's head at least 3/4" back from the edge and glue it on with hot glue. Be sure to tuck the edge under as you press to hold the glued place.
Now lets do the few things that are different for this Milli.
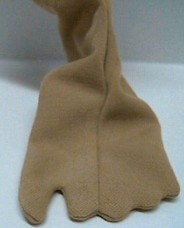
The legs/feet
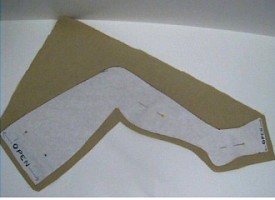
Leave open at the top and at the toes.
Be sure to make a right and left foot! NOTE***I always cut the toe templates by folding my Freezer paper shiny sides together and then cut the templates out. You have a right and left toe template that way.
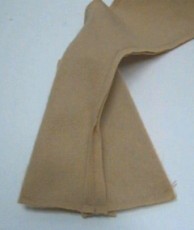 The foot folded seam to seam and stitched across. |
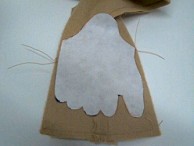 The toe template ironed on and sewn at the sides and at the toes. |
Use your closed hemostat tip to push the toes out nice and rounded.
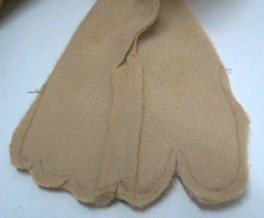 The toes sewn, trimmed and clipped. |
 The toes turned right side out. |
(In the picture that follows, I had already "eyeballed" the toe sewing, but thought a dot might help those who cant "eyeball" sooo .the between the toes areas are sewn already, but the picture shows making the dot with a colored pencil.)
Why? You ask, do I not hand needle sculpt the toes after stuffing? Because that makes fat little toes and a fat little foot, rather than a nice lady foot.
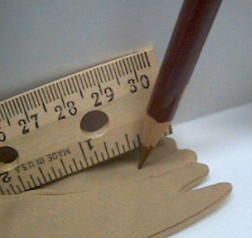 Mark the starting spots for the sewing. |
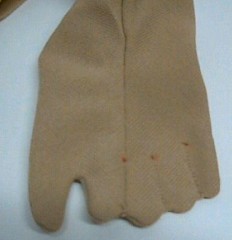 Sew between the toes by machine. |
A "competition doll" finish note****For an extra fine finish at the toes, dont cut the threads from the between the toes sewing, at either end. Wait til you have the foot all stuffed and then "lose the ends" of the threads so there are no little thread ends sticking up. I didnt do that in the picture. I just cut them close, but if this doll was going for a competition I would.
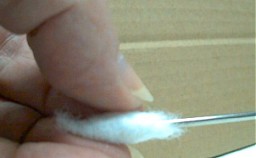
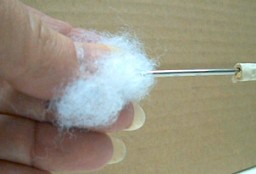 Twirl some stuffing onto your fork. |
 A little Q-Tip. |
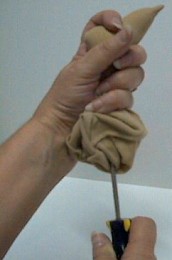
11. Stuff the front of the foot very firmly, and then the heel. Hold your dolls foot like shown in the picture to stuff into the heel. This way the stuffing will go down into the heel and not tip the foot down more at the same time, causing the foot to "deform".
This is also how you hold the foot to stuff the ankle, and as far up the leg as you can while holding like this.
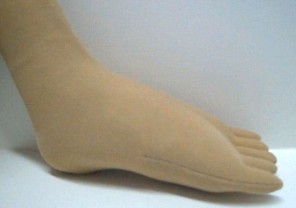 A nice shape from the side. |
 A nice shape from the front. |
12) Does she need an ankle bone?? Now is
the time, before the leg is stuffed any farther. A small bead (pea sized)
makes a nice ankle bone. Grip it with your hemostat and rub it in Glue
Stick Glue and then quickly guide it down into the area where it belongs.
Look at your own ankles to see where the bones are. You can put the
beads at the outer ankle and the inner. I usually just put them at the
outer ankle, when I add this detail. They make a shadow that looks very
"ankle boneish".
I personally dont like the look of stitches making the ankle bones, so the beads are what I use.
The ankle bone in place.
You can also just do a coat of Gesso and a coat of paint for toenails.
The arms
Pose her hands nicely, or have her hold something. I still like the wrists bent back and the fingers daintily posed.
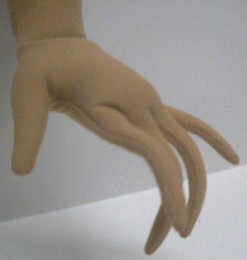
A daintily posed hand.
Do the nails just like before or another option for those who can "eyeball" things is to cut down real fake fingernails. Get the cheap, thin ones and cut them to fit your dolls fingers, using very sharp, small scissors.
I found some at a dollar store that were already colored red or pink, and some that were iridescent.
The trick to putting them on the Doesuede or Velour is to use Krazy Glue or Super Glue. The kind that sticks you to you and everything else!
Put the glue VERY sparingly, on the part of the fingernail that you want stuck and then press it quickly to the finger. It actually melts the fabric a little and really sticks! Be sure you place it where you want it, there is no second chance!
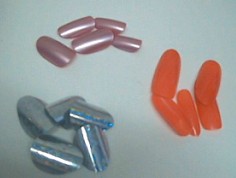 Some cheap, thin fake nails. |
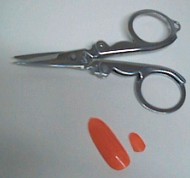 A cut down nail next to a big one. |
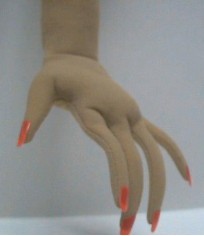
A daintily posed hand with red
nails glued on.
Well dollmakers, that does it for Milli. Do your Millis with pizzazz and flair!
Have fun and Dolly Hugs, Judi
Go to... ~ Classroom ~ Pattern ~
Copyright
Notice: All pages and graphics are copyrighted
by the Internet Visions Company and/or instructor.
You may print these out for the use of the class only. All
other uses or distributions are forbidden.
Crafty College and Doll Net are divisions of the Internet Visions Company.
© 1997-2003, Internet Visions Co. All rights reserved.