Ó 2000 Judi Ward -Judis Dolls
Pattern Preparation
Pattern Preparation
If you are resizing your pattern, (making it smaller) and will need to add seam allowances back to the body/torso, skirt yoke and head sides, an easy way to add 1/4" seam allowances was shared in another class. The dollmaker taped 2 lead pencils together side by side. She drew one along the edge of the pattern piece that has no seam allowance and the other pencil drew the seam allowance 1/4" away.
I know there are other ways too, and there are some gadgets to do it.
Add the seam allowance however you desire. You can even measure and make dots about an inch apart and then connect them like "dot to dot".
Transfer all markings needed, like STRETCH DIRECTION, TEMPLATE, DART, BODYBACK, ETC. to the Freezer paper patterns.
Always keep your original patterns intact to refer to for extra directions and for re-tracing a lost or damaged piece.
Make 2 arm, 2 leg and 2 ear patterns. (They dont need to be made with one reversed, since they will be sewn and cut out on doubled fabric.)
NOTE I like to have all of the pattern parts on Freezer Paper. Not just the actual doll parts that are templates. Why you ask? You can iron the pattern pieces for clothing onto doubled fabric; stick in a few pins and the nice sharp edge of the Freezer Paper pattern makes it so much easier to cut accurately. When you just pin the pattern parts on, you get little gaps between the pins and sometimes the parts arent accurately cut.
Cut out the pattern parts from your Freezer Paper. For the TEMPLATE pieces . Cut off the drawn lines too. Why you ask? If you cut outside of the drawn lines the pattern is automatically bigger by a fraction, and then you tend to sew a bit outside of the Freezer Paper pattern, which makes it bigger still. When this happens you will lose the space between the fingers and fat fingers will be the result. The whole unit, leg, arm etc. will be fatter too. On very small dolls this can be a real problem. On Milli it isnt much of a problem except at the fingers, where she will end up with "fat sausages" instead of long slim fingers.
Dolls are small and it doesnt take much to make a difference in their finished size.
I think this is one of the biggest problems when dollmakers start making detailed fingers. They lose that "between the fingers" space, and then they cant clip close and it makes turning hard. With woven fabrics it also often results in fingers tearing in between.
***BEFORE IRONING THE PATTERN ONTO YOUR DOLL BODY FABRIC, FOLD THE FABRIC WITH THE ***SMOOTH SIDE TO THE INSIDE *** YOU WILL BE SEWING ON THE FUZZY SIDE.
REPEAT****SMOOTH SIDE TO THE INSIDE***YES, I AM YELLING THIS. In every class someone doesnt do this and has a fuzzy doll. Sorry, just trying to keep this from happening, so for this class I am yelling it twice!I am not really mean! Honest! I just want to keep it from happening. Baby dolls are wonderful with the fuzzy side showing, but elegant adult dolls just lose something with fuzz all over!
After the pattern parts are all cut out of the Freezer paper, iron the parts onto your doubled fabric. I like to iron the parts onto the fabric, and then cut the sections away from the rest. I.E. Cut the leg section away from the arms. The head away from the shoulder plates etc. I dont mean to cut the template pieces out around the edges, that will be done AFTER sewing.
Do cut the shoulder plates pieces out though, right along the Freezer Paper edge.
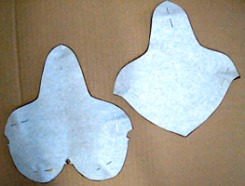
NOTE>>>Look at the layout and notice that the upper front shoulder plate, with the bigger curves (boobs) is ironed to the doubled fabric, but the under front shoulder plate, with the smaller curves is no where in sight. I didnt forget it, honest.
I will explain how you cut it out a little farther down.
Be sure to check the Stretch Direction. You want the stretch up and down the height of the doll.
Velour stretches most from selvedge to selvedge. Doesuede/Suedecloth stretches most, perpendicular to the selvedge.
(2 layouts follow with the stretch direction illustrations.)
Even wovens have a little stretch, more one way than the other. The cross grain gives a
little more. Woven fabric dolls look better with the "give" up and down too.
NOTE>>>You can make the whole Milli from 100% cotton woven fabric if you are really good with woven fabric. She will be a little smaller and will have a few places where it is very hard to get the "Krinkles" out. If you are going to make her from woven fabric, be sure it is very high quality, 100% cotton and place the head pieces on the BIAS.
The firm knits will make your dollmaking much easier though.
Pattern layout for Doesuede.
Pattern layout for Velour
Be sure to leave at least 1/2" between all parts, especially the Template parts.
You will cut the parts with seam allowances added out before sewing. You will cut the template parts out after sewing. NOTE>>>Remember The head pieces are part template and part non template. The head front and back seam will be sewn BEFORE cutting the parts out. Then you will cut the head parts out right along the paper at the sides, and 1/8" away from the paper on the sewn front and back.
Set your iron to the wool setting and iron the parts to the FUZZY (Yelling again!) side of the fabric. Put a pin of two in each part, just to keep the 2 layers of fabric together while you are sewing the template parts and cutting the other parts out.
Put a couple more pins in the shoulder plate parts and cut them out right along the freezer paper edge. Before you cut!!! Is everything ironed to the FUZZY side of the DOUBLED fabric, right??
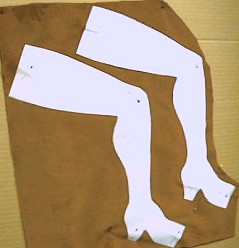
Legs cut away. |
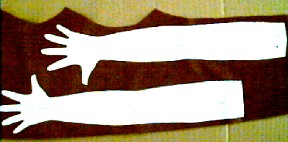
Arms cut away. |
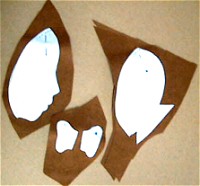
Head and ears cut away. |
"Big Boob" front shoulder plate and back shoulder plate cut away. |
NOTE>>>For any of you who have been in other classes with pictures, you will recognize the different shades in the pictures. In Oregon the weather changes by the minute and the light through the windows does too. It changes the colors when I am taking pictures.
The tan background is the same piece of cardboard, just before and after a cloud went over! A dollmaker I am A photographer I am not! ;-)
***Now about that other shoulder plate piece that doesnt show up on the layout***
Once you have the upper front ironed on and cut out, take the pins out and remove the Freezer Paper. You will have 2 of those pieces, when you need only 1 with the big boob curves. Now, simply take the pattern piece with the small boob curves, and line the neck and shoulder parts up nicely on one of those 2 pieces. Iron it on and cut the small boob curves.
Everything for the upper and under part is the same, except the boob curves, so you might as well save a little cutting time and cut shoulders and neck at the same time, using the large boob part and then just have to cut the small boob part on a single thickness. Pictures follow.
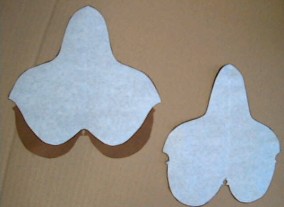
Here is one upper piece with the Freezer Paper still on (right) and the under shoulder plate ironed to the other fabric piece. |
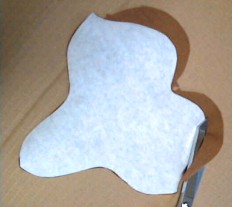
The excess fabric being cut from the piece, so you have an upper and lower front shoulder plate piece. |
NOTE>>>We are going to use this same method of cutting the bigger piece out on doubled fabric and then cutting the smaller piece out from one of those pieces when we do the body/torso.
Now, all of your patterns should be re-traced, cut out and ironed to the doubled fabric. You should have all of the parts pinned here and there, and have the sections cut apart for easier handling.
In the next chapter we will be sewing the arms and legs, cutting them out, stuffing them and of course adding the chenille stems for the fingers and for the rest of the arm if desired.
Now take a rest and have a cuppa, or a snack, (chocolate of course!)
Also, practice that fine sewing and study the following skills lesson, so your Milli will have long, slim, dainty fingers that can be posed very delicately.
So she will have no cellulite, or hollows where they dont belong, and so she will be one of the finest dolls you have ever made.
Dolly Hugs, Judi
Go to... ~ Classroom ~ Pattern ~
Copyright
Notice: All pages and graphics are copyrighted
by the Internet Visions Company and/or instructor.
You may print these out for the use of the class only. All
other uses or distributions are forbidden.
Crafty College and Doll Net are divisions of the Internet Visions Company.
© 1997-2003, Internet Visions Co. All rights reserved.