Ó 2000 Judi Ward -Judis Dolls
Making the arms, finger articulation,
hand posing, easy arm armature if desired.
***Now lets do the arms***
If you havent done so already, from the directions in the first chapters, do # 1 and #2 below. If you have already done #1 and #2 go to #3. Also, the directions in the first chapters tell you to cut the sections apart for easier handling.
If you are actually just getting the patterns ready and onto the fabric, go back to the previous chapters and see how to cut the sections apart. See, I know you guys!
You dont have to do it exactly like pictured of course. Just be sure to keep the "stretch direction" correct.
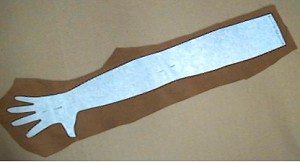
1. Make two arm/ hand templates from freezer paper. Iron the freezer paper templates in place on doubled fabric, using a wool setting on your iron. Be sure to leave space between the parts, so you can cut them out! Again, see the previous chapter.
2. Put a couple of pins through the paper and fabric to keep it together.
3. Sew arm and hand seams. Use a very tiny stitch and sew slowly around the fingers.
...NOTE...Remember the SEW, SEW, LIFT and TURN method for sewing around curves. This is especially important around the fingertips. Dont try to DRAG the fabric around as you sew. You will always end up with jerky little points and squared off places if you do.
Repeat this "sew, sew, lift and turn" method, around each fingertip. Sew a couple of stitches between each finger too. You can get away without doing it with the firm knits, but it makes turning easier. You can not get away without doing the between the fingers stitches with wovens, if you have decided to use woven fabric for Milli. Leave arms open at the top for turning and stuffing.
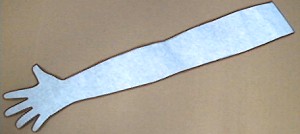
Sew all around,
leaving open at the top .
4. Remove the Freezer paper, and cut the arms out, leaving a very small seam allowance. Slightly less than 1/8th inch for knits, larger for wovens. Dont throw the Freezer Paper pattern away. You can re-use it several times.
5. Clip between the fingers and trim excess fabric from around the fingers.
NOTE*** If you are making your doll from 100% cotton woven fabric, you will need to put some Fray Stop along the seam allowances of the fingers before turning. Use a tiny paintbrush to do this so the Fray Stop only goes on the edges of the seam allowances, not on the stitching. Apply the Fray Stop very sparingly! If often bleeds out onto your doll, if you get a bit too much.
This is one reason I am so partial to the firm knits for my dolls. No Fray preventives needed.
Trim close to seam and clip and trim between fingers.
NOTE***Millis fingers are large enough that they can easily be turned with a hemostat that is small enough to fit inside each finger. My 5" long one fits, with room to spare.
6. Insert your hemostat into one finger, poke a bit of the fabric at the tip of the finger into the slightly open jaws of the hemostat, and then slowly work the finger into the palm. ONLY into the palm! Turn one finger at a time, until they are all in the palm. Finish turning the rest of the hand/arm HALF WAY right side out.
Leave the upper arm folded over the lower arm for now. Makes it easier to insert the chenille stems, and stuff the lower hand and arm.
7. Poke each fingertip out nice and round, using a Phillips screwdriver or the hemostat to help. I usually just use my hemostat.
NOTE*** If you are making a smaller Milli you may need to use another method of turning the fingers. Use your favorite method or There is a needle and thread turning sheet at the end of this chapter.
The needle and thread turning method will let you turn really tiny fingers. It takes a few tries to "get it" but once you do, it is so easy.
Also note. Some very small fingers just wont turn. If the fabric is too thick, (IE ROBE Velour or Felt) or too stiff, IE (crisp, thick cottons or poly cottons) very small fingers often just wont turn at all. If that is the case, you will need to go up a size, or use thinner fabric.
CRAFT Velour and Doesuede/Suedecloth will allow you to turn amazingly small fingers. I have fingers/hands about 1/2 " wide in both, that turn just fine.
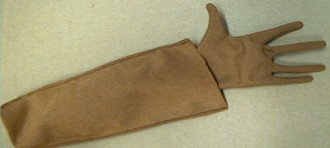
The arms turned
1/2 way right side out.
Note the "krinkles" between the fingers.
8. After all of the fingers are turned, the best way to remove any little "krinkles" between the fingers is to hold as illustrated and gently rub the fabric together, kinda like washing out a stain. Dont pull the fingers away from each other! This rubbing works for both knit and woven fabrics.
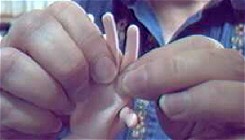
Rub gently in each V. |
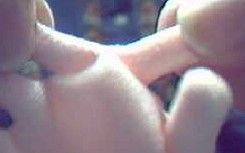
DONT pull the Vs apart. |
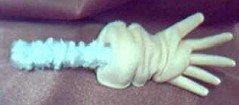
9. To stuff the fingers/arms with the chenille stems, fold 10 stems in half. Roll the arms down even farther, so you can get to the fingers more easily.
Fold a chenille stem (15 mm size for a full sized Milli) in half and then insert the folded end into each finger, using your 12" long, broken upholstery needle/stuffing fork to guide the chenille stems into place. (You can also use a commercially made stuffing fork.)
When the stem is all the way to the end of the finger, grip the finger tightly and pull the stuffing fork out. Repeat for each finger.
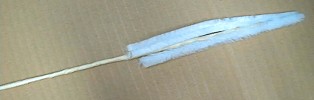
Below is a picture of my 20-year-old stuffing fork, made when I accidentally broke the eye of one of my long needles. I then wrapped the shaft with masking tape, and blunted the sharp point on the sidewalk! This has served me well all these years and I couldnt be without it.
Before I had it, I used a small Phillips screwdriver the same way. It was much harder to use!
I also use it to stuff fingers (and toes) with stuffing. I "twirl" a piece of stuffing in the forked end, while pressing and holding the stuffing fairly tightly between my fingers, making a Q-Tip like piece of stuffing on the needle. This is then guided into the fingers, on the end of the needle.

My "accidental"
stuffing fork.
It is actually 12" long, and not gold. (weird lighting again)
I do treasure like it was gold though!
You may have one from another class or you have ordered one for this class. Wrap it with tape to make it easier to hold. Dont make it real fat though. It is easier to guide down into long arms when it is thin.
If you still dont have one, you can make one by using a hacksaw or strong pliers type cutters, to cut off the top part of the eye from a 12" long upholstery needle.
The fork should be no more than 1/8" long. My fork isnt even. One side is longer than the other. That is just the way it broke many, many years ago.
A stuffing fork with a chenille stem hooked in the
fork,
ready to be guided into a finger.
Be sure to pinch the chenille stem tight against the needle. Dont leave it in a loose loop.
NOTE***For smaller Millis you will use smaller Chenille stems but You will be surprised at how small a finger will hold a 15mm stem. My Abigail has really small hands, and she uses the 15mm size perfectly.
Chenille stem guided
into the pointer finger.
10. After each finger is stuffed with the chenille stems, use your hemostat to bend the sharp tips over a little bit, and then squeeze the long ends of the chenille stems together and wrap thread around them to bundle them together.
This makes it easier to stuff the arms. If you just leave the chenille stems loose, they will bend all about as you stuff.
SPECIAL NOTE**** When you put the chenille stems into the fingers, be sure to keep the proportion of the fingers. The center finger is the longest and needs to be kept that way. You can actually push hard on one of the other fingers, and make it the longest! Makes no difference whether you are using woven or knit fabric either.
You may need to actually pull on the center finger to make it the longest after all of the chenille stems are inserted and before you bundle them.
NOTE>>>Read the Optional Arm Armature before you bundle the first set of 5 stems that are in the fingers. If you decide to do the arm armature, you will bundle all of the stems, fingers and arms together
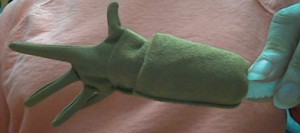
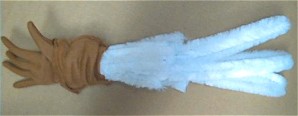
The below pictures are of the stems in just the fingers, first loose, then bundled.
Arm rolled down. Chenille stems inside fingers Before bending the sharp ends over. |
Long ends of stems bundled together and wrapped with thread. |
The above method is if you ARE NOT going to use the arm armature. See below for arm armature.
|
***Optional Arm Armature*** NOTE>>>>Following is an extra step, if you wish to do it. If you have a fear that the arms wont be strong enough, without an armature in them, here is a simple armature to put in. 1. Fold 3 chenille stems in half. 2. Put the sharp ends into the bundle of stems coming out of the arm. 3. Now, wrap thread all around the bunch of stems, all the way up and down to keep the stems all together. The stems wont go all the way to the end of the arm, when it is extended, but it goes far enough.
All of the stems |
Another NOTE>>>The chenille stems in the arms also allow you to bend the arms at the elbows if desired if you dont want your Milli to sit back on her hands.
Now, after you have decided whether or not to add the extensions, and have added them or not, we can stuff the arms.
11. Push a little bit of stuffing into the base of each finger as you stuff the hands very lightly, making sure that you stuff just a thin layer over all of the stems in the palm area and on the backs of the hands.
You can add a little "pad" at the base of the thumb, for more realism, and you will need to put some stuffing up around the thumb too.
Dont stuff the hands all fat and puffy. Form them as you stuff, into a nice inward curve, making a right and a left.
Your flat screwdriver blade will let you "spread" the stuffing out flat across the backs of the hands.
12. Bend the thumb slightly toward the palm, and the pointer and little finger slightly up. There will be little creases where the fingers bend upward, just like real hands
The reason I have you do this right away is so that it dictates your stuffing to make a right and a left hand and arm.
13. Stuff the arms, firmly, "sliding" the stuffing down along the sides of the chenille stem bundle. Dont push rounded bunches down here and there. Work "in the round", sliding the stuffing down one side, then the other, going all the way around. It is easy to stuff all on one side of the chenille stems and have the chenille stems pressing against the "skin" on the other side. You dont want that.
Again, your flat bladed screwdriver will allow you to slide the stuffing down and also to flatten a spot that has a bump.
The hand and wrist areas will not be as hard as a rock. They will in fact be fairly soft compared to how hard the rest of the doll needs to be stuffed. The wrist area needs to be stuffed so it is flat, not round. Look at your own wrist and forearm. You will see that it is flatter from top to bottom, and rounds out as it goes up the arm. The wrist needs to be flexible so the hands can be posed in a bent back position.
 A nicely stuffed hand. |
 natural crease at the wrist and at the base of the finger. |
I always bend the wrist back as soon as I start to stuff up the forearm, then I stuff down to the bend, all around. This assures that the wrist doesnt get too hard to bend later.
Of course, as you are stuffing the forearm, you will need to pull the upper arm back up so you can see how your stuffing is coming along, and keep pulling it up as you stuff farther up the arm.
14. Before you get too far up the arm, you may want to guide a 1/4" pom-pom or little "pea sized" lump of stuffing down in the wrist for a wrist bone. This is the only time you get to wad the stuffing up!
15. Once you get past the chenille stem bundle, start to put the stuffing down in layers. Large pieces at a time, and push and twist with your fingers and/or screwdriver to pack the layers down very firmly, all the while, holding the whole arm like a banana, til you cant hold around it anymore because you are too close the top.
When you get about 3"-4" from the top, you will have to hold the edge to get the stuffing in. Just dont hold right on a seam. The upper arm is stuffed harder the farther it goes up towards the opening.
16. Stuff to within about 1 1/2" of the top of the arm. That 1 1/2" will be up under the shoulder plate. When we start to put Milli together, and attach the arms and shoulder plate, you may need to add or subtract a little stuffing there.
17. When the hands and arms are stuffed and shaped to your satisfaction, pose the fingers more and bend the wrists back more. When you bend the wrists back, it helps to press your fingernail in the "crease" so the wrist creases like a real hand. Bend your own wrist back to see the crease.
When you are my age it is "creases". But for Milli try for one crease. She is a lot younger! You can also press the side of your big jointing needle across the wrist where you want the crease. Bending the wrist back against the side of the needle or your fingernail helps to make a sharp crease.
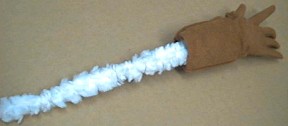
As a last "finessing"
for the arm, you can slightly squeeze it here and there to shape it
more. Dont rub it or squeeze a lot, that "worries" the skin
and makes it look old. Also, be sure your hands are very clean before
pressing or squeezing.
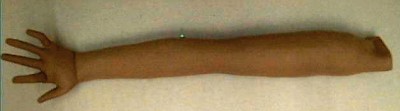
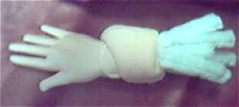
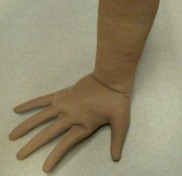
A nicely shaped arm.
The hand is tipped back at the wrist.
The pointer finger looks short in this picture, but it is just lifted
and bent.
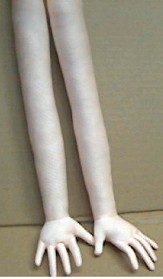
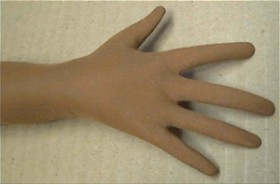
A nice pair of arms.
It's fun to play with the fingers to achieve natural looking hands.
Now lets put the palm creases in with colored pencil (or gel pens) and paint the fingernails.
18. Look at your hand to see where the palm creases go. I also put in wrist creases. I use a colored pencil a few shades darker than the "skin".
NOTE>>>>The new Gel Pens also work great for this. They dont bleed on knits, and come in many colors. Choose a shade that is slightly darker than your dolls "skin". You can go towards the tans and browns for dark skin, and tans or peaches for light skin. Ditto for colored pencils.
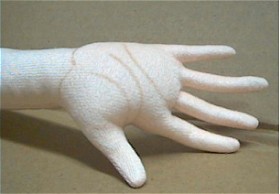 Palm lines in tan colored pencil. |
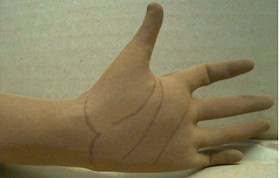 Palm lines in brown Gel Pen. |
You should have arms and legs sewn, turned, and stuffed. You should have the shoulder plate and head pieces ironed to the fabric, and have the lower "boob" piece cut out separately from the upper "boob" piece.
In the next chapter we will draw on the shoes, paint them with the basic coats of paint and make the clay shoe tabs if desired. We wont fully decorate the shoes until chapter 9, because the decorations are easy to knock off while messing with all of the other things we will be doing.
To whet your "shoe appetite" though, there is a Bonus, Shoe Project at the end of this chapter. A lot of it will be up to you and your imagination, but the basics are there for a fun project!
We will make the long elegant fingernails in chapter 3 too.
Dolly Hugs, Judi
Go to... ~ Classroom ~ Pattern ~
Copyright
Notice: All pages and graphics are copyrighted
by the Internet Visions Company and/or instructor.
You may print these out for the use of the class only. All
other uses or distributions are forbidden.
Crafty College and Doll Net are divisions of the Internet Visions Company.
© 1997-2003, Internet Visions Co. All rights reserved.