Lesson 1 - Hat Analysis 101
To "put on a thinking cap" means to give a problem or situation careful thought. The phrase refers back to the Middle Ages when teachers and philosophers wore distinctive hats. We will begin this hat making process by examining the basic parts of a hat and how they are put together. The ability to look at a hat and determine how it is constructed is the first step towards creating almost any hat you desire. Next we will take a look at the basic supplies and equipment we'll be using in our projects before learning some unique measuring techniques. Keep an inspiration notebook of hat ideas that includes photographs, pictures of hat designs and trim ideas, and sketches. Include in this notebook pictures of any hats you make. Be sure to include front and back views. Consider a top view also if the hat is especially elaborate.
No matter what a hat is made of or how a hat is constructed, hats can be broken down to two basic elements:
1. the crown is the portion of the hat that covers the head
2. the brim (if there is one) is the part of the hat that extends out from the crown
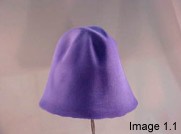
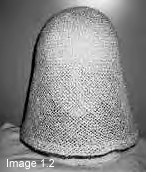
One-piece crowns can be made by stretching felt over a mold and steaming it into shape, or by spiraling straw braid and stitching it together.
Throughout the centuries felt and straw have been the most commonly used materials in hat making.
|
|
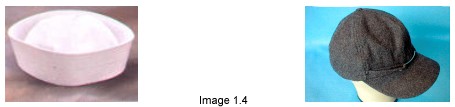
Two-piece crowns can be made by attaching a sideband to a tip, which is what milliners call the top of a hat. The tip can be the same size as the opening (pillbox), smaller than the opening like a fez or larger than the opening like tams or berets. The style of the hat will also be influenced by the height of the sideband.

Another way to form a crown is to sew a number of identical wedge shape sections together like a sailor's hat or a baseball cap.
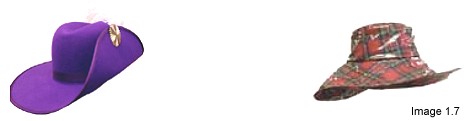
A brim might be narrow like a bowler or a top hat,
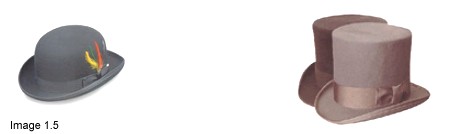
or wide like a picture hat or sombrero.
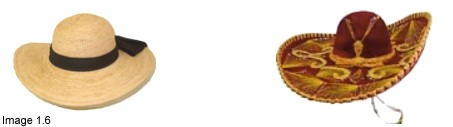
Brims can also be angled up or down, be the same width all the way around or asymmetrical, stiffened and shaped with wire or soft and floppy.
We are going to show you a variety of methods to construct crowns and brims and several different ways to attach them to each other. We are confident that you will be amazed at how easy it is to make the pieces you need to fit each individual doll. Whether you are reproducing a human hat or creating something wonderfully unique for your doll, every hat you design will be a matter of mixing and matching the basic elements - crown and brim.
For each hat you make, you will need to answer the following questions:
Crown
1. How many pieces?
a. One?
b. Sections / how many?
c. Two pieces / side band and tip2. Is the tip
a. the same size?
b. larger than?
c. smaller than the hat opening?3. How high is the sideband?
4. Will the crown fit close to the head or poof out?
Brim
1. Full brim or visor (projecting front piece of a cap for eye protection)?
2. Narrow or wide?
3. Straight out or angled up or down?
4. Consistent width or asymmetrical?
5. Stiffened and shaped with wire or soft and floppy?
Once these basic elements are determined, the materials, manner of construction and decoration will be considered.
Basic Millinery Equipment
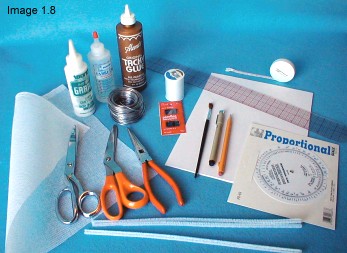
The following list is an overview of the basic equipment and tools used in the hat making process. You are likely to find most of the items around your house and in your general sewing supplies. Special supplies (such as pleaters) will be addressed under individual projects. It is not necessary to assemble everything on the list. You can determine what you'll need later according to the projects you choose to make.
Brushes - An assortment of brushes will come in handy including the following:
-
Glue Brushes - Small, used paintbrushes to use with white glue to apply trims and glue small areas.
-
Paintbrushes - Good quality paintbrushes used for decorative painting on hats.
Buckram - Stiff, heavily sized cotton fabric which is used to form the interlining or foundation for fabric covered hats. It is most commonly found in white and can be purchased at regular fabric stores. A heavier grade of buckram, which resembles needlepoint canvas, can be found in black at better fabric stores.
Clamps/Clips - Use paper clips, clothespins, bulldog clamps, alligator clamps and/or hemostats for holding glue pieces and trims in place until dry.
Cutting Tools - A variety of tools will be used including the following:
-
Scissors - You will need several pairs.
-
Dressmaking Sheers - A good pair of fabric scissors 7-8" long. Keep them sharp and use only for fabric.
-
Paper Scissors - These are a cheap pair of scissors which will cut paper, straw and buckram.
-
-
Wire cutters/Needle-Nosed Pliers - Needle-nosed pliers with a wire cutter in the center is the best combination.
-
Aleene's Jewel-It glue (attaches jewels firmly to fabric)
-
Aleene's Tacky and Designer Tacky glue
-
Elmer's white glue
-
Instant Grrrip by Bond (lies on surface of fabric - little bleeding)
-
Velverette glue (won't bleed through fabric -- great for miniatures)
-
Fabri-Tac or Magna-Tac (great for trims - short shelf life - strong fumes - used to attach trims to bridal gowns and headpieces - can be dry-cleaned)
-
Leather Weld or Aleene's Leather and Suede (use for leather and ultrasuede)
-
Sobo Glue
A Few Words About Using Glue
Most hats are sewn by hand or machine. However, once in a while a little glue helps. Mary Ann likes to hand sew everything because she feels she has a serious gluing impairment (she gets it all over everything!) Bonnie loves to use glue and never seems to have a problem. Here is our compromise.
1. Gluing can speed up hat production, but caution must be employed. Improper techniques can lead to glue bleed-through onto fabrics, which ruins the hat. Hot glue can cause unsightly lumps and leave strings on delicate fabrics. WE NEVER RECOMMEND USING HOT GLUE WHEN MAKING HATS! If you glue anything, it is almost impossible to undo, and can ruin the hat if improperly placed. Now that we have thoroughly frightened you, here is how to use glue successfully when making tiny doll hats.
2. Use white glue (Elmer's, Sobo or GRRRIP), or Fabri-Tac (not water soluble.) The white glues are water cleanup, and spread very easily. If using an old paintbrush to apply the glue, keep the brushes in a water container when not in use.
3. Too much glue will seep through fabric, so a little goes a long ways. GRRRIP and Fabri-Tac stick almost instantly. They act like a friendly hot glue without the heat. If you want a heavy glue, we recommend Aleene's Designer Tacky or Velverette. All of these glues will bleed through if too much is used.
4. To apply white glue (Elmer's or Sobo), place tiny beads of glue along both edges to be joined. Use a hat pin, toothpick or old paintbrush to gently smooth out the tiny drops into a thin line. Let glue set, which usually takes about 1 minute. Then place both sides together and press gently to adhere. This is known as the "contact method" of gluing. If your white glue becomes thick, you can thin with a little water before using.
HINT: Try storing toothpicks in an empty tall spice jar. When you need a toothpick, just remove the lid and shake one out of the jar. This is especially convenient when travelling to a class.
5. If using GRRRIP or Fabri-Tac, only apply to one surface using the Technique in #4 and glue immediately. They set up in less than a minute, and are fantastic for adding heavy trims and jewels. Designer Tacky and Velverette also hold almost immediately. They dry flexible and are wonderful for gluing areas that need to flex, such as a hatband or sweatband.
6. Be aware that it is almost impossible to sew through glued areas, so use glue after all the sewing is done.
7. If you are using thin fabric such as batiste, where the glue might bleed through, sometimes you can apply a very thin layer to the area first using the technique in #4, let dry, and then add more glue on top of the dried glue. Be sure to try this method on a scrap piece first before using on the finished hat.
8. If you need to glue ultra suede or leather, Leather Weld from Tandy Leather or other leather glues are best.
9. When you are finished with your glue, wipe the tip of the bottle or the mouth of the jar. You can apply a little petroleum jelly or cover the mouth of the jar with plastic wrap before putting the cap on so that your container will open easily the next time you use it.
Hat Stands
- Useful for storing
hats so they don't get squashed or dented. At the end of COURSE 3
we will show you how to make one with a clothespin, styrofoam egg and
nylon stocking.
Interlinings - We will be using
a variety of materials to add extra shape and form to our hats such
as:
- Flannel - Great for mulling buckram when using thin fabrics.
- Fleece - Regular or fusible.
- Iron-On Interfacing - Not recommended for human hats, but fine for doll hats.
- Thin Quilt Batting - About 1/4" thick, you can split a thicker batt if necessary.
June Tailor Cut 'n Press Board - creates perfect lap desk for drawing and cutting out small hat pieces. Available through Nancy's Notions in 2 sizes (http://www.nancysnotions.com).
Marking Tools - We have used the followed implements for transferring marks:
- Fine Line Permanent Markers - Markers such as Micron Pigma Pens are essential for marking pattern pieces, buckram, etc.
- Pencils - Black lead pencils (mechanical pencils are great) can also be used for drawing on foundation materials such as buckram. If using light fabrics, be careful to cut away marks so they don't show.
- Tailors Chalk - This chalk comes in thin flat squares in many colors and brushes off after use. There are also chalk pencils available at most fabric stores. NEVER use wax markers as they can stain fabrics if they are ironed or steamed.
- Water and Air Soluble Markers - There are new markers available which have a special eraser on one end. They come in white (perfect for dark fabrics) and blue. Test on a small piece of fabric before using. DO NOT iron over the marks before removing - they will turn brown and become permanent.
Measuring Tools - You will need the following tools for successful hat making:
- Adjustable Hem Gauge - A small metal ruler with a sliding tab used in marking seam allowances.
- Compass - Used for drawing circles.
- Dream Seamer - This handy little gizmo let's you add a perfect 1/4" seam allowance to any shape template. http://dollmakersjourney.com/supplies.html
- French Curves - Helpful for smoothing out curves when you create patterns.
- Pipe Cleaners - Essential for transferring the shape of a doll's head to paper.
- Proportional Scale - A circular slide rule used to enlarge, reduce and compare sizes. Its uses will be discussed later in this chapter. They can be ordered through our company, Dollmaker's Journey, for a nominal fee. http://dollmakersjourney.com/supplies.html
- Ruler - A small clear 1/4" gridded ruler is essential for creating pattern pieces. Some come with holes every half-inch which enable you to use it as a compass. There are also attachments you can buy at art supply stores to turn it into a large compass. Heavy plastic see-through rotary cutting rulers are wonderful for measuring bias strips and adding seam allowances to straight edges.
- Tape Measure - This should be 60" long, with metal tabs on each end. A plastic tape measure is best as the fabric ones stretch out over time. It is very helpful if it is marked in both inches and centimeters.
Needles - It helps to have a variety of needles when working with different materials.
- Beading Needles - Extremely fine and long, hard to thread, useful for beading and slip stitching fine rolled hems.
- Curved Needles - These are helpful in sewing curved seams, attaching trim and attaching crowns to brims.
- Embroidery or Darning Needles - These have large eyes and are easier to thread.
- Leather Needles - These triangular shaped needles cut through leather and ultra suede. They are essential when hand sewing. Tandy Leather sells them. You can also buy leather needles for your sewing machine at most fabric stores.
- Sharps - For basic hand sewing.
- Tapestry/Yarn Needles - Their blunt tip and large eye make them ideal for threading cording, elastic or narrow ribbon through casings and insertion lace.
Paper for Patterns and More - Here is a list of products we recommend:
- Brown Paper Bags - will come in handy when designing brims.
- Freezer Paper - Plastic coated paper that can be used to create templates and then be ironed onto just about any fabric. This makes it easy to cut out patterns. You can also sew around the edge of templates to create perfect shapes. Then cut out 1/4"from stitching line for perfect seams.
- Gridded Pellon - Useful for creating patterns, covering work table, and draping to create mock ups. Paper towels can also be used.
- Paper Towels - also useful for creating patterns
- Plastic Template Sheets - Cut your final hat patterns out of heavy plastic, punch a hole in each piece and keep together with safety pins. Be sure to mark information on each piece with permanent marker.
- Scrap/Typing Paper - Make sure you have a ready supply handy as we will be using stacks of it!
Pins - Several different kinds are needed.
- Quilting Pins - Long pins with plastic heads useful for pinning on trims - won't get lost in lots of ruffles. Also good for pinning hats to styrofoam blocks.
- Safety Pins - You need an assortment of sizes. Great for keeping pattern templates together. Large ones are used to attach molded hats to electric fans (see COURSE 3.)
- Straight Pins - Steel dressmaker's silk pins won't rust and are very fine - great for pinning silk.
Pincushion with Emery Strawberry Attached - Store your needles and pins here. The strawberry shaped bag is filled with emery powder. Use it to remove rust from needles and sharpen the point by running a needle through it several times.
Plastic Shoeboxes - These are great for keeping small trims, laces, feathers and scraps of fabric. Label each box. If they are clear it helps to see what is inside. Bonnie likes to put individual trims and laces into snack size zip lock bags so they don't get tangled. Be sure to let out all the air before sealing. These boxes also stack nicely and take up little room.
Pressing Tools -
- Iron - A good steam iron is a must. For small doll hats you can also use a puff iron, available through Nancy's Notions. It was designed for heirloom sewing and is perfect for hats. It enables you to iron in small areas a normal iron can't reach.
- Ironing Board - A well-padded ironing board with a removable cover is essential. You can then wash the cover periodically to keep it clean. You can also use a padded portable ironing board, shaped like a square, which was originally designed for quilters. It is helpful to place a piece of aluminum foil underneath the cloth cover to reflect the heat and steam back through the material being ironed.
- Needle Board - This is a specialty item sold through Nancy's Notions (http://www.nancysnotions.com) and other dressmaking catalogs. It is useful for ironing pile fabrics such as velvet so the pile won't flatten. In a pinch you can also use another piece of velvet or thick terry towel. Place pile fabrics right sides together and iron from the wrong side only.
- Pressing Cloth - A 12" square of soft cloth (cotton or old diaper) used for dampening or steam pressing. When pressing straw use silk or taffeta, since cotton can leave fibers on the straw. NEVER use rayon or synthetics as pressing cloths. If making a dark hat, use a dark pressing cloth.
- Pressing Pad - This is used when you can't lay a hat flat on the ironing board. You can insert this into a hat and it protects your hand from heat and steam. Make it by folding a prewashed square of fabric (100% cotton muslin works well) 36"x36" into a 4-1/2" x 4-1/2"square. Whip stitch the edges together.
- Pressing Roll - This is the same as the pressing pad, but used in even smaller areas. Fold a prewashed square of muslin 36" x 36" into a piece 9" x 36". Roll up and whip stitch the edges together. Your finished roll will be 9" long.
Salad Bar Boxes - Perfect boxes for storing finished hats.
Seam Ripper - Necessary for un-picking seams.
Sewing Machine - It is helpful to have a beading foot or foot with a narrow channel underneath for zigzagging over wire. You also need a zipper foot for sewing piping. An open toe embroidery foot is helpful when you are using freezer paper templates. The edgestitch foot makes sewing along the edge of hatbands a breeze.
Tape - Cellophane and masking tape are useful for pattern making.
Thimble - A metal or leather thimble is useful when sewing wire onto buckram or working with leather. In a pinch a Band-Aid will do.
Tweezers - Helpful for applying trims.
Wire - A variety of wires will be used for the different hats:
- 18-20 Gauge Galvanized Steel - Found in rolls at the hardware store.
- Floral Wire #21 - Cloth covered - used for lightweight brims.
- Pipe Cleaners or Chenille Stems - Found in craft departments.
- 16 Gauge Aluminum Sculptor's Wire - Found in art supply stores and catalogs.
- Telephone Wire - Buy telephone cord at an office supply store. Remove outer plastic casing, and you will find six plastic coated copper wires inside that are great for lightweight hats and wings.