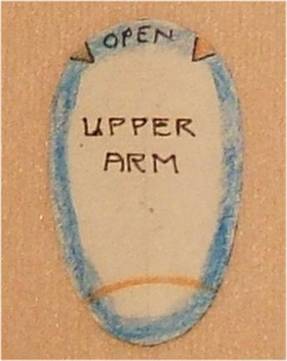
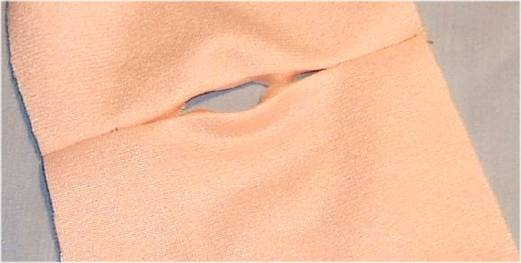
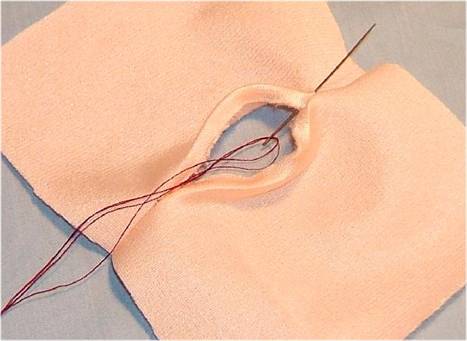
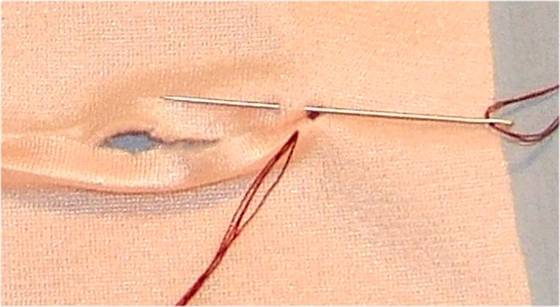
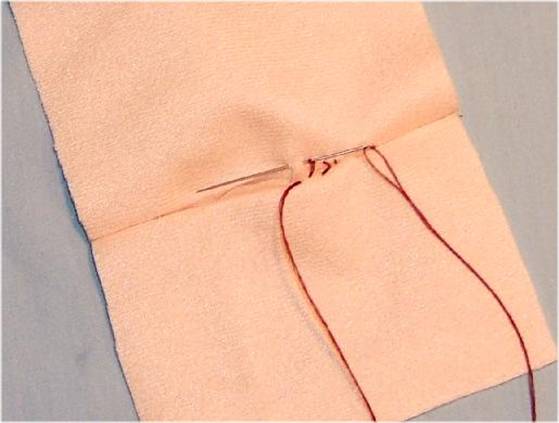
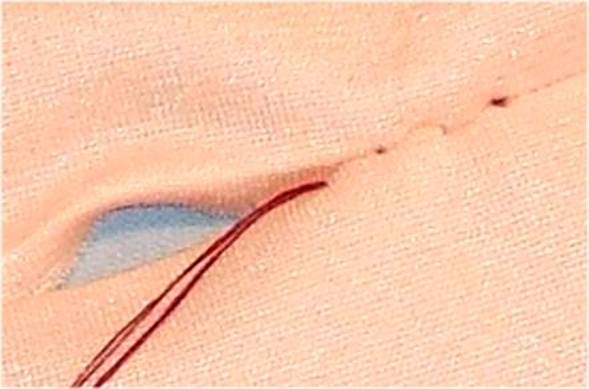
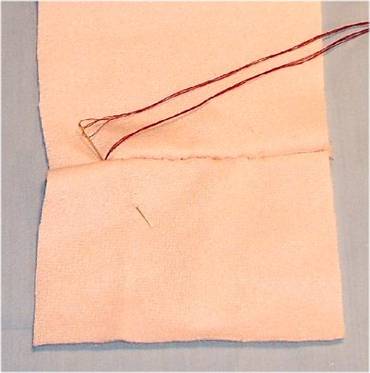
Bleuette in Cloth! Chapter 1 First let me show you a little trick for those who have a hard time seeing the white Freezer Paper against the light peach fabrics. Simply color around the retraced pieces with a colored pencil before you cut all of your pattern pieces out! DON'T use a lead pencil for this! Lead pencil marks rub off, smear and get on your fabric. Colored pencils don't. See the picture below that I colored around in blue colored pencil. A dark pink might have been a better choice, but you get the idea. Next, I want to show some REALLY BIG pictures of what the "ever famous" and "ever elusive" LADDER STITCH looks like. You really need to conquer the execution of the ladder stitch for closing the openings in your dolls. The ladder stitch will close both a straight opening and a curved one. It is very easy to do, though there are those who have just not conquered it, or even tried it. I always use a quadruple thread for doing it. The stitches don't show at all, but the 4 strands of thread make a stronger closing, and I also don't break the thread while pulling the stitches tight. Here is how to do it . Pull off 2 strands of thread, about 30" long. Thread 2 ends through your sewing needle. Pull the thread half way and tie the 4 ends together with a nice firm knot. Now, insert your needle under the end of the seam that is to be closed, right in the seam allowance. Bring the needle out on the right side, and then take a small stitch along the seam allowance, entering and exiting on the right side. Remember "along the seam allowance", not perpendicular to it. The KEY to making a ladder stitch is that every stitch Enters and Exits on the right side of the fabric, right along the seam allowance. Now, bring your needle across to the other side and take a small stitch, right along the seam allowance , Entering and Exiting on the right side. ( NEVER, NEVER, does your needle enter the fabric from the underside after the stitch with the knot.) It always enters and exits on the right side. There will be a length of thread across the opening. Don't pull it real tight yet. Simply repeat this, going back and forth across the opening about 4 times, and then pull the little "Ladder Stitches" tight, helping the seam edge to the inside with your finger if needed. Continue this way to the other end of the opening, then stitch in place right in the seam and lose the ends. NOTE As you close with a ladder stitch on a doll part, you add a bit of stuffing to make sure the area is filled up. I often add a cotton ball at the tops of legs and arms, as cotton balls don't puff out of the opening, like polyester stuffing does. Once you do the ladder stitch a few times, you will do it like a pro, without even thinking. Honest! Never again will you have openings with the thread showing and looking messy. No overcast stitches ever again! Following are some pictures using light fabric and dark thread. I hope this helps any who are having trouble with the ladder stitch. Please note that the pictures are really BIG. Much bigger than any opening you will have to close in this doll. Things show that would not show on a doll opening. If you know how to do the ladder stitch, please just pass over this HUGE tutorial!
I hope this helps. I did it big and with dark thread. With the correct color thread, the ladder stitch will be nearly invisible. It is also more invisible when done on a stuffed item because the stuffing stretches the opening tighter and makes it smooth. |
||
| Go to... ~ Classroom ~ | ||

Copyright Notice: All pages and graphics are copyrighted by the Internet Visions Company and/or instructor.
You may print these out for the use of the class only. All other uses or distributions are forbidden.
Crafty College and Doll Net are divisions of the Internet Visions Company.
© 1997-2006, Internet Visions Co. All rights reserved.
All trademarks are owned by Internet Visions Company.