Bleuette in Cloth! Chapter 2 Time to retrace your pattern pieces to FREEZER PAPER . Freezer Paper is available in the canning sections of grocery stores, at Wal Mart and in many quilt shops. It is made by Reynolds, and over the past couple of years it has become so popular in the doll making world that I think most everyone has it by now. 1) Carefully retrace all of the pattern pieces to the Freezer Paper, using a fine line permanent marker. Put the part labels and all markings on the pieces too, and note that some parts have seam allowances added and others don't. Those pattern pieces without seam allowances added are TEMPLATES, and are ironed to your doubled fabric and sewn around before cutting the fabric parts out. Those parts with the seam allowances added are still ironed to your fabric, but they are cut out before sewing. 2) Cut the Freezer Paper pattern pieces out, cutting the lines you drew off, ESPECIALLY AT THE FINGERS! Cutting outside of the lines you drew makes the pattern slightly bigger, and at the fingers, cutting outside of the lines will make it so the fingers are too close together, so they can't be clipped between, trimmed and turned easily.
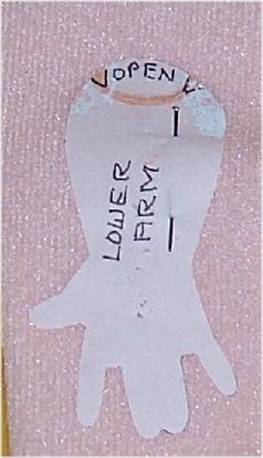
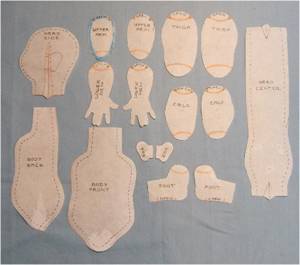
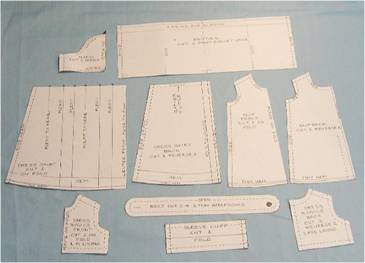
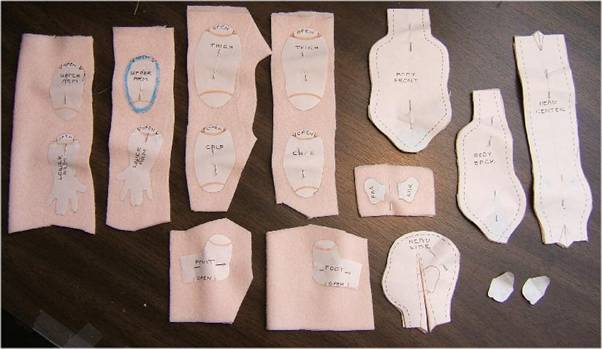
You will be sewing right along the freezer paper edge, hence "outside of the pattern" so it is really imperative that those lines are cut off! Above is a picture of the lower arm and hand pattern with the fingers cut correctly .notice how much room there is between the fingers! It is actually squared off. The picture is actual size on my computer. I sure hope it is on your computer too .BUT .the bottom line is, make sure that you have plenty of room between those fingers! A bit of "HISTORY" about fingers from way back in the "olden days", the 1970s My very first pattern offerings had separate fingers, and for years I could not figure out why some had so much trouble with fingers, even big ones. It wasn't until I really watched dollmakers during classes that I realized that most didn't automatically cut those lines off! I always did, and just "assumed" everyone else did too. Another thing I noticed which makes it really hard to turn fingers, is that some patterns have fingers that are fatter at the ends, than at the base. This is OK for a big hand, but if you do that in a small hand, those fingers will not turn! O.K ..Start Your Scissors, and, cut those lines off! Below are the parts for the doll cut out of the Freezer Paper and the parts for the clothes cut out of the Freezer Paper. These doll pattern pieces are the pattern pieces I have been using since last summer 2005. Don't pay any attention to the white-out and marks here and there! These are my well used patterns! BONUS!!!! As you can see, the Freezer Paper patterns can be used over and over again, as long as you don't sew through them!
3) Put the clothes patterns away in a plastic bag or something to use later or You can dress your Cloth Bleuette in the clothes patterns available from the magazines and other various sources. I have used several of those patterns from magazines and they are fun but the directions are pretty basic and leave a lot to the imagination. 4) Get your doll fabric out and fold it in half, FUZZY SIDE OUT!!!! You will iron your pattern pieces onto the fuzzy side , and you will sew on the fuzzy side . Check for the most stretch. The pattern pieces will go on the fabric with the most stretch up and down the length of the doll. ( NOTE As mentioned before, if you are a brave soul, and are using woven cotton, place the most give across the pattern pieces.) 5) Place the freezer paper pattern pieces on the fabric, with the parts at least ½" apart. The body front, and head center need only one piece each, so can be placed on a single layer of fabric (.I don't though, I just place it all on doubled fabric and iron it all on, then I have an extra body front and head center.) Who knows, someday I might need em'! Use the wool setting on your iron to iron the pieces to the fabric.
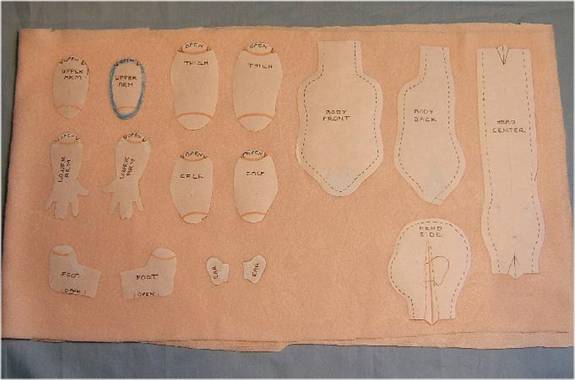
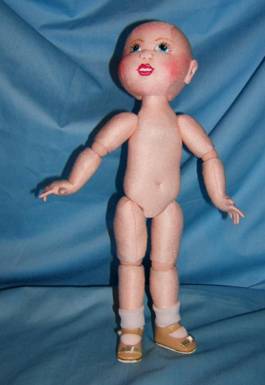
6) Now, put a straight pin into each part, 2 in the bigger parts, to help the pieces stay attached while you cut them out. BIG NOTE The head center, head side and body front and back are cut out now, right along the paper. Those parts have seam allowances on them .The rest of the parts are templates, and are simply cut apart, leaving fabric all around the edges. The following picture shows this clearly. NOTE notice the pins in the pieces. They are not around the edges. See the body and head pieces cut out right along the paper. Notice the other parts are cut apart to make them easier to handle while sewing. I find with this small doll, that I can leave some of the leg and foot parts and all of the arm and hand parts together. Notice the little ears, and notice that the TOE TEMPLATES are not ironed on to anything yet. The toe templates are used after the feet are sewn. A picture to keep you spurred on. Such a cutie even without hair. |
||
| Go to... ~ Classroom ~ | ||
Copyright Notice: All pages and graphics are copyrighted by the Internet Visions Company and/or instructor.
You may print these out for the use of the class only. All other uses or distributions are forbidden.
Crafty College and Doll Net are divisions of the Internet Visions Company.
© 1997-2006, Internet Visions Co. All rights reserved.
All trademarks are owned by Internet Visions Company.