Bleuette in Cloth! Chapter 7 I am importing the Invisible Jointing Directions from the Whatever! Whatever! class, as they are very good and most students in that class have "gotten" it. There is no sense in my rewriting the whole procedure. If you have taken the Whatever! Whatever! class or the Cloth dollmaking For Everyone class you have these jointing directions already and can save some ink by not printing them again. Do read them though, because there are a few differences for Bleuette REMEMBER!!! The pictures are of Whatever! but the technique is the same. We, (hubby and I) also did a short video of the jointing procedure. I know some will not be able to access the video, but you should be able to do the jointing from the written directions. Whatever! Whatever!
Anything smaller than that doesn't really need a button inside. You can joint it by just going through the fabric and catching some stuffing in the stitch for added strength. I am going to demonstrate the jointing method, as if you all have a jointing needle with only one point. If you have my double pointed jointing needle it makes one step a little faster, and I will demo that step for those who have the double pointed needles. Do this a step at a time, and you will have no trouble. Eat your Wheaties again! It does take some pulling strength, but it doesn't require an added hand. It does require some coordination but You can do this by yourself! For Bleuette it is easier too, because she is so small. You will also be using fewer cords for her because she is small. A single strand of my jointing cord, doubled through the body, or a double strand of dental floss, quadrupled through the body. When you go through this, it will seem like a TON!! of directions. That is only because I have broken it into tiny steps. Many of which I could have gotten away with just some words, but for those who work better with pictures, all the pictures should help. I you break it down into what is actually happening it is
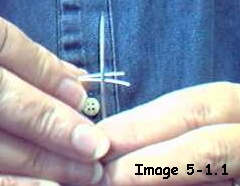
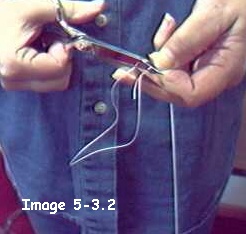
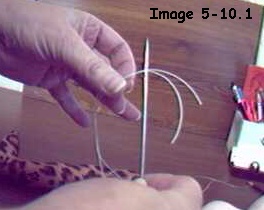
Once you do this a few times it will be second nature, and you can joint any doll invisibly. I am going to write 2 "worded" directions and then show 2 pictures. I am writing the directions as if you have my jointing cord, which is a "hand stitching twine" used in the upholstery and shoe repair industry. I also found this cord at a bead shop, so people are using it for jewelry making. If you have a bead shop nearby, perhaps they carry it. REMEMBER! for Bleuette you will be starting with one cord, not 2. I still use the long length, because it makes it easier to pull and tie. 1. Pull off 2 yards of cord and put the two ends through the eye of the needle. 2. Pull cords ONLY about 4" past the eye. DO NOT PULL CORDS 1/2 way through!
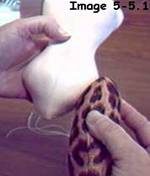
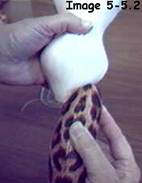
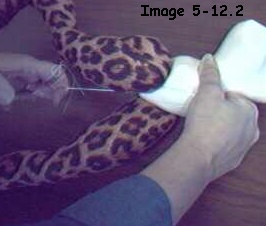
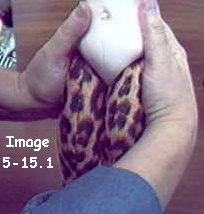
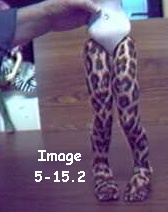
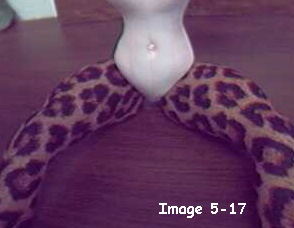
3. Put needle through shank of button in left leg. NOTE***If you are left handed, put needle through shank of button in right leg. 4. Pull cords so 1/2 are on either side of shank. OOPS! Sun came out, lighting changed! I do need a photo box! I am going to demonstrate on my "leopard" legs. The contrast will help things show up better. Aren't they Kewl?!
5. Tie the cords to the shank on that leg. 6. Trim all the ends even. If you are using my cord, you will have 4 ends now. If you are using lighter weight nylon cord, like dental floss you will have at least 8 ends. Even 16! Sun went behind a cloud!
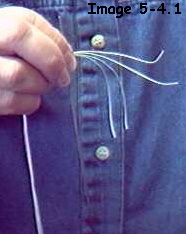
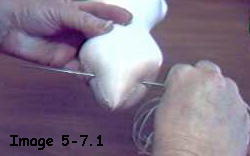
7. You should have 4 ends, all trimmed evenly. (or 8 or 16) 8. Put all 4 ends through the eye of jointing needle. Again, pull only about 4" from the eye.
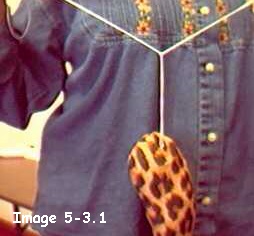
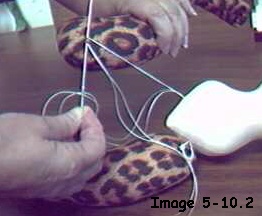
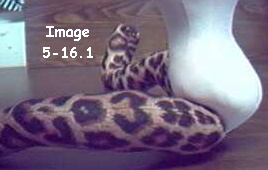
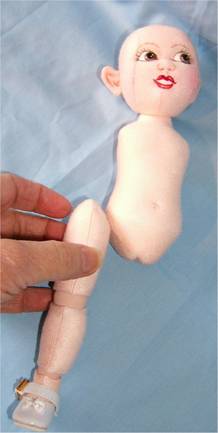
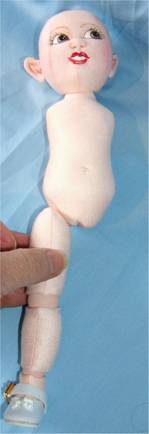
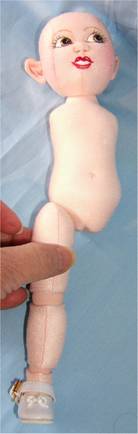
NOW FOR PLACEMENT I am going to show two NO! pictures, and a correct placement picture. FOR BLEUETTE, JUST PUT THE NEEDLE IN RIGHT AT THE SEAM. NOT THROUGH IT OR YOU MAY BREAK THE SEAM. THE FRONT TO BACK ALIGNMENT DOES NOT COME INTO PLAY FOR BLEUETTE. THE TOO HIGH AND TOO LOW PART DOES COME INTO PLAY THOUGH. The front to back placement also comes into play for Whatever! Whatever! because you make her more, or less, pigeon toed and knock kneed by that placement. If you put the needle through the body, right on the seam, she will be very pigeon toed and knock-kneed. If you put the needle through about 1/2" back from the seam, she will still be pigeon toed and knock kneed, but not so much so. (As long as the buttons are placed towards the front) The 1/2" back jointing will also make a tighter joint, because there is more "body" to press against.
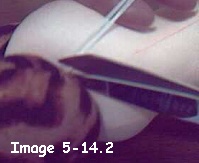
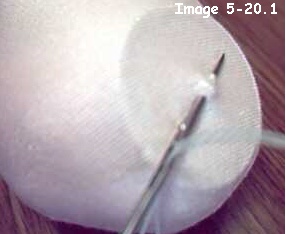
9. Peek under the leg, and see where the "shank" touches the body. That is where the needle will go in. I am doing this one right on the seam. It is about 1 1/2" from the center of the crotch too. This will vary with EVERY doll. You will have to put the legs up to the body to see where the shank touches for each doll. I will picture the results for one jointed farther back later. The PROCESS is the same for all. 10. Put the needle through the body from side to side, entering where the shank touched the body and exiting at the same height on the other side. You will probably have to twist the needle back and forth as you push to get it through. DON'T try to jam it through like a battering ram! It will be VERY hard to do, as it will push a blob of stuffing ahead of the needle and you will never get the needle through. 11. Now, pull the needle out the other side, again, twisting back and forth as you pull. It will seem like it is taking forever, but I timed some in a class, and none took more than a minute. Most took 15 to 30 seconds. BLEUETTE SHOULD TAKE WAY LESS THAN 30 SECONDS, BECAUSE SHE IS SO SMALL.
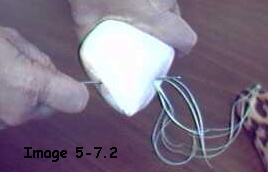
12. Now, divide the cords in half. (2 or 4 or 6 or 8) 13. Put 1/2 of the cords through the eye of your needle. Only pull about 4" past the eye.
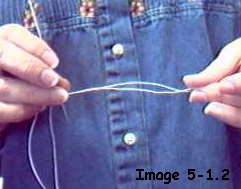
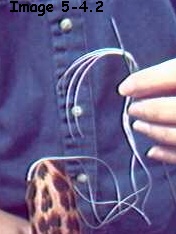
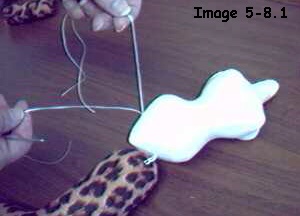
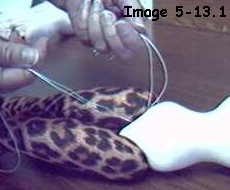
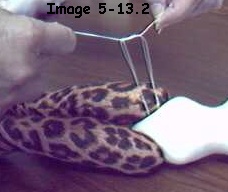
14. Put the needle, with the cord on it, through the shank of the button in the other leg from right to left if you are right handed. Left to right if you are left handed. NOTE***Depending on which way the shank is facing under the fabric, right to left, and left to right, could be top to bottom, bottom to top etc. it makes no difference in the finished joint. The idea is to make the cords OPPOSING. 15. Notice the cords coming from the body and through the shank in the leg. The other half of the cords are still on the table.
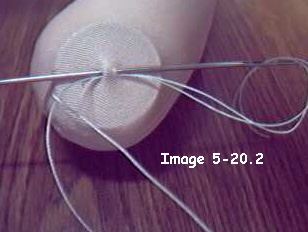
16. Now, thread the other half of the cords through the eye of the needle. Pull ONLY about 4" past the eye! The reason I keep saying that is because from teaching this so many times, I know there is a tendency to want to pull that limb up to the body RIGHT NOW! If you do that the cords get stuck in the body, or part way through the shank, and you can't get the needle off easily. 17. Now, put the needle through the shank of the button from the left to the right. (If you are left handed, from right to left.) In the picture the first 2 cords are laying over the leg. The other end of those cords is the straight line from the body to the shank. You don't need to pull it out straight. I just did it for the picture.
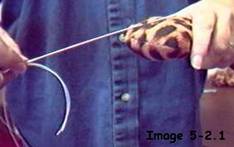
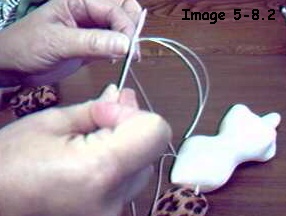
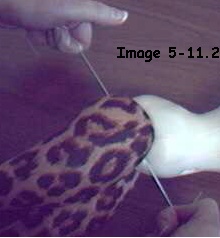
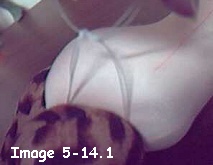
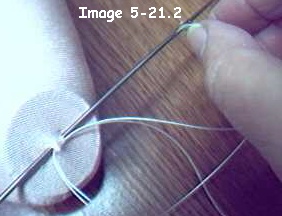
18. Grip the cords coming from the shank in the leg, and actually wrap them around your hands. Notice they come from OPPOSITE sides of the shank. I didn't picture them wrapped around my hands, but they really need to be, to get the grip for pulling. 19. Now, pull as hard as you can and then some. Here is where most dollmakers say to themselves HOW AM I SUPPOSED TO TIE THESE NOW!!! IF I LET GO TO TIE, THE LEGS COME LOOSE! THIS IS WORSE THAN PACKAGE BOWS! Then the call goes out to the hubby, or friend to come and hold this "gol darned" thing, which usually results in loose limbs anyway. Really, you don't need help, if you can keep thinking about keeping the cords taut, and pressing down on the body with one thumb.
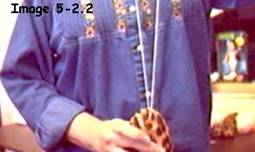
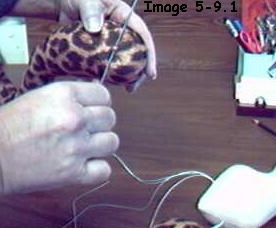
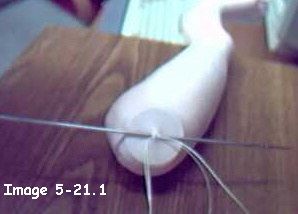
20. Keeping the cords TAUT, press down on the body with one thumb. 21. Still keeping the cords TAUT, quickly wrap the cords in your free hand around between the body and limb twice. As soon as you have wrapped the cords you can let go of the cords and they will stay tight! In the second picture below, it looks like I have my hand under the body. I don't. I was just trying to keep the doll steady while my hubby took the picture. He took FOREVER! To get the camera focused!
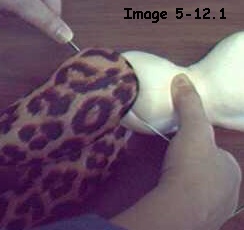
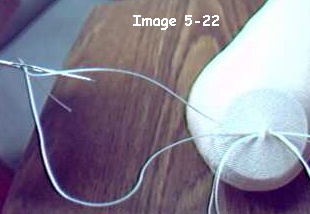
22. Now tie the cords. (Remember the nurse's knot, which makes an automatic square knot) I always tie one square knot in the front, and then take the cords to the back and repeat.
23. Tie a square knot in back. 24. Cut the cords close to the fabric. Don't cut way down next to the knot. Leave a little cord. You can tuck it between the limb and body.
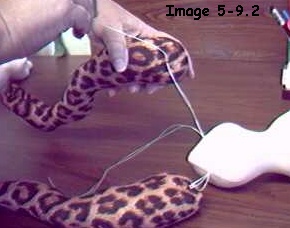
25. Press the hips in at the sides to align the upper legs with the body, and to help narrow the hip area. 26. She's all jointed, and very pigeon toed and knock kneed. BLEUETTE WON'T BE SO PIGEON TOED AND KNOCK KNEED. SHE IS NOT DESIGNED TO BE.
With the legs so far forward and low, Whatever! Whatever! actually sits on the backs of her upper thighs. Her crotch doesn't touch the table. In fact for all of the jointing positions, she will sit on the backs of her thighs.
If you joint the legs back farther, she will still be pigeon toed and knock kneed as long as you placed the joint buttons forward in the legs. Whatever! Whatever! already stands alone, even without shoes! BLEUETTE WILL TOO. A note about having your dolls stand alone There is a tendency that I have observed in classes for the dollmaker to push down on the doll to get her to stand. This only results in bending her legs and never works! The only thing you do is GENTLY set her on a flat surface, press on her FEET if she doesn't have shoes on yet. This flattens the feet some. Tip the body forward or back, whichever is needed, to set the center of gravity and your doll will stand. Remember, pressing down on the whole doll will only bend her legs. Sometimes a doll is stuffed with such rounded foot bottoms that she just won't stand til she has shoes on. Don't feel bad if that happens. Happens to the best of us! I told you I would show you how to use the double pointed needle to make one step a little quicker. 1. What you do is When you are getting ready to put the SECOND limb on, put the point that is near the eye through the shank of the button in that second limb. 2. Put it only half way through. Leave the needle in place!
3. Take the cords out of the eye. 4. Now, put the other 2 cords through the eye.
5. PULL BACK on the needle. It will bring the other cords out the opposite side, and you will have OPPOSING cords. 6. Tighten and tie just like for the other way.
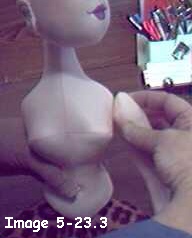
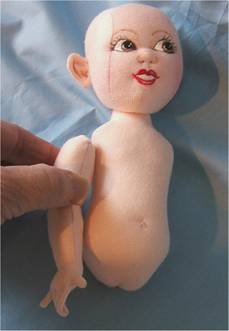
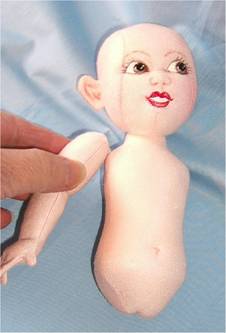
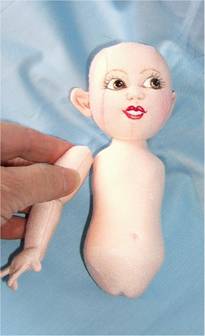
The benefit of this method is first it eliminates the chance of having your needle go through the "twists" of the cord when you take the second set of cords through. When that happens it sometimes breaks a strand of the cord or makes it impossible to even get the cords to pull through. For jointing the arms, you use exactly the same methods as for the legs, except of course the placement! I am not going to repeat all of the directions, but will show you some No! No! and Yes! placement pictures. Try to go through the fabric just to the side of the actual seam. When you go through the seam itself, you may break threads in the seam. You will again have to twist back and forth as you push AND PULL the needle through. For the wider shoulder area, it takes a little longer.
YES! Here are some placement pics for Bleuette
|


