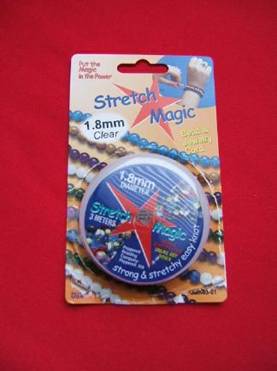
Bleuette in Cloth! Introduction and the BEAD, GRAPE and CORD preparation chapter. Bleuette was a VERY popular little porcelain and composition doll during the early 1900s and forward to the 1960s. She was a premium doll given for selling subscriptions to the French magazine "La Semaine de Suzette". Each issue had a pattern for clothing for her, and little girls were encouraged to sew for their little doll. Bleuette celebrated her 100th birthday in 2005, and is quite a phenomenon in the doll world right now. There are dozens and dozens, probably hundreds, of patterns available for clothing for her, in Doll Crafter, Doll Costuming, from Jean Nordquist Designs here at the Doll Net, and I am sure a dozen other places. Below is a Bleuette site with a ton of information! http://collectdolls.about.com/od/frenchdolls/a/bleuettedolls.htm For me and many cloth doll makers, the allure of a porcelain Bleuette is not all that great. I/we want to make our little 10 ¾ to 11 doll from cloth, and that was right up my alley. I love recreating cloth dolls that resemble old porcelain, composition, hard plastic or china dolls. I do it from pictures and try to incorporate the look or construction of the old dolls as fully as possible with cloth. Also the size when that is desirable. I didn't make this cloth Bleuette have jointed wrists though. That was just too much! She has what are sometimes called straight wrists or "broken" wrists in the antique doll world. Bleuette was made by more than one doll producer throughout the years, so both straight wrists and jointed wrists were represented. Since this cloth Bleuette has chenille stems up past her wrists, you can bend her hands up for the appearance of the "broken wrist" style, with the hands posed daintily. Bleuette was a real challenge because she had a ball jointed, composition body with a porcelain head. To make ball joints with the cloth, I had to invent a way to make the sockets for the balls to sit in. I started with making clay cups, and that is what the dolls that I sold in 2005 have but an encounter with some "old" clay that did not bake well and broke easily, changed my mind about clay cups. The search for something that would be available to all, almost anywhere in the world was on! Then Viola! A brain burp said .Plastic Grapes!!!!! Cut in half!!! It was an epiphany in search of a place to land! LOL ..Sooooo, bunches of grapes, in several sizes were sought out, cut and tried and they are the answer! When you see this... "NOTE" in the text, it means to slow down and absorb the previous sentence or paragraph, noting things that are perhaps "weird" or different and then digesting the NOTE for added info. Lots of the things you will be buying and doing for this dollmaking experience are not at all "normal" and there is a tendency for we dollmakers to rush ahead and then end up in a pickle NOTE Sometimes the note will just have one of my "afterthoughts" or a bit of humor. When you go to the store buy your Plastic Grapes take your wooden balls with you and find grapes in the 2 sizes. NOTE My bunches of grapes also have other sizes in them, both smaller and larger, but I only need 4 big grapes and 8 of the smaller size, so there were plenty of the right size in 2 bunches of grapes. NOTE I only use the end of the grapes without the "stem" hole, because the "stem" holes were all different sizes and some had big lumps too NOTE again>>>You will be cutting the grapes<<< The balls for this cloth Bleuette are wood, with a SMALL (about 3/8") hole, which you paint to match your dolls skin tone. These are available in crafts stores, and from some fabric stores. I am in Germany now and couldn't find any locally, so I ordered from the USA . CRs Crafts has them, in small packages, very reasonably priced. www.crscrafts.com The materials list tells you what to order or look for, size wise. Her legs and arms are also strung on clear, elastic, jewelry cord, which I was a bit dubious about, but it turned out to be easy and very strong. The rest of this little doll is made from CRAFT VELOUR not .woven cotton unless you are very brave, don't mind little wrinkles in your doll's skin, and are a glutton for punishment! I did test some of the parts in 100% woven cotton, and it does work, but I simply like the porcelain look that Craft Velour gives, and also the ease with which one can sew, cut, trim and stuff the craft velour. If you choose to use woven cotton, get it with a high thread count, and place all of the pattern pieces with the "give" side to side, not up and down. With velour, I place the pattern pieces with the most "give" up and down. NOTE CRs Crafts has the craft velour and woven cotton fabrics, as do Doll Net vendors like Dollmakers Journey. In the early days Bleuette was always Caucasian, but you can surely make your own in brown or tan. Doll Face Velour is the Caucasian shade Beige, Honey, Dark Brown and Chamois are also good doll shades. The dolls pictured in class are all from Doll Face Craft Velour. When I was designing and testing the pattern I made several Bleuette's, with several faces, and they all sold right away. The original, porcelain Bleuette's had several faces and several makers over the years. The face templates I have given in the class make a pretty little Bleuette, and are meant to be painted and Gel Penned, with some colored pencil shading and "people" blush. If you wish to embroider the face, I suggest using a single strand of ordinary sewing thread for the embroidery. The face is small and thick embroidery floss overpowers it. If you are a face painter, by all means, do your own face design if desired! This little doll is fun to make clothes for and she doesn't have to look like a Bleuette if you don't want her to. She can be anyone you want her to be! She could even have little black half ball buttons for eyes and a bit of blush for a mouth after pulling the mouth in with thread. The hardest part of making this doll are the many small sections that make up her legs and arms, and the proper insertion of the grape cups. Let me warn you that you will want to put them in upside down, and will probably have to turn them around. I will proceed with the steps and photograph things in the correct order for preparing, sewing, stuffing, and stringing, so if you follow the order as shown, you won't end up with little parts all over the place, including the trash! NOTE You will HAVE TO HAVE the plastic, Stretch Magic Jewelry Cord to joint your little Bleuette's legs and arms at the knees, elbows and ankles. The thin elastic you can get in a Fabric store will not work. It BREAKS! The cloth covered elastic used to string porcelain and composition dolls also will not work. It just doesn't pull through the stuffing easily, nor does it tie correctly and stay tied. I have tried both of the above, and please let me assure you, they don't work. I have pictured the Stretch Magic cord below and in the Materials list, so you can easily find it, either at a craft store, fabric store, bead store or online. I found it in several places by searching in Google. You need the 1.8mm size though, and some places had only the very thin cord. Below is a web site called Create For Less that has it in the 1.8mm size for $2.13 for 3 meters. I ordered from them, because I couldn't find any here in Germany . The service was very fast. I do think there is a 3 roll minimum order though. http://www.createforless.com/products/productDetail.asp?
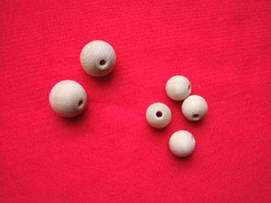
LET'S START! There is a bit of preparation to do before you begin sewing and stuffing. If you do this prep. work first, it will make the whole dollmaking experience more fun and lots easier. First, let's prepare the beads by painting them with acrylic paint to match your chosen skin fabric. The brand and color I used is simply called Pink, and it is by Plaid. It is a very light, peachy pink, not a bright pink. There are many brands of acrylic paint and they are all good. I have one called Light Flesh by Delta Ceramacoat that is great too. Those 2 shades match the Doll Face Pink velour very well. Please don't obsess about the brand of acrylic paint, just try to match the skin tone you have chosen as close as possible. You can even mix a bit of orange and red into white for the paint. 1. You need two 20mm wood beads, with about a 1/8" hole. These are for the knees. You need four, 14mm wood beads with a small hole (1/8") these are for the elbows and the ankles. 2. Now get some toothpicks or wood skewers out, and place them in the holes of the beads to hold the beads steady. I didn't have any skewers, so I used toothpicks. The bigger beads usually take 3 toothpicks. The smaller ones often take only two toothpicks. The toothpicks are for ease of handling as you paint the beads. NOTE Of course there are all sorts of things to stick the beads onto. Chopsticks, lollipop sticks, paintbrush handles, etc.
3. Paint each bead with acrylic paint to match the skin fabric, then stick the toothpick end in some clay or Styrofoam to hold the beads until they dry. Paint a second coat of paint on and then after that is dry, spray the painted beads with a clear acrylic spray. Let Dry. Just leave the beads to dry really well, while you prepare the "plastic grape" cups.
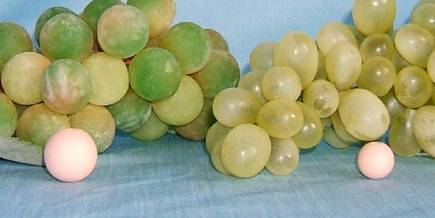
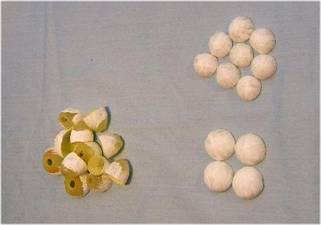
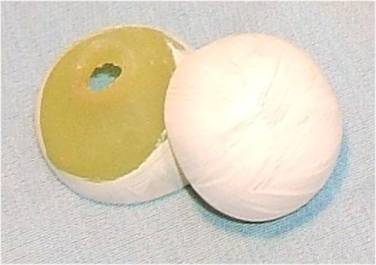
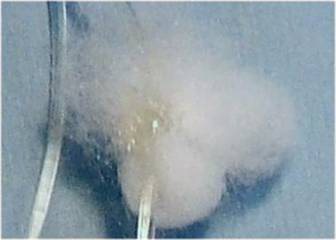
Here are the grapes I have been using. I chose light green grapes because they are easier to cover with white Gesso so they don't show through the "skin". This pic is "about" actual size. 4. Now choose your grapes .4 big ones for the big beads and 8 small ones for the small beads. Just "eyeball" the grapes next to the beads to pick the best sizes. Remember, you will only be using the rounded half of each grape, not the stem end. 5. The grapes need to be painted with white Gesso before using them. I finally went to the store and got some lollipop sticks to put mine onto for painting. 6. After the grapes are painted and dry, cut them in half, discarding the half with the hole in it! I know you are now saying Why can't I use that part? It is because the hole is too big! One can not tie a knot even with stuffing in the knot, that won't pull through that big hole! Maybe not today or tomorrow, but down the line sometime! 7. After you cut the grapes in half, trim all around the edge of the good halves so the part you use is actually a little less than half. (Fits in the limbs better that way)
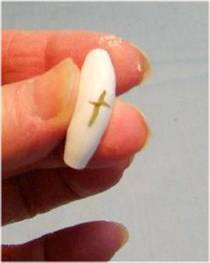
8. Now, you need to cut a tiny X in the end of each grape half. The picture is big, but make your X small. In fact, it should be about as big as the capital X (12 pt Ariel font) on this page. This is where your needle, carrying the Stretch Magic Cord will go through. I tried doing it without making the little hole, but it made it too hard to get the needle through, without discombobulating everything! Hmmmm Is "Discombobulating" even a word?!?! The first picture below shows a really close view of a cut and painted grape with both the part you use and the part you throw away. The second picture shows the X cut in the half grape.
9. OK, you now have all of the beads ready, and all of the grapes ready, so now you need to get the Stretch Magic cord ready. Trust me , doing all of this before you start sewing will make this whole dollmaking experience a lot more fun and less stressful! 10. Cut 4 lengths of cord, 12" long each. This gives you plenty to tie, without fighting short ends. I know it seems wasteful, but I hate fighting short ends with anything I tie! 11. Now get a clump of stuffing about marble size and tie the first tie around the bit of stuffing. Put a drop of Krazy Glue (or 527 Bond or other clear, chemical smelling) glue on the knot and tie again reversing the order, so you make a square knot. (First tie right over left Second tie left over right.) Pull the knots really tight, squishing the glue in them and making sure you catch the stuffing in the knot. Set these aside to dry. NOTE All of this is to assure that the cord does not pull through the Xs in the grape ends when you string the sections of the arms and legs. There will even be stuffing between the knots and the X in the cups, but one can not be too careful with stretchy cords!
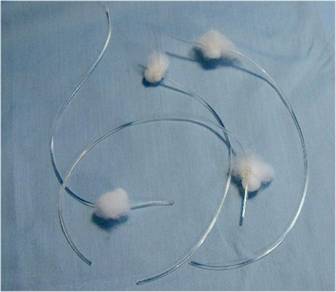
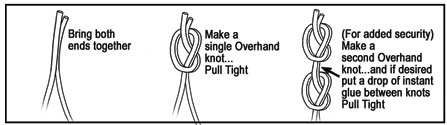
Below is the Stretch Magic Knot picture, from the package. This is basically how you will be tying the knots, but you will have stuffing in the ties and you will be using only one cord, not 2, and will be tying the knot in the end of each of your cords. Stretch Magic Knot Technique Now everything is ready for the patterns and sewing etc. Take a break, have a "cuppa" coffee or tea, and relax. |
||||||||
| Go to... ~ Classroom ~ | ||||||||

Copyright Notice: All pages and graphics are copyrighted by the Internet Visions Company and/or instructor.
You may print these out for the use of the class only. All other uses or distributions are forbidden.
Crafty College and Doll Net are divisions of the Internet Visions Company.
© 1997-2006, Internet Visions Co. All rights reserved.
All trademarks are owned by Internet Visions Company.