|
Awake/Asleep
Pacifier Doll
Online Cloth Doll Class
by Gail Kellison
© 2007
Chapter 4
Sculpting the Faces
Hint: Use a disappearing ink pen to make the sculpting dots on the face. Also, use a disappearing ink pen to draw the eyelids and the eyebrows before drawing them on with the brown pen (by using the pen, if you want to make a change, the marks aren't permanent yet).
Step 1:
To sink the first eye, thread a 3" doll needle with about 30" of craft thread. Knot one end.
Insert the needle into the felt at #1, exit at the inside corner of the eye #2.
Take a small stitch and bring needle back out at #3. Pull the thread tight to sink the inner corner of the eye. Insert needle at #3 and exit at the inner corner of the eye #4.
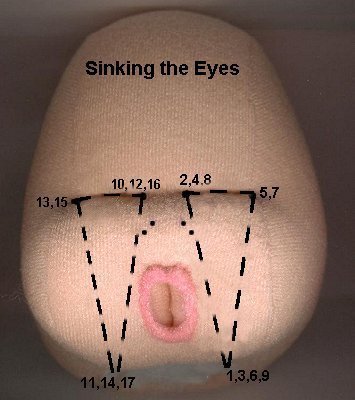
With the thread on the outside of the fabric, insert needle at the outer corner of the eye #5 and exit at #6. Pull the thread tight to make the eye area sink. Make a small stitch at #6 and exit at the outside corner of the eye #7.
With the thread on the outside of the fabric, insert needle in at #8.
Exit at the edge of the neck #9. Pull the thread tight and tie off on the neck, but do NOT cut the thread.
Below is the stitch sequence. The line between 4 & 5, as well as, 7 & 8, means that stitch is on the OUTSIDE of the fabric.
1, 2, 3, 4 ¯ 5, 6, 7 ¯ 8, 9
To sink the second eye, make a small stitch in the felt at #9, and exit at the inner corner of the eye #10.
Make a small stitch and exit in the felt on the neck at #11. Pull the thread tight to sink the inner corner of the eye.
Take a small stitch at #11 and exit at #12.
With the thread on the outside of the fabric, insert the needle at the outer corner of the eye #13 and exit at #14. Pull the thread tight to sink the eye area. Make a small stitch and exit at the outside corner of the eye #15.
With the thread on the outside of the fabric, insert the needle in at #16. Exit at the neck edge #17. Pull the thread tight, tie off the thread, and cut the thread.
Stitch sequence:
9, 10, 11, 12 ¯ 13, 14, 15 ¯ 16 , 17
|
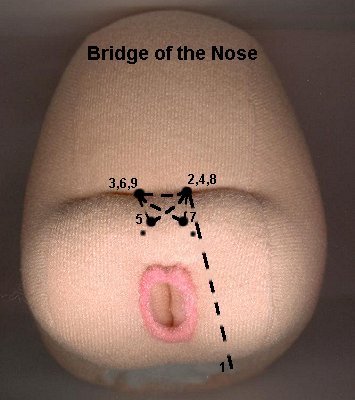
Step 2:
Bridge of the Nose:
Thread the doll needle, knot one end, and insert the needle into the felt at #1. Exit at the inner corner of the eye at #2. Make a small stitch a #2, and exit at #3. Pull the thread slightly to accentuate the bridge of the nose. Make a small stitch at #3 and exit back out on the other side of the bridge at #4. Pull the thread slightly again.
Use the tip of the needle to lift stuffing up into the nose area so the nose won't end up flat and shapeless.
Insert the needle at #4 and exit at the nostril #5. Continue to lift the fiberfill with the tip of the needle in between stitches. Insert the needle back in at #5 and exit at #6. Pull the thread tight to draw up the nostril. Hold the thread tight while you insert the needle back in at #6 and exit at #7. Lift the stuffing in the tip of the nose again, insert the needle back in at #7 and exit at #8.
Pull the thread tight, make a small stitch at #8 and exit at #9.
|
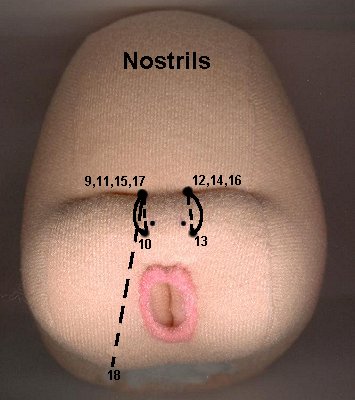
Step 3:
Making the sides of the Nostrils:
Make a stitch at #9 and exit the bottom of the nose at #10. Lift stuffing into the side of the nose with the tip of the needle. With the thread on the OUTSIDE of the fabric, insert the needle into the inner corner of the eye #11. Hold the thread tight and insert the needle back into the corner of the eye at #11 and exit in the corner of the other eye at #12.
Pull the thread tight to shape the nostril. If necessary, pull stuffing into the side again before pulling the thread tight.
Make a small stitch at #12 and exit at bottom of the nose at #13. Lift stuffing into the nostril on that side of the nose. With the thread on the OUTSIDE of the fabric, insert the needle in #14 and exit at #15. Pull the thread tight to shape the nostril. Make a small stitch at #15 and exit at the corner of the eye #16. Make a small stitch and exit on the other side of the bridge at #17. Make a small stitch and exit at the neck at #18. Tie off the thread on the neck and cut.
Stitch sequence:
9, 10 ¯ 11, 12, 13 ¯ 14, 15, 16, 17, 18
|
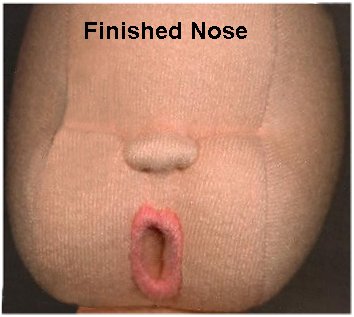
The picture on the right shows the finished nose.
Sinking the eyes and making the nose is done the same way for both faces on the head.
Repeat these steps to sink the eyes and make the nose on the other face. |
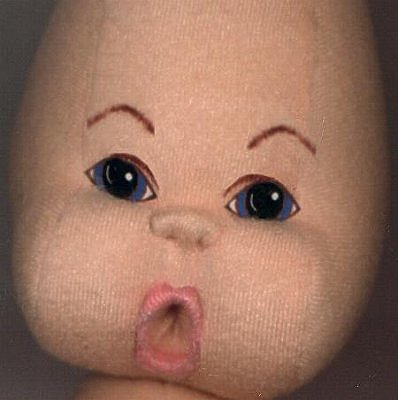
Step 4:
Face with Open Eyes:
I have included a few pairs of colored eyes (Click HERE) - ready to use. You can print them
off and use a pair of them or you can draw the eye pattern and color them yourself with permanent ink pens or paint.
Whether you use mine or color your own, use a file card or other card stock type paper (something a little heavier than regular paper).
To use the eyes I've included, print the eyes off and cover them with a sealer. I often use clear fingernail polish, but any clear sealer will work fine. Let dry.
Cut out one pair of eyes.
Fold each eye around a pencil to give them a bit of a curve.
Add a little glue to the back of each eye and glue them in place. Let dry. Don't get carried away with the glue. You don't want it to ooze out around the eyes. Put some in the middle of the eye and use a toothpick to spread it out to the edges.
Use a brown permanent ink pen to draw an eyelid on the inside of
each eye as shown in the picture. Draw the eyebrows with the brown pen.
Note: If you prefer, you can draw the eyes directly onto the face and color them or paint them. I prefer using card stock because if I make a mistake, the entire face isn't ruined.
|
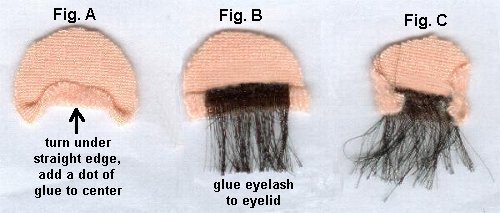
Step 5:
Eyelids for the Face with Closed Eyes:
From a scrap of the doll fabric, and using the eyelid pattern, cut 2 eyelids.
Use real eyelashes or a small piece of frayed black or dark brown organdy for the eyelashes.
Real eyelashes are the easiest and most real looking. However, I have used the frayed organdy in the picture at the left so you can see how that will also work. When fraying organdy, leave a small area along the top edge unfrayed to glue to the eyelid.
Turn the straight bottom edge of the eyelid up ⅛" and put a dot of glue in the center of the fold to hold it. Fig. A
Place a drop or two of glue along the turned up edge. Lay the eyelash along this edge. The eyelash should not go all the way to the ends of the eyelid on either side. Fig. B
Turn the eyelid in on each side. Place just a tiny dot of glue under each side to hold it in place on the eyelash. Fig. C
|
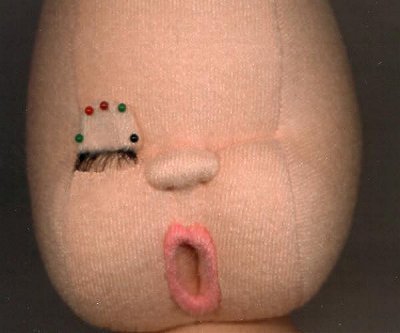
Step 6:
Pin the eyelid in place on the face, turning under the raw edge ⅛" all around the curve.
Blind stitch the eyelid to the face.
Repeat for the other eyelid.
If the lashes are too long, trim them. Trim them evenly so they will match. |
|
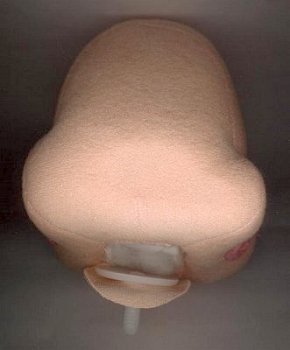
Step 7:
Place the part of the doll joint with the post over the opening in the head (at the neck).
Clip the center of the cloth neck cover and place it over the post.
|
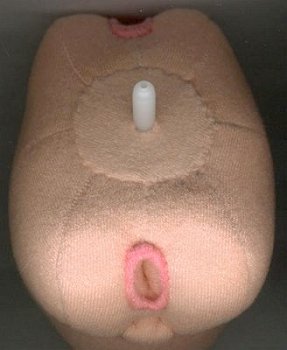
Step 8:
Use a blind stitch to sew the neck circle to the head.
Stitch around twice to hold it securely.
|
|
|
The head is now ready to go on the body, so we better get the body made.
We'll make it in the next chapter.
Go to Chapter 5
|
|