Iron the freezer paper templates in place on doubled fabric, using a wool setting on your iron.
OR>>> Lightly trace around arm and hand templates on doubled fabric, if you are using that method.
Be sure to leave space between the parts, so you can cut them out! Again, see chapter 1.
2. Put a couple of pins through the paper and fabric to keep it together.
3. Sew arm and hand seams. Use a very tiny stitch and sew slowly around the fingers. ...NOTE...Remember the SEW, SEW, LIFT and TURN method for sewing around curves. This is especially important around the finger tips. Dont try to DRAG the fabric around as you sew. You will always end up with jerky little points and squared off places if you do.
Repeat this "sew, sew, lift and turn" method, around each fingertip. Sew a couple of stitches between each finger too. You can get away without doing it with the firm knits, but it makes turning easier. You can not get away without doing the between the fingers stitches with wovens. Leave arms open at the top or back for turning and stuffing.
I prefer the tops for the openings. Once you get the Ladder Stitch down, you will find it is easier to close a curve than a straight! It is also easier to place the metal buttons inside from the top.
Also, Whatever! has a short sleeved shirt, and you want the closing hidden under her clothes.
Image 3-1
Sew all around, leaving open at the top (or back)
4. Remove the Freezer paper, and cut the arms out, leaving a very small seam allowance. Slightly less than 1/8th inch for knits, larger for wovens. Dont throw the Freezer Paper pattern away. You can re-use it several times.
NOTE*** If you used the draw around method, you have no paper to remove.
At the opening on the top, continue around the curve.
Dont leave a big flap up there.
5. Clip between the fingers and trim excess fabric from around the fingers.
NOTE*** If you are making your doll from 100% cotton woven fabric, you will need to put some Fray Stop along the seam allowances of the fingers before turning. Use a tiny paintbrush to do this so the Fray Stop only goes on the edges of the seam allowances, not on the stitching. Apply the Fray Stop very sparingly! If often bleeds out onto your doll, if you get a bit too much. This is one reason I am so partial to the firm knits for my dolls. No Fray preventives needed.
NOTE***Whatevers fingers are large enough that they can easily be turned with a hemostat that is small enough to fit inside each finger. My 5" long one fits with room to spare.
6. Insert your hemostat into one finger, poke a bit of the fabric at the tip of the finger into the slightly open jaws of the hemostat, and then slowly work the finger into the palm. ONLY into the palm! Turn one finger at a time, until they are all in the palm. Finish turning the rest of the hand/arm HALF WAY right side out.
Leave the upper arm folded over the lower arm for now. Makes it easier to insert the chenille stems, and stuff the lower hand and arm.
7. Poke each fingertip out nice and round, using your stuffing tool, Phillips screwdriver or the hemostat to help. I usually just use my hemostat.
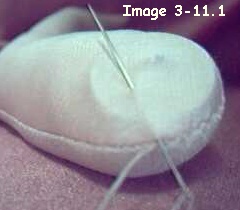
NOTE*** If you are making a smaller Whatever! Whatever! you may need to use another method of turning the fingers. Use your favorite method or There is a needle and thread turning sheet at the end of this chapter.
The needle and thread turning method will let you turn really tiny fingers. It takes a few tries to "get it" but once you do, it is so easy.
Also note. Some very small fingers just wont turn. If the fabric is too thick, (IE ROBE Velour or Felt) or too stiff, IE (crisp, thick cottons or poly cottons) very small fingers often just wont turn at all. If that is the case, you will need to go up a size, or use thinner fabric.
CRAFT Velour and Doesuede/Suedecloth will allow
you to turn amazingly small fingers. I have fingers/hands about 1/2" wide
in both, that turn just fine.
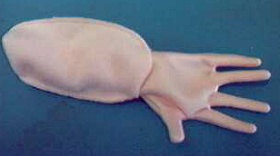
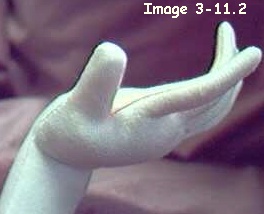
Image 3-4
The arms turned 1/2 way right side out.
Note the "krinkles" between the fingers.
8. After all of the fingers are turned, the
best way to remove any little "krinkles" between the fingers is to hold
as illustrated and gently rub the fabric together, kinda like washing out
a stain. Dont pull the fingers away from each other! This rubbing works
for both knit and woven fabrics.
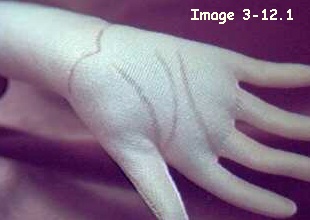
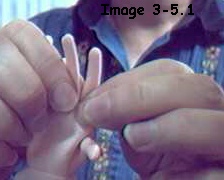 Image 3-5.1 Rub gently in each V. |
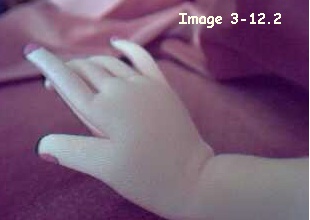
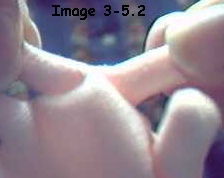 Image 3-5.2 DONT pull the Vs apart. |
9. To stuff the fingers/arms with the chenille stems, fold 10 stems in half. Roll the arms down even farther, so you can get to the fingers more easily.
Fold a chenille stem (15 mm size for a full sized Whatever! Whatever!) in half and then insert the folded end into each finger, using your 12" long, broken upholstery needle/stuffing fork to guide the chenille stems into place. (You can also use a commercially made stuffing fork.)
When the stem is all the way to the end of the finger, grip the finger tightly and pull the stuffing fork out. Repeat for each finger.
Below is a picture of my 20-year-old stuffing
fork, made when I accidentally broke the eye of one of my long needles.
I then wrapped the shaft with masking tape, and blunted the sharp point
on the sidewalk! This has served me well all these years and I couldnt
be without it.
Before I had it, I used a small Phillips
screwdriver the same way. It was much harder to use!
I also use it to stuff fingers (and toes) with stuffing.
I "twirl" a piece of stuffing in the forked end, while pressing and holding
the stuffing fairly tightly between my fingers, making a Q-Tip like piece
of stuffing on the needle. This is then guided into the fingers, on the end
of the needle.

Image 3-6
Stuffing "twirled" onto a stuffing
fork.
A great way to stuff fingers or toes with stuffing.
My "accidental" stuffing fork. It is actually 12" long. You may have one from another class or you have ordered one for this class. Wrap it with tape to make it easier to hold. Dont make it real fat though. It is easier to guide down into long arms when it is thin.
If you still dont have one, you can make one by using a hacksaw or strong pliers type cutters, to cut off the top part of the eye from a 12" long upholstery needle.
The fork should be no more than 1/8" long.
![]()
Image 3-7
My accidental stuffing fork. It is actually
12" long.
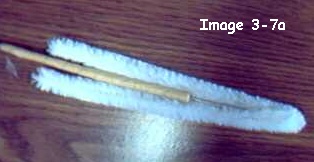
Image 3-7a
A stuffing fork with a chenille stem hooked
in the fork,
ready to be guided into a finger. Be sure to pinch
the chenille stem tight against the needle.
Dont leave it in a loose loop.
NOTE***For smaller Whatevers! you will use smaller Chenille stems but You will be surprised at how small a finger will hold a 15mm stem. My Abigail has really small hands, and she uses the 15mm size perfectly.
10. After each finger is stuffed with the chenille stems, use your hemostat to bend the sharp tips over a little bit, and then squeeze the long ends of the chenille stems together and wrap thread around them to bundle them together.
This makes it easier to stuff the arms. If you just leave the chenille stems loose, they will bend all about as you stuff.
SPECIAL NOTE**** When you put the chenille stems into the fingers, be sure to keep the proportion of the fingers. The center finger is the longest and needs to be kept that way. You can actually push hard on one of the other fingers, and make it the longest! Makes no difference whether you are using woven or knit fabric either.
You may need to actually pull on the center
finger to make it the longest after all of the chenille stems are inserted
and before you bundle them.
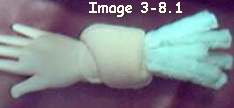
Image 3-8.1 Arm rolled down. Chenille stems inside fingers Before bending the sharp ends over. |
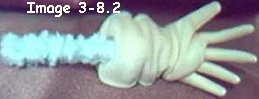
Image 3-8.2 Long ends of stems bundled together and wrapped with thread. |
11. Push a little bit of stuffing into the base of each finger as you stuff the hands very lightly, making sure that you stuff just a thin layer over all of the stems in the palm area and on the backs of the hands.
You can add a little "pad" at the base of the thumb, for more realism, and you will need to put some stuffing up around the thumb too.
Dont stuff the hands all fat and puffy. Form them as you stuff, into a nice inward curve, making a right and a left.
Your flat screwdriver blade will let you "spread" the stuffing out flat across the backs of the hands.
There will be little creases where the fingers bend inward, just like real hands.
12. Bend the thumb slightly toward the palm, and the pointer and little finger slightly up.
The reason I have you do this right away is so that it dictates your stuffing to make a right and a left hand and arm.
13. Stuff the arms, medium firmly, "sliding" the stuffing down along the sides of the chenille stem bundle. Dont push rounded bunches down here and there.
Again, your flat bladed screwdriver will allow you to slide the stuffing down and also to flatten a spot that has a bump.
The hand, wrist, and forearm areas will not be as hard as a rock. They will in fact be fairly soft compared to how hard the rest of the doll needs to be stuffed.. The wrist area needs to be stuffed so it is flat, not round. Look at your own wrist and forearm. You will see that it is flatter from top to bottom, and rounds out as it goes up the arm. The wrist needs to be flexible so the hands can be posed.
Of course, as you are stuffing the forearm, you will need to pull the upper arm back so you can see how your stuffing is coming along.
14. Before you get too far up the arm, you may want to guide a 1/4" pom-pom or little "pea sized" lump of stuffing down in the wrist for a wrist bone. This is the only time you get to wad the stuffing up!
Don't leave any of the chenille stem bundle in the arms touching the inside of the arm fabric.
15. Once you get past the chenille stem bundle, start to put the stuffing down in layers. Large pieces at a time, and push and twist with your screwdriver to pack the layers down very firmly, all the while, holding the whole arm like a banana. The upper arm is stuffed hard.
16. When you reach the top, it is time to put the CLOSED, 45 MM METAL, SHANK BUTTON down inside the arm tops, and close the opening with a ladder stitch. Be sure the buttons are placed in the inner side of the arms. REMEMBER, You need a right and a left arm!
The edge of the button needs to be almost even with the seam allowance at the top of the arm. Dont push the button way down in the arm.
The button is centered between the seams for the arms. An actual size illustration and photo follows.
The shank of the button will push against the dolls "skin". You need to be able to see it under the "skin".
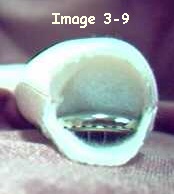
Image 3-9
Photo of button placement.
Image 3-10
X-Ray view of the buttons position
making a right and a left arm.
17. Close the openings in the arms with a ladder stitch, adding fluffed up cotton balls as you close to make it easier to make nice smooth closings. The cotton balls arent mandatory, but they dont "puff" up like stuffing does, so it makes it a littler easier to close smoothly.
18. When you get to the end of the closing, bring your needle out near the button, and stitch in place there, rather than at the end of the seam. This way, the stitching in place, to secure your stitching, will be hidden after your doll is jointed.

