
Image 3-13.1 Sew across the Toe area to hold it together. |
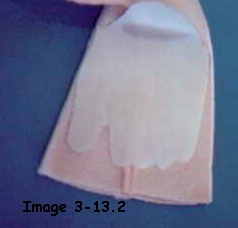 Image 3-13.2 Freezer Paper ironed on. |
Taught by Judi Ward of Judi's Dolls
http://JudisDolls.com
***Now lets do the legs***
A lot of the basics are the same for legs as for the arms. Small stitches, trimming the seams, fray stop for wovens, sewing inside the lines if you are using the draw around method, etc.
I wont repeat these things.
1. Use the Freezer Paper method or Draw around the leg templates twice on doubled fabric if you havent done so already. Sew the leg seams, LEAVE OPEN AT THE FRONT OF THE FOOT, and between the dots at the tops of the legs or the backs of the legs, whichever you have chosen. Again, I prefer the tops to be left open. Remove the Freezer Paper if you used that method.2. Cut the legs out, leaving a very small seam allowance. The seam at the tops is just cut around in the same curve as the paper. Dont leave a big tab of fabric up there.
3. Now fold the toe area of the "foot", "seam to seam", and then sew across the toe area right at the edge to hold it together. This way you dont have pins in the way of your sewing the actual "foot" shape. Repeat for the other "foot". (A picture follows the directions in #4.)
4. Iron the Freezer Paper, toe templates in place on each "foot" front, making sure to make a right and a left foot! OR Draw around the toe template on the top of each "foot", tapering the line to the sides of the feet.
Line the foot seam up between the second and third toe. Try very hard not to have the foot seam right down the middle of a toe!
NOTE...You make the "toes" about 1/2" back from the front of the fabric. If you work right at the edge, where you sewed across to hold the fabric together, it will make the foot too big, (She already has big feet!) and may be hard to sew nicely shaped "toes", because you will be so close to the edge of the fabric.
Note 2 You will want to taper the seam to the sides of the feet. Sometimes, depending on how you did the sewing of the foot and legs seams, the template may be a little wide as it gets to the edges. If that is the case simply trim a little of the paper off and then continue the seam, tapering it off the sides.
You can get really creative and sew a curved instep area too if desired.
|
Image 3-13.1 Sew across the Toe area to hold it together. |
Image 3-13.2 Freezer Paper ironed on. |
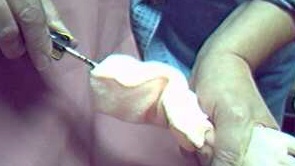
8. Sew around the Freezer Paper templates or Sew the "toes" on the lines that you have drawn, starting at one tapered edge. Sew slowly around each toe, using a very tiny stitch and lifting the presser foot of your machine as you do for all small curves. End at the opposite tapered edge. Repeat for other "foot" front.9. Trim away the excess fabric at the foot fronts, and clip between the toes.
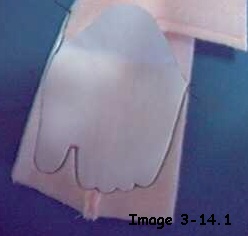
Image 3-14.1 I sewed this sample in black so it is easier to see. Notice how the stitching tapers Off past the paper on the upper left side especially. |
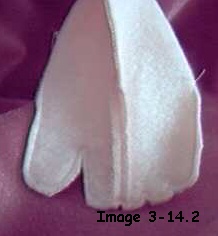 Image 3-14.2 Toes sewn and trimmed. The right color of thread! This is velour. I can trim very close. |
5. Turn the feet and legs 1/2 way right side out, using your screwdriver, hemostat or stuffing tool to help with the turning. Poke the heel out nice and round. Work each toe out, fully and smoothly to the right side.6. Top stitch between the toes, now, before stuffing. I did it in black for one photo so you can see it better. The stitching between the toes is about 1/2" long. Mark it if you cant eyeball it.
If you do mark it, use a colored pencil a shade or 2 darker than the "skin". It wont show that way.
Always start the stitching up in the foot area, not at the edge of the toes. If you start at the edge, your sewing machine might "eat" the fabric there.
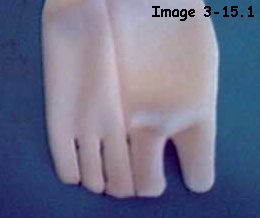
Image 3-15.1 Between the toes stitching in black just so you can see it better. |
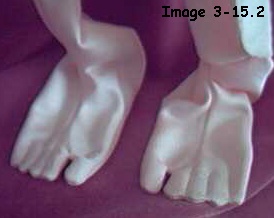 Image 3-15.2 A right and a left foot, ready for stuffing. |
7. To stuff the toes with stuffing, twirl just a little stuffing onto your fork for each toe, and then guide the stuffing into place. The rest of the foot stuffing will hold the toe stuffing in place. Your stuffing fork is great to stuff the toes with (but not to stuff the feet with)8. Use your screwdriver to stuff the feet very firmly, shaping as you stuff. Be sure you have stuffing out into each toe, and really firmly into the instep and heel.
Note To get the leverage and "push" to really stuff the feet, heels, and ankles VERY, VERY firmly, hold the whole foot in your hand and push it against your hand as you press the stuffing down with that twisting back and forth motion.
STOP!!!! After the regular stuffing directions for the feet and legs, an OPTION, using chenille stems will follow. Read all of the directions before you decide which method you wish to use.
I dont put the chenille stems in my dolls legs, because I do stuff VERY firmly. I have been making "Stand Alone" dolls since the early 70s, and never could figure out what all the hype was about, dealing with armatures so ones dolls would stand alone.
I finally figured out that it was that most people dont stuff as firmly as I do where that type of stuffing is needed.
I tried wires and such for the extra stability in case students wanted to use an armature, but decided that the chenille stems are the easiest to deal with. They are readily available in any craft shop, and the fuzz on them holds onto your stuffing.
I personally find it difficult to stuff very firmly around slippery wire.
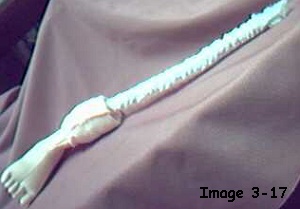
9. Pack the stuffing down in layers, VERY, VERY firmly. Always hold around the leg as you stuff and dont hold the seams. If you hold onto the seams while stuffing, you will almost always pop the seams!As you go up the leg, you will of course need to continue to turn the rest of the leg to the right side. It is just easier to stuff if you dont have the whole length of the leg to deal with while stuffing the feet and lower legs.
10. Be sure to make nice rounded calves, thighs and the little kneecap. A cotton ball, guided down with your screwdriver or hemostat makes great kneecaps.
11. When you get nearly to the top of the leg, put it down between your knees and stuff down into it. At this point you will just be using your fingers to push the stuffing down. You will have to hold the edges to do this, but dont hold right on the actual seams.
Whatevers legs are very well shaped, when sewn and stuffed properly. They are also slightly bent. Be careful as you stuff so that you dont straighten them out. If you do, the seams will pop behind the knees.
The OPTION follows, and then we will put the joint buttons down inside and close the tops.
Once the feet and heels are stuffed, you can choose to put Chenille stem re-enforcements in the legs, if desired. This is not a necessity, but if you think your stuffing wont hold the legs up, under the weight of the rest of the doll, you may want to do this as added "strength" insurance.
You can use 5 or more chenille stems for
this. 5 gives a little extra strength. 10 will give a lot, but gets a little
spendy.
1. Simply take the chosen number of chenille stems, and twist them around and around on themselves, until they are a long tight bundle.2. Still keeping the leg turned back halfway, place the chenille stem bundle down against the stuffing at the heel, just before you start up the ankle. Center it. The little "poky" wires will stick into the stuffing and help hold it there.
3. Now, lay the leg on the table and carefully slide a "stream" of stuffing down along the sides, front and back of the chenille stem bundle. Pick the leg up and hold the area you are stuffing like a banana and pack the stuffing down firmly all around.It is a bit more of a challenge to stuff around the chenille stems, and you must be watching all the time or they will migrate to the sides of the legs! Just remember to stuff all around first, and then pack down what you put in.Repeat laying the leg on the table, to slide the "streams" of stuffing down and then picking it up to pack the stuffing.
4. Continue up the leg, shaping as you stuff, and making sure the chenille stem bundle is covered on all sides.
5. Stuff all the way to the top of the leg just as for the legs without the chenille stems inside.
When you get to the top of the chenille stems, bend the sharp tips over a little and then finish the stuffing.
If you have some "cellulite", roll the legs in your hands like a sausage. This will smooth them, and then the "release" the stuffing will undergo overnight, will smooth them more. Pinch the area behind the knee it she got fat knees during the stuffing. The legs should taper in there.
If you have stuffed very firmly, you will be able to mold and sculpt the legs with your fingers, almost like clay. Your flat bladed screwdriver can also be slid down the side of the leg to "flatten" a persistent lump.
1 . NOW It is time to put the CLOSED, 60 MM METAL, SHANK BUTTON down inside the leg tops in the position that lets Whatever! Whatever! stand A little pidgeon toed and knock kneed.Some things to place in your Doll Making Memory BankIt is very simple and involves only a change of position for the button.
REMEMBER, You need a right and a left leg! The buttons go inside the BIG TOE side of the legs. And Remember, the edge of the button needs to be almost even with the seam allowance at the top of the leg. Dont push the button way down in the leg. The shank of the button will push against the dolls "skin".
All of this is just like for the arm tops.
The only difference is in where you place the buttons. They need to be forward so the edge of the button is almost to the seam in the front, rather than centered from seam to seam.
NOTE*** Want to make a doll "Duck Footed"? Place the joint buttons towards the back. If you want a doll to do a ballet pose, with her feet out to the sides, place the joint buttons, centered on the back seam! Just some ideas
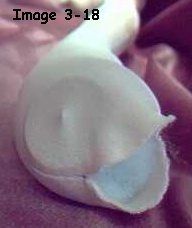
Image 3-18
Button placement for legs that will pose
slightly pidgeon toed and knock kneed.
Image 3-19
Drawing of the button placement.
Making a right and left leg.Wow! That fore-shortened look is really something in the above photo! But you can see how far forward the button is. You can also see very clearly how the shank pushes against the dolls "skin".2. Once both buttons are placed properly, (Check again, to be sure they are in the BIG TOE sides of the legs) finish stuffing the leg tops even more, and use fluffed up cotton balls in the very tops. Close the opening with a ladder stitch and hide the stitching in place above the button, just like you did for the arms.
1. It is easier to stuff something all out of shape than to stuff it into shape.Can you add some things to add to the Memory Bank? Post them to the Blackboard O.K.2. Any doll meant to be button jointed, can be invisibly button jointed by putting shank buttons inside the tops of the limbs.
3. Never hold right on a seam. It will pop the stitches.
4. Always use a screwdriver for a stuffing tool. Once you really try it, you will be amazed at how much firmer you can stuff and how much faster too.
5. Shape, shape, shape. Dont just fill the space with stuffing. The casing has the shape built in, but incorrect stuffing and shaping can and will take the correct shape right out. Makes no difference whether you are using a firm knit or a woven fabric.
6. Always support the parts you are stuffing, by holding firmly all around, or at the bottom, or wherever the support is needed to allow you to push stuffing in very firmly.
The next chapter will be the body. Whatever! Whatever! has high, perky boobs. She is a young thing and they havent sagged yet!
She has a real looking "inny" belly button and a bottom. You can also make her a real girl if desired. Its just a matter of where you place a stitch.
She requires VERY, VERY firm stuffing in the neck, and I will teach you an OPTION done with clay for the "hard stuffing challenged".
If you are going to do the clay neck, have 2 small packages of WHITE Fimo, Promat, Super Sculpey, Sculpey III or other oven baked clay, and a fat needle sculpting needle.
NOTE***You can also use Paper Clay or Model Magic, but I like the oven baked ones best. Paper clay is a little sticky for me, and Model Magic doesnt hold the clavicle molding as well. Both work fine for the necks though, and both are lighter in weight than the oven baked clays.
See you in a few days
Dolly Hugs, Judi
Judi Ward
Judi's Dolls
http://JudisDolls.com

