Ó 2000 Judi Ward -Judis Dolls
Introduction and Supplies.
Milli is an elegant and sexy Boudoir Doll, who will take her place in your home as an exceptional decorator piece.
 Milli
sits about 17"-18" tall with about
a 30" total height. You can reduce
the pattern to make a smaller Milli if desired, but she is meant to be
a display piece on a bed or chair, so the larger size is so much more
effective!
Milli
sits about 17"-18" tall with about
a 30" total height. You can reduce
the pattern to make a smaller Milli if desired, but she is meant to be
a display piece on a bed or chair, so the larger size is so much more
effective!
Milli has some great new techniques and pattern innovations that make her fun to make and embellish.
You can use lovely laces and trims, flowers and braids for embellishment, either sewn or glued on .I usually glue I am not a hand sewing purist! If you do beading, Milli is the perfect palette for your finest work.
You can use woven fabric for her torso, like quilt fabric, satin, brocade, taffeta, etc or a firm knit like Doesuede, or upholstery velour. Doesuede and upholstery velour come in some great colors, and even prints.
Dont use a stretchy knit for her body/torso, unless you plan to underline it with a firm, 100% cotton woven fabric.
Do use Craft Velour or Doesuede for her legs, arms, shoulder plate and head. Woven cotton can be used for the above parts, but your doll wont be as smooth or "luxurious" looking. Add more elegance with the lace and net choices for the skirt, and the fancy fabric for the yoke of her skirt.
***Table of Contents***
1. Introduction, supplies list, pattern preparation and pattern.
Also Some basic technique directions. Ladder stitching. Stuffing. Shaping, stuffing fork, Freezer Paper use for all pattern pieces, even those with the seam allowances included, not just templates.
2. Making the Legs and Arms. Finger articulation, hand posing, easy arm armature if desired (but not needed if you stuff very firmly.)
3. Painting the shoes (decorating them will come later. It is too easy to knock off the decorations while assembling your doll, to do it now.) Painting the fingernails and making long fingernails with crystal lacquer.
4. Making the Body. Attaching the legs and arms to the body.
5. Making the shoulder plate, stuffing the neck with clay and sculpting the clavicles inside the cloth. Stuffing the Boobs and making Millis lovely cleavage. Attaching the shoulder plate to the body.
6. Making the head, including shaping the clay in the nose, stuffing, needle sculpting the mouth and eyes. Painting the Face. Shading the face (Applying the eyelashes, will be done after the head is on the doll.) Attaching the head to the shoulder plate.
7. Applying and styling the hair, using a felting needle for the application of the mohair. NOTE>>>You can use a real doll wig instead if desired.
8. Making the skirt, and sleeves and adding the lace and trim to the bodice. Embellishment ideas!
9. Decorating the shoes, including a clay piece if desired, and applying the eyelashes.
10. Pattern and "quick" directions for the barefoot and bent arm version
***Introduction***
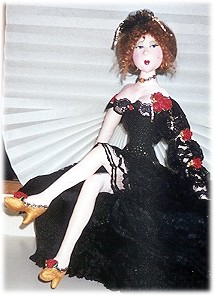
Milli is the elegant doll you have always wanted posing on your bed or sofa.
The peach skinned Milli shown in this class, will be dressed in rust and ecru and is for my living room.
 The
Milli with brown skin, shown in this class will be dressed in red with
gold flecks.
The
Milli with brown skin, shown in this class will be dressed in red with
gold flecks.
The Milli in white with wings is "Angel" and won first place, judges choice at the Portland Festival.
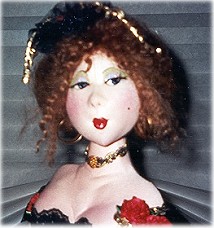
The Milli with the black "wild" hair is the bare foot and bent arm version and resides on the bed in the Master bedroom. Her hair is a mohair, "skin wig". It was cut in an oval and darted to fit her head, and then glued down. I teach this in the Hair class here at Crafty College. She has the feet with toes and the bent arms. I did her face with bigger lips and a "fresher" look. She even has freckles.
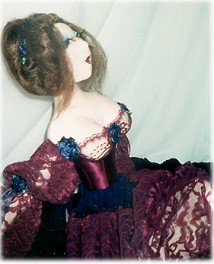
The haughty Milli was made during the first "hands on" class here at the Unfinished Castle, and the group shots are of Millis in various stages during a class here too.
The Milli in the black is the first "prototype" Milli and started the Milli progression.
I am sure there will be many more Millis coming, as I love to make and "decorate" her.
Milli has articulated fingers, with poseable wrists.
She has a shoulder plate design for her upper chest and neck, with sculpted in clavicles and lovely cleavage. I will show you how to do clay in the neck! So you never have to worry about neck flop again. This is usable in many other doll projects.
She has a turning head too! (So easy to do, you will do it for all of your tab head patterns)
I will show you how to apply real wefted mohair for hair in an upswept hairdo that is so elegant.
We will make beautiful high heel shoes with added embellishments so they look like they are removable, but they are actually just part of the foot.
This class will guide you along, a step at a time, towards making this detailed and expressive doll.
You will need to have good control of your sewing machine, and if you have taken the Cloth Dollmaking For Everyone class, on-line, you will recognize and be able to use many techniques taught there.
In this class there are some skills to practice and/or do so that you will have a fine quality doll.
They will be at the end of Chapter 1.
If you have been in the Whatever! Whatever! Class or Cloth Dollmaking For Everyone class, you should already have these skills in your dollmaking repertoire.
If you dont feel good about some of your skills, practicing some more wont hurt though.
To save paper If you have the basic skills chapters from either of the above classes, you dont need to print them out again, unless you want to have them with this class too.
***Doll Size***
My original Milli is about 30" tall. I have made several and they are all in the 29" to 32" range. Milli is a sitting doll so her height will vary in the sitting position too. (It is about 17")
A cloth doll cannot be said to be "exactly" a certain height. An extra strong "stuffing day" will produce a taller doll, perhaps fatter too.
Stuffing softly will produce a smaller doll. Slightly different seam allowances will make size differences. Different fabrics will do the same. Turning the "Stretch Direction" of the fabric across rather than up and down will produce yet another size.
The pattern pieces for this class should come from your computer full sized. Paul has the "sizing problem" fixed for almost every kind of computer, program, and printer known.
***but***
If you got your pattern over the web, and it isnt full sized, the sizing directions are here too. You can also make a small size if desired, or any size for that matter.
If you got the pattern by mail, or if it printed out full sized, and you wish to make a smaller doll, simply take it to a copy shop and reduce all of the pages the same amount.
**Two important things to remember**
#1 Always remove all seam allowances BEFORE you reduce or enlarge any pattern. The seam allowances also reduce and enlarge. You could end up with seam allowances of only 1/16th of an inch! Or 3/4 of an inch! You would, from habit, probably still use a 1/4" seam allowance and end up with a very different doll indeed. (Perhaps a nice doll, perhaps not so nice!)
Always add the appropriate seam allowances after the resizing. (Template pieces dont need seam allowances)
#2 Resizing a pattern does not make it a "different" pattern. All copyrights still apply, just as if it was the original size.
There are seam allowances on the body, skirt yoke and head center seam, front and back on the Milli pattern. All other pieces are either dimensional or templates. The head is a combination Template and non-template piece. More on that in the lessons.
Following is the supplies list to keep with your pattern and class. You have received it from Paul already, and should have most of your supplies ready to go, but I thought it would be nice to have here too, in the same format as the class.
***Supplies List***
** There are lots of wonderful suppliers at http://www.thedollnet.com
The proportional wheel, if you wish to use it for sizing, can be found there, at Dollmakers Journey. They also carry fabrics and many other things.
Milli doesnt require a jointing needle or jointing buttons or cord.
** CRs Crafts http://www.CRScraft.com :Do get their catalog. It has all kinds of doll "stuff" that is hard to find. If you have been in any of my other classes, you already have their catalog. If not call and order it. Also order their fabric and fur sample cards if you can. They are about $14.00 and have hundreds of samples of everything from mohair fur, to wovens, to fake fur and lots more.
CRs Crafts has the 15mm chenille stems for Millis fingers, hemostats, wefted mohair and wigs too.
CRs Crafts phone numbers:
1-641-567-3652 for general info.
1-877-2772782 for ordering only.
For calling purposes, they are only open from 8 AM til 4 Pm central time,
Mon thru. Fri.
** Sandcastle Creations for wefted mohair. I usually use their "seconds" in the 7 to 9" length. 1-800-605-1901 . Their wefted mohair is a GREAT Price!
** Keelings Krafts has the Crystal Lacquer for long, elegant fingernails. www.keelingskrafts.com
I am not affiliated with any of the sources I give addresses for here, except my own of course! I just use these sources for many things, and have had great service from them all.
***Supplies for the doll***
1. Right off the bat you will need Freezer Paper, for re-tracing ALL of the pattern parts onto. This is the preferred method, for the most accurate dollmaking. Freezer Paper is available at almost all grocery stores and at Wal Mart. It is about $6.00 for 150 feet, 18" wide. It will be near the paper goods or the canning supplies. Costco has it in 1200 yard rolls too! A lifetime supply for the whole doll world!
You can also use the Draw Around and Sew method, but it isnt quite as accurate or easy.
If you are in another country like Australia, New Zealand, Japan, Britain etc. you may have a problem finding Freezer Paper. You can use the wrapping paper from many brands Copy Machine paper! It is a paper that is waxed on one side, and that is what you need.
Perhaps a butcher shop would have it too. Also, some quilt shops carry it. Dont try to use waxed paper It doesnt work.
2. 1/2 yard of a firm knit fabric, like CRAFT VELOUR or DOESUEDE (Suedecloth at Jo Anns dont get Ultrasuede!) for the dolls head, arms, legs and shoulder plate. NOTE<<<Remember Millis torso/body is from a "clothing" fabric.
Note on Fabric: You can use 100% cotton woven fabric instead of the called for Velour or Doesuede.... For detailed dolls like Milli use the woven fabric on the bias. On the bias, the fabric will stretch a little both ways. This is desirable for the detailed dolls, as they need the stretch for the shaping. Be sure to cut the lines off of your pattern pieces when preparing the patterns for use. This is especially crucial at the fingers. If you don't you may end up with no space between the fingers, and with woven fabrics, you must have enough space to clip between and leave at least 1/16" seam allowance. If fraying is a problem, apply watered down white glue to the raw edges of the seam allowances. Let dry until it is almost completely dry, then turn the parts right side out. I only find this necessary for very small fingers. Don't let it dry all the way. If you do it will be too stiff to turn.
If you have any
questions on fabric please ask them on the Black Board.
3. 1 1/2 pounds of excellent quality polyester stuffing. Putnam, Buffalo Batt, Polyfil, Create a Craft, Airtex, etc. (not Airtex soft and silky, it is too soft) The best stuffing for detailed, hard stuffed cloth dolls, has a slightly wiry feel to it. Not a slippery feel. And no Lumps! You wont use the whole 1 1/2 pounds, but it is better to have too much than to run out.
NOTE>>If you have a business name, and the proper state numbers for your state, you can order the kind I use in 10 pound rolls from I.R. Specialty Foam and Packaging-Tacoma Industrial Rubber and Supply 1-800-426-7944
It is called Plain Fortrel. Tell them Judi, from Judis Dolls sent you. The stuffing is about $25.00 per 10# roll plus shipping. 10# is the minimum order.
Dont forget the business name and the proper state ID#
I dont get anything from them for this. It is just great stuffing, I have used it for years and love it!
4. Metrosene/Mettler, polyester thread to match your dolls "skin". Metrosene/Mettler is the only thread that stands up to very firm stuffing nowadays. Metrosene/Mettler is usually only available from stores that sell top of the line sewing machines, and sometimes from quilt shops.
Be sure to get the POLYESTER type,
not the all cotton. You can also get Metrosene/Mettler thread on-line from
http://www.zippersplus.com/thread.htm#Metrosenethread
and I am sure other on-line sources.
Gutterman thread is the next best, then Coats Dual Duty.
5. 1/2 yard of a pretty, 100% cotton woven fabric for the torso/body>>>OR>>>I have used many different fabrics. Teffeta, cotton, and Doesuede. Pick something glittery or elegant. You can also use a heavier fabric like drapery or tapestry fabric, but it is harder to sew. The torso needs to be made of woven fabric though, not knit (except Doesuede) UNLESS You want to underline the torso with a woven fabric. That works great, but is a little more work. My Doesuede torso didnt need underlining, but she came out a little slimmer. Whatever you choose, we will work with it and decide on underlining etc. A lot of the fun with Milli is the torso fabric and co-ordinating it with trims and laces. I started out with her using ONLY 100% cotton woven fabric to go along with the trend in dollmaking towards quilt fabrics but I just couldnt eliminate those other wonderful fabrics!
NOTE>>>Very thin fabric may need to be underlined with fleece so the stuffing goes smoother. In class one lady did use a very thin knit with sparkles on it. We underlined it with felt! Worked GREAT!
6. 2 yards of "allover" lace with a border edge or 1 yard if it has both edges with a border.
8. A small piece (1/4 yd.) of taffeta, or other elegant fabric for the skirt yoke. You can use a woven or a knit like the ones with the sequin look. You can also use the torso fabric if desired.
 9. 2
yards, of 2" wide gathered lace, to co-ordinate with your fabrics.
9. 2
yards, of 2" wide gathered lace, to co-ordinate with your fabrics.10. Assorted smaller laces, braids, trims, sequins, strung pearls, beads, ribbons, flowers, etc. Just get into your stash and find a bunch of pretty "stuff" and as the decorating begins, you may need a trip to pick up something else pretty.
11. A small bottle of tacky glue, and a bottle of Fabri Tac glue. (Also your low temp "hot" glue gun. For the positioning of the shoulder plate on the body, and other things if desired.) You can also sew everything on if you wish. Takes lots of time, and I am not a "sewing purist", so I very neatly glue many trims on, sometimes using hot glue, sometimes using Fabri Tac.
12. Acrylic paint for the shoes and face features. Co-ordinate the shoes with the "dress". Also trim for the shoes. You may want to wait for those til you decide what shoe style you are going to make. I will be showing several styles and doing 2 styles in the class.
13. Colored pencils for the shading on the face, and "people" blush for the cheek blush.
14. A pair of "people" fake eyelashes. Long and thick. We are going for vamp here!
15. A very small (ten 0) paintbrush for the face and a little bigger one for the shoes.
16. A small bottle of White Gesso.
17. We will be doing Crystal Lacquer fingernails on Milli so you will need a bottle.
23. Your sewing machine in good working order.
24. Schmetz Universal Needles in a size 10 or 11.
25. Your usual, hand and machine sewing supplies.
26. A long, slim, flat blade screwdriver for stuffing. About 10" to 12" total length. Mine has a blade about ¼" wide. Using a screwdriver for a stuffing tool will make your dollmaking both easier and faster! Not to mention higher quality. I promise!
27. A small package of WHITE, Model Magic clay. This is for stuffing the neck. This stuff is great for necks and even for whole heads, shoes, etc. It stays slightly "spongy" after it air dries and you can even sew through it for a day or so. It is available at Walmart, Michaels Crafts, Craft Warehouse, and I even saw it at Jo Anns. Be sure to get WHITE.
28. A tiny piece of WHITE Sculpy or Fimo for the nose. I dont like the Model Magic in the nose, because it doesnt take the sculpting well.
29. A small bottle of ultra fine glitter. I like the iridescent kind. My favorite one says it is gold, but it looks more multi colored and crystaline. We use it on the shoes and the eyelids.
WOW! This looks like quite a list! BUT It is just body materials and stuffing. Clothing materials. Hair materials. Painting and sewing supplies, and, of course Freezer Paper.
Go to... ~ Classroom ~ Pattern ~
Copyright
Notice: All pages and graphics are copyrighted
by the Internet Visions Company and/or instructor.
You may print these out for the use of the class only. All
other uses or distributions are forbidden.
Crafty College and Doll Net are divisions of the Internet Visions Company.
© 1997-2003, Internet Visions Co. All rights reserved.