Ó 2000 Judi Ward -Judis Dolls
Making the body.
First lets talk for a minute about the fabric you have chosen for the body. You can use almost anything but each fabric needs to be treated differently.
*Some will need a good woven fabric
under-lining.
*Some will need a fleece or felt under-lining.
*Some will need no underlining, (but most
benefit from the underlining.)
When we do an underlining we are just going to lay it down with the fabric and cut and sew them all at once, as if they were just fabric, without the under-lining.
Easy and effective.
Now, why have I given so much over to this underlining thing? Because when I started teaching the Milli class here at the "Unfinished Castle", even though the supplies list said Good Woven Cotton for the body, everyone came with such an assortment of fabrics they all needed to be treated differently. We even had a vintage re-embroidered silk fabric that was dry rotted!
Sooooo.
***Fabrics that need a good, solid, woven, 100% cotton fabric underlining***
-
Any stretchy knit.
-
Some Doesuedes, if they have a lot of give. Most are very firm, but some of the less expensive ones have more stretch.
-
Velour.
-
Silkama Velour.
-
Royalcama Velour.
-
Raw silk.
-
Any thin sequined fabric.
-
Any loosely woven fabric.
-
Any other knit of any kind.
***Fabrics that need a fleece or felt underlining***
-
Taffeta.
-
Satin.
-
Thin cotton or poly cotton wovens.
-
Summer weight linen.
-
Rayon wovens.
-
Thin silks.
-
Raw silk.
Any fabric that is thin. The fleece or felt will eliminate "Cellulite" while stuffing.
***Fabrics that dont really need an underlining***
-
Expensive cotton wovens.
BUT
If you use the fleece or felt underlining with them, cellulite will be a thing of the past.
If you have a concern about the fabric you have chosen for the body, post to the Blackboard and we can figure it out. Some fabrics actually benefit from both under-linings! The firm, woven cotton for stability and the fleece or felt to prevent cellulite. Some that fall into that category are the thin silks, polyester lining fabrics, organdy, chiffons, laces, etc.
Lets look at the cotton, fleece and felt, I have used for under-linings. The woven cottons are easy to find. Just use 100% cotton broadcloth.
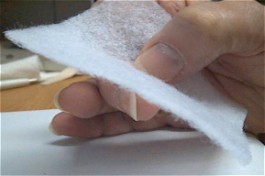 The fleece. It comes on a bolt by the Pellon interfacings. It is about as thick as felt. Thermalon is what the one I have says on the bolt. |
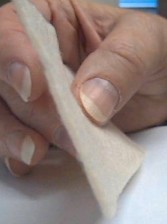 Felt from a bolt at Jo Ann fabrics. |
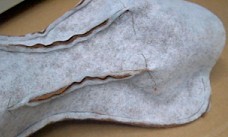
To cut the fleece/felt/cotton out right along with the fabric, you will make a "sandwich" which goes Underlining body fabric, right side up body fabric wrong side up Underlining.
The same "sandwich" is used for fleece, felt or cotton woven under-linings.
It is really easy to get mixed up when doing this and have the wrong fabric in the wrong order.
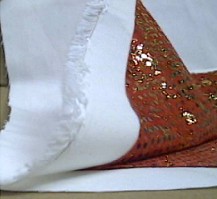
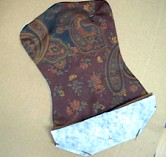
I am using a very firm doesuede for one doll for this class, but I am going to under-line it with Fleece, because it is a little thin. It is firm enough that it doesnt need the woven underlining.
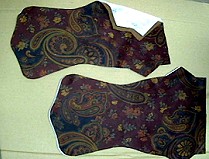
I am using a velvety velour with a gold filigree print on it for the other doll in class. I am going to underline this piece with a woven cotton because it has a lot of stretch. It also has a rather thick, fuzzy surface so it doesnt need the fleece to prevent cellulite.
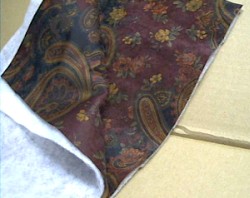 The sandwich. Fleece, Doesuede (right side up) Doesuede, (wrong side up) Fleece. |
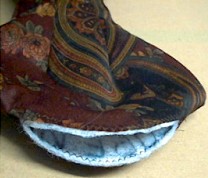
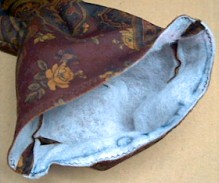
 Another sandwich. Cotton woven, velour, (right side up) Velour, (wrong side up) cotton woven. |
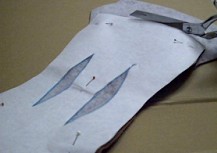
1) Now, cut your body patterns out of Freezer paper if you havent done so already.
Cut the darts out of the paper, and cut the little Vs out of each side of the body back piece.
The reason I want you to cut the darts out of the paper, is because we are going to draw through them onto the fabrics.
2) Set the body front piece aside for a minute. Iron the body back piece to the fabric sandwich you have made (We will cut the body front from one of the body back pieces) (Remember how we cut the shoulder plate pieces out. First the upper and then the lower from the second upper?)
3) Stick a few pins here and there in the pattern to keep the fabrics together for cutting.
4) Draw through the darts in the body back pattern piece with a Gel Pen or colored pencil. Gel Pens work GREAT!
 The pattern ironed on and pinned here and there. |
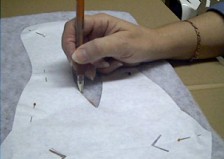 Draw through the darts. The big one and the little Vs. |
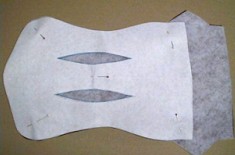
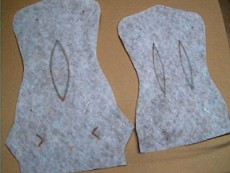
6) Now take the pins out and take the bottom "layer" of the fabric sandwich away from the top layer. You will have what appears to be two body backs In fact that is what you have at this point. Each piece of fabric has a piece of underlining under it.
 The fabric sandwich cut out using the body back pattern to cut around. |
 The two body backs and under- linings separated. We will cut the body front out of one of these sets. |
7) Now lay the body front pattern on the wrong side of the piece you took away, and line up all the top and side edges.
8) Iron the body front pattern to that body back piece, and cut the body front out. You will only have to cut a little, because except at the bottom, the front and back are the same. There may be a little difference around the shoulders and sides. These are just cutting discrepancies between the front and back. They are usually so minor that they are taken care on when you are sewing the front to the back. If they bother you, trim them off. Sometimes they wont be there at all.
 Iron the body front pattern piece to one of the body back sections. |
 Cut the excess from that body back piece. |
Now you will have a body back piece, with the fabric and under-lining together, and a body front piece with the fabric and under-lining together. (You can peel the Freezer paper off now.)
Both pieces will have the darts DRAWN through NOT CUT OUT. Sorry, yelling again!
I had a student in a hands on class cut the darts out before I could get to her, so I know it is a thought.
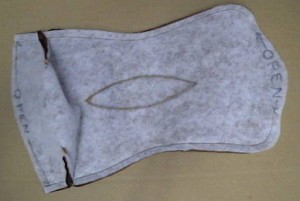
 The front and the back cut out with the darts drawn through . |
 The Freezer Paper peeled off. See how the darts show up . |
10) Now to sew the lower darts in the body back They are just like sewing in a dart on a ladies blouse or dress. Simply pinch them up and sew from the edge to the point. I back tack at both ends. Some prefer to tie the ends.
11) Trim the excess fabric from the darts to about 1/4".
 Pinch the lower darts up and sew them in. |
 Trim the excess fabric from the darts to about 1/4". |
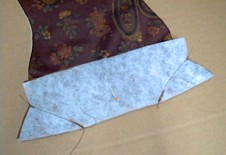
12) Fit, pin and sew the body parts together around the sides, leaving it open at the straight bottom and at the top where it is marked on your pattern. Back tack at both ends of your seams.
We will be attaching the legs at the straight bottom and stuffing through the open top. Trust me, it is easier this way. The "normal" way to do this type of body is to sew it all closed except at the straight bottom and then sew the legs onto the front part of the body, then stuff through there and then have to hand sew the bottom neatly closed, with the stuffing working against you. I like to sew that bottom closed without the stuffing getting in the way. Just lazy I guess!
Also, when you stuff through the top, you get a better "bottom" and can stuff down into the body by sitting it on a table. You can do a really firm stuffing job this way, and the "bottom" will be good and solid for sitting upon.
NOTE>>>If you desire, you can fill the lower body with plastic pellets to weight it. About 3 cups would be good. Finish with very firm stuffing.
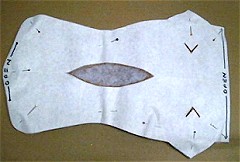
The top opening wont show at all when we pull the shoulder plate over it, so you can close it with big ugly stitches if you want to!! Permission to make big ugly stitches!!!
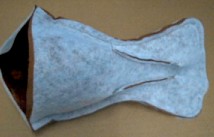
The sides sewn. I marked OPEN at the top and bottom for you to see it better. You dont need to mark it though. Note that we havent sewn the long waist darts yet. It is best to sew them after sewing the sides together.
15) Trim the side seams nice and even too.
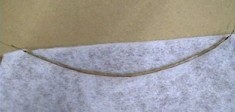 Birds eye view of sewing a dart "just outside the lines you drew". |
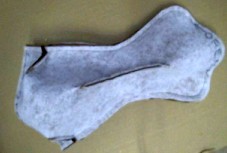 The back dart sewn and trimmed.. |
 The front darts sewn and trimmed. |
 Trim the side seams nice and even too, If you havent already.. |
16) Turn the body right side out and zig zag stitch along the edges of the top opening and along the edges of the bottom opening.
 Zig zag stitch along the top opening. |
 Zig Zag stitch around the bottom opening. |
Go to... ~ Classroom ~ Pattern ~
Copyright
Notice: All pages and graphics are copyrighted
by the Internet Visions Company and/or instructor.
You may print these out for the use of the class only. All
other uses or distributions are forbidden.
Crafty College and Doll Net are divisions of the Internet Visions Company.
© 1997-2003, Internet Visions Co. All rights reserved.