Ó 2000 Judi Ward -Judis Dolls
The head, face,
and eyelids and attaching the head to the neck.
Plus, of course, little extras to keep your mind racing!
The head a face are probably the first thing you look at when you see a doll. They are what draws you in and captivates you. I want to try to help you to make Millis head/face the best you have ever done
Make two heads, if heads and faces have proven to be a problem for you in the past.
Millis face is meant to be painted with acrylic paints, but can be embroidered or done with colored pencils. I will be showing the painting techniques only, except for some Gel Pen work that you can do if desired.
You can use Gel Pens on the face without fear of the pens bleeding.
If you choose to use any other fabric pens on the face, go about it with great trepidation!
On unsealed fabric the other fabric pens, which are used on 100% cotton woven fabrics can often be a runny, smeary disaster! They also bleed on 100% cotton wovens if you press a bit too hard.
If you must use any pens other than Gel Pens, seal the fabric with Krylon Clear Acrylic spray after sewing and stuffing the head .
Krylon is available in the PAINT dept. of hardware and variety stores. In fact, ANY clear Acrylic spray will work. Test on a tiny scrap of fabric first though.
Only use the spray on the smooth side of napped fabrics, like Velour and Doesuede
When sealing, spray 1 coat, let dry, spray another coat and let it dry for at least 2 hours before proceeding with any fabric pen except Gel Pens. You do not need to seal the Doesuede or Velour to use Gel Pens.
Please, do try to do the face with acrylic paint if at all possible. The face will be more vibrant. More dramatic. More permanent and once painting faces is conquered, it is usually the medium of choice, for truly beautiful art dolls.
***Lets get started***
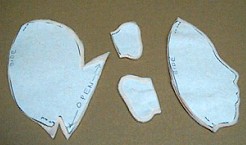
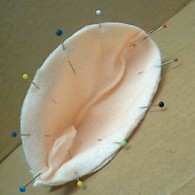
Following is what you should have. I am showing both the dark and light heads that I am making.
Notice that I have the head and ear pieces on separate scraps of fabric. It is easier to sew when the pieces are separated.
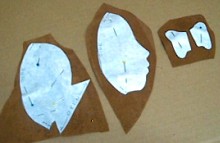
The head and ears pieces ironed on. |
The head and ears pieces ironed on. |
2) Set your sewing machine at that tiny stitch length, 15 to 20 stitches per inch, and sew the center front and then the center back seams of each head piece, right along the paper. Sew to the end of the "tabs" but leave the places marked OPEN un-sewn. Leave the sides un-sewn also.
Also, when you get to the Vs of the tab, sew over a couple of stitches and then turn the fabric and finish to the end of the tab. It is a tight V and if you sew over a couple of stitches, it will clip and turn better, just like between fingers.
Sew VERY accurately along the profile. The pattern should also have been
be cut VERY accurately.
In hands on classes, I have found many dollmakers who do not cut the patterns accurately nor do they sew accurately, and the front seam and the dolls face suffers from "crooked seam" disease! Sometimes they lose the mouth bumps too, and then the mouth isnt as dramatic. When I catch it we go back and do it over.
It is hard to catch in hands on classes, because everyone is working at a different speed and some are not really listening to directions Here, I can catch it before it happens!
In a well sewn, and stuffed profile faced doll, the seam down the front will disappear from the eye. If it is crooked or jerky, it will stick out like a sore thumb.
The "stitch, stitch, lift and turn method is VERY IMPORTANT around the nose, lips and chin.
3. Sew the curved edge of the ears. Remember, the stitch, stitch, lift and turn method here too! No jerky little points permitted anywhere!
4. Cut the parts out, right along the paper at the UN-SEWN edges, (sides) and 1/8" from the sewn edges. (center front, and center back) NOTE*** A hint for the under chin area. Leave the seam allowance a little bigger under the chin so you can open the seam there. It makes a nicer chin area when it is stuffed, if the seam is opened in that area.
|
|
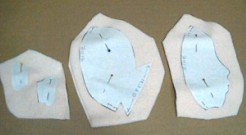
The head and ear pieces sewn
and cut out. The sides are not sewn.
Look on your pattern pieces to see where the sides are, the marks dont
show very well here.
6. Put your hemostat inside of an ear and grab a bit of fabric in the jaws. NOTE*** Poke a bit of fabric into the jaws with your fingernail, then close the jaws. Pull the ear right side out, and release the fabric. (Dollmaking requires fingernails!)
Using your closed hemostats, poke all the edges of the ear out nice and smooth.
Repeat for the other ear.
7. Draw the inner stitch lines on with a colored pencil, a shade or two darker than the "skin". Be sure to make a left and a right ear by laying them in front of you as shown to draw the stitch lines.
The reason you need to make a right and a left ear, even though they the ears are the same on both sides, is because some sewing machines dont like to sew on stuffed things, and they will not make as neat a stitch on the back side. By making a right and a left, you can always hide the bad side against the dolls head.
8. Stuff the ears very lightly, and then sew on the inner stitch lines. (Remember, the stitch, stitch, lift and turn method!) Set the ears aside after they are done. They will be hand sewn to the doll after the head is all stuffed. (or maybe you wont even use them) Dont let the cat get them. My cats LOVE little stuffed doll parts!
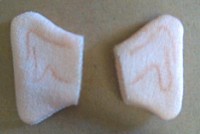
Ears, with inner stitch lines drawn on. |
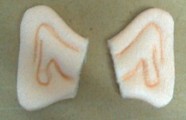
Ears stitched on the inner stitch lines. I darkened the lines with colored pencil. I have found I like that "look" with ears. |
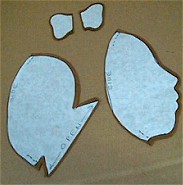
Now, we will put the front and back head pieces together.
It is like a self-facing now. The end that is pinned is at the chin end of the head piece.
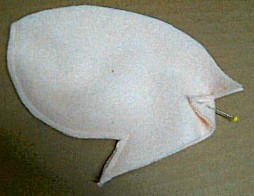
The little tab end pinned
out of the way.
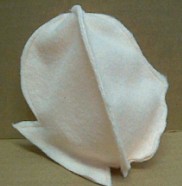
10) Press the center chin seam open, both front and back, and then fit, pin and sew the head front to the head back, all around the sides. NOTE***If you turn the front, right side out and lay it into the back, they will "cup" together and it makes it easier to pin and sew.
The head front "cupped" into the back. |

The view from the back side. |
Fit, pin and sew the front to the back all around.
11) Trim the side seam all around to 1/8".
12) Turn the head right side out. Push the "lip bumps" and nose out nice and rounded, using your hemostat. You didnt lose your lips did you?
Wrong side out. |
Right side out. |
13) Now it is time to do the clay in the nose. This is really easy to do and results in a firm, smooth nose that you can actually sculpt inside the head to make a real looking nose with out needle sculpturing. (This method is best for dainty noses. Big Honkers look best stuffed and needle sculpted.)
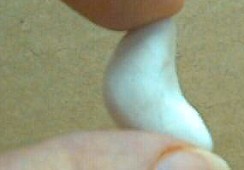
The piece of clay you will use for a full sized Milli will be about the size of a marble. For smaller dolls you will of course use a smaller piece.
The following picture looks huge of course, but compare it to the size of my fingers, and you will see it is about the size of a marble.
14) Now, before you put the clay in, shape it into a cone on both ends, and slightly curve the middle. Place one point in the point of the nose, and have the other point going up the center seam towards the forehead. The whole thing will only be about 1" long total.

|
|
It doesnt have to be perfect, because you are going to
mold it inside the fabric more anyway.
15) Guide the clay into the nose area of the head and press it into the point of the nose really well. Form it into a "nose shape" wider at the nostril area and tapering up towards the forehead. Squeeze any extra clay that wants to go out into the face back to the back side with your fingers.
You will do the forming right through the cloth, and by reaching inside with your fingers and pressing the clay out at the sides for the nose flares. Try to keep it even on both sides and dont smash the clay out into the face.
Push up at the bottom with your fingernail to flatten the nose there. Also pinch the sides above the nostril area to narrow it there. There will be a picture of this pinching following the drawings of where the clay doesnt go, and where it should be.
NOTE>>>Some of the sculpting will distort as you stuff the head, but it is easy to fix it after the head is stuffed.
Again, excess clay will need to be worked to the back side, not out into the face. If it is lumpy on the back side that is O.K. It will grab the stuffing better.
EX-RAY VIEWS. The clay is
INSIDE.
16) Now it is time to stuff the head (the nose will be baked after this initial stuffing is done) Really! Head and all in the oven.
A little stuffing right behind the nose helps keep it from pulling loose and getting lost in the head as you are stuffing. Use large pieces of stuffing and stuff up into the top and upper sides of the head first. Then stuff the mid face and jaws.
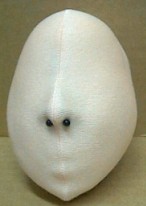
Following are pictures of the nose starting to take shape and just a little stuffing in the head, so you know that at this point, the head is going to look weird and the nose wont be perfect. You have several more "goes" at it to get the nose really nice and dainty.
The nose shaping up. Just a little Stuffing in the head at this point. Note one side bigger than the Other! I will fix it, Honest!!! |
The head shaped up much better. The nose looks better too. It is about ready for the final pinch and the nostril pins. |
17) Pinch the nose above and below the nose flares, and press up at the bottom of the nose to be sure no clay is going down in the mouth area. Pinch and shape the nose bridge more too. It needs to be thin going up towards the forehead.
18)Now, take 2 round headed pins and push them into the nose where the nostrils will be. Push them hard so they make a dent there.
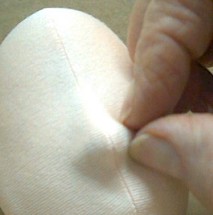
Pinch above the nostrils and push up where the "nose holes" would be. Flatten the base of the nose, so clay isn't going down into the mouth area. |
 The pins pushed in to form the nostrils. |
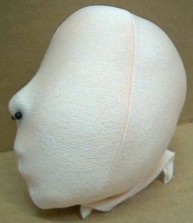
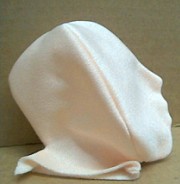
The side view at this point. The head IS NOT finished being stuffed yet. It is just stuffed enough to get an idea of shape and form and to hold the nose in place and let you sculpt the nose nicely. |
19. Now go turn your oven on to 225 degrees. Lay a towel in the oven and lay your dolls head on the towel. Nothing will burn up, Honest!
Leave your dolls head in the oven for about 15 min. Turn the oven off and let the head cool before you touch it. The fabric and clay are tender while hot.
20. Pull the pins out of the nostrils. (Sometimes the pin heads pull off. If that happens, pull the wire out with your hemostats.) The pins will have left nice little indentations to hint at nostrils. You will later draw the nostril flares on with colored pencil, and color the dents in too.
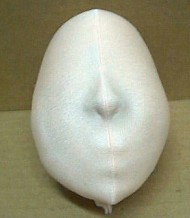
The pins are out. Notice the nice
nose
under the "skin" and the nostril "dents
At this point, you may have an Alien though!!!
With the nose nice and hard now, you can really finish stuffing and shaping the head.
21) Stuff down into the chin very well. It may get pointy, and you may not want that, so, stuff out into each side of the chin to round the lower face more.
22) Add more stuffing where needed to shape the "heart shaped" face. Keep in mind that a neck has to go up in the opening in the head. Always push the stuffing AWAY from the opening, leaving a hollow spot big enough to put your thumb into.
The easiest way to do this final head stuffing is with the head face down between your knees.
When stuffing this type of head it is as easy to stuff it out of shape, as it is to stuff it into shape! Keep turning the head to look at what you are doing and shape the head by adding more stuffing to the cheek areas and up under the eye areas. Be sure that any stuffing you push into an area near the "skin" is fed in and smoothed as it is fed in. dont just take a wad and push it in. It will always make a wad in the doll.
Before the lips are pulled out more. |
After the lips are pulled out more. |
REMEMBER! Leave that space in the head for the neck to fit into. Keep pushing the stuffing away from the neck hole!
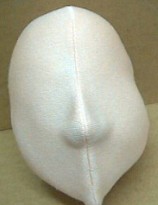
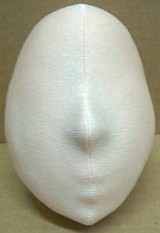
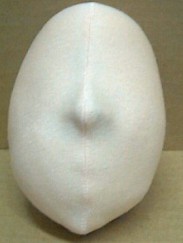
NOTE***Millis head is "sorta" what the books on face shapes call "heart shaped" from the front, and has a skull shape from the side. She has a narrow forehead
Some heads will turn out a little bigger than others. Some will have a more protruding mouth area. Some a wider jaw area. Some will have a protruding chin and some will have a slightly receding chin. Every one you make will be slightly different.
These differences are all O.K. As long as the head is smooth and nicely shaped. Part of the fun of cloth doll making is the little variances you can achieve with just a tweak here and bit of stuffing there.
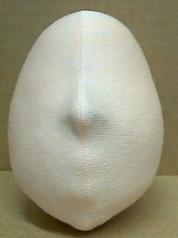
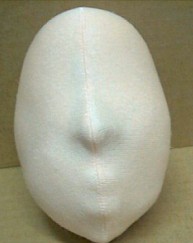
The head from the front. |

The head from the side. |
***Now lets put the face on***
1. Now it is time to make the templates for the eyes and mouth if you arent able to free hand the face.
NOTE***Please, if face drawing and painting is something you do well and love to do, design and paint the face you want on your Milli. Free-handing faces is one of the greatest joys of dollmaking.
BUT If free-handing isnt an option, I will teach you a Template Method that lets the most artistically challenged dollmaker make a nice face.
3) Using the side of a lead pencil, cover the BACK SIDE of the features on the pattern sheet with pencil. This makes a carbon. Lay the " pencil carboned" paper over a sticky label, and draw over the features. The features will be transferred to the label/labels.
4. It is best to put the mouth on one label, and trace one eye on another label. Fold the label in half, and cut 2 eye shapes at once. I also like to fold the mouth in half down the center of the "V" in the top lip and cut the mouth out on a fold. Makes both sides of the mouth match.
5. Now, cut the eye and mouth shapes from sticky labels. Cut just inside of the lines, so the features dont get bigger. You can also cut another sliver, (1/32") off of the features all around, so you can simply draw around them on the face, rather than drawing slightly under the edge. Remember***When you draw around something it gets bigger.
NOTE>>>To get the backing off of the labels is a trick at times! The easiest way is to slide the point of a needle between the label and backing. Get your bi-focals out for this, or take them off, whatever works!
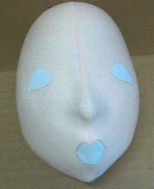
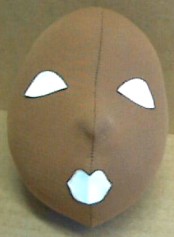
6. Stick the cut out features on your dolls face using these guidelines. The bottom of the mouth will be about 1" above the point of the chin. It is actually very easy to locate where the mouth goes on Milli! because she has those little "mouth bumps".
The bottom of the eyes will be about 1 and 1/2" above the TOP of the top lip.
There needs to be about one eye width between the eyes. This placement is not written in stone, but be very careful not to put the eyes up on the forehead, and the mouth down on the chin!
You can adjust the features a little at this time. Perhaps slant the eyes a little, or move the mouth up or down a little. Each tiny move of the features will give your doll a different look. You can even color the sticky label parts to get a better "pre look" at what the finished face will look like.
Dont slant the eyes too far down at the outside corners. It makes Milli look sleepy all the time.
Also remember, there will be eyelids above the eyes, so dont put those eyes so far up on the head, that the eyelids will be in her hairline!
Let me show a couple of common but bad feature placements. For Milli it is the eyes that are often placed incorrectly. The mouth is real hard to place wrong due to the mouth bumps.
Eyes too high. |
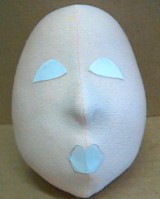
Eyes too far apart. |
 Eyes too close together. |
***After the next 3 paragraphs I will show faces with the features just right***
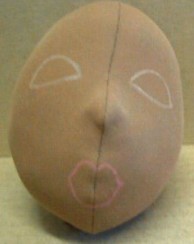
When you have them placed where you want them, Draw VERY LIGHTLY! JUST UNDER THE EDGE of the shapes, with a sharp, brown colored pencil for the eyes, and a sharp, red or pink colored pencil for the mouth.
REMEMBER***The reason I have you draw JUST UNDER THE EDGE OF THE SHAPES is because when you draw around something, it gets bigger. When you paint these features, you will cover ALL of the colored pencil marks, so you dont want to start out too big.
Note***(Just draw around them if you cut that extra 32" off but If faces are very new to you, it is harder to get an idea of the placement when the label features are actually too small, that is why I make the templates in the pattern the right size rather than too small)
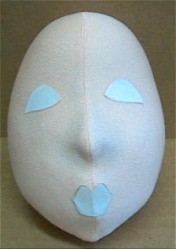
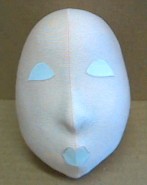
Placed just right. |
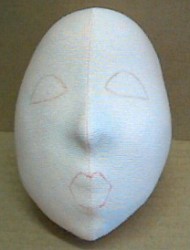
Templates drawn around. |
Here is the other head too. She is going to be gorgeous!
The reason she is showing up infrequently is because as I was writing this class, I was teaching a Hands On class and she was used in that class a lot.
|
|
7) Lightly draw in the tiny nose lines, and eyebrows with a light brown colored pencil. (Or a color that will show on your chosen fabric) Use these face pictures as a guide.
The center of the eyebrows are about 1/2" above the top/center of the eye shape. These are just little curves and not hard to do freehand. Practice on paper first if you are a little dubious about it.
We will be applying raised eyelids and "real" eyelashes so you dont need to worry about those yet.
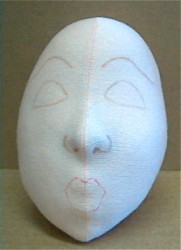
Eyebrows and nose lines drawn in. |
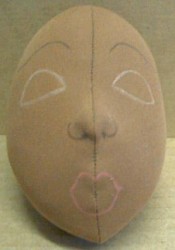
Eyebrows and nose lines drawn in. |
Some finished faces to look at to get an idea of the variety that can be achieved with the same templates.
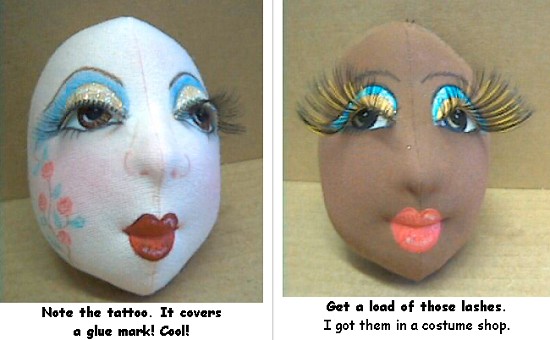
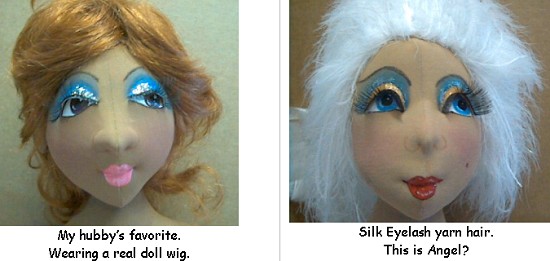
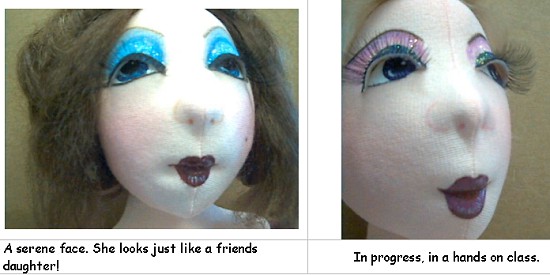
These are just some dolls I have on hand. Every one of them started with the same templates.
Tiny painting changes make the different "looks"
Go to... ~ Classroom ~ Pattern ~
Copyright
Notice: All pages and graphics are copyrighted
by the Internet Visions Company and/or instructor.
You may print these out for the use of the class only. All
other uses or distributions are forbidden.
Crafty College and Doll Net are divisions of the Internet Visions Company.
© 1997-2003, Internet Visions Co. All rights reserved.