Ó 2000 Judi Ward -Judis Dolls
***Now, the mouth needs to be sculpted in, before painting****
I needlesculpt with a quadruople thread. Not quilting thread, just ordinary thread that I am using for sewing the doll. Remember; always pull on the thread not on the needle. Also, "help" the stitch pull the area in, by pressing on the area with your finger to indent it. If you try to let the thread do all the work, it will often break!
Tie your thread off using a "nurses knot". This is an automatic "Square knot". You dont have to think, right over left-left over right. Remember the Nurses Knot at the beginning of the class?
Always use a needle that is long enough to reach from the sculpted part to the back or top of the head, without "squishing" the head to do so.
I enter from the front for all needle sculpturing that will be tied in the back, top or side. If you have ever done any needle sculpting, you will remember how hard it is to get a needle to come out where you want it to on the face! I solve that by entering from the front.
I start each stitch exactly where I want it on the face and then exit where I desire on the top, side or back of the head. The exit spots on the head arent so exactingly crucial.
This method really solves the problem of poking around, trying to get the needle to come out where you want it! Honest! It is worth the effort to thread the needle twice.
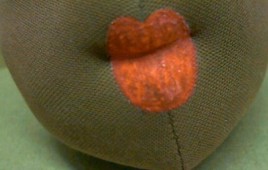
1. Thread your needle sculpture needle with 2 strands of thread about 40" long. Pull half way, so you have 4 strands. Dont tie a knot in the end. (A quadruple thread)
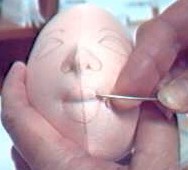
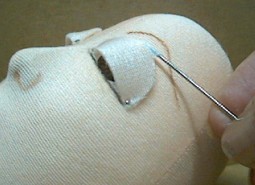
2. Put the needle in at one mouth corner and out the top of the head about ½" behind the seam and on one side of the center seam. Leave the longest thread length hanging out of the corner of the mouth. You only need about 5" coming out of the top of the head.
3. Now, thread the thread hanging out of the corner of the mouth onto your needle and put the needle in at the other mouth corner and out the top of the head, near the first exit place.
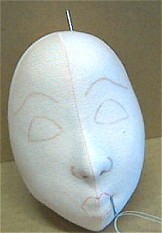
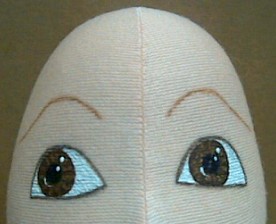
Entering at the first mouth corner . |
Entering at the second mouth corner. |

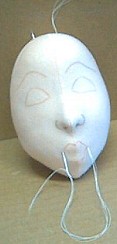
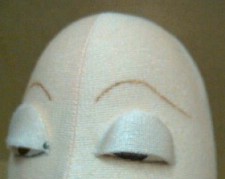
Tied at the top of the
Head.
I shortened the threads on the second picture so I could get them in the picture.
Ideally, they would be longer so they are easier to hold onto to tie them at the top of the head.
|
|
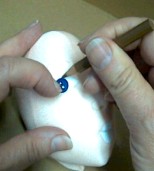
For the mouth, it is almost always necessary to pull some stuffing into place above the thread, and sometimes below, to give the mouth more of a smile. Pull stuffing into place, with the point of your needle,
Pulling stuffing into place.
This picture is from the Whatever! Class. It showed what I wanted, so I didnt change it. No sense recreating the wheel!
The eyes will be pulled in AFTER the eyes are painted, and the eyelids and even the eyelashes are on.
But This doll often doesnt even need to have the eye corners pulled in.
***Now it is time to paint the features***
When painting doll faces, the first, foremost, and perhaps most important thing to remember is that you dont get to freely stroke the paint on in flourishes like an artist doing an oil painting Unless you are an artist, and know what you are doing! The minute you start to stroke the paint on with the side of your paintbrush, is the minute your paint will go out of the lines!
When painting doll faces, you are just filling in pre designated spaces, neatly and fully. You need to paint with very tiny (000 to 00000, even 10 zeros! My favorite brushes are ten zero spotters.) You need pointed paintbrushes, and you need to learn to paint with your paintbrush held STRAIGHT UP AND DOWN. The weight of your hand will rest on your little finger.
I call it "assuming the position"
and below is what it looks like. If you want to learn a whole lot about
painting doll faces, mixing colors, etc. (Over 60 pages worth) I do teach
that class at Crafty College too.
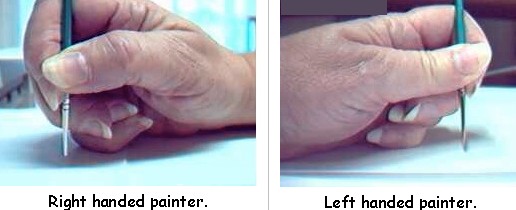
The correct hand position for
face painting.
Boy, I really need a manicure
and some anti wrinkle cream too!
Manicures only last about 30 minutes though, so why bother!
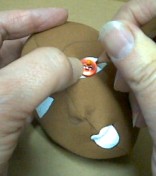
1. First do a fill in, on the eye and mouth shapes with Gesso. Gesso seals the fabric and readies it for the paint. Gesso also prevents any "paint bleed" from occurring, as long as you keep the paint on top of the Gesso. Once in a great while, acrylic paint will bleed. It usually occurs when the paint hasnt been shaken up really well. Some of the "watery" liquid comes out first, and that is what bleeds.
ALWAYS SHAKE YOUR PAINTS REALLY WELL BEFORE USING.
NOTE****The gesso covers all of the marks for the basic eye shape and for the mouth shape.
Apply the Gesso thickly and dot it around the edges.
You can sand it after it is dry with a piece of Brown Paper Bag. It works, really!
I apply the gesso and paint so thickly that I dont feel a need to sand. The combination of Gesso, paint and clear gloss later, makes the surface smooth when all is done.
Remember, it aint done, til its done! Every step will bring you closer to perfection but in between you will have some weird lookin times.
2. After the Gesso is dry, paint a coat of white paint (or another coat of Gesso) on the eye shape. Let dry.
3. Use a small button to draw around for the iris of the eyes, if you dont feel confident drawing them freehand. Make the eyes looking either to the right or left. It is very hard to get eyes to look correct if you try to center them in the whites. The side glancing eyes are also more alluring for Milli.
Be sure to have a little of the colored part of the eye drawn to appear to be under the edge of the eye. If white shows all around, your doll will look beady eyed.
REMEMBER! When you DRAW AROUND something, it gets bigger, so the button you need to use may be lots smaller than you think. The one I used was 3/8" across.
Draw around the button with colored pencil. |
Draw around the button with colored pencil. |
NOTE***I am drawing around the button with a brown colored pencil for the light skinned doll because the eyes are going to be brown. It is easier to cover the colored pencil marks if they are the same color as the eyes. If you do miss a speck, it wont show.
For the dark skinned doll, who will have solid black eyes, I am using a black colored pencil.
NOTE>>>Think about the clothing colors when choosing eye and mouth colors. But the nice thing about painted faces, is you can change your mind about the eye and mouth color right up to the time you say, its done!
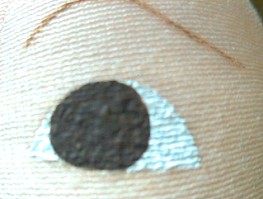
4. Now fill the whole iris (the round part) in with one color. You choose. A solid black iris is the easiest, and I will do one that way, and show it later. When you make a solid black iris, you dont have to do anything else to it except for the "life-lites".
5. If you painted the irises solid black, let the first coat dry, then paint on a second coat. Let the second coat dry. You will add the life-lites later, but there is no need for a pupil.
6. For more detailed eyes, paint the irises any solid color, and then add little lines from the center to the sides in a different shade. Perhaps blue irises with dark navy lines OR Green irises with dark green lines, Etc.
A solid brown for the irises.
I did this REALLY close so you can see all of
the tiny imperfections that won't show at all on the finished doll.
You can even see the "knit" of the fabric.
Those little bumps will also disappear! Honest!
7. Now make a lighter or darker shade of your "iris" paint color and paint in the little radiating lines in the iriss. If the base coat for the eye is light, make the radiating lines darker, and vice versa if the base coat is dark.
For the brown eyes I am going to make some lighter brown by adding some metallic gold to the brown. This makes a tan with a bit of glow. You could add a bit of white instead.
Again with the "birds eye
view. See the little
random lines made with the golden tan.

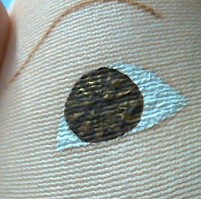
A solid black pupil done with the end of the paintbrush . |
Both eyes with the basic paint on. Looks, funny right now!!!! |
8. To outline the eyes, use black paint, or that wonderful black Gel Pen and carefully paint (or draw) a VERY THIN LINE around them.
If you paint, DON"T try to work the paint down into the fabric. The line will be on top, and may even have tiny breaks in it due to the "knit" of the fabric.
To paint a VERY THIN LINE of paint, your paintbrush needs to be loaded with paint, and you need to hold the paintbrush STRAIGHT UP AND DOWN, so the paint flows off of the tip, rather than off the side of the paintbrush. The paint right at the tip, is the only thing that touches the fabric. You will have to reload the paintbrush after about 1/4 " to 3/8 ". sometimes even less! Keep that line thin!
Since the "invention" of the Gel Pens, I have been using them for this outlining, and really love them. It is much easier to get that fine line. This is especially good news for the painting challenged.
The black outlines around the
eyes.
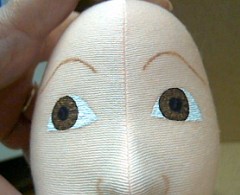
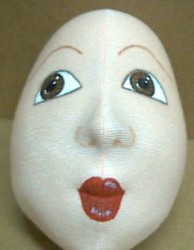
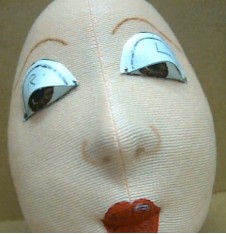
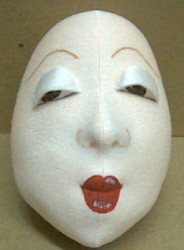
9. Now add little "life-lites" in white, as shown in the following picture. The black eyed doll shown already has her eyelids and eyelashes on. I used her as a demo head in a class here, so she got ahead of us.
This will happen frequently in this class. I have several dolls in various stages and they will show up here and there as needed.
She also got her eye-shadow, and lips. This shows you that there is still hope for your dolls head. It will go from weird looking to Wonderful real soon!
The eyes done except for the eyelids and eyelashes, shading and glitter . |
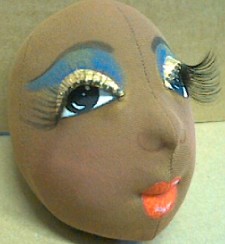
Ahhhh, all those things are done! Another set of GREAT eyelashes! |
10. Do the eyebrows in brown paint or fill them in darker with brown colored pencil or Gel Pen. NOTE>>>For a dark skinned doll black eyebrows are better.
11. Do the nose outline with light brown paint, or Gel Pen a color slightly darker than your dolls skin if you desire or leave them in colored pencil.
Now, lets paint a coat of lip color on the mouth.
1. Simply fill the space in, fully and thickly. Let dry, then repeat with a second coat of the lip color. Let the second coat dry.
For Milli I start with a true red for the lips. I put the head up on the body to see how the red goes with the torso, and adjust from there.
I have added a little blue to the red for a dark marroony/red. I sometimes add a little yellow to make a more orange shade. A little brown and white to make a mauvy shade. Experiment! Have fun! Try different colors! Use a cheap, Walmart paint brush and you can even mix the paint with the brush!!!
Experiment with color on a scrap. The lip color "making" is a fun part of the Milli doll. If you have a teen around, they will tell you EXACTLY what color is good with the clothes!!
I usually leave the mouth in the "Betty Boop" pursed shape. A very good "look" for Milli, but you can make her less Vampy by drawing the corners of the mouth paint out and up slightly at this time too. Keep the line thin. Later, you may even draw it up into more of a smile.
Dont forget the "dotting" of the paint around the edges, and do keep the paint on top of the Gesso.
2. Mix a color for the little "lip lines" by adding a little brown to the lip color if I have done pure red lips. BUT>>>Sometimes I will do those little lip lines in a lighter color. I have done that on the brown skinned doll. I didnt like the dark lines for her.
Remember, there are no "set in stone" color rules here. You can change your mind all along the way. You can paint over a color you dislike.
For Milli you dont need to define the center of the mouth with paint. The deep sculpting at the center of the mouth defines it just fine.
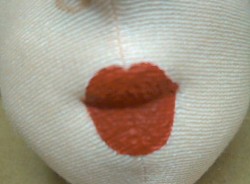
Painted solid red. I painted the corners out a little. |
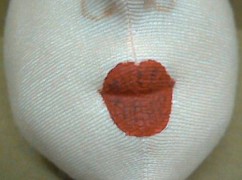
The little darker lip lines. |
These lip lines are done with
an orange Gel Pen!
3. With white paint, add a little "lite" to the lips too. On the top lip add the lite" in the same upper quadrant as you did for the eyes. On the bottom lip, add it in the center.
The "lites" on the lips. She still looks very plain, but just you Wait. This too shall pass! |
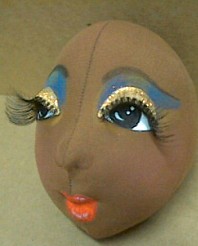
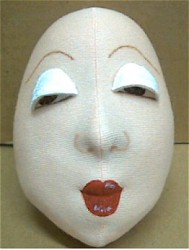
The lights on the dark dolls lips, and a lot of other stuff too! Like everything but the gloss, eyeliner and perhaps a beauty mark. |
With the one doll coming along ahead of the other doll, I think it will give you courage and trust that your dolls face will soon be lovely and dramatic. Do you agree.
Lets do those great domed eyelids now. The method I am going to show you can be used for any doll where the directions read, "make eyelids and glue them on"! I just read some directions like that and wondered how many dollmakers could do it without a little more info.
1) First get a piece of paper. I use a scrap of Freezer Paper, but for this class I am going to show this using tissue paper so you can see the eye showing through better.
After making the patterns on tissue paper, they need to be cut out of Freezer paper or regular paper so they have some body.
2) Lay the piece of paper over one of your dolls eyes, and draw right along the top line of the eye from corner to corner with a pencil.
3) Now, take the paper off and lay it down on the table. Draw about 1/16" away from that top line and then draw straight across the bottom, connecting the 2 corners.
The following photos tell the story.
Draw along the upper eye line. |
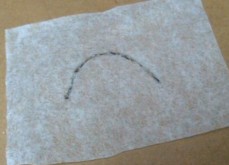
The upper eye line drawn on paper. |
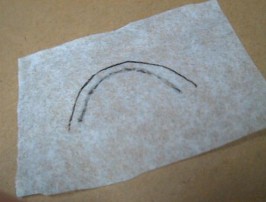
The line 1/16" away from the first line. |
The line straight across the bottom. |
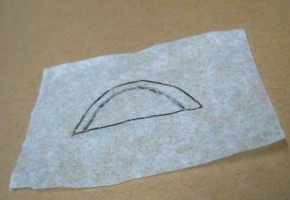
4) Now, make a right and a left eyelid pattern from firmer paper. I use Freezer Paper, folding it shiny sides together, and cut both eyelids at the same time.
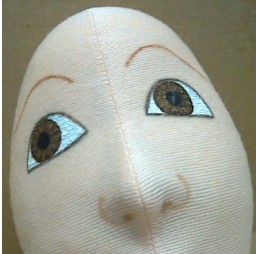
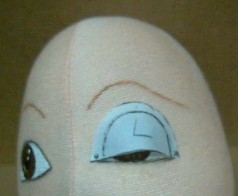
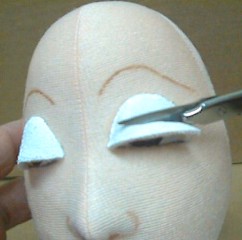
5) Place the inner corner of one eyelid at the inner corner of the corner of the correct eye and push a small straight pin straight into it, securing it to the face. Curve the eyelid and pin the other corner to the other corner of the eye. Push the top of the eyelid back against the face to see how they are going to "dome" over the eye.
NOTE>>>The upper edge of the eyelid will be about 1/8" above the top of the painted eye.
NOTE 2>>> The eyelids will be covering too much of the eye. We will trim them pretty soon. In fact we can trim them right up the when the eyelashes are applied!
6. Repeat for the other eye.
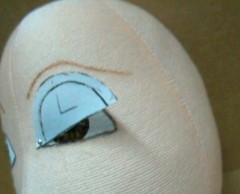
One corner pinned. |
The other corner pinned. |
Both paper lids on.
SoooooSleepy!
7. Iron your Freezer Paper patterns to a scrap of your skin fabric and cut them out.
8. Now, you need to take the paper off and put the fabric eyelids on, just like you did with the paper. (We are going to trim them, honest! But not until they are Gessoed) Be patient.
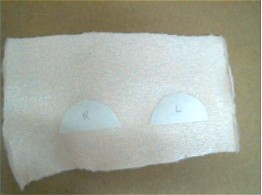
The Freezer Paper eyelids ironed to the fabric. |
The fabric eyelids pinned on. |
9. Using a Super Tacky glue and a long needle that you can hold onto,
apply glue carefully to the underside of the eyelids and press them
into the fabric all along the upper edge.
I put a little under the edge in the center, and press it down with the side of the needle, then remove one corner pin and put glue along that area and press it down, then remove the other pin and apply glue there and press it down.
Try to keep the glue sparse, and mostly under the edge of the lid. Some will come out on the skin above the eyelid, but try to keep it to a minimum.
I find most dollmakers have trouble applying the glue all along the edge and then putting the eyelid in place. It seems to stick to their fingers and drop on the face etc. Hence the above method.
Applying the glue under the edge Press on the top of the edge with the needle, after applying the glue underneath. |
One eyelid glued down. Note how it "cups" in and forms a nice rounded curve over the eye. |
NOTE>>>>The doesuede will not cup in as much as the velour. Dont worry about it, they are both fine. It is a mystery to me too. When all is done, no one will know!
10. Repeat for the other eye, and then let it set for a few minutes and check to see if the eyelids stayed glued. If a part came up press it down again, perhaps adding a little glue with the side of your needle.
Both eyelids glued in place and
drying
Sorry, she is still VERY sleepy or drunk!
When I have had the students trim the eyelids first, and then apply them we ran into a lot of trouble with not knowing how much, or trimming the corners off etc. so with trial and error I found it is best to wait til they are glued on, gessoed and dry. We will trim them with tiny scissors real soon and wake your Millis right up!
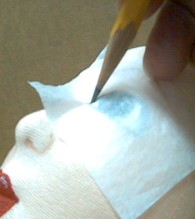
11. After the eyelids are glued securely in place, paint a coat of Gesso over them. Put it on thick. This will harden the lids up, and then after the Gesso is dry we will trim the lids.
12. Get a tiny pair of scissors, like manicure scissors and trim the eyelids off. Start at one corner and curve up, taking about 1/4" off of the center and taper to nothing at the other corner. This may not be enough. BUT .It is best to start small and work up.
Pictures will follow.
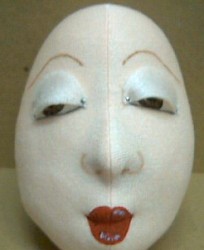
The eyelids gessoed and dry. My oh my does she look dazed! |
Trimming one eyelid. |
Go to... ~ Classroom ~ Pattern ~
Copyright
Notice: All pages and graphics are copyrighted
by the Internet Visions Company and/or instructor.
You may print these out for the use of the class only. All
other uses or distributions are forbidden.
Crafty College and Doll Net are divisions of the Internet Visions Company.
© 1997-2003, Internet Visions Co. All rights reserved.