Ó 2000 Judi Ward -Judis Dolls
... Applying and styling the hair into an upswept hairdo using felting needles ...
You can also glue the hair, use a felting and glue combo or
use a real doll wig. Milli takes a size 11"-12" doll wig..
Lets talk about Wefted Mohair .If you buy the seconds, (sometimes even in the firsts) there may be little places where the wefting is not even and the "hair" may be thin. For the way we are using it for Milli, that doesnt matter. We are going to cut the wefting off!!! You cant leave it on for needle felting.
Why buy it wefted then? Because when it isnt wefted, you have to deal with straightening it out and lining it up, and that is just a lot of extra time spent when you can get it already done for you.
Needle felted hair is NOT brushable, or playable. It needs to be put on, styled and sprayed heavily with hair spray. It is for "look at" dolls only. Milli is a "look at" doll.
For more durability, you can apply the hair by felting and then add thinned tacky glue over the "felted" area. .Use a flat, 1/2" wide paintbrush to spread thinned tacky glue over the needle felted hair. You have to do this in rows, if applying more than one row of hair to the dolls head. Let it dry between rows. This makes a sturdier hair do.
Some dollmakers are spreading tacky glue along the hairline and then pressing the hair into it, and then needle felting over the hair and glue. I found this to be too messy, the hair stuck to the needles, my fingers and everything within a 2 mile range! LOL and it really gummed up the felting needles.
If you want to, you can simply glue the hair on too. Use a "Low Temp" glue gun, to prevent 3rd degree burns, or Tacky glue. Follow the same application pattern, but spread glue along the colored band and press the hair into it. Do this a little section at a time.
If you have taken the Whatever! Whatever! Class, you can apply the mohair the way we did in that class for the one ponytail hairdo, using glue. Then continue with the upswept styling directions, which will come later in this lesson. For that, you dont cut the wefting off.
Needle felted hair is all the rage right now, so I want to present it for Milli. You can of course do the hair any way you wish, or use a wig. Some of the dolls that have been pictured have wigs and they are FAST and beautiful! The wigs are simply hot glued on. You will usually need to add the rat at the top of the head or stuff up under the wig before you finish gluing it down. Dont glue on the neck. Just let the edge of the wig back, hang over the neck. If you glue it to the neck, the head wont turn.
*About hot glue and wigs .I use hot glue for wigs on dolls because if you want to remove the wig for some reason, you simply direct a hot blow dryer at the glued edge and you can peel the wig off. No other glue will let you do that.
The directions that follow are for needle felting the hair.
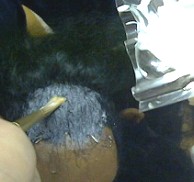
Now look really closely at your strip of mohair. One side will have little short hairs near the wefting. After you cut the wefting off, I want you to pull the little short hairs off, and set them aside. In the picture below, I have lifted some of the matted short hair up so you can see about how long it is. It is about 1 1/2 " long and very uneven on my piece of mohair.
See those little short hairs?
We want those kept to cover the "rat".
We are going to use those little pieces to cover the white stuffing "rat" that we are going to make, to hold the fancy upswept hairdo up. Later, you will needle felt the "rat" in place too.
For Millis hair, you will probably use almost all of the approximately 1 yard strip of hair.
Dont worry if you dont use it all though. You didnt do anything wrong. If when you gently pull the hair up into the upsweep, it leaves any "bare head" showing, you will need to go around the head again with another row of mohair, or fill in bare spots.
Now, lets get started .First, you need to establish the hairline all around the head. The hairline will go across the forehead, down in front of the ears a little, over the ears, and then down behind them. (un-pin the ears if you havent already) It will go low on the side-backs of the head and go up to just above the neck in the center back.
If you have chosen to eliminate the ears, the hairline will go below where the earlobes would be.
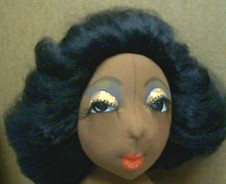
NOTE***Millis head is WEIRD SHAPED, and looks too small from the side and back, but with the addition of the hair, it looks normal.
1. If you can simply draw a hairline on, please do so. If not I will show you a way to do it with a piece of narrow ribbon or cord. In both the freehand drawn, and the ribbon method, please note that the side-backs dont go all the way down to the lower seam. They drop to only about 1/2" below the earlobe level.
Following are some pictures of the hairline drawn on freehand. It isnt hard at all. Just be sure that you dont go too far down on the forehead or the side-back.
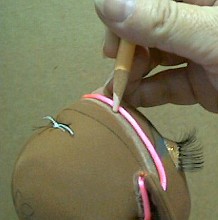
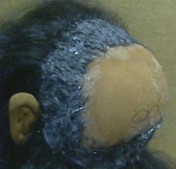
The front hairline is ABOUT 3/4" from the seam in the center. (picture # 1) I marked it with a colored pencil. All marks will be covered with hair. Heads vary, so the 3/4" is a starting point.
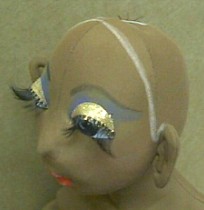
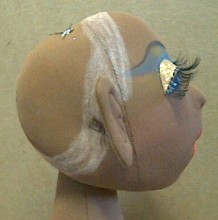
The second picture shows the hairline going down to below where the earlobes would be. I didnt put ears on this head. It also shows an eye on the back of her head!!!! Testing those new gel pens again .Sorry!
By the way, I didnt like the gel pen over paint for eyes. Too muted.
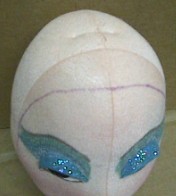 The front hairline. |
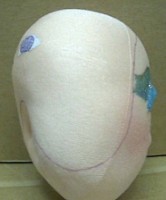 The side, and up to the back hairline. This hairline covers the ear area. |
2. If you dont feel confidant just marking the hairline freehand, you can use a narrow ribbon to plan the hairline, and then mark ABOVE the ribbon.
3. Simply start the center of a piece of ribbon in the center front and pin it down as you go. After you pin it down, draw ABOVE the ribbon. Pictures follow.
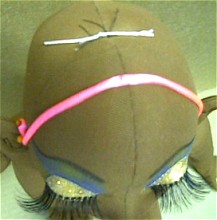 The ribbon pinned in front. |
 The ribbon pinned at the sides and around to the back. |
NOTE***I wouldnt usually be doing the hair after the eyelashes, but remember this little head got ahead of us sometime back in the class. She is on the body now too but She could come off and be replaced by another head!!! Who knows!?
The reason you draw ABOVE the ribbon is because if you draw below the ribbon, there is a huge chance for the hair to be too far down on the forehead.
Drawing with a colored pencil.
 The ribbon is removed. The front is drawn along. |
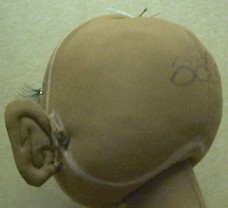 The back drawn along. There are those test eye shapes again! |
Before we get those felting
needles a-goin here is the politically correct CAUTION!!!
BE VERY CAREFUL WHILE PUSHING THE NEEDLE STRAIGHT UP AND DOWN INTO THE HEAD. Those needles are SHARP!!!!!!! They have BARBS, and they HURT!!!!!! A LOT!!!
You have to hold the hair some as you are felting it into the head, but keep your fingers as far back as possible!!!! Another reason for the wide band of felting we will do. DO NOT STICK YOURSELF!
You are now suitable warned BUT you will stick yourself at least once! But usually only once! J
Here is what my felting needles look like. I got them from a merchant on http://www.thedollnet.com You have the names of the merchants who carry them from an earlier chapter. Notice one of mine is bent, one is broken and there are only 3 left in the 4 pack I have been using. I tend to bend them and break them pretty often. At least one for each hairdo!
Some packages come 4 to a pack and some come 8 to a pack. The 8 pack is the best value, but it doesnt come with a little book of directions.
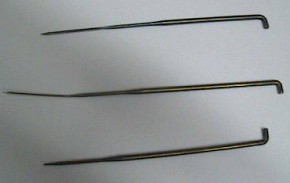
The top one is good. The
middle one is bent,
but still usable til it breaks. The bottom one is broken off.
I wanted you all to realize that the needles won't last forever.
Mine hardly last till lunch!
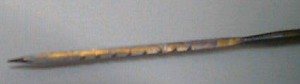
A close up showing the barbs
on the needle shaft.
These barbs are what drags the hair into the dolls head. They are also what HURTS so much when you stick yourself!
***Moving right along***
5. Now color a strip about 1/2" wide, all the way around the head, ABOVE the line you drew.
I have found in "hands on" classes that the students want to put the cut edge of the hair right on the FIRST line they drew.. If you do that the hair will not be secure enough. It takes that wide felted strip to make it secure. You will be pushing the needle into the hair and into the head the full 1/2" width.
The head colored all the
way around.
Hair will be felted into the full width of this colored strip.
NOTE****We will put the "rat" on after the hair is felted all
the way around.
NOTE 2****As you are applying the hair it will be down over the face.
You will work only about 1" at a time along the colored hairline. The first time around with the hair will often not be thick enough, and a second trip around will be needed. Be sure to apply the hair the full width of the colored part.
6. Now, cut a 1" section of mohair off of the wefting.
7. Pull the little short hairs off and set them aside.
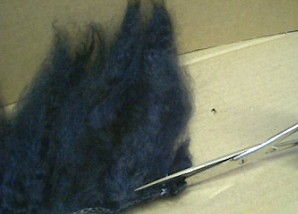 Cut a section about 1" long off. |
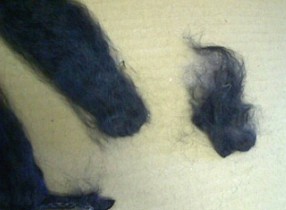 The wefting, the section that was cut off and the little short hairs. |
-
Now lets "felt"
that first section into the head.
NOTE***Some hair may go into the neck too, so turn the head a little to pull it off of the neck. This actually helps, as it pulls the hair in a little farther.
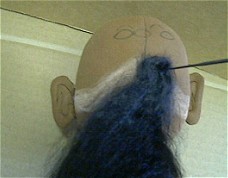 The hair laid over the colored part and the needle pushed in to start the application. |
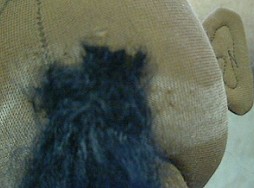 Note how matted the hair looks when it is felted in tightly. |
10. Repeat all the way around, a section at
a time, to the center back again. Be sure to save all those little short
hairs. We will need them later.
This whole process gets "real hairy" about now!
NOTE****If you want to make a full head of hair, you just keep going around and around till you get to the crown. "Felt" a last "plug" of hair right into the center top, and you will have a full head of hair. Remember the lady with the tattoo on her cheek? She has a full head of hair. For her, I went around once thinly, spread thinned tacky glue over the felting, let dry, then repeated this several more times around. By adding the glue, I can "comb" the hair with a needle and it is really beautiful. I wouldnt try to brush it though. The front hair was pulled back after all the felting and gluing was done.
12. GENTLY, pull the hair up to check and see if you covered all of the colored area. If any color shows around the face, carefully "felt" the area again, adding clumps of hair as needed.
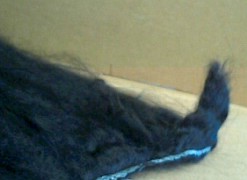
The edges around the hairline will show little "roots". I like them showing a little, but dont like them too long. They will pull out long if you pull on the hair too much. I also add tendrils along the front hairline, to cover some of them, after the hairdo is all secured in the upsweep.
 The hair hanging all around. |
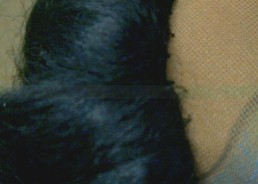 A fly's eye view of the "roots". See the long one? I need to needle felt this area some more. |
Now, gently pull the hair back and look at
your doll
.Does the hairline need to come down
more on the forehead? If so, put the hair back over her face and needle
felt at the center of the forehead making the hairline a little farther
down on the forehead (A widows peak?) I wanted my dolls hairline a little
farther down.
 The hairline too high in front. The hair is left loose here. |
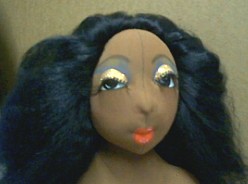
 It is much better now. The hair is "sorta" bent to the center in this photo. Not styled yet though. |
I have also decided that her hair is thick
enough and I dont need to add any more for the upswept hairdo. I had
a piece about 8" long left on the wefting. If you decide to use all
of your hair, do keep out a few long, curly tendrils for the face framing
tendrils we will do later. You dont need much, a couple of little "pinches"
will do. Pick some real curly parts.
Brushing the thinned glue on. |
The glue on all around. |
Go to... ~ Classroom ~ Pattern ~
Copyright
Notice: All pages and graphics are copyrighted
by the Internet Visions Company and/or instructor.
You may print these out for the use of the class only. All
other uses or distributions are forbidden.
Crafty College and Doll Net are divisions of the Internet Visions Company.
© 1997-2003, Internet Visions Co. All rights reserved.