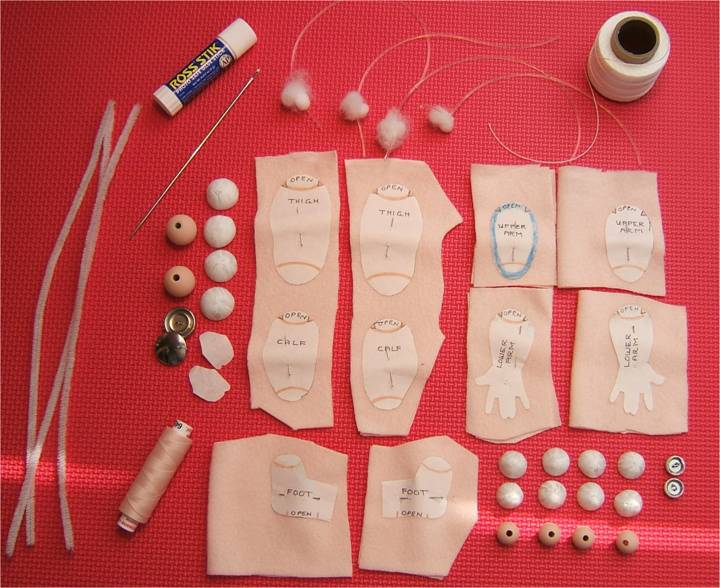
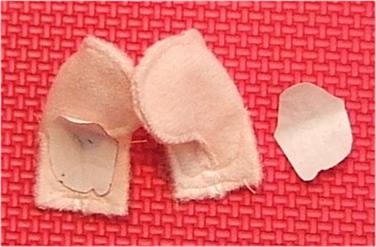
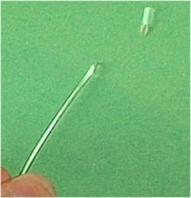
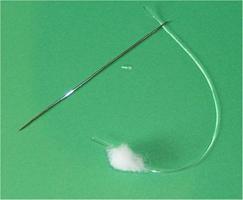
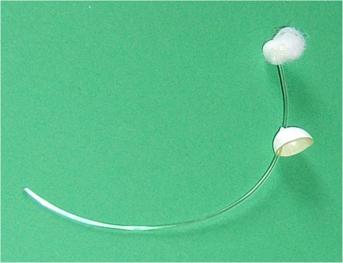
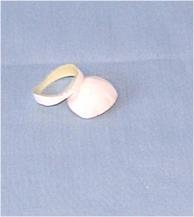
Bleuette in Cloth! Chapter 6 - Part 1 The truly ball jointed legs and arms for Cloth Reproductions of old porcelain dolls has been something I have wanted to do for ages. I "piddled" with it now and again, but never spent the time to make it possible for anyone to do. Now, there are a lot of cloth dolls with "balls" slid up on the fabric, as knee and elbow joints, and lots of patterns with "balls" with thread through them for joints, but as far as I have been able to find, none with ball joints that look like the old porcelain dolls joints, with stretchy cord running up the length of the arms and/or legs. I have pored over many old magazines and books to see if there was anything like it, and have not found anything .so .I "think" this may be a first for cloth doll makers. Remember, I am saying "I think" this may be a first, but it may not be but if there is another pattern like this, I'll bet it didn't involve plastic GRAPES! A bit of history about the plastic grapes When I first designed the Cloth Bleuette I was making the cups for the balls from clay. It involved shaping the oven baked clay like Fimo over the wood balls then cutting it in half and poking the hole then baking the little cups. This works great, but involves the ever feared "sculpting" and then to make matters worse I got hold of some old clay from a craft store that broke easily after baking and it was then and there that I was on a quest for another item for the cups. A brain burp declared PLASTIC GRAPES! The hunt was on but here in Germany , I could not find any plastic grapes except at a restaurant and they wouldn't sell me theirs! I knew they were readily available in America , so I had a friend bring me some after her visit back home. They were the answer to the problem! NOTE I have since found some in a builders supply place, in the garden section where they are putting out artificial flowers and such for spring decorations. You should have your grapes painted and cut in half .you should have the little X cut in the center of the rounded end .you should have your Stretch Magic cord attached to a clump of stuffing .you should have the wood balls painted to match your dolls skin .You should have the arm and leg pattern pieces ironed to your craft velour .you should have the shank buttons for the shoulder and hip joints .and .you should have jointing cord and a jointing needle .a glue stick Pipe cleaners or thin chenille stems .thread and stuffing .and . of course, and an open mind ready for this chapter. The sewing part is easy, no different than any other doll. The stuffing part is a bit different because the parts can't be stuffed really hard, which for me is very different. The Stretch Magic cord going up through the parts is different and inserting the half grapes in the parts is different. .but .none of it is really hard, just small and intricate. Following is a pic of what you should have ready. Of course, you will want your sewing machine, and turning and stuffing tools. This class is being written in Germany , in the winter, and the sunshine does not often show its happy face. This must be a good omen! Let's Begin
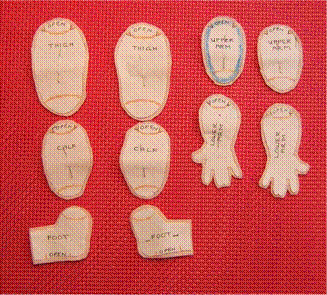
Above are all of the parts sewn around and cut out a scant 1/8" from the sewing. Notice that the cutting is the scant 1/8" everywhere but at the foot front. Your pattern piece will say OPEN at the foot front. Mine which is the old one I have used, adapted and changed over the past few months never got that written on it. Now, if you do cut a scant 1/8" from the foot front, it will simply allow you to place the toe template a bit farther from the edge for sewing the toe seams. The pattern has planned into it the ability to set that toe template at least ¼" back already though. 2. Fold the foot fronts seam to seam and press with an iron set on wool. Open the seams if you can as you press, then sew across the very front edge to hold the fronts together 3. Now, using the same wool setting, iron your toe templates to the front of the feet, keeping them at least ¼" from the edge.
4. Now sew around the templates, tapering your seam to the sides of the feet at both sides. 5. After sewing around the front part of the templates, remove the paper template, and trim the seams to a scant 1/8". Be sure to clip between the big toe and the rest of the foot front. NOTE You can make a simpler foot front by using the template in the Bonus Arm and Leg pattern.
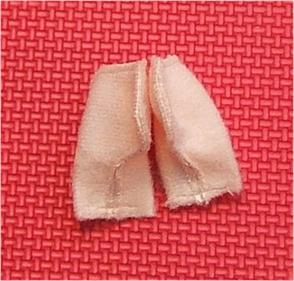
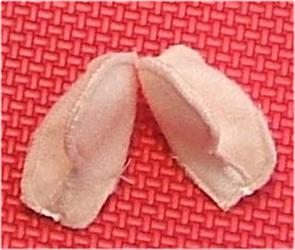
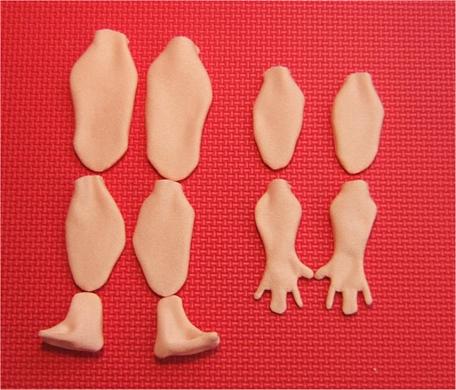
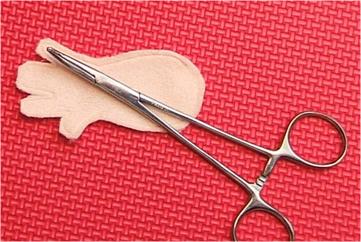
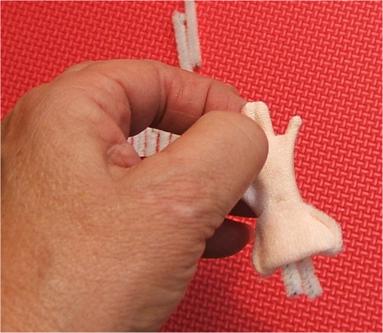
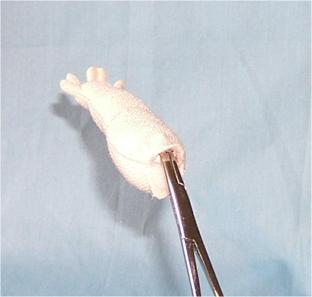
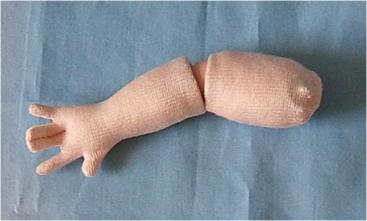
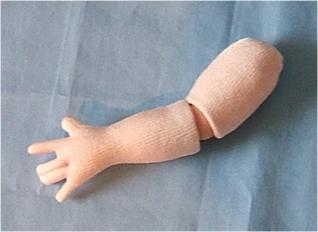
6. Now that all of the parts are sewn, you can turn them all right side out. You will need a small nosed hemostat for the turning, and if you have one with a very small nose, you can actually turn the fingers with it. Mine is a 5" curved nose hemostat that I got at the sporting goods dept. of K-Mart or Wal-Mart. They have them for tying flies. Some help with turning fingers follows the picture of all of the parts turned right side out. If you lay them in order as you turn them and work with the order, it will be easier, and you won't get the calf of the leg confused with the upper arm.
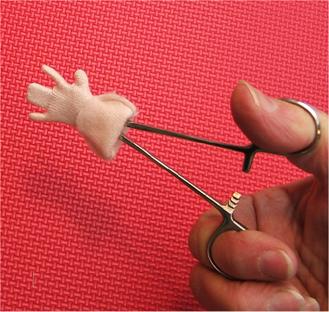
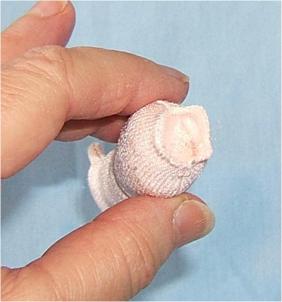
7. To turn the fingers with a small hemostat, push the hemostat into the finger, open the jaws the fraction of an inch that the size of the tiny finger will allow, poke your fingernail into the fabric at the tip to catch a bit of fabric in the hemostat and close it. Use a twisting back and forth motion, while holding the finger gently, to work the finger into the palm. Repeat for all of the fingers.
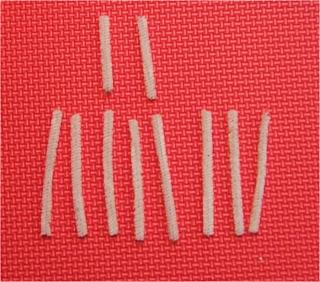
If you turn fingers another way, and it is successful, please use your way. The tubes work great, the needle and thread method works great, and then if all of that fails, and fingers are your downfall, you can make the simpler hand using the pattern in the Bonus pattern. With the fingers turned we are going to work our way up the arm, stuffing, adding the Stretch Magic cord, the GRAPES, etc. etc. all the way to the shoulder. 8. We will stuff the fingers with chenille stems or pipe cleaners. The small chenille stems are needed. 6mm is the size some packages say but I have a packet here that says 9mm and is the same size as the 6mm. Soooo, the size pictured is about right. 9. Cut 8 pieces, a bit over 2" long from two 12" long ones. The leftover piece at the end of 2 stems is just right for the thumb. If you are using real "pipe cleaners" the thumb piece is a bit over 1½" long then cut the 8 2" pieces from however many stems it takes. 10. Using your hemostat, bend one tip of each stem over about ¼", and then really pinch the bend with your hemostats. This is to compress it and make the tip as small as possible.
11. Guide 2 chenille stems into the MIDDLE fingers, with the bent end at the tip of the fingers. 12. Using your fingernail, press between the fingers to separate the stems inside so you can sew down the middle. 13. Sew between the fingers either by machine or by hand. If you sew by machine, begin your sewing in the hand, not at the tip of the finger. My sewing machine does this part very well, but there may be machines out there in doll land that will balk at sewing with the chenille stems inside, even though you won't be sewing the metal wire part. If that is the case, simply sew down the middle by hand, using a single thread. Start at the tip, leaving a tail of thread to tie. After sewing one way, retrace your stitches, going between the previous stitches so you have a continuous line of stitching. Tie the threads off at the tip of the finger, after either hand or machine sewing, and follow the "lose the ends" pics that follow.
14. Now push the rest of the chenille stems into place in each finger. Sometimes it may be a bit hard, and if that is so, you can use the stuffing needle to guide the stems into place. My small stuffing needle is simply a 5" needle sculpture needle that I cut most of the eye off of, using a wire cutter. The fork is very short. You just slip the bent end of the chenille stem into the fork, and guide the stem into place. NOTE The shortest stem goes into the thumb. 15. After all of the chenille stems are in, you need to wrap them tightly together with thread, and then you need to bend at least 1/2 " of the bundle of stems over and press it really tight with your hemostat.
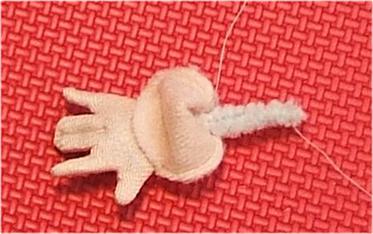
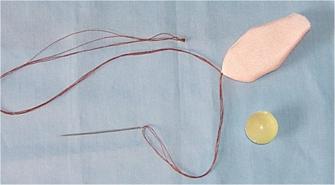
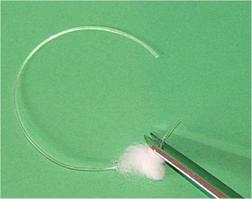
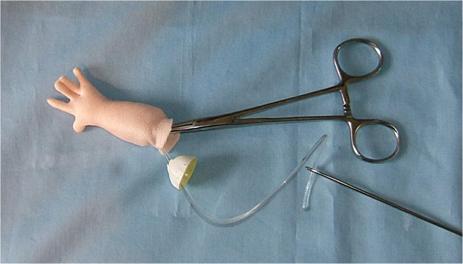
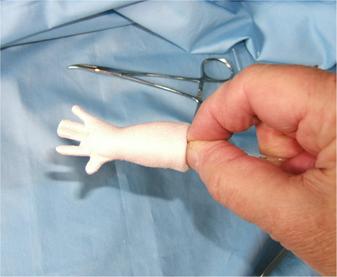
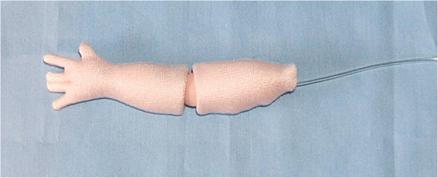
16. Everything up to here has been pretty "normal cloth dollmaking". Many of the things shown are really old hat in the dollmaking world, some perhaps a variation on a skill used a lot .But, now we are going to start with the Ball joints, so this will be very different as far as keeping the order you work in on track, and of course the Grapes! I am going to move my stuff over here to my computer and photograph with the blue cloth as background now. The red is by my sewing machine, and we are all done with that. This will change your ink usage too! I'll bet that will be welcomed! We are going to do one hand/arm assembly first. After you do one, you will simply repeat the procedure. Below is what you need to have ready for the one hand arm assembly Of course, you will need your stuffing too. My stuffing tool is a flat blade screwdriver, as everyone knows, and for this doll I have found it to be especially helpful in pressing the stuffing evenly all around, because I can't stuff the limbs for this doll as hard as I usually do. If you stuff too hard, the Grapes squish! Sorry, my 5" curved nose hemostat got left out the picture. I do use it for help in positioning the grape halves, and for bending the chenille stems.
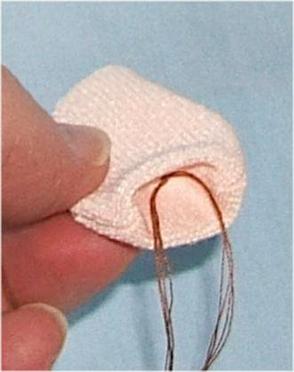
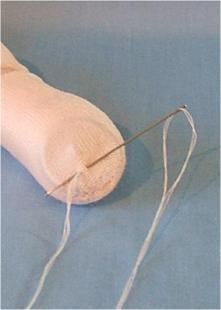
Of course you need your stuffing too And your hemostat Here we go 1. First, tie a thread loosely at the center of the closed, rounded end of the upper arm piece. This is to help you to find the center while you are inserting and positioning the grape cup. I did it with brown thread so you can see it better. It gets cut off later anyway, so the color doesn't matter.
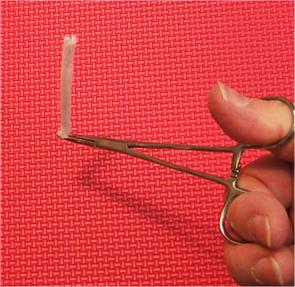
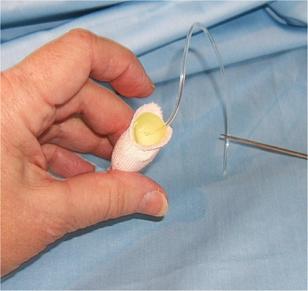
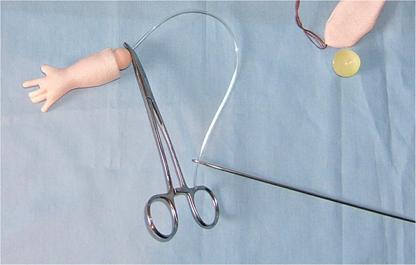
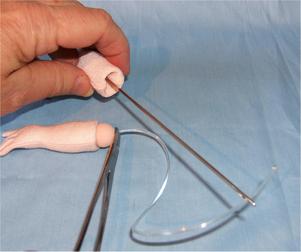
2. Now, cut the free end of the Stretch Magic Cord to a slant. This is so you can thread it through the eye of the 6" to 8" jointing needle. You may need to grab the bit with your hemostats to pull it through if you can't push it right through. Some of the needle eyes are big enough that you can just push it through, some not. I changed to a green paper because the cut cord didn't show on the blue fabric.
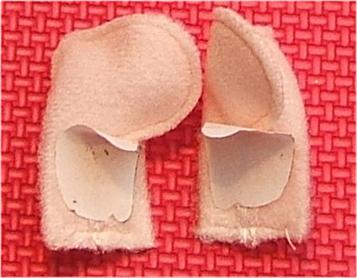
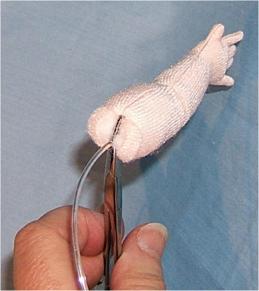
3. Now, gently and lightly stuff the hand. Put just a little stuffing in the palm and even less in the back of the hand. Stuff up the arm, carefully stuffing all around the chenille stem bundle. Work the stuffing nice and evenly all around and stop at the top of the chenille stem bundle .Remember, we will be putting the Grape Half in and the fabric will be glued down into the Grape Half, so if you stuff all the way to the top, like normal, there is no place for the Grape Half. I also press the end of the chenille stem bundle really hard with my finger to seat it very well down in the arm and hand just before I put the grape half in place. NOTE If you left the chenille stem bundle too long, the grape half won't sit down in the arm correctly. Remember, This arm top is different, in that it will fold inside of the concave part of the grape, not like a normal curved arm end, that you stuff fully and the top stays in the outward curved shape. The lower arm is not stuffed as hard as a rock either.
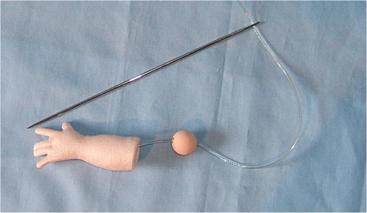
4. To start, string a grape half onto the cord as pictured. Your brain will tell you it is upside down .but it isn't.
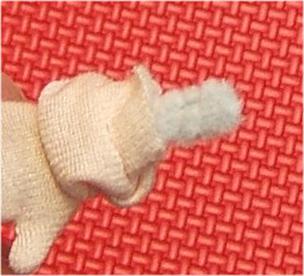
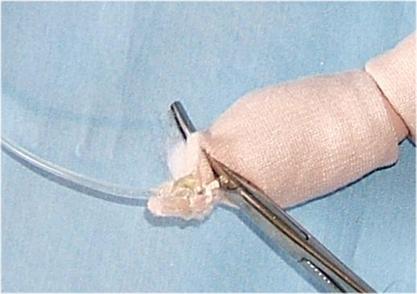
Now, this is the hardest part, in fact you will think it is impossible! 5. Push the end of the Stretch Magic cord with the stuffing on it into the arm. I do use my hemostat for this. Push really hard to get it down in there, right on top of the chenille stem bundle, with the cord as closely centered as possible. Now, start working the Grape that is still on that cord, down into the top of the arm, painted part first. The silly thing wiggles and bends and doesn't want to go in but using your fingers and even your hemostat to grip an edge that just isn't co-operating, you can get that Grape in there with the UN-PAINTED CONCAVE surface showing out the top of the arm. The PAINTED SURFACE IS AGAINST THE STUFFING . The following pictures will help. You want the arm to be as even as possible all around, and you want the curved edge of the fabric at the opening to be free. This curved edge will glue to the inside of the Grape. NOTE If you put the Grape Cup in place and it wants to "buckle", immediately take it out and cut a thin strip off. If it "buckles" it is a bit too big around, and removing the thin strip will make it smaller around. This holds true for every place where you put the Grape Cups in place. It is especially so where the cups go down into the closed ends. Sometimes you will get one grape in just fine for a part, and the exact same part, for the other arm or leg will not let you do it without cutting the thin strip off. Just be flexible, and don't try to force the cups to fit.
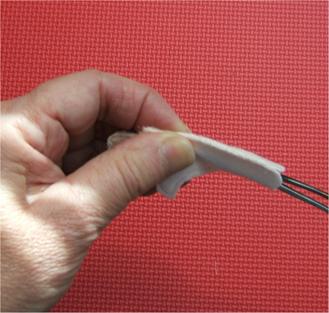
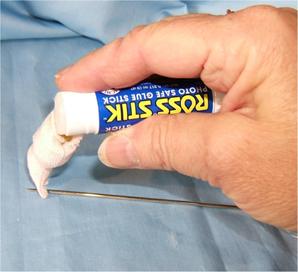
6. Once you have the Grape in there and it is looking pretty good, pull on the cord while pressing your finger or thumb into the concave part of the Grape. This will give you a better look at how even the edges are, before you add the glue and the bead. Sometimes you may have to take it out and add a bit more stuffing in the arm Sometimes not. The first one will be the hardest to judge, but you can do it! 7. Now, pull the fabric edges out of the grape and apply some glue stick glue to the edges and mash the edges back into the concave part.
8. String the bead onto the cord and push it down into the concave part of the arm top. Hold it tight to get a better look at how it will look when all done. At this point I often clamp the hemostat onto the cord to keep the bead tight, while I do the rest of the "ball jointing" procedure.
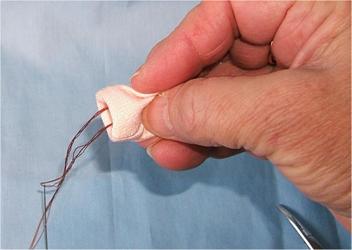
9. Now pick up the upper arm piece that you put the little thread into. That thread will be clipped off later, but it is your "center" guide for now. The grape half for this part of the arm goes down in the closed end where you have the thread. Once the Grape is down there and you start adding stuffing, the thread makes it easier to keep the center of that curved part in place.
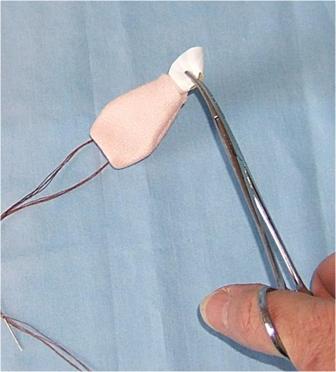
10. Work the Grape down into place, and then stuff the upper arm just a bit. Not all the way to the top right now. 11. Now, clip off or pull out the thread you put in for centering purposes, and then push the needle with the Stretch Magic cord on it, into the end of the upper arm with the grape in place. Try to get the needle through the X cut in the grape or the needle will make another hole, weakening the Grape and it will be hard to pull through too.
12. Finish stuffing the upper arm, keeping the Stretch Magic cord centered.
The cord doesn't look centered in this picture, but it is. 13. Now pull the cord up so the arm joint is tight, and clamp the cord with your hemostats .THEN .Tie a bit of velour (a small scrap about 1" long and ¼" wide) onto the cord as close to the clamp as you can. Drop a tiny bit of glue on the knot, and let it sit a bit before you cut the excess cord off and then unclamp the cord and let it go inside of the arm top. You may need to add a bit more stuffing too. The "ball joint" will not be extremely tight. It should move freely, but should not hang loose.
14. Let the knot and the bit of fabric go inside of the arm top and then push your shank button down inside of the arm top, with the shank against the INNER arm.
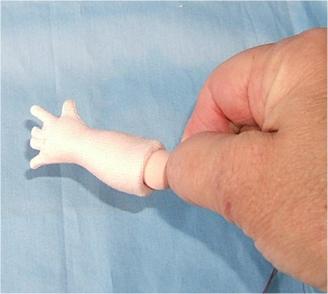
15. Once the shank button is in place, close the top of the arm with a ladder stitch. As you close the curved edge, be sure to take 2 or 3 stitches, and then push the stitched "ladder" with your finger and/or the tip of your needle to encourage the fabric to go inside.
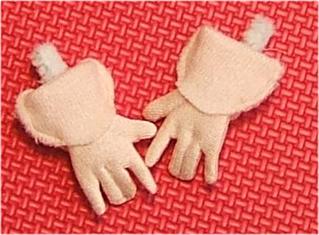
16. Now go back to the beginning and repeat the preceding for the other arm. BE SURE to make a RIGHT and a LEFT arm! You will find that the second arm is almost a piece of cake and it will be time for a piece of cake too!
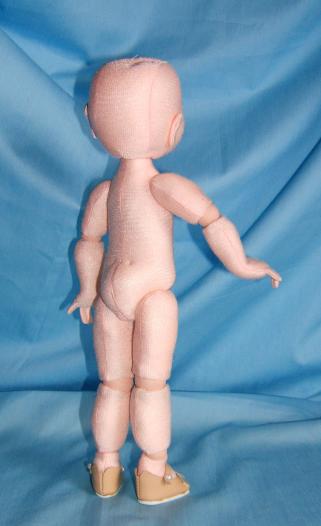
The arm will not bend fully like a human arm does, but it will bend enough to get the "ball jointed" look and the lower arm can be rotated to take many different poses. We will joint the arms and legs to the body at the same time and a short video will accompany the written directions for this procedure. This will come after we do the legs. Many dollmakers already use my "invisible jointing" method, and once you get the hang of it the "back and forth through the body several times" method will be deleted from your dollmaking repertoire. Also deleted from your dollmaking repertoire will be the "OH My! How do I tie it now?!?! My method goes through the body once and I show a way to tie the cords very tightly, all by yourself. You won't need to invite company over to hold the doll down or to hold the limb tightly.
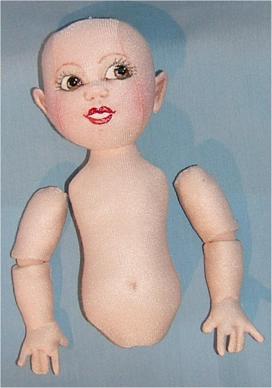
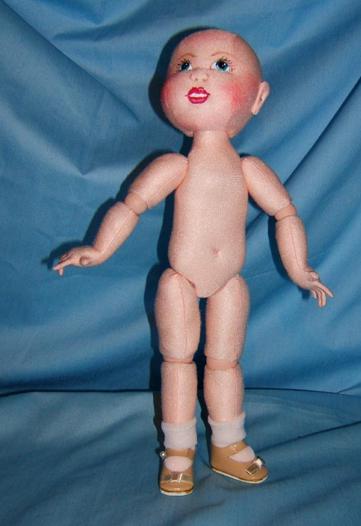
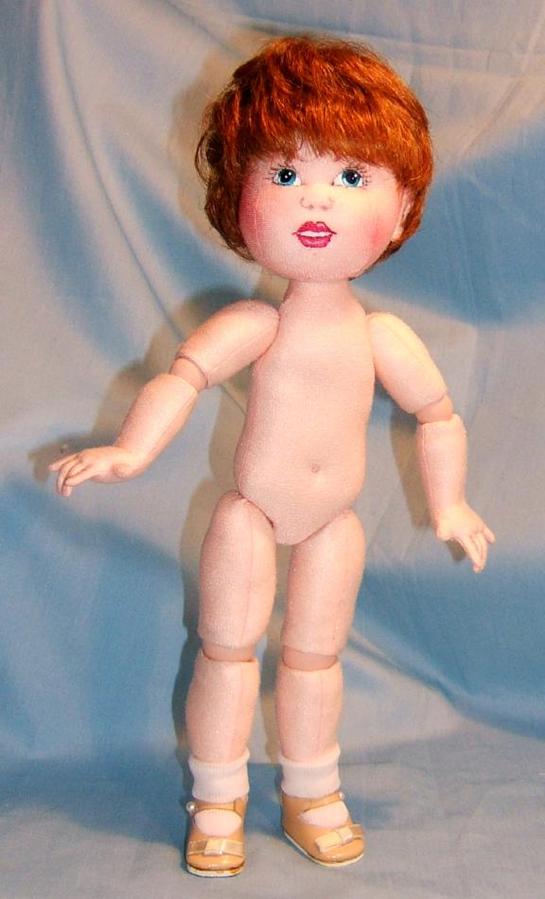
Just to keep you happily working on your Bleuette. Two "Little Bleuette" views. These dolls are sold. Before the doll on the left was shipped I painted over the little glue mess on the right shoe sole, in fact I painted the edges of both shoes. Sometimes with purchased shoes, a bit of glue escapes the inspectors scrutiny, but never a dollmakers scrutiny!
This picture is a bit smaller than actual size when printed on 8-1/2" x 11" paper. |