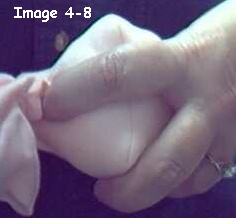
Image 4-8
Hold the body like this while stuffing the "Boobs".
This hold will be done for stuffing from the neck too, but in the reverse.
Taught by Judi Ward of Judi's Dolls
http://JudisDolls.com
***NOW IT IS TIME TO STUFF***
Please read the NOTES***they are extra stuffing tips, and will be used in different places. Some will be mentioned in later directions, some will be used intuitively.
NOTE***It will help to make the neck harder, if you stuff from the base of the neck to within about 1 1/2" from the top, with fluffed up cotton balls. Cotton stuffs harder, so makes a harder neck. Be sure the last 1 ½" is regular polyester stuffing though. It is almost impossible to get a needle through hard stuffed cotton, and you have to get a needle through the neck top to joint the neck
NOTE***I personally find that when I get the body about ½ stuffed, I work with the stuffed part between my knees, with my hand there too, and stuff "down". My knees give a little more support to the whole unit.
NOTE***Always hold on both sides of a seam, not right on the seam, when you get to places where "edge holding" is needed.
NOTE*** Pressing and twisting the screwdriver back and forth Once you get the feel for doing this, and using a screwdriver for a stuffing tool, and for holding parts as a unit, you will discover that your stuffing is MUCH firmer and smoother! Practice makes perfect.
NOTE***A lot of the stuffing will be started into an area with your fore-finger and then finished with the screwdriver.
***IF YOU ARE STUFFING FROM THE HIP OPENINGS***
The Directions for the stuffing from the
neck and for the clay in the neck will follow. Please read through all
of the directions before starting for the best results, and continuity.
1. Feed a large piece of stuffing up into the neck. Hold the neck like a banana and force the stuffing down hard with a twisting back and forth, as you push motion. (For added neck strength, stuff from about 1 1/2" from the top to the base of the neck with fluffed up cotton balls, if you dont think you can stuff hard enough with regular stuffing)Press and twist them in just like regular stuffing. Mold the neck with your fingers to remove lumps. You can also "spread" the stuffing with the flat blade of your screwdriver, to flatten a lump.
2. Continue stuffing down the body, remembering to hold the whole body as much as possible as you stuff. Make nice matching shoulders and stuff just past the boobs. At this point the stuffing wont be as hard as it needs to be.
NOTE***I switch from one opening in the hip area, to the other, to assure matching shoulders and boobs. (It is hard to stuff the right shoulder/boob from the left hip and vice-versa)
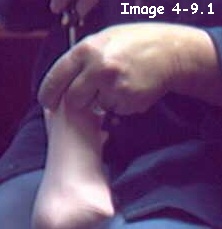
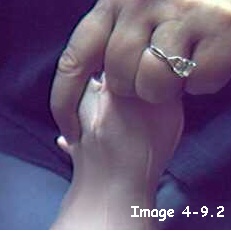
3. When the whole upper body is firm, add separate pieces of stuffing to each boob. Form and shape them, by adding more stuffing until they are what you want. (They sure are better than any I ever had!)
It is important to hold the body similar to the below picture for boob stuffing. It supports the rest of the body while forcing stuffing out into the boobs.
4. Continue down the body, shaping the bottom nice and round.This is where I would put the body between my knees to add large streams of stuffing while holding on each side of the seam, and then once the stream of stuffing is all in the body, I would pick the body up and start forcing the stuffing down with the twisting motion.
 Image 4-9.1 |
 Image 4-9.2 |
5. When the body looks pretty well stuffed, close the opening in ONE side with a ladder stitch.
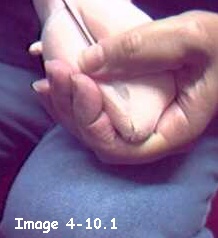
6. Add more stuffing from the other opening, straight down into the crotch to make it long and pointed. Add stuffing to make sure the hips go out on each side above where the legs will be too.
 Image 4-10.1 Stuff straight down into the crotch. |
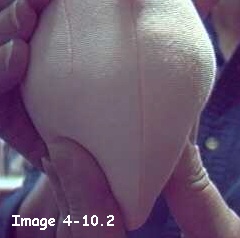 Image 4-10.2 This is the shape the lower body needs to have. |
7. When the body is shaped as well as you can get it, close the remaining opening with aladder stitch, adding stuffing as you close. The hip area needs to be somewhat concave and you dont want to push it all out of shape with too much extra stuffing though.
NOTE***this is a good place to practice the ladder stitch. It wont show when your doll is jointed, so practice small stitches, and larger ones to see what looks best. Usually, the smaller the stitch, the better it looks but This area will be hidden under the legs, so just practice.

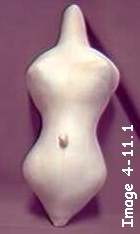
Image 4-11.1 Nice shaped body front view. |

Image 4-11.2 Nice shaped body, side view. |
Those belly button bumps still look gross!
Go to #1 in Making The Belly Button and Bottom directions.
****OR****
***IF YOU ARE STUFFING FROM THE NECK***
1. Roll part of the neck down. Feed in large pieces of stuffing, first with your fore-finger and then with your screwdriver.Once you have quite a bit of stuffing down in the bottom of the body, press and twist the screwdriver back and forth to force the stuffing down firmly, Push especially hard in the center of the crotch. The crotch needs to remain long and fairly pointed. Always hold as much of the body in your whole hand as you can to support it as you press the stuffing down.
By pressing large pieces of stuffing down, each layering into the stuffing below, you will be doing what I call "stuffing long". Rather than adding a little piece in this side, another over there, a tad right here, etc. keep the stuffing going down in layers, while holding the body (or any other part for that matter) as a unit.
2. Stuff fully and smoothly, out into the bottom. Dont stuff the belly button bump. At this point the stuffing wont be as hard as it needs to be. Each layer will firm up the stuffing.
The best way to hold the body until you get up to the boobs, is all the way around the un-stuffed part, and press and twist your screwdriver as you force the stuffing down.
Then when there is quite a bit of stuffing down there, change and hold the crotch area and press against your hand as you force the stuffing down harder.
3. Stuff to just past the boobs, and then work on adding stuffing to each boob, until they are firm and full. Shape them as you stuff, and make them match. (Ours dont but Hey! Whatevers can! Or at least come pretty close!) This is one place where you do add stuffing to just one part at a time.I would hold the body down between my knees at this point so I could stuff "down".
Be sure to bring the body up to look at it now and again. Flatten any lumps with the blade of your screwdriver before you are too far up the neck to get into the body easily.
4. Continue stuffing the shoulders and up the neck. The shoulders will need to be stuffed as separate units too, and when you are stuffing from the neck, you have to be very sure that the shoulders are full and smooth.
Remember, to shape as you stuff. Look at what you are doing, and make the hips, boobs and shoulders match.
NOTE***the belly button bump will remain sticking out for now. Never fear! We will pull it in, in a little bit.
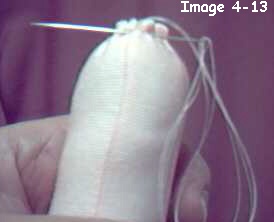
5. When you have the whole body and neck stuffed as hard and smoothly as possible, run a gathering stitch around the opening at the top of the neck and draw it up tightly. Secure your stitching, and go to #1 in Making The Belly Button and Bottom directions.
Read the Clay in the Neck directions too. You may want to try it sometime..or maybe you read all of the previous directions and have decided to try it for this first doll Or
You may want to do it for some "busts".
For the busts, I put the clay all the way down to nearly the bottom of the whole piece. I will staple the edge of the fabric to a wood plaque and decorate the edge and the shoulders, add hair a hat, flowers, ribbons, etc. What Fun!
Stuffing the body after you put Clay in the
Neck is the same as the stuffing from the hips, for all but the neck itself.
1. To stuff the neck with clay, first turn the body part way wrong side out, through one hip opening, so you can get to the neck easier.2. Put balls of clay about 1" around down into the neck. The first ball should be formed into a point so it will go up into the small end of the neck. NOTE*** I have found for Model Magic, you need to put a long tube down in and then mash it and add extra to it. With the other clays, when you try to put a long tube down in, it gets all stuck to the fabric. Model Magic doesnt stick to the fabric, but it is a little harder to get it to stick to itself too.
3 Press each piece of clay down firmly, sticking it to the previous one. Keep
filling the neck with the balls of clay (or pieces, for Model Magic) and mashing them together until you get down just below the curve where the neck curves out to the shoulder.
Shape the clay so the neck is nice and round and smooth. One sure thing about the clay in the neck. There are no lumps! HMMMM? Stuff a whole doll with Model Magic?
4. Finish stuffing the body, shaping and forming as before. Be sure to press the stuffing REALLY firmly against the clay.
5. This is where I would put the body between my knees just like for the regular stuffing to add large streams of stuffing while holding on each side of the seam, and then once the stream of stuffing is all in the body, I would pick the body up and start forcing the stuffing down with the twisting motion.
Be careful while doing this that you dont completely destroy the neck.
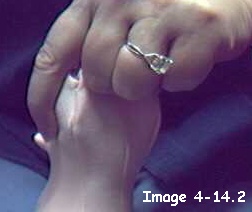
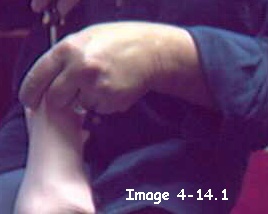 Image 4-14.1 |
 Image 4-14.2 |
6. Once the body is all stuffed, and the openings closed, shape the clay in the neck some more. Press in with your fingernails to form the neck bones if desired.See the neck bones in the pictures of the "busts" at the first of this chapter.
There will be a very small difference in the look between the clay and the stuffing, but by adding the neck bones, that is obliterated. Once you add a little blush across the neck bones, you wont notice it at all.
7. Close the openings just like before.
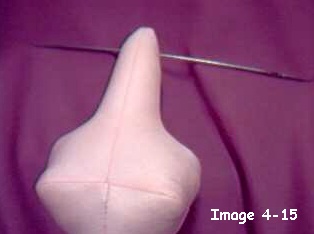
8. Put a jointing needle through the neck, from side to side, about 1" down from the top.
This is so you will have a channel to put the neck jointing cord through later.
Be sure to re-sculpt anything you messed up while putting the needle through.
9. For oven baked clay Lay your whole doll body on a towel in your oven. Turn the oven to 225 degrees. NO HIGHER!!!! Leave it in the oven for about 45 min. Turn the oven off and let it cool. Take the doll out and she will have a hard, solid neck like you have never done before.
OR .For Air drying clay. Simply lay the body in a warm, dry area, and let it dry for a couple of days. Dont forget to put the needle through!NOTE***If you used Model Magic, you can actually put a needle through it even after it is dry. It stays sorta spongy, but firm.
ANOTHER NOTE***Dont put Model Magic in a warm oven to hurry the drying. Been there, done that! It swells up!
You can put Paperclay and the Amazing Clay in a
warm oven to hurry the drying though. About 150 drgrees.
Now you have the body ready to finally get
rid of that offending belly button bump!
1. Thread a needle sculpture needle at least 4" long, with 2 strands of regular sewing thread at least 36" long each. Pull then 1/2 way through and tie a knot in the end. You will be doing the belly button and bottom with a Quadruple thread (4 strands)2. Put your needle in at the side of the belly button bump about 1/2 way between the end and the body.
3. Run a gathering stitch all around the bump, and then exit at the tip.
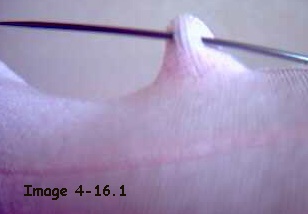
Image 4-16.1 Enter about 1/2 way between tip and body. |
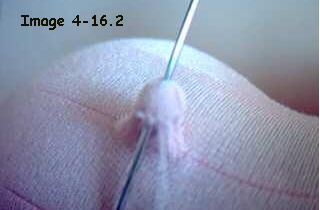 Image 4-16.2 Run a gather all around and exit at tip. |
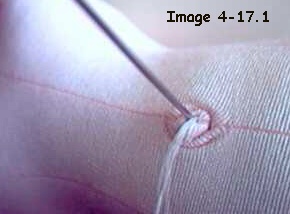
4. Pull all the thread up and pull the gathers some.5. Now, re-enter at the tip, which will push the belly button in, with all its little wrinkles.
6. Come out in the center of the back about 3/4" below the waistline. This is the top of the "butt crack". Sorry, I didnt know what else to call it!
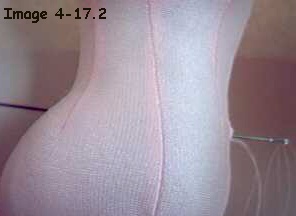
 Image 4-17.1 Enter at tip to push the belly button in. |
 Image 4-17.2 Exit at the back. |
7. Now, this is the hard part. Actually, it is the part where you need some strength. Did you eat your Wheaties?!You will take the needle and thread down to the center of the crotch and take a stitch. You want the thread to go right down the center back seam, which is going to make the "crack".
It wont be real deep, but will make the bottom look like it has a crack. This requires that you pull the thread tightly and then take another stitch to secure it. It is going to make some wrinkles right at the center, so dont worry about them.
Be sure that you pull on the THREAD, not on the needle. Pull it tight, and then grip the thread near the stitch with your other hand and take the next stitch. Take a few more stitches to secure the stitching really well and lose the ends. Pictures will follow.

Image 4-18.1 Put the thread right down the middle of the crack. |
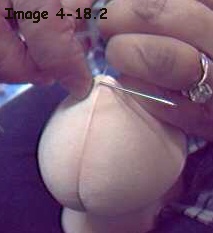
Image 4-18.2 Take a quick stitch while holding the thread tightly. |

Image 4-19.1 Take a couple more stitches to secure. |
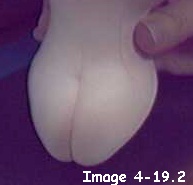
Image 4-19.2 The crack down the center of the bottom. |
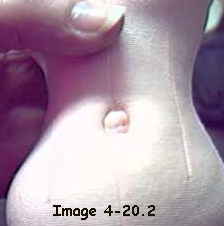
Notice on your doll how the belly button pulls right in and looks like a real belly button!
The little belly button. Some will have more wrinkles inside.
Some will be deeper, some shallower, just like real ones.
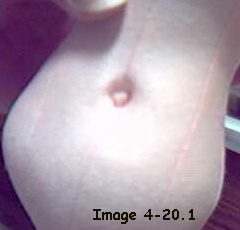

Image 4-20.2 |
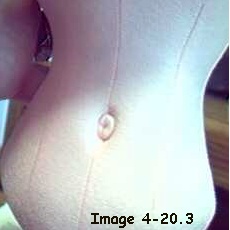
Image 4-20.3 |
Well that does it for the body! See you in a few days to string all these parts together.
It is fast and easy, really! In fact, once you get the "hang" of jointing this way, you can assemble a whole doll in about 5 minutes!
Question?? Did anyone make the legs from a printed Doesuede or Velour?
Wipe from your mind the idea of going back and forth through the body with the jointing cords. You will only go through once for the arms and once for the legs.
Forget the sentence I have seen in magazine patterns that goes something like this
"Bring the string out and tie in a knot"! Where? How? How does it hold?
I have been jointing dolls the way I will show you for at least 25 years, but every time I show it at a seminar or class, the people cant believe how easy it is.
Tight too.
Dolly Hugs, Judi
**** One last thing. You can make your doll a "real" girl if desired. Directions and picture will follow.
It that is offensive dont go there. Paul fixed it so it is a separate "Click Here"
Judi Ward
Judi's Dolls
http://JudisDolls.com

