 Also,
I have found that in "hands on" classes, sewing on spandex is very new
to most, and many dollmakers are afraid of it.
Also,
I have found that in "hands on" classes, sewing on spandex is very new
to most, and many dollmakers are afraid of it.
Taught by Judi Ward of Judi's Dolls
http://JudisDolls.com
Chapter 7 Part 1
Making the panties,
stockings, (tights) sport bra, shirt and skirt.
Also dressing your Whatever!
Whatever! and accessorizing the hair.
~ Part 1 ~ Part 2 ~
Part
3 ~
There are probably way more directions than needed for most of the clothes but for any beginners, the extra directions may be needed.
Also,
I have found that in "hands on" classes, sewing on spandex is very new
to most, and many dollmakers are afraid of it.
It is best NOT to pin spandex. It is very forgiving, and you can just stretch a part to fit. BUT it is needed when sewing the legs of the stockings to the panty leg openings. Be sure to remove them as you sew, and be sure not to stick yourself as you are slightly stretching the parts to fit together.
Slightly stretch as you sew on it too. Not much, just a little. More like "easing" than stretching.
Be sure to hold onto the thread at the back of your machine as you start a seam. This will keep the needle from pushing the fabric into the throat plate.
This is a good idea for any sewing!
FIRST**** Lets fix the stocking/tights pattern.
Sorry I didnt check out more of the spandex on the market before doing the pattern. I had so much in my stash, that I just used what I had here.
When we had the first "hands on" Whatever! class here at the "Unfinished Castle" it became apparent immediately that a lot of the spandex the ladies bought stretched one way a lot, and the other way almost none. For the original pattern to work, the spandex needs to stretch almost equal both ways. And it needs to stretch a lot. TEST*** A 6" wide piece needs to easily stretch to 10" in either direction.
If your stocking fabric does not stretch that much***FIRST*** Make a whole stocking pattern from Freezer Paper. To do this, fold the Freezer Paper and place the "place on fold" line of the printed pattern on the fold of the Freezer paper. Cut out, open flat and you have a whole pattern. If you are going to make tights, cut the curved sections out too.
To fix your pattern Cut it apart between the ankle and knee and between the knee and top.
Separate the parts about 1" and retrace the new pattern to Freezer Paper.
With all of the spandex we worked with in
classes here we found that this much added worked fine for all.
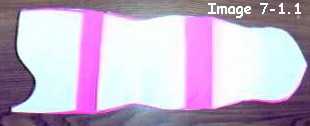 Image 7-1.1 The pattern cut apart and separated. |
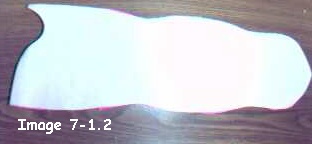 Image 7-1.2 The new pattern ironed to spandex. |
This pattern adjustment is only for the tights version. The stockings version doesnt have to be lengthened, but you surely can if you want to. If you dont lengthen it, the stockings may come to mid thigh, rather than all the way to the hips.
One student made them Mid Thigh and added lace to the tops. They were really cute and I saw some like that in a teen magazine. Now your stocking/tights pattern is fixed.
Lets move on and make the panties.
The Panties***
1. Cut the panties with the most stretch going across. Cut one on the fold.
2. Narrowly hem the leg openings using a small zig-zag or stretch stitch.
3. Sew the side seams.
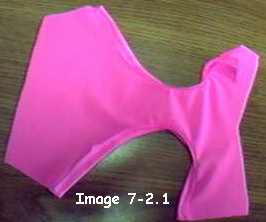 Image 7-2.1 Narrowly hem the leg openings. |
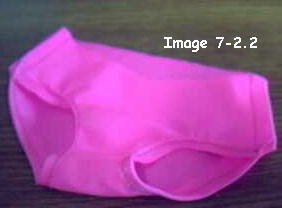 Image 7-2.2 Sew the side seams. |
4. Stretch and sew 1/4 " wide elastic to the WRONG side of the waist. Dont stretch it too much, or you wont be able to stretch it enough on the finished panties to get the waist over your dolls hips.
5. Then turn the waist edge to the inside and top stitch, holding the elastic down. As you are top stitching, stretch the waist edge to the max, so it will stretch to get the panties on your doll.
If the "stretch and sew" method escapes you,
you can make a narrow casing and run very narrow 1/8" or round elastic
through the casing.
 Image 7-3.1 Stretch and sew elastic to wrong side. |
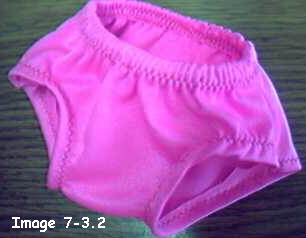 Image 7-3.2 Turn to inside and top stitch. |
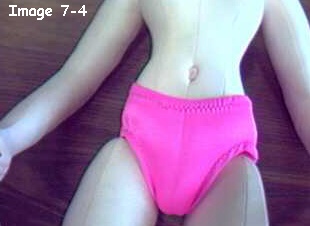 Image 7-4 These are bikini panties and they should fit below the belly button. |
The Tights***Panty and stockings attached to each other.
1. Cut both the panty and the leg part with the most stretch across. Be sure that you cut the curved part out of the pattern and fabric for the leg part of the tights. Also be sure to cut the little notch on the panty leg openings. That notch lines up with the back seam of the stockings when you sew them together.
The panties are cut on the fold. The leg part of the tights, are cut on doubled fabric.
2. When making the tights, you DON"T hem the leg openings of the panties. Go right to sewing the side seams of the panties.
3. Sew the long back seams of the leg parts. Use a stretch stitch or very narrow zig-zag stitch. Trim the seam very narrow for the leg parts.
In the picture, I put a little piece of paper in the tops of the leg parts so you could see the curve.
4. Turn the leg parts right side out, and then fit, pin and sew them to the panty leg openings.
It is easier if you keep the panty WRONG SIDE Out and put the leg up through the waist edge.
The back seam of the leg part lines up with the notch on the panty part. The cut out curve is the INNER leg.
Stretch the edges as you sew, to eliminate
any pleats. This stuff is very forgiving, and if you dont sew it quite
perfect, it wont show at all.
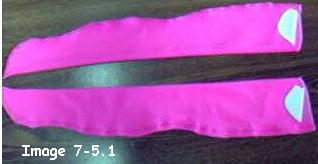 Image 7-5.1 The leg parts sewn. One trimmed. The white paper is just so you can see how the inner edge curves. |
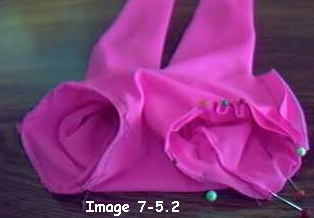 Image 7-5.2 The legs inserted into the panties. One leg sewn in. One still pinned. |
Now, if you just hate to sew " nit-picky" stuff, and this pinning, stretching and sewing is driving you to chocolate, just make the panties and stockings separate.
I have even run a gathering stitch around the tops of the stockings, cut with the curve and gathered the tops tightly between the hips and the legs where they joint to the body. This looks almost like tights when done.
5. Sew the elastic around the waist just like for the panties.
6. Now for the really hard part!!!! Putting these on "aint easy McGee" It always reminds me of why I quit wearing panty hose a few years ago!
First, crunch the legs up down to the feet. Put both feet in. Start working the tights up the legs, first one, then the other. Keep on til you get them up. Smooth them out and align the back seam. If there are wrinkles in the legs, especially near the ankles, simply pull the toes of the tights and work the wrinkles out.
Yikes! Now the toes are too long! Never fear,
just tuck them under in the shoes. I sure am not taking them back off to
sew across the toes!!!
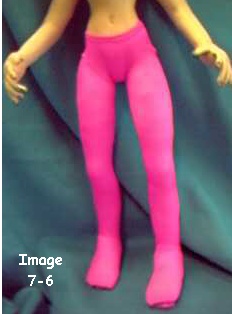 Image 7-6 The tights are on! Now, go for chocolate!!! |
I dont think you need extra pictures for the stockings. If you are making stockings, you dont need to cut the curved area out. Just sew the back seams. Turn them right side out and put them on, working them up the legs like the tights.
Judi Ward
Judi's Dolls
http://JudisDolls.com

