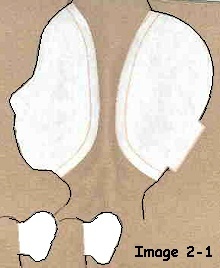
Image 2-1
I have sewn with black thread so you can see it better.
Taught by Judi Ward of Judi's Dolls
http://JudisDolls.com
The head a face are probably the first thing you look at when you see a doll. They are what draws you in and captivates you. I want to try to help you to make Whatevers head/face the best you have ever done.
Make two heads, if heads and faces have proven to be a problem for you in the past.
Whatever! Whatevers! face is meant to be painted with acrylic paints, but can be embroidered or done with colored pencils. I will be showing the painting techniques only.
If you wish to use fabric pens, be sure to seal the surface of the fabric with 2 light coats of Krylon, Clear acrylic spray. Let it dry completely before doing any work on the face.
Krylon is available in the PAINT dept. of hardware and variety stores. In fact, ANY clear Acrylic spray will work. Test on a tiny scrap of fabric first though.
Only use the spray on the smooth side of napped fabrics, like Velour and Doesuede.
The pens often bleed on the firm knits and sometimes on other fabrics too. I personally dont use them, but have tested them all, and they are fine as long as you seal the fabric first.
On unsealed fabric they can often be a disaster!
***Lets get started***
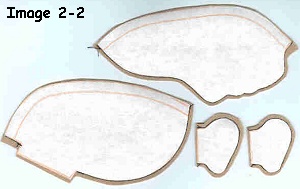
1. First, get your fabric out, that has the head and ear parts ironed to it. (note*** You can re-use the Freezer paper pattern for the second head)
2. Set your sewing machine at that tiny stitch length, 15 to 20 stitches per inch, and sew the center front and then the center back seams of each head piece. Leave the sides un-sewn and leave the "tab" in back un-sewn.3. Sew the curved edge of the ears. Remember, the stitch, stitch, lift and turn method! No jerky little points anywhere!
6. Put your hemostats inside of an ear and grab a bit of fabric in the jaws. NOTE*** Poke a bit of fabric into the jaws with your fingernail. Pull the ear right side out, and release the fabric. (Dollmaking requires fingernails!)
Using your closed hemostats, poke all the edges of the ear out nice and smooth.
Repeat for the other ear.
7. Draw the inner stitch lines on with a colored pencil, a shade or two darker than the "skin". Be sure to make a left and a right ear by laying them in front of you as shown to draw the stitch lines.
The reason you need to make a right and a left ear, even though they the ears are the same on both sides, is because some sewing machines dont like to sew on stuffed things, and they will not make as neat a stitch on the back side. By making a right and a left, you can always hide the bad side against the dolls head.
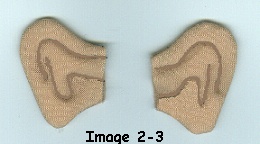
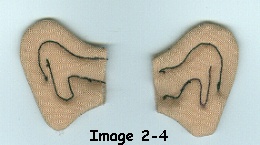
Image 2-4
Ears stitched on the inner stitch lines.
I did it with black thread so you can see it
better.
You could use a thread to match your dolls skin or a shade or so darker.
9. Now, press the center chin seam open, both
front and back, and then fit, pin and sew the head front to the head back,
all around the sides. NOTE***If you turn the front, right side out and lay
it into the back, they will "cup" together and it makes it easier to pin and
sew.
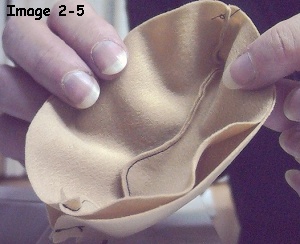
Image 2-5
Wow! I sure need a manicure!
The head front "cupped" into the back.
Fit, pin and sew the front to the back all around.
10. After you have the front sewn to the back, turn the head right side out through the back opening. Using your closed Hemostats, gently push all the curves out, work especially in the nose and lip areas. NOTE***If you are making a woven fabric doll, you will need to clip in the Vs under the nose and between the lips.
11. Now it is time to do the clay in the nose. This is really easy to do and results in a firm, smooth nose that you can actually sculpt inside the head to make a real looking nose with out needle sculpturing. (This method is best for dainty noses. Big Honkers look best stuffed and needle sculpted.)
The piece of clay you will use for a full sized Whatever! Whatever! will be about the size of a marble. For smaller dolls you will of course use a smaller piece.
The following picture looks huge of course, but compare it to the size of my fingers, and you will see it is about the size of a marble.
12. Now, before you put the clay in, shape it
into a cone on both ends, and slightly curve the middle. Place one point in
the point of the nose, and have the other point going up the center seam towards
the forehead. The whole thing will only be about 1" long total.
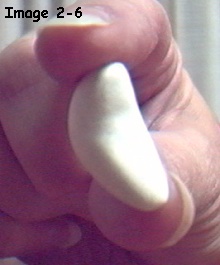
Image 2-6
The curved piece is only about 1" long and 1/2"
wide at the curve.
It doesnt have to be perfect, because you are
going to
mold it inside the fabric more anyway.
13. Form the clay inside into a nose shape. Narrow at the bridge and wider at the base.
You will do the forming right through the cloth, and by reaching inside with your fingers and pressing the clay out at the sides for the nose flares. Try to keep it even on both sides and dont smash the clay out into the face.
Push up at the bottom with your fingernail to flatten the nose there. Also pinch the sides of the nostril area to narrow it there. There will be a picture of this pinching following the drawings of where the clay doesnt go, and where it should be.
Some of the sculpting will distort as you stuff the head, but it is easy to fix it after the head is stuffed.
Excess clay will need to be worked to the back
side, not out into the face. If it is lumpy on the back side that is O.K.
It will grab the stuffing better.
EX-RAY VIEWS. The clay is INSIDE.
Image 2-7
14. Now it is time to stuff the head (the nose will be baked after this initial stuffing is done) Really!
Use large pieces of stuffing and stuff up into the top and upper sides of the head first. Then stuff the mid face and jaws. Stuff down into the chin very well. Add more stuffing where needed to shape the "heart shaped" face. Keep in mind that a neck has to go up in the opening in the head. Always push the stuffing away from the opening, leaving a hollow spot big enough to put your thumb into.
When stuffing this type of head it is as easy to stuff it out of shape, as it is to stuff it into shape! Keep turning the head to look at what you are doing and shape the head by adding more stuffing to the cheek areas and up under the eye areas. Be sure that any stuffing you push into an area near the "skin" is fed in and smoothed as it is fed in. dont just take a wad and push it in. It will always make a wad in the doll.
15. When the head is stuffed pretty well, re-shape
the nose and pinch above and below the nostrils, as pictured, to give them
more indentation.
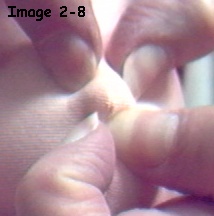
Image 2-8
Pinch above the nostrils and push up where
the "nose holes" would be. Flatten the base
of the nose, so clay isnt going down into
the mouth area.
16. When the nose is nicely shaped inside, place 2 round head pins in the nostrils area as pictured. Push them with the end of your hemostat or screwdriver to impress the dents in for the nostrils.
You will shape and stuff the head more
after the clay is baked, but once the nose is baked, it can not be re-shaped,
so be sure that you get it nice before baking.
See picture following.
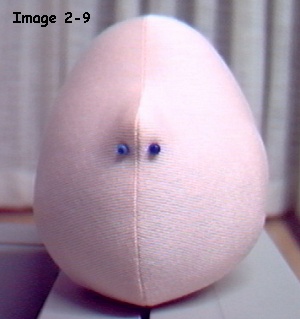
Image 2-9
Arent those blue pins lovely?!
17. Now go turn your oven on to 225 degrees. Lay a towel in the oven and lay your dolls head on the towel. Nothing will burn up, Honest!
Leave your dolls head in the oven for about 15 min. Turn the oven off and let the head cool before you touch it. The fabric and clay are tender while hot.
18. Pull the pins out of the nostrils. (Sometimes
the heads pull off. If that happens, pull the wire out with your hemostats.)
The pins will have left nice little indentations to hint at nostrils. You
will later draw the nostril flares on with colored pencil, and color the dents
in too.
See the dents in the following picture.
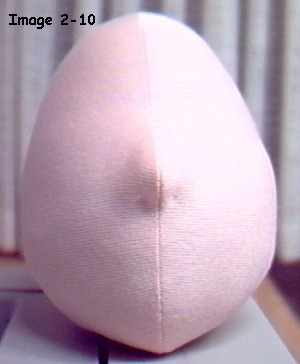
Image 2-10
The dents and tiny holes from the pins. This
nose will look very
"real" once you add the paint to delineate the
nostril flares
and a little paint for the nostrils.
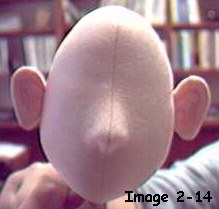
19. Now finish perfecting the stuffing so the head is smooth and nicely shaped. REMEMBER! Leave that space in the head for the neck to fit into.
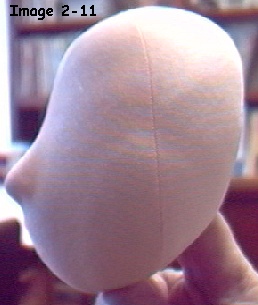
NOTE***Whatevers head is "sorta" what the books on face shapes call "heart shaped" from the front, and has a skull shape from the side.
Some heads will turn out a little bigger than others. Some will have a more protruding mouth area. Some a wider jaw area. Some will have a protruding chin and some will have a receding chin. Every one you make will be slightly different.
These differences are all O.K. As long as the head is smooth and nicely shaped. As I was writing this class I made 2 heads to show in various stages of development. They are each slightly different. One has a very protruding mouth area. Perfect for the bigger lips! The very protruding mouth will pull in wonderfully and will have a great profile.
Part of the fun of cloth doll making is the little
variances you can achieve with just a tweak here and bit of stuffing there.
Side view. See the shadow of the piece of stuffing that went up the side of the cheek when I added more to the cheek area. It doesnt blend in very well. I will use the blade of the screwdriver to press it smooth. Actually, you cant see it in "real life" it only showed up in the photo. Now I know why I look so awful in photos! They show EVERYTHING!
Hmmmm? Where do they go? I have a way for you to get them on in the right place if you cant just eyeball it. If you can eyeball it, go ahead.
Ears align, just about between the eyebrows and the top lip. The top of the ear is the wider part. They will sew on just behind the seam line. If they are put in the seam as you sew the side seam, they are too close to the face. I tried the design with the face front wider, but it looked funny sooooo the ears are put on by hand.
2. Place the ear with the sewn side towards the face. Have the lobe just in front of the pin head. The raw edge will be about 1/2" back from the side seam of the head.
3. Pin the ear in place. Repeat for the other side. The following pictures will explain better.
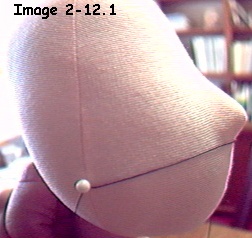 Image 2-12.1 |
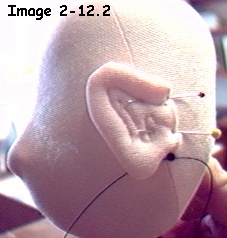
Image 2-12.2 |
|
|
The string is just hanging down in this picture. Dont need it anymore. |
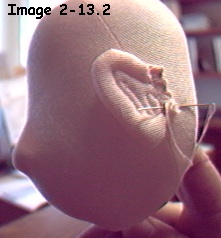
4. Hand stitch the ears onto the head along the straight edge, about 3/8" inch in from the raw edge.
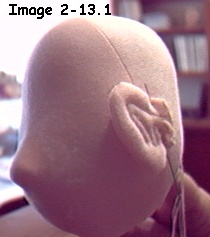
Image 2-13.1 |
 Image 2-13.2 |
|
|
|
Notice with the shadows the way they are, how nicely shaped the nose is.
Dont you just love the background?! My office. Magazines, books, and more books!
Judi Ward
Judi's Dolls
http://JudisDolls.com

