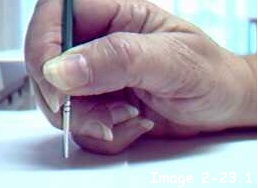
 Image 2-23.1 Right handed painter. |
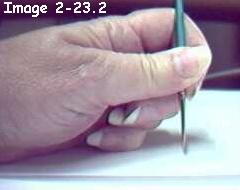 Image 2-23.2 Left handed painter. |
Taught by Judi Ward of Judi's Dolls
http://JudisDolls.com
Chapter 2 - Part 3
Making the Head
~ Part 1 ~
Part 2 ~ Part 3 ~ Part
4 ~
***Now it is time to paint the features***
When painting doll faces, the first, foremost, and perhaps most important thing to remember is that you dont get to freely stroke the paint on in flourishes like an artist doing an oil painting Unless you are an artist, and know what you are doing! The minute you start to stroke the paint on with the side of your paintbrush, is the minute your paint will go out of the lines!
When painting doll faces, you are just filling in pre designated spaces, neatly and fully. You need to paint with very tiny (000 to 00000, even 10 zeros! My favorite brushes are ten zero spotters.) You need pointed paintbrushes, and you need to learn to paint with your paintbrush held STRAIGHT UP AND DOWN. The weight of your hand will rest on your little finger.
I call it "assuming the position" and below
is what it looks like. If you want to learn a whole lot about painting
doll faces, mixing colors, etc. (Over 60 pages worth) I do teach that class
at Crafty College too.
|
Image 2-23.1 Right handed painter. |
Image 2-23.2 Left handed painter. |
Boy, I still need that manicure and some anti wrinkle cream too!
1. I do, and highly recommend, a first fill in, on the eye and mouth shapes with Gesso. Gesso seals the fabric and readies it for the paint. Gesso also prevents any "paint bleed" from occurring, as long as you keep the paint on top of the Gesso. Once in a great while, acrylic paint will bleed. It usually occurs when the paint hasnt been shaken up really well. Some of the "watery" liquid comes out first, and that is what bleeds.
NOTE****The gesso covers all of the marks for the basic eye shape and for the mouth shape.
NOTE 2****If you are going to paint the eyelids, coat them with Gesso too.You can choose instead to do the eyelids with colored pencils. If you choose that, dont coat the eyelids with Gesso.
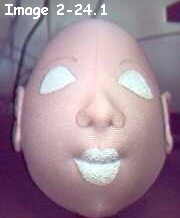 Image 2-24.1 Gesso coat, big lips, eyelids will be painted. |
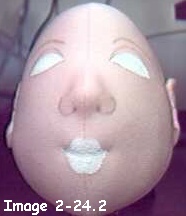 Image 2-24.2 Gesso coat, small lips, eyelids will be colored pencil. |
2. After the Gesso is dry, paint a coat of white paint (or another coat of Gesso) on the eyes first, and then paint a coat of peachy pink, (or color of your choice) on the mouth. Simply fill the spaces in, fully and thickly. Let dry, then repeat with a second coat of the lip color. Let the second coat dry.To make a peachy/pink if you dont have a color already in a bottle .Mix about equal parts of red and white. Add orange or yellow, a little at a time, til you have a nice shade. If it is too bright, add a tiny touch of blue to dull it.
NOTE 1***I draw the corners of the mouth paint out and up slightly at this time. Keep the line thin. Later, you may even draw it up into more of a smile.
NOTE 2***It is very important for the edges of the eye shapes and mouth to be as smooth and sharp as possible. On the firm knit fabrics the paint may need to be dotted on along the edges to make a clean line. This is the only drawback to making dolls from firm knits. Paint doesnt "move" as well on them, and the "paint dotting" is needed. It is not hard, just takes a steady hand, and the "Straight Up and Down" position.
3. If you are making painted eyelids, draw very lightly around the top of your eye template to re-establish the eye shape, and then paint the eyelids above that line in the color of your choice.
Image 2-25
Draw on the eyelid to define the eyelid area. Paint the eyelid.
I painted this big, on a flat piece of fabric so it is easier to see.
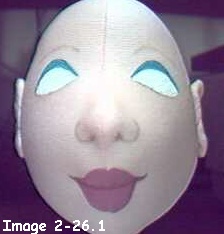 Image 2-26.1 Mouth, eye-whites and eyelids painted. Large mouth. |
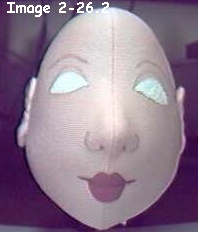 Image 2-26.2 Mouth and eye-whites painted. Small mouth. |
4. Use a small button to draw around for the iris of the eyes, if you dont feel confident drawing them freehand. Make the eyes looking either to the right or left, up or down.I prefer Whatever! Whatever! to have her eyes looking slightly up and to one side. It gives her that exasperated "look".
5. Now fill the whole iris in with one color. You choose. A solid black iris is the easiest, and I will do one that way. When you make a solid black iris, you dont have to do anything else to it except for the "life-lites".
If you have chosen the clothing fabrics for your doll, you may want to think of that as you choose eye color. (Mouth color too, in fact!) The nice thing about painted faces, is you can change your mind about the eye and mouth color right up to the time you say, Its done!
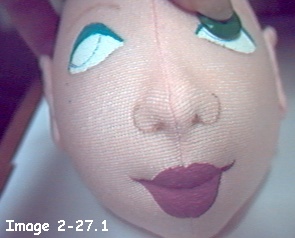 Image 2-27.1 Iriss placed up and to the side. |
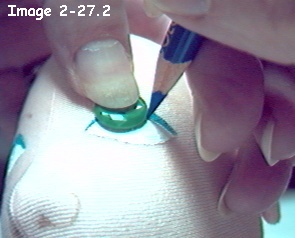 Image 2-27.2 Draw around the button with colored pencil. |
Draw around a button for irises, if you cant freehand the circle. REMEMBER! When you DRAW AROUND something, it gets bigger, so the button you need to use may be lots smaller than you think. The one I used was 3/8" across.NOTE***I am drawing around the button with a blue colored pencil. The eyes are going to be blue. It is easier to cover the colored pencil marks if they are the same color as the eyes. If you do miss a speck, it wont show.
6. If you painted the irises solid black, let the first coat dry, then paint on a second coat. Let the second coat dry. You will add the life-lites later, but there is no need for a pupil.
7. For more detailed eyes, paint the irises any solid color, and then add little lines from the center to the sides in a different shade. Perhaps blue irises with dark navy lines OR Green irises with dark green lines, Etc.
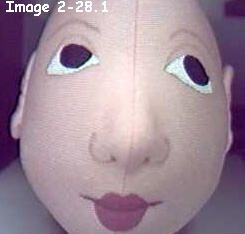 Image 2-28.1 Solid black irises. |
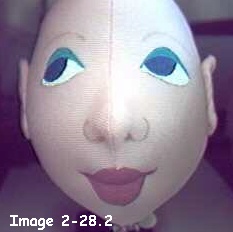
Image 2-28.2 A different solid color for the irises. |

Image 2-29.1 Radiating lines in a different shade. |
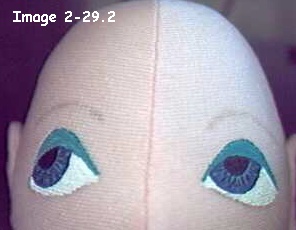 Image 2-29.2 Add a solid black pupil, |
The pupil will be slightly smaller than a pencil eraser but for these "looking up" eyes, half of the pupil will be hidden under the eyelids.NOTE***In the huge photo, you can see every little un-evenness in the eye. It doesnt show at all when you look at the actual dolls face.
8. To outline the eyes, use black paint and carefully paint a VERY THIN LINE around them. DON"T try to work the paint down into the fabric. The line will be on top, and may even have tiny breaks in it due to the "knit" of the fabric.
To paint a VERY THIN LINE of paint, your paintbrush needs to be loaded with paint, and you need to hold the paintbrush STRAIGHT UP AND DOWN, so the paint flows off of the tip, rather than off the side of the paintbrush. The paint right at the tip, is the only thing that touches the fabric. You will have to reload the paintbrush after about 1/4 " to 3/8 ". sometimes even less! Keep that line thin!
9. Now add little "life-lites" in white, as shown in the following pictures.
 Image 2-30.1 |
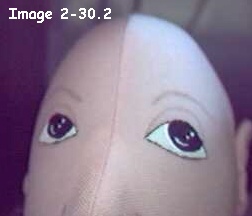 Image 2-30.2 |
10. Do the eyebrows in brown paint or fill them in darker with brown colored pencil.11. Do the nose outline with brown paint, or a color slightly darker than your dolls skin if you desire or leave them in colored pencil.
12. Fill in the unpainted eyelids, if that was your choice of eye styles, with colored pencil to co-ordinate with your dolls clothes or eyes.
13. Fill in the area between the eyelids and the eyebrows with colored pencil too, for either eye type. I like to use a lighter pressure for the color just below the eyebrows. Sometime a different color entirely.
NOTE*** Later, after we put the eyelashes on, it is fun to coat the eyelids with a clear coating, like Mod Podge, and sprinkle extra fine glitter on it. When we get to that part, you will also be coating the whole eye, so be sure to follow the steps in the order directed, so you dont end up with glitter all over the eyes too!
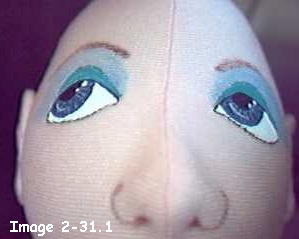 Image 2-31.1 Eyes shaded and outlined. |
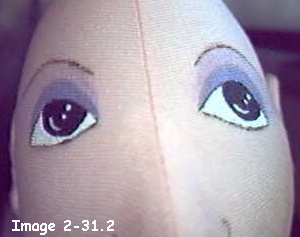 Image 2-31.2 Eyes shades and outlined. |
Lets pull the eye corners in now. You dont even have to if you dont want to, but this is how to do it.
14. I always enter at the front for this, just like for the mouth, which, by the way, we will finish in a minute.
15. The eye corners need to be pulled in and tied behind the ears. Put the needle with thread to match the skin in at one corner and out behind the ear. Of course, unpin the ears first. (I hope you didnt sew them down yet! We do that after the wig is on.)
Repeat with the other end of the threads, just a tiny fraction of an inch away at the corner. Tie the thread behind the ear. Be sure to "help" the stitch by pressing in with your finger, and Remember, the "nurses knot", which will help the knot hold while you adjust and pull, and then tie the second tie.
I like to do the inner corners first. Quite often I decide not to do the outer corners at all.
Do both inner eye corners before you decide whether you want to do the outer corners.
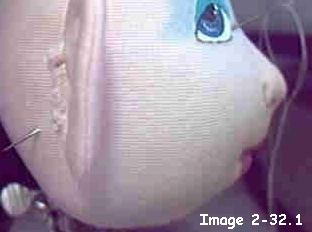 Image 2-32.1 |
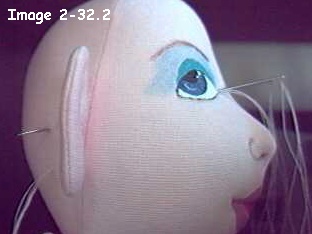 Image 2-32.2 |
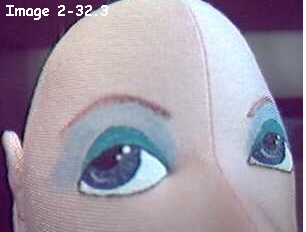 Image 2-32.3 Inner corners pulled in on the head with the painted eyelids. |
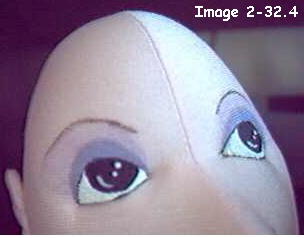
Image 2-32.4 Inner and outer corners pulled in. Colored pencil eyelids. |
Judi Ward
Judi's Dolls
http://JudisDolls.com


