Image 2-15
Taught by Judi Ward of Judi's Dolls
http://JudisDolls.com
***Now lets put the face on***
First, pin your dolls ears back. Dont sew them! We will stitch them AFTER the hair is on.
NOTE***Please, if face drawing and painting is something you do well and love to do, design and paint the face you want on your Whatever! Whatever! Free-handing faces is one of the greatest joys of dollmaking.
BUT If free-handing isnt an option, I will teach you a Template Method that lets the most artistically challenged dollmaker make a nice face. (At the end of this chapter I will show you a still easier face method, using buttons and colored pencils)
For those who dont freehand yet, it is something that can be learned. By practicing the drawing, and filling in basic shapes in the step by step method I will teach.
2. Find the eye and mouth shapes on your pattern sheet. You have a choice of 2 eye-shapes and 2 mouths. You choose. The bigger mouth can go with the other eyes, and vice versa.
Using the side of a lead pencil, cover the BACK side of the features on the pattern sheet with pencil. This makes a carbon. Lay the " pencil carboned" paper over a sticky label, and draw over the features. The features will be transferred to the label/labels.
3. It is best to put the mouth on one label, and trace one eye on another label. Fold the label in half, and cut 2 eye shapes at once. I also like to fold the mouth in half down the center of the "V" in the top lip and cut the mouth out on a fold. Makes both sides of the mouth match.4. Now, cut the eye and mouth shapes from sticky labels. Cut just inside of the lines, so the features dont get bigger. You can also cut another sliver, (1/32") off of the features all around, so you can simply draw around them on the face, rather than drawing slightly under the edge. Remember***When you draw around something it gets bigger.
NOTE>>>To get the backing off of the labels is a trick at times! The easiest way is to slide the point of a needle between the label and backing. Get your bi-focals out for this, or take them off, whatever works!
5. Stick the cut out features on your dolls face using these guidelines. The bottom of the mouth will be about 1" above the point of the chin. It is actually very easy to locate where the mouth goes on Whatever! Whatever! because she has those little "mouth bumps"
The bottom of the eyes will be about 1 and 1/2" above the TOP of the top lip.
There needs to be about one eye width between the eyes. This placement is not written in stone, but be very careful not to put the eyes up on the forehead, and the mouth down on the chin!
You can adjust the features a little at this time. Perhaps slant the eyes a little, or move the mouth up or down a little. Each tiny move of the features will give your doll a different look. You can even color the sticky label parts to get a better "pre look" at what the finished face will look like.
Dont slant the eyes too far down at the outside corners. It makes Whatever! Whatever! look sleepy all the time.
Also remember, there will be eyelids above the eyes, so dont put those eyes so far up on the head, that the eyelids will be in her hairline!
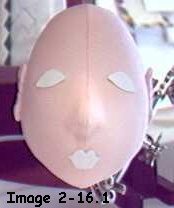 Image 2-16.1 Good template placement. |
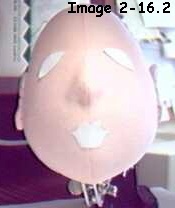 Image 2-16.2 Eyes too slanted. |
Hubby gave me a little "getter-grabber" to hold
the heads on. Now you have a background of the computer desk, bulletin board
mess and the "getter grabber"!
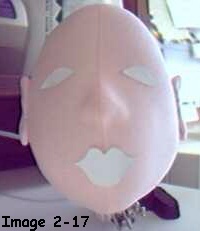
Image 2-17
The bigger lips, a different head.
When you have them placed where you want them, Draw VERY LIGHTLY! JUST UNDER THE EDGE of the shapes, with a sharp, brown colored pencil for the eyes, and a sharp, red or pink colored pencil for the mouth.REMEMBER***The reason I have you draw JUST UNDER THE EDGE OF THE SHAPES is because when you draw around something, it gets bigger. When you paint these features, you will cover ALL of the colored pencil marks, so you dont want to start out too big.
Note***(Draw around them if you cut that extra 32" off but If faces are very new to you, it is harder to get an idea of the placement when the label features are actually too small, that is why I make the templates in the pattern the right size rather than too small)

Image 2-18.1
Eye and mouth shapes drawn in.
Big lips.
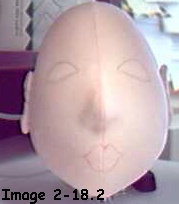
Image 2-18.2
Eye and mouth shapes drawn in.
Small lips.
6. Lightly draw in the tiny nose lines, eyebrows and eyelids with a light brown colored pencil. (Or a color that will show on your chosen fabric) Use the face pictures as a guide. These are just little curves and not hard to do freehand. Practice on paper first if you are a little dubious about it. Do not do the drawing in pens, and then plan to paint over the pen. The paint almost always makes the pen run.Dont mark eyelashes, We will be applying "real" eyelashes. BONUS!!!! Its easier than painting too, if painting is not your thing! Eyelashes seem to be really hard for some to paint.
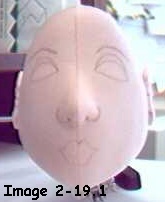
Image 2-19.1 Eyelids, eyebrows and nose lines drawn in. Small lips. |
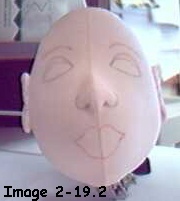
Image 2-19.2 Eyelids, eyebrows and nose lines drawn in. Big lips. |
Do you notice that the whole face has changed! No more MONKEY! When we pull the lip line in she will look a little bit "elfish" that will change too. Doll faces metamorphose as each step is done. It isnt DONE, til its done! It wont look just the way you want it to in your mind, until every step has been done.Some finished faces to look at to get an idea of the variety that can be achieved with the same templates.
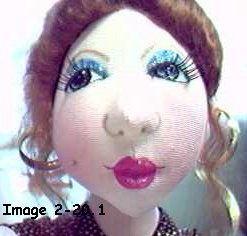
Image 2-20.1 |
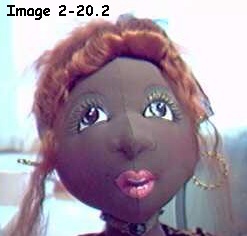
Image 2-20.2 |
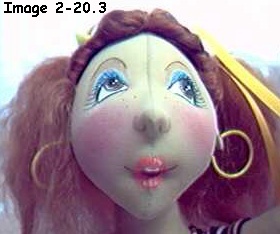
Image 2-20.3 |
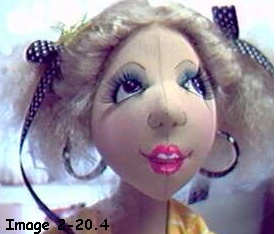
Image 2-20.4 |
These are just 4 dolls I have on hand. Note in the third picture, that the eyes are higher in the middle. I simply painted the white up higher in a more "domed" shape.
Note the 2nd and 3rd dolls have painted
eyelashes. They had to be shipped and were going to be packed and unpacked many
times, so I thought the real eyelashes might not fare well with the packing
and unpacking. They dont come off, but they can get mashed flat.
***Now, the mouth needs to be sculpted in, before painting.****
I sculpt with at least a double thread. Not quilting thread, just ordinary Metrosene. Sometimes, especially for pulling in the mouth line, I use a quadruple thread. Remember; always pull on the thread not on the needle. Also, "help" the stitch pull the area in, by pressing on the area with your finger to indent it. If you try to let the thread do all the work, it will often break!
Tie your thread off using a "nurses knot". This is an automatic "Square knot". You dont have to think, right over left-left over right. Remember the Nurses Knot at the beginning of the class?
Always use a needle that is long enough to reach from the sculpted part to the back or top of the head, without "squishing" the head to do so.
I enter from the front for all needle sculpturing that will be tied in the back, top or side. If you have ever done any needle sculpting, you will remember how hard it is to get a needle to come out where you want it to on the face! I solve that by entering from the front.
I start each stitch exactly where I want it on the face and then exit where I desire on the top, side or back of the head. The exit spots on the head arent so exactingly crucial.
This method really solves the problem of
poking around, trying to get the needle to come out where you want it!
Honest! It is worth the effort to thread the needle twice.
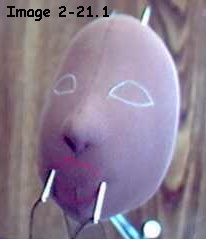 Image 2-21.1 |
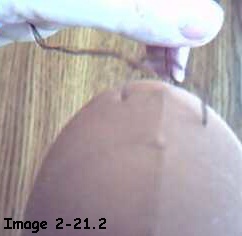 Image 2-21.2 |
This is how to pull the center of the mouth in.
I am showing it with 2 needles just for the illustration.
Those needles are so shiny that they look bigger than they are. They are 5" long doll sculpting needles that I got from CRs Crafts.
For a wider mouth, simply put the needles in a little farther from the corners.
NOTE***I decided at the last minute to do this as a photo, rather than a drawing, and wanted to make a brown Whatever! Whatever! Hence, the skin color change for this photo.
Note also, the white eye outline. The white shows up on the brown fabric. It doesnt show up well at all on lighter fabrics.
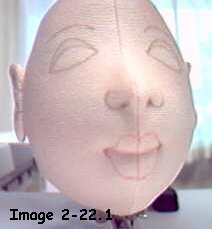 Image 2-22.1 |
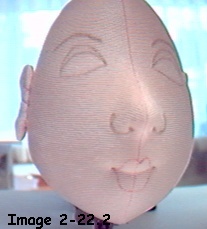 Image 2-22.2 |
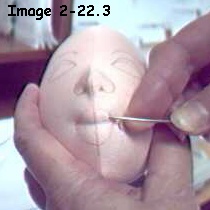
Image 2-22.3
Pulling stuffing into place.
For the mouth, it is almost always necessary to pull some stuffing into place above the thread, to give the mouth more of a smile. Pull stuffing into place, with the point of your needle,
You can also pull some into place in the lower lip, and some up below the eyes for cheekbones using the same method.
The eyes will be pulled in AFTER the eyes are painted, but before the eyelashes are on. The eyelashes wont be put on until the whole doll is together and the hair is on.
Judi Ward
Judi's Dolls
http://JudisDolls.com

