Whatever!
Whatever!
Ó 1999
Taught by Judi Ward of Judi's Dolls
http://TheDollNet.com/judi/
Judi@CraftyCollege.com
Chapter 2 - Part 4
Making the Head
~ Part 1 ~
Part 2 ~ Part 3
~ Part 4 ~
***Now
lets finish the mouth***
Read all of this section before proceeding.
I sometimes change my mind about the mouth color in "mid paint". I also
often add a couple more coats of paint on the lips while doing this
mouth finalizing. The mouths on the dolls in the lesson are a pinker shade,
(more red and white, less yellow) because I have some fuscia clothing plans
but
I
may change my mind, and change the mouth color to co-ordinate.
If I am making a doll with an open mouth,
I like for the lips to be out farther (thicker) than the inner mouth, another
reason for the optional, extra coats on the lips only.
16. To mix a color for the little
"lip lines and for the inner mouth, add a little brown and red to the lip
color and paint the dividing line, between the top and bottom lip, curving
the line up a little at the corners.
NOTE*** Draw the line on with a colored
pencil before painting.
The dividing line can be painted down near
the string, for a closed mouth, or higher up, which will open Whatevers
mouth.
You can also mark another dividing line down
on the bottom lip, depending on how big you have made the mouth. This will
make the mouth more open. You will fill the inner mouth with the darker
paint color. The sculpting string wont even show on the finished mouth.
The following drawings show some of the shapes
the lips can take, all starting with the basic template shapes.

Image 2-33.1
The upper lip dividing line is shaped like
this.
It goes right over the sculpting string.
eyelids will be painted.
A closed mouth.
|
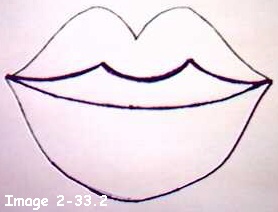
Image 2-33.2
Upper and lower lip dividing lines
for an open mouth. The sculpting thread s the bottom lip line. It has been
pulled down in a curve, by pulling stuffing over it with a needle.
|
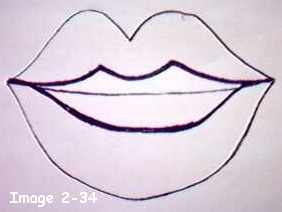
Image 2-34
Upper and lower lip dividing lines.
For an open mouth with the bottom lip
line down farther.
The sculpting thread is in the middle.
The drawings above are on paper, with no
actual sculpting strings. They are just for the purpose of showing you
the "shapes" for the lips.
Remember, after the painting is done, the
sculpting thread wont show.
If you are making an open mouth, you will
fill the open part with the darker paint.
With the darker shade, also paint a few fine,
thin lines from the center, to the edge of the lips. Do both the top and
bottom lip. VERY CAREFULLY extend the darker paint out into the corners
and up, to make the mouth smile more if desired. I usually do this for
this doll especially.
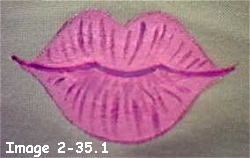
Image 2-35.1
The fine lines painted on both the top and
bottom lips.
eyelids will be painted.
A closed mouth.
|
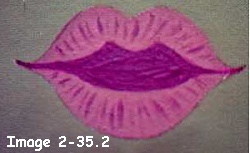
Image 2-35.2
The fine lines painted on both the top and
bottom lips. eyelids will be colored pencil.
An open mouth. The center filled in with
the darker paint.
|
I did this really big, on flat fabric,
because they are so faint and understated in the smaller size for an actual
doll that they didnt show up well on the dolls.
Always let everything dry between going on
to the next step when painting. It is so easy to get your hand in wet paint,
and mess up a face. Aim a blow dryer on the face to hurry up the drying
process.
17. For the final touch with the paint, add teeth
if desired. They are very small, and the paint shouldnt be real thick. A
hint of teeth is more what they are.
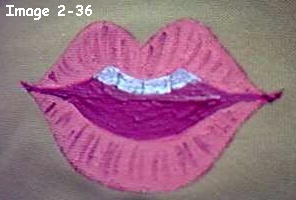
Image 2-36
A hint of teeth. Note that the lines
between them are very faint.
They are also shown in the picture
of one of the dolls I am working on for class.
OOP"S, I almost forgot. With white paint,
add a little "lite" to the lips too. On the top lip add the lite" in the
same upper quadrant as you did for the eyes. On the bottom lip, add it
in the center.
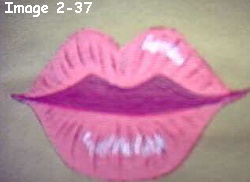
Image 2-37
The "lites" on the lips.
18. To blush your dolls face, simply
whisk the brush that came with the blush across the blush and apply the
blush to your doll the same way you would do for yourself. Darker on the
"cheekbones". A light dusting across the nose. Dust lightly on the lower
cheeks and ears.
I usually dust a bit across the chin and
forehead too.
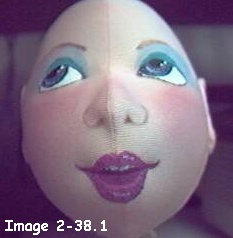
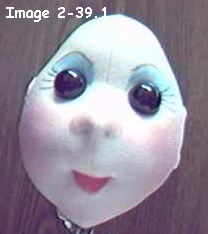
Image 2-38.1
Face done except for gloss and eyelashes.
The large mouth. Open, with teeth.
|

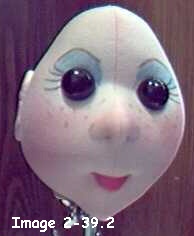
Image 2-38.2
Face done except for gloss and eyelashes.
The small mouth, closed.
|
Remember
We will do the eyelashes, the gloss
on the eyes and lips, and the glitter towards the very end of making this
doll. She doesnt look like a Monkey now
but
there is still more to be
done to make her really GREAT!
It aint over, til its over!
Every step is a small bit of progress towards
a finished product.
If you stopped way back when she looked like
a monkey, start over and keep at it, til you have a great face!
A fun question??? How many of you took one
look at the Big Mouth version and said " Yikes, that mouth is HUGE?" its
not so huge once it is completed is it?
The small mouth version can have the open
mouth too. You can also change the mouth shape some with the Gesso and
paint. Start with the basic and go from that.
Perhaps you might like to bring the "bow"
of the top lip up to sharper points.
Perhaps you would like to make the bottom
lip wider, instead of U shaped.
There are many ways to change the "look".
Sometimes it will be by accident!
You may accidentally paint one "bow" up higher
and need to make the other "bow" match.
You may make a smudge outside the lines on the bottom
lip. And to "fix" it you have to make the mouth bigger. All do-able and sometimes
the results make a better face than what you had originally planned.
***Now,
lets do a very simple face for the truly "face challenged***
This face is very Pixy like and cute. Fast
and easy too. You may decide to make Whatever! Whatever! into an elf or
pixy, especially if you are making her in a small size.
First, lightly seal the head and face with
Krylon clear Acrylic Spray. 2 very light coats is best. This will keep
the pen from running if you choose to use pens.
This face is done with button eyes and colored
pencil and/or pens for the rest.
I used 1/2" buttons with a shank on the back
for the eyes for the full sized doll head. You would need to use smaller
buttons for a smaller doll. The buttons are spaced a little more than a
button width apart.
Tie the shank buttons in behind the ears.
Pull them in tightly so they indent the eye sockets.
I pulled the mouth up just the same as before,
but didnt draw any lips on first. You can see where the mouth goes by
locating the "bumps" in the front seam.
You can make the mouth wider or narrower
as you desire. The mouth on the doll who is pictured is about 3/4" wide.
Hmmmm. Now I have made 4 heads, not 2!
After you pull the mouth up, pull some stuffing
into the top lip just like before.
With colored pencil, color the bottom lip
area, making a little "half moon" shape.
Also with colored pencil, draw in the nostrils
and nostril flares just like before.
Draw in the eyebrows with brown colored pencil.
Color eye shadow above the eyes with colored pencil.
Draw a few eyelashes out to the sides with
black colored pencil too
or
test your doll pens on the back of your dolls
head to be sure they wont bleed, and do the eyelashes in pen. You can
do the mouth and eyebrows in pen too, if your pens dont bleed.
Add a few colored pencil freckles if desired.
This makes a "cute", fast face. And really does have a "pixy" like quality
to it.
Well, thats it for the head and face until
we get to the eyelashes and glittery eyelids.
Do things a step at a time. Be sure the stuffing
goes in, in large pieces, not little balled up bits. Shape as you stuff,
always pushing the stuffing in from the back which forces the stuffing
already there to go forward and fill out the face. Stuff down into that
little chin, and out to the sides of it too, into the jaw-line, so the
chin isnt "witchy". You can continue to "finesse" the stuffing right up
until we put the turning head onto the body.
It aint done, til its done!
A final thing to do the head, after you love
the shape. Hold the head in your hand, face against your fingers and the
nose between your first and second finger.
With your screwdriver, push straight in,
very hard to compact the stuffing away from the opening. You may find that
you need to add more stuffing!
Do this all around the opening, making sure
there is an area up in the back of the head for the neck.
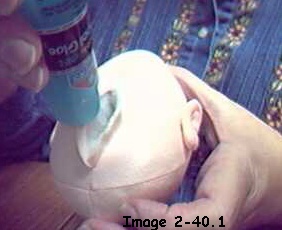
Now, rub some Glue Stick Glue on the inside
of the "tabs" and press them into the stuffing in the opening. This gluing
isnt really necessary, but will make you feel better when you put the
head on. You wont have that weird feeling like "Oh Dear! The tabs are
going to come out and look yucky!
When the head is tied on tightly, the tabs
stay inside, but the glue makes sure of that!
Let dry.
The next chapter wont be so "picture intensive"
which will preserve your ink cartridge!
I thought the face chapter needed to be really
"picture intensive" though.
The next chapter will be the Legs and Arms.
REMEMBER! It Aint Done, til its Done.
Judi Ward
Judi's Dolls
http://JudisDolls.com
Back to Classroom
~ Part 1 ~ Part
2 ~ Part 3 ~ Part 4 ~


| Back to Classroom |
Copyright Notice: All pages and graphics are copyrighted by
the Internet Visions Company and/or instructor. You may print these out for
the use of the class only. All other uses or distributions are forbidden.
Crafty College and The
Doll Net are divisions of the Internet
Visions Company.
© 1997-2003, Internet Visions Co. All rights reserved.
All trademarks are owned by Internet Visions Company.