 Image 5-1.1 2 ends through needle. |
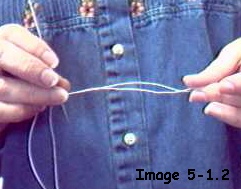 Image 5-1.2 Pull only about 4" past eye. |
Taught by Judi Ward of Judi's Dolls
http://JudisDolls.com
The way I joint a doll is something I devised about 25 years ago when I was making dolls for my doll and craft shop in Idaho. I was making dolls and jointing them on the outside with regular, plastic shank buttons. Then I switched to the metal "buttons to cover" and covered them with cloth to match the dolls skin. I liked that better but A safety issued reared it's ugly head, and it was brought to my attention that some of the dolls would be played with by children, and if a button got broken off and a child swallowed it, it could be a really bad news! Soooo, I figured out the way I have used for all these years.
I still use metal shank buttons (they are stronger) but I do not cover them with cloth, and I put them inside the limbs.
One could use ordinary clothing buttons the same way for smaller dolls. But I would be sure they were strong, metal ones, like from an old uniform or something.
I have found old coats in thrift stores with big metal buttons on them, and they work great.
The buttons I use are readily available from fabric stores. They are made by Prymm/Dritz and are always on the accessories wall in fabric stores, not with the regular buttons.
They come in many sizes, from tiny little ones 1/4" across to giant ones about 2" across. These are some of the sizes I use:
Anything smaller than that doesn't really need a button inside. You can joint it by just going through the fabric and catching some stuffing in the stitch for added strength.
I am going to demonstrate the jointing method, as if you all have a jointing needle with only one point. If you have my double pointed jointing needle it makes one step a little faster, and I will demo that step for those who have the double pointed needles.
Do this a step at a time, and you will have no trouble. Eat your Wheaties again! It does take some pulling strength, but it doesn't require an added hand.
It does require some coordination but
You can do this by yourself!
When you go through this, it will seem like a TON!! of directions. That is only because I have broken it into tiny steps. Many of which I could have gotten away with just some words, but for those who work better with pictures, all the pictures should help.
I you break it down into what is actually happening it is
I am going to write 2 "worded" directions and then show 2 pictures.
I am writing the directions as if you have my jointing cord, which is a "hand stitching twine" used in the upholstery and shoe repair industry.
I also found this cord at a bead shop, so people are using it for jewelry making.
If you have a bead shop nearby, perhaps they carry it.
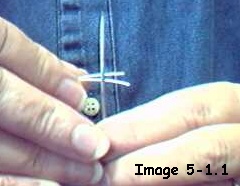
1. Pull off 2 yards of cord and put the two ends through the eye of the needle.2. Pull cords ONLY about 4" past the eye. DO NOT PULL CORDS 1/2 way through!
|
Image 5-1.1 2 ends through needle. |
Image 5-1.2 Pull only about 4" past eye. |
3. Put needle through shank of button in left leg. NOTE***If you are left handed, put needle through shank of button in right leg.4. Pull cords so 1/2 are on either side of shank.
OOPS! Sun came out, lighting changed! I do need a photo box!
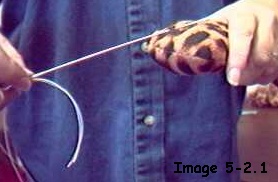 Image 5-2.1 Put needle through shank. |
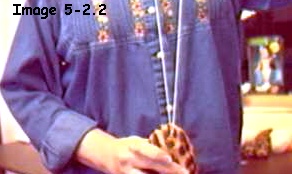 Image 5-2.2 Pull cords 1/2 way. |
5. Tie the cords to the shank on that leg.6. Trim all the ends even. If you are using my cord, you will have 4 ends now. If you are using lighter weight nylon cord, like dental floss you will have at least 8 ends. Even 16!
Sun went behind a cloud!
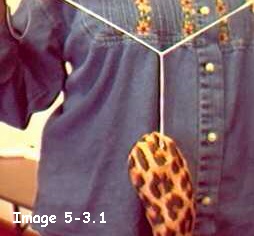 Image 5-3.1 Tie cords to shank. |
 Image 5-3.2 Trim ends of cords even. |
7. You should have 4 ends, all trimmed evenly. (or 8 or 16)8. Put all 4 ends through the eye of jointing needle. Again, pull only about 4" from the eye.
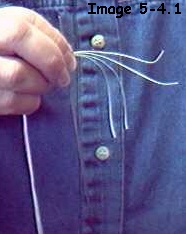 Image 5-4.1 Four ends, trimmed evenly. |
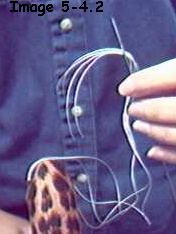
Image 5-4.2 Put all ends through needle. Only about 4" hangs out from eye. |
NOW FOR PLACEMENT I am going to show two NO! pictures, and a correct placement picture.The front to back placement also comes into play for Whatever! Whatever! because you make her more, or less, pigeon toed and knock kneed by that placement.
If you put the needle through the body, right on the seam, she will be very pigeon toed and knock-kneed.
If you put the needle through about 1/2" back from the seam, she will still be pigeon toed and knock kneed, but not so much so. (As long as the buttons are placed towards the front)
The 1/2" back jointing will also make a tighter joint, because there is more "body" to press against.
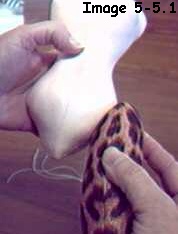 Image 5-5.1 NO! Too high! |
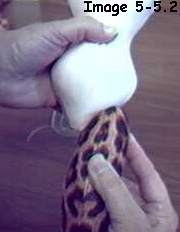 Image 5-5.2 NO! Too low. |
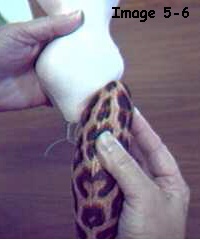
Image 5-6
YES!
Just right for the up and down position.
9. Peek under the leg, and see where the "shank" touches the body. That is where the needle will go in.
I am doing this one right on the seam. It is about 1 1/2" from the center of the crotch too. This will vary with EVERY doll. You will have to put the legs up to the body to see where the shank touches for each doll.I will picture the results for one jointed farther back later. The PROCESS is the same for all.
10. Put the needle through the body from side to side, entering where the shank touched the body and exiting at the same height on the other side. You will probably have to twist the needle back and forth as you push to get it through. DON'T try to jam it through like a battering ram! It will be VERY hard to do, as it will push a blob of stuffing ahead of the needle and you will never get the needle through.
11. Now, pull the needle out the other side, again, twisting back and forth as you pull.
It will seem like it is taking forever, but I timed some in a class, and none took more than a minute. Most took 15 to 30 seconds.
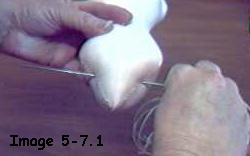 Image 5-7.1 Put the needle through the body. |
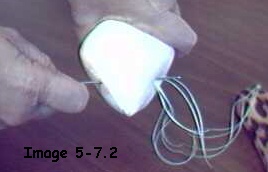
Image 5-5.1 Pull the needle the rest of the way through. |
12. Now, divide the cords in half. (2 or 4 or 6 or 8)13. Put 1/2 of the cords through the eye of your needle. Only pull about 4" past the eye.
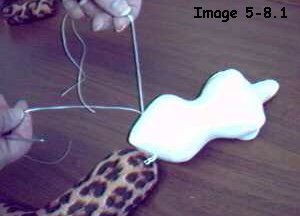 Image 5-8.1 Divide cords in half. |
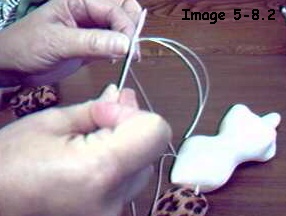 Image 5-8.2 Put that half through the needle's eye. |
14. Put the needle, with the cord on it, through the shank of the button in the other leg from right to left if you are right handed. Left to right if you are left handed.NOTE***Depending on which way the shank is facing under the fabric, right to left, and left to right, could be top to bottom, bottom to top etc. it makes no difference in the finished joint.
The idea is to make the cords OPPOSING.
15. Notice the cords coming from the body and through the shank in the leg. The other half of the cords are still on the table.
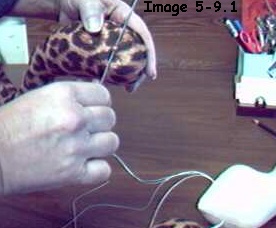 Image 5-9.1 Put the needle through the shank. |
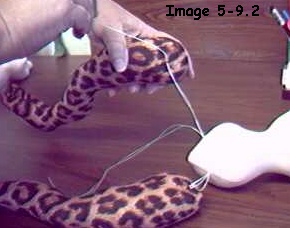
Image 5-9.2 Notice cords from body, and through the shank. The other cords are on the table. |
16. Now, thread the other half of the cords through the eye of the needle. Pull ONLY about 4" past the eye! The reason I keep saying that is because from teaching this so many times, I know there is a tendency to want to pull that limb up to the body RIGHT NOW! If you do that the cords get stuck in the body, or part way through the shank, and you can't get the needle off easily.17. Now, put the needle through the shank of the button from the left to the right.
(If you are left handed, from right to left.)
In the picture the first 2 cords are laying over the leg. The other end of those cords is the straight line from the body to the shank. You don't need to pull it out straight. I just did it for the picture.
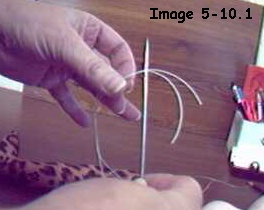
Image 5-10.1 Thread the other half of the cords through The needle's eye. Remember 4"! |
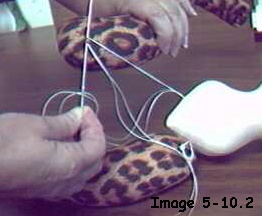
Image 5-10.2 Put the other 1/2 of the cords through the shank in the OPPOSITE direction from the first. |
Judi Ward
Judi's Dolls
http://JudisDolls.com

