 Image 5-24.1 Check to be sure you have that "hollow". |
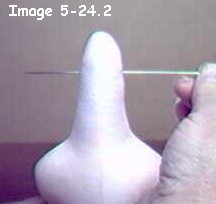
Image 5-24.2 Put the needle and cord through the top of the neck. |
Taught by Judi Ward of Judi's Dolls
http://JudisDolls.com
Now, lets put Whatevers head on.
You can use this method for any tab head doll that has a "hole" in back for the neck to fit into.
This turning head can be attached in 30 seconds! A whole lot less time than sewing the head on!
Gives your dolls so much personality too.
Lay your doll, FRONT DOWN on a table to do this. You want the head on the right way! If you have the body front facing you, and the head back facing you, the head will be on backwards, and it can't be turned all the way around to "fix" it.
This turning head actually turns like a real head. About 1/2 way to each side and it also tips up and down.
The pictures are done with my doll sitting. Hubby said he could see it better that way. Do yours lying down.
Before you start, "try" the head on the neck. Gently work it down and make the "hollow" fit the neck. You may need to poke the neck into the hollow in the head with your finger.
If the neck "crumples" at this point, it isn't stuffed hard enough. If the head goes way down on the neck, the head isn't stuffed enough. You want Whatever! to have a long, willowy neck.
1. Now, thread a single strand of my jointing cord (about 1 yard long) through a needle sculpture needle (4" or 5" long) and put it through the neck, from side to side, about 1" down from the top. (Use 4 strands of dental floss)2. Check again to be sure the head is stuffed just the way you want it. Last chance!
Just Kidding! Actually, you can easily cut the cord and remove the head any time before putting the hair on.
|
Image 5-24.1 Check to be sure you have that "hollow". |
Image 5-24.2 Put the needle and cord through the top of the neck. |
3. Now, thread the cord on the right, through your needle sculpture needle, (4" or 5" long) and put the needle up through the "hollow" and out the top of the head, to the right of the seam, and back about 3/4". Don't come out right where the seams cross. That is too far forward.Don't catch any of the fabric in the opening with the needle.
4. Take the needle off. You now have one cord out the top of the head.
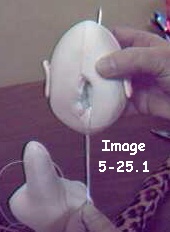
Image 5-25.1 Put needle and cord through "hollow" and out top of head. |

Image 5-25.2 You now have one cord out the top of the head. |
5. Now, thread the other cord through your needle, and pass it up through the opening to the top of the head, on the left side of the seam.6. Pull the cords and work the head down on the neck. Be sure to tuck any of the fabric in the opening to the inside.
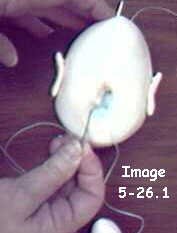
Image 5-26.1 The other cord up through the head. |
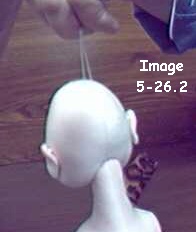
Image 5-26.2 Work the head down onto the neck. |
7. Tie the cords, which keeps the head on the neck. Remember, the nurses knot but you may have to put your finger on the first tie to keep it tight while you tie the second time.8. Cut the cords, leaving about 1/2" ends.
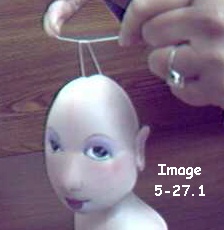 Image 5-27.1 Tie the cords at the top. |
 Image 5-27.2 Cut the cords. |
 Image 5-27.3 My head is on! |
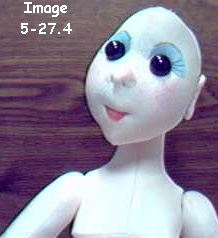
Image 5-27.4 And my head is on! I am going to be a fairy I think! A Giant Fairy! Because Giants need Fairys too. |
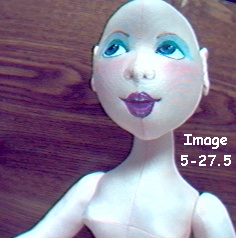
Image 5-27.5
And my head is on too!
Remember, when I said I had done these 2 Whatever's! with fuscia toned lips, because I had some fuscia clothes in mind. Changed my mind.
That is the nice thing about painted features. You can change your mind at any time, and paint lips and eyes a different color.
I am going to do one with a lighter pink lip color and the other with a more orangey color.
Be back soon
..
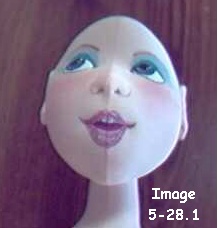 Image 5-28.1 Lighter pink lips. |
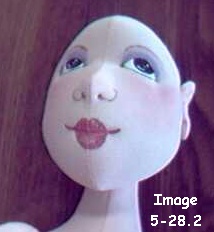 Image 5-28.2 More orangey lips. |
Judi Ward
Judi's Dolls
http://JudisDolls.com

